It happens that after restarting Windows 7, the sound from the computer speakers suddenly disappears. Setting up sound on a Windows 7 computer is different from earlier Windows. They have become more convenient, but the necessary steps to configure have undergone changes.
There may be a whole list of reasons why it is not possible to reproduce them on a PC or laptop. This note provides detailed information on how to configure sound in Windows 7.
Reasons for no sound
The reasons may vary depending on the type of device. For example, if there is no playback on a laptop, then the following is necessary:
- determine the speaker volume level. It may be turned off by pressing keys;
- Next, try to reboot the OS and make sure the sound card software versions are correct;
- establish the absence of defects in the sound card;
- Check the reliability of the device contacts if the laptop was disassembled for cleaning before the sound disappeared.
If lost on a desktop computer, then in addition to the above, the following is required:
- establish the correct connection of all device wires: speakers, microphone, speakers or headphones. Determine whether the cables are connected correctly to all connectors on the system unit;
- If you are using an HDMI cable, there may be no sound playback due to the graphics device;
- when using USB audio devices, you should restart the PC or disconnect and connect the cable to the system unit;
- sometimes the system unit has many connectors for sound transmitting devices and often one of them does not work, so it is necessary to establish their functionality by serially connecting known-good equipment, for example, a speaker;
- analyze the integrity of the connection cords, whether there are any kinks or breaks;
Setting the sound in headphones
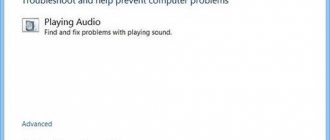
If there is still no sound, then read the article about solving sound problems. When sound appears in the headphones, you can adjust the sound parameters; to do this, go to the sound control panel to the “Playback” tab and double-click on the device.
Volume and balance
Let's go to the "Levels" tab:
The slider sets the overall volume level, but it is also available by clicking on the speaker icon next to the clock. But the balance of the left and right channels is available only from this window. Press the "Balance" button and adjust the level of the right and left channels, if necessary. When you change the master volume, the levels of the right and left channels will change in proportion to the values you set.
Enhancements (Sound Effects)
On the “Enhancements” tab, you can configure sound effects; they are also called improving sound quality. The list of effects differs depending on the sound card and drivers, but the logic of application is the same. The “Disable all enhancements” checkbox disables all sound enhancements, so for the effects to work in headphones, you need to uncheck the box:
Next, mark the desired effect and click the “Settings” button. Each effect will have its own settings. Here is a list of some "improvers":
- Bass Boost: Increases the level of low frequencies. In the settings you need to select the frequency (Frequency) and gain level (Boost Level). For headphones, suitable frequency values are 50-100 Hz, gain 3-12 dB, selected individually by ear;
- Virtual Surround: encodes multi-channel audio as stereo (for receivers);
- Room Correction: allows you to adjust the sound using a calibrated microphone to compensate for the reflectivity of the room, not relevant when connecting headphones;
- Loudness Equalization: equalizes loud and quiet sounds, can be useful for listening to quiet recordings through headphones;
- Equalizer: an equalizer for adjusting the sound timbre, less common.
The “Preview” button will help you evaluate the impact of the effect on sound quality. It plays a test sound, or your audio file.
Sampling frequency
You don't need to change anything in the Advanced tab, but if you are listening to high-quality soundtracks with a sampling rate higher than 48 KHz, i.e. It makes sense to choose from the list “24 bit, 96000 Hz” or “24 bit, 192000 Hz (Studio recording)”. In the normal case, there is no difference in sound quality, but the load on the processor increases. The default setting should be "16bit, 48000Hz (DVD Disc)".
We don’t touch the “Exclusive Mode” block, but if there is no sound in your program after some other program is launched, then uncheck both boxes.
Spatial audio
In the Spatial Sound tab, try:
- select “Windows Sonic for headphones”;
- "Enable 7.1 virtual surround sound".
Evaluate whether there is an effect in movies or games. If you have any questions about the operation of the headphones, feel free to ask in the comments.
Checking drivers on a computer with Windows 7
During installation, “Seven” automatically adjusts the sound. If there is no sound, you need to enter the “Device Manager” and see if drivers are installed for all equipment (the “!” icon should not be displayed), and the display of a red cross indicates that the device is disabled.
If this is the case, then by calling the context menu, you need to click on “Enable”. A positive criterion will be the appearance of the speaker image in the tray.
Connection sequence and settings
When the headset is connected, you need to check if the sound and microphone are working. With the first option everything is simple, just turn on the music. The second one is a little more difficult. To check the functionality of the microphone, you can use:
1. A classic voice recorder that can be installed on any OS. Typically, in Windows, the program can be opened through: Start - Accessories - Voice Recorder. Start recording and find out if the sound works.
2. You can go to the installed Skype program, find the sound test (Echo/Sound Test Service) and run it. However, in this case, the settings of Skype itself may be configured incorrectly.
3. Immediately go to the computer settings and check that the microphone is turned on.
Each OS has its own path to sound settings, but even users with basic PC knowledge should not encounter any difficulties.
How to enable microphone on headphones on Windows XP, 8, 8.1
The microphone activation procedure takes no more than 5 minutes. To do this, after turning on and checking the headset, if it does not work, do the following:
Incorrect operation of the sound card
On a PC or laptop with Windows 7, you need to go to “Control Panel” through “Start”, then open “Hardware and Sound” and find “Device Manager” here. In the list that appears, select the line “Sound, video and gaming devices” and click on it. If the sound card appears, it means it is installed normally, otherwise it will need to be activated. If a yellow question mark is displayed next to the inscription, then you need to click on “Properties” in the context menu and reinstall the driver.
Setting up speakers on Windows
In the same window there is a “Customize” button. When activated, a small dialog box opens with which you can check the stereo balance.
For 2.1 and 2.0 systems, select the “Stereo” mode; when using 5.1 acoustics, switch to the corresponding item.
If the mode does not match the speaker configuration, the test simply will not be performed.
In the properties of the device you are using, for which there is a separate button in the “Sound” menu, various audio effects are available in the “Additional Features” tab - for example, volume equalization or loudness compensation.
Just below you can select a preset for the direction of music that you prefer. Of course, there are not as many presets as in a good MP3 player, but you can use them too.
And by the way, it would be nice to advise you to read about “How to connect speakers to a computer” - otherwise, suddenly, something is connected incorrectly.)
How to install sound card software on Windows 7 PC?
If the causes are identified in the hardware drivers, first of all it is necessary to rid the computer of the old sound card driver, and it is also recommended to clean the registry.
Next, install the software by copying them from Windows 7 resources or the hardware manufacturer. Then the operating system will automatically adjust the sound after rebooting the laptop or computer. To check, click on the speaker image in the system tray. You will be able to set the volume and sound effects.
Setting up speakers on a laptop
On a laptop with the Windows 7 operating system installed, the settings are no different. The only difference here is that there is no need to connect speakers: they are already integrated into the device. However, there are some peculiarities.
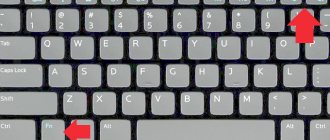
Many models of modern laptops are equipped with a function key Fn, which is designed to call up additional options. One of the possibilities is to quickly mute the sound using the appropriate combination.
To activate or deactivate the emitters, just press the Fn button in combination with the button with a schematic representation of the speaker.
Configuration using programs
Equipment manufacturers also develop various programs for configuring sound cards. For example, there is an application "Realtek". In the Windows 7 search bar, you need to type “Realtek HD Manager” and press “Enter”.
The application that launches will contain all the necessary settings for speakers, headphones, etc. After making the settings, you need to save them by clicking on “Ok” before exiting the utility.
The use of such programs facilitates the process of setting up sound on laptops or PCs.
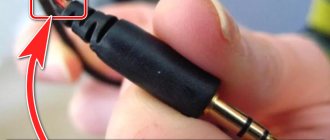
Headphones do not work when connected to the front panel of the computer
It would be good to make sure that this special headphone output, which can be found somewhere on the front or top panel of the system unit, is generally connected to the motherboard, and connected correctly. It’s not uncommon, even during the process of assembly or some kind of repair, that these outputs are simply not connected, or are connected incorrectly.
I'll show you using my computer as an example. The following plug labeled Audio :
For me it connects to a port that is signed as JAUD1 .
I also checked it on a new computer with a modern motherboard. Almost everything is the same there. The connector is called JAUD1 , only HD Audio .
Some more information on this topic can be found in the article connecting the front panel connectors of a computer.
What to do if there is no sound on the computer?
Greetings, dear guests of the computer help site. In today's article I will give some tips to solve the problem if the sound on your computer or laptop is lost.
Read carefully and you will be able to restore the sound. Just recently I talked about what to do when the sound disappeared in Google Chrome, but today’s situation is no longer with the browser, but with the computer or laptop itself. So, what should you do if the sound on your computer or laptop disappears? These are my recommendations that will help you get your sound back, read carefully and you will succeed. Here are the reasons why the sound on your computer may not work and immediately tips on how to fix the problem.
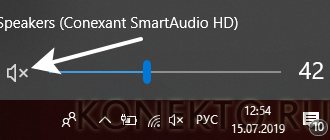
Reduced volume in settings.
Yes, the first and most stupid thing that can happen is simply lowering the volume in the settings to zero. Check by clicking on the sound icon in the taskbar.
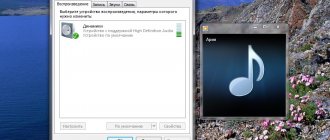
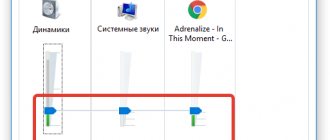
Also right-click on the volume icon and select “Sounds”.
Next, in the window that opens, you need to go to the “Playback” tab. Here you need to see if the speakers or speakers are turned on, if it’s a laptop. If it is like in this picture, then everything is in order, i.e. There are no problems with the laptop speakers:
If so, i.e. instead of a checkmark there is an arrow next to the speaker icon, then the device is simply disabled:
Performing setup
You can configure the sound on a PC with Windows 7 using the “native” functionality of this operating system or using the sound card control panel. Both of these options will be discussed below. But first, make sure that the sound on your PC is turned on.
Method 1: Sound Card Control Panel
First of all, let's look at the configuration option in the control panel of the audio adapter. The interface of this tool will depend on the specific sound card that is connected to the computer. As a rule, the control program is installed along with the drivers. We will look at the algorithm of actions using the example of the control panel of a VIA HD Audio sound card.
- To go to the audio adapter control window, click “Start” and go to “Control Panel”.
In the section that opens, find the name “VIA HD Audio Deck” and click on it. If you are using a Realtek sound card, then the item will be named accordingly.
You can also go to the audio adapter interface by clicking on its icon in the notification area. In the program for the VIA HD Audio sound card, it looks like a note inscribed in a circle.
The sound card control panel interface will launch. First of all, to access the full functionality, click "Advanced Mode" at the bottom of the window.
The first section, which is indicated by a speaker icon, is called “Volume Control”. By dragging the “Volume” slider to the left or right, you can decrease or increase this indicator, respectively. But we advise you to set the slider to the extreme right position, that is, to maximum volume. These will be global settings, but in reality you can adjust it and, if necessary, reduce it in a specific program, for example, in a media player.
Below, by moving the sliders down or up, you can adjust the volume level separately for the front and rear audio output. We advise you to raise them as high as possible, unless there is a particular need for the opposite.
Next, go to the “Speaker Settings and Test” section. Here you can test the sound when connecting several paired speakers. At the bottom of the window, select the number of channels that corresponds to the number of speakers connected to the computer. Here you can activate volume equalization by clicking on the corresponding button. To listen to the sound, click the “Test all speakers” button. Each of the sound devices connected to the PC will play a melody in turn and you can compare their sound.
If you have 4 speakers connected to your computer rather than 2, and you select the appropriate number of channels, the “Extended Stereo” option will become available, which can be activated or deactivated by clicking on the button of the same name.
If you are the happy owner of 6 speakers, then when you select the appropriate number of channels, the “Replace center/subwoofer” option is added, and in addition, an additional “Bass Control” section appears.
The “Bass Control” section is designed to adjust the operation of the subwoofer. To activate this function, after going to the section, click the “Enable” button. Now you can drag the slider down and up to adjust the bass gain.
In the Default Format section, you can select the sample rate and bit resolution by clicking on one of the options provided. The higher the value you select, the better the sound will be, but the more system resources will be used.
In the “Equalizer” section you can adjust the sound tones. To do this, first activate this option by clicking “Enable”. Then, by dragging the sliders, achieve the optimal sound of the melody you are listening to.
If you're not an EQ expert, use the Default Settings drop-down list to select the tune type that best matches the music currently playing from your speakers.
After this, the arrangement of the sliders will automatically change to the optimal one for this melody.
If you want to reset all parameters changed in the equalizer to default, then simply click the “Restore default settings” button.
- In the "Ambient Audio" section, you can use one of the ready-made sound schemes depending on what kind of external environment surrounds you. To activate this feature, click “Enable”. Next, from the “Advanced options” drop-down list, select from the presented options the one that most closely matches the sound environment where the system is located:
- Club;
- Audience;
- Forest;
- Bathroom;
- Church, etc.
- In the last section, Room Correction, you can optimize the sound by specifying the distance from you to the speakers. To activate the feature, click “Enable” and then move the sliders to the appropriate number of meters that separates you from each speaker connected to your PC.
If your computer is located in normal home conditions, then select the “Living Room” option. After this, the sound scheme that is most optimal for the selected external environment will be applied.
At this point, setting up sound using the control panel tools of the VIA HD Audio sound card can be considered complete.
Method 2: Operating system functionality
Even if you have not installed the sound card control panel on your computer, the sound on Windows 7 can be adjusted using the “native” tools of this operating system. The appropriate settings are made through the Sound tool interface.
- Go to the “Hardware and Sound” section in the “Control Panel” of Windows 7. How to do this was described in the description of Method 1. Next, click on the name of the “Sound” element.
You can also go to the desired section through the system tray. To do this, right-click on the speaker icon in the Notification Area. In the list that opens, navigate to the “Playback devices” item.
The Sound tool interface opens. Navigate to the Playback section if it opens in another tab. Mark the name of the active device (speakers or headphones). There will be a check mark next to it in a green circle. Next, click “Properties”.
In the properties window that opens, go to the “Levels” tab.
A slider will be located in the displayed shell. By moving it to the left you can decrease the volume, and by moving it to the right you can increase it. As when adjusting through the control panel of a sound card, here we also recommend placing the slider in the extreme right position, and actually adjusting the volume through the specific programs you are working with.
If you need to adjust the volume level separately for the front and rear audio output, click the “Balance” button.
In the window that opens, move the sliders of the corresponding audio outputs to the desired level and click “OK”.
Go to the "Advanced" section.
Here you can select the most optimal combination of sampling frequency and bit resolution from the drop-down list. The higher the value of the indicators, the better the quality of the recording and, accordingly, more computer resources will be used. But if you have a powerful PC, feel free to choose the lowest option offered. If you have doubts about the power of your computer device, it is better to leave the default values. To hear what the sound will be like when you select a specific parameter, click “Test.”
In the “Exclusive mode” block, by checking the boxes, individual programs are allowed to use sound devices exclusively, that is, by blocking sound playback by other applications. If you do not need this function, then it is better to uncheck the corresponding checkboxes.
If you want to reset all the adjustments you made in the “Advanced” tab to the default settings, click “Default”.
In the “Enhancements” or “Improvements” section you can make a number of additional settings. Which ones specifically depend on the drivers and sound card you use. But, in particular, you can adjust the equalizer there. How to do this is described in our separate lesson.
Lesson: Adjusting the equalizer in Windows 7
In this lesson, we found out that you can configure sound in Windows 7 using the sound card control panel or through the internal functions of the operating system. Using a specialized program to control the audio adapter allows you to configure more diverse sound parameters than the internal OS tools. But at the same time, using built-in Windows tools does not require installing any additional software.
Thank the author and share the article on social networks.
Complaints that there is no sound on Windows 7 can be heard from many users of this operating system. People complain that there may be no sound at all or disappear periodically, appearing after rebooting the computer or even without it. Therefore, we should consider the main reasons why this phenomenon is possible.
Connecting wireless bluetooth speakers
Step 1. Make sure that the laptop is equipped with a Bluetooth radio module, which can be used to connect wireless speakers. To do this, press the “Win R” key, type “devmgmt.msc” in the line and click “OK”.
If you see a category called “Bluetooth Radios” in the Device Manager tree, click on it to expand the list of devices. If there are any devices in the list, then Bluetooth is installed on the laptop.
Step 2: Make sure Bluetooth is turned on. To do this, look in the tray (bottom right) for the presence of a blue icon.
If the icon is missing, you will need to enable it.
- Press the button with the image of a wireless connection in the form of a Bluetooth or antenna icon on the laptop. Usually this is one of the “F1–F12” buttons (depending on the laptop model), pressed together with the “Fn” button.
Step 3: Find a suitable location to place the Bluetooth speakers (speaker).
When installing speakers you need to consider:
- the speakers must be connected to a nearby power source;
- To easily turn the speakers on and off, place them in an easily accessible place;
- the presence of a wall between the laptop and the speakers is not necessary, but may reduce the sound quality;
- Consult your speakers' manual to find out how close they should be to your laptop.
Reference! Typically, Bluetooth speakers can be up to 10 meters away from the receiving device, but some models may have a closer range.
Step 4: Turn on the speaker, making it discoverable. Whether the speakers are turned on depends on the speaker model. They often have a button that must be held down for a few seconds to put the device into "discovery" mode.
Note! If the information on how to enable detection of a Bluetooth speaker printed on its body is not enough, you should refer to its instruction manual.
Step 5. To connect the laptop to the Bluetooth speakers, press “Win R”, type “control printers” and click “OK”.
Step 6. In the window that opens, select “Add a device.”
Step 7. The search for devices will begin. When the speakers appear, select them with a mouse click and click Next to pair the devices.
What do you need to know?
In order to cope with this situation, you will need to carefully consider all the settings and diagnose the connected devices and installed drivers on this device.
The use of this laptop function becomes necessary in other important cases. For example, a laptop is an excellent way to establish unlimited communication both at work and to achieve any household or personal goals.
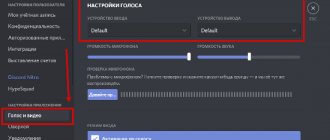
In order to make quality calls with certain subscribers or get all the necessary information on work as a result of listening to or watching any courses and webinars, you need to know how to set up the sound on Skype.