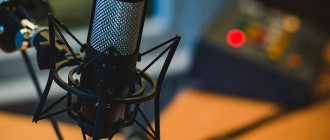
Types of microphones for PC
Sound recording devices are divided into several groups:
- Built-in.
- Wired.
- Wireless.
Built-in
Microphones of this type are found not only in laptops, but also in desktop PCs. They are a separate module in the system unit or in peripherals - headphones, web cameras, keyboards. Built-in models do not have high sensitivity.
Wired
The equipment is connected to the computer via a cable. The most common models are those with a 3.5 mm interface (mini jack). In addition, there are devices with a USB connection. The microphone does not require additional power sources to operate, because they consume power from the PC.
Wireless
This category includes devices with Bluetooth or Wi-Fi connection. Their range depends on the communication standard used. Wireless models run on batteries.
The wireless microphone connects via Bluetooth or Wi-Fi.
Connecting to a computer
Before setting up a microphone on Windows 7, you must connect it to your PC. Depending on the interfaces used, the specifics of the procedure will vary.
Wired microphone
In the case of a desktop computer or laptop, the external device is connected to a suitable connector. So, you can use a headset with a microphone, a webcam, or a full-fledged audio recording device for podcasts. Depending on the connection interface, wired devices are divided into the following groups:
- 3.5 mm.
- USB interface.
A wired microphone is connected via a connector.
If USB models are connected to any port, then when using equipment with a 3.5 mm standard, you need to correctly insert the plug into the audio jack. By default, it is indicated by the corresponding icon or pink color. In some system units, such a connector is located both at the back of the case and on the front panel with the optical drive.
Wireless equipment
Setting up wireless devices is done in a few clicks. First, you should launch a microphone, headset or webcam with such a module and find the device through the Bluetooth or Wi-Fi settings panel. Having activated the search for devices, you need to wait until the system determines the appropriate model and pair it.
Other ways to improve microphone performance
If all of the above methods did not help you configure the microphone to the quality you need, then I advise you to buy a webcam with a built-in microphone. If you don’t need such a camera, then simply change the microphone to a better one. Also, do not exclude the option of purchasing a separate sound card with a good microphone input. You can try to find a microphone amplifier that comes separately. But, to be honest, I have never seen such good quality.
Such amplifiers can be found either as very expensive professional ones, or in the form of inexpensive printed circuit boards, with the help of which you will have to assemble the amplifier yourself. Such a “constructor” can be bought on the radio market or searched on the Internet. But finding such a device is half the trouble. You will still have to assemble it yourself, and without certain skills and tools this will not be possible.
That's all. I hope my tips will allow you to improve the quality of your microphone, and you will finally be heard clearly and without unnecessary noise. Thank you for your attention, if the article helped, don’t forget to share it!
This small guide will help you set up a microphone in an HP, Asus, Sony, Lenovo, Acer, Samsung or Toshiba laptop with Windows 10 installed.
In particular, you will learn how to set it up, what to do if it doesn’t work, how to install the driver, enable it, and if not needed, then disable it.
I will not touch on technical issues in this post, only software.
As for the hardware, you always have the option of using an external microphone in your laptop.
Checking drivers and software
First of all, you should check that the microphone is connected and working correctly. The main indicator of proper pairing is the characteristic signal when connecting equipment to the connector. However, this does not guarantee that the device is connected correctly. To check the installed drivers, follow these steps:
- Right-click on the “Computer” icon and find the “Properties” button.
- Find "Device Manager".
- Go to the subsection “Sound, video and gaming devices. This menu displays all sound devices that were detected by the computer. By default, High Definition Audio drivers are used. Realtek HD and other similar series. If there were no problems with the installation, there should be no exclamation marks near the devices.
If the software is installed correctly, the “General” tab in the settings will display the status: “The device is working normally.” In the “Driver” item you can roll back, update or remove installed software.
Go to the “Sound, video and gaming devices” section.
For those who do not know how to install microphone drivers on Windows 7, there is an option to automatically search for the required software by the operating system.
Audio drivers
Regardless of whether you have a built-in sound card or a discrete one, you need drivers. A driver is a program through which the operating system works with the device. If there is no driver or it is faulty, then the OS does not work correctly with audio devices. That is, we either have no sound at all or the microphone does not work.
You can see whether drivers are installed in Device Manager. You can open the latter on the Computer icon on the desktop
Also
in the Start menu.
If you see at least in device manager
, then it’s better to go to the official website for your computer or motherboard and download the latest drivers. And install them. You can read more about installing drivers here.
After the task manager accepts
.
Now we have the drivers installed. Let's move on to the software part.
Checking the microphone status
Several methods are used to assess the condition of the microphone. With the standard method you need:
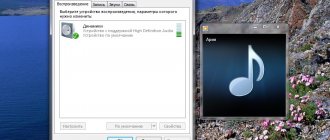
- Go to the “Control Panel”.
- Activate the “Category” view type and expand the “Hardware and Sound” section.
- Activate the Sound panel.
To assess the condition of the microphone, go to the “Equipment and Sound” section.
The “Recording” tab will show all connected devices. On the right is an indication that shows the current signal.
To change the device settings, double-click on it with the left mouse button and click on the “Listen” option. Next, just check the “Listen from this device” checkbox.
How to set up a microphone in voice communication programs
Popular voice communication programs have built-in tools for selecting a particular camera and microphone for communication. Also in their settings you can configure and check audio input and output devices.
Setting up in Skype
The most popular program for communication for any purpose. Using it to check the microphone takes a couple of minutes. For this:
- Select the “Tools” section and go to the “Settings” item.
- In the corresponding window, click on the “Sound Settings” section.
- Select the required microphone and save the parameter.
You can also check micro in Skype or Discord
The device will immediately begin to pick up sound, which will be displayed in a special scale, similar to standard Windows tools. In addition, you can specify a number of other settings.
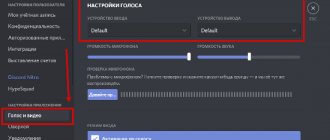
Setting up in Discord
This program is more intended for gamers and video game lovers. It also helps you set up your microphone and check its functionality. The following step-by-step instructions will tell you how to test the microphone on a Windows 7 laptop or PC:
- Go to the “Settings” section by clicking on the gear icon in the lower left corner of the program window.
- Select the “Voice and Video” section and the “Input Device” subsection.
- Select the desired device from the list provided.
- Check it for correct connection.
Microphone settings
The following tools are suitable for setting up the device on a computer:
- Drivers and software.
- Standard Windows tools.
Via driver
Built-in and external devices are easily configured using utilities from the audio card company. For example, consider the Realtek HD program, which is often used on computers.
To launch the utility, go to the “Control Panel” or double-click on the icon. Controls and software interface vary depending on the motherboard manufacturer.
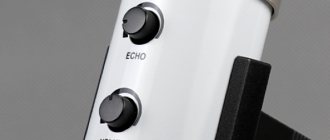
In the Realtek HD manager, connected devices are displayed at the top. A little lower is a slider for adjusting the volume settings. If you click on the microphone icon, you can increase the level. Next there are keys for turning on the noise reduction and echo systems, in addition, the conference mode. The sub-item “Standard format” provides settings for the sampling frequency and bit depth.
Via Windows Tools
To change parameters, for example, increase or decrease the volume, reset settings, you can use standard operating system tools. With their help, the signal level is adjusted, gain, noise reduction and other parameters are adjusted. A window with such tools opens in the following ways:
- Using the icon on the taskbar.
- Through “Start” and the “Control Panel” section.
In the control panel, open the “Recording” tab.
The “Recording” tab displays all connected devices. To open properties, double-right-click on it or select the corresponding device.
In the “Listen” sub-item, the user will be able to evaluate the quality of the work without recording a fragment.
In messengers
Many online communication apps have built-in audio settings. If we are considering the Skype messenger, then in the latest version of the application such a section is located in the additional menu. The playback quality is tested using the “Make a test call” button at the bottom of the window that opens.
Through third party programs
Depending on the functions for which the microphone is used, the user can download special software with settings. Thus, the free OBS package is suitable for broadcasting desktop content or recording fragments. The program provides flexible adjustments to microphone parameters.
Optimizing the recording device so there is no noise
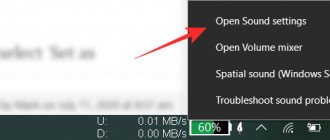
Having recorded or listened to a short section of your own voice, you can understand that the microphone is not configured properly. The sound is too quiet. Or you can hear various noises and interference in it. It can come as if from a tunnel. To fix these issues and get clear audio, anyone can use the built-in microphone settings. We will need to open the settings window - RMB on the icon with the volume control. Select "Playback Devices".
Further:
- Go to the “Recording” tab and select the “Properties” button at the bottom;
- Next, select the “Listen” tab at the top;
- Check the box “Listen from this device”;
- At the bottom, click on the “Apply” button and make a speech to hear it through headphones or sound output devices;
- Click on the next tab "Levels". Two controls will appear on the screen in the window: microphone volume and frequency gain. Adjust them and check the sound quality after changing these parameters;
- Noise can be reduced by the dB control. Try different positions of this parameter. Noise can also be mitigated by turning down the volume;
- Open the last tab "Advanced". Change sound recording modes until the sound quality is satisfactory.
All these settings must be applied as needed. And also use different sound parameters to find the “golden mean”. Perhaps, due to the quality of the microphone, it will not be possible to completely get rid of noise, background hum and other unnecessary sounds. But they can be significantly reduced so that your voice is clear when recording or talking. If noise remains after changing the settings, use the built-in utility to fix device problems.
To do this, right-click on the volume icon and select “Troubleshoot.” Follow the prompts.
Troubleshoot microphone problems on PC
If you detect any hardware problems, you should run the standard troubleshooting tool. Often this method solves the problem by displaying the cause of the equipment failure.
The computer does not see the microphone
If your PC refuses to display the microphone in the list of connected devices, you may need to reinstall the driver. Before such a procedure, you should remove old versions of the software to avoid conflicts due to incompatibility.
In some cases, display problems are hardware related. So, if you frequently plug and unplug a microphone, this may damage the connector or cable. Therefore, it is worth assessing the condition of the wire and connection interface for defects or switching the device to the rear or front panel.
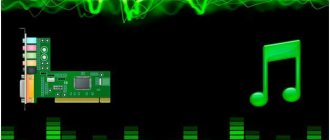
Sound card doesn't work
If you use third-party equipment to connect a microphone, you must first install drivers and software for this card model. They can be taken from the official disk or from the manufacturer’s website. Before installation, it is important to check the bitness of the OS.
No enhancement tab
Some PC owners are faced with the absence of the “Improvements” tab. This is due to the installation of the wrong driver version.
The problem can be solved by visiting the official website of the software manufacturer and updating the software.
No Realtek HD
The problem occurs for users of branded Realtek sound cards. If the section with the software from this manufacturer is missing, you should try to reinstall the drivers.
Recorder setup problems
There are often cases when the computer refuses to display the connected device. If you are trying to connect an expensive microphone model, make sure that it does not require additional drivers. It is also worth looking to see if the device is disabled in the manager.
What should be done:
- Press WIN+PAUSE;
- Select "Device Manager";
- Click on audio devices and select microphone RMB. Select "Enable" if the device is turned off.
Also make sure that the microphone plug is connected to the correct connector on the motherboard.