Browsing your Facebook news feed while listening to music on YouTube, taking notes while watching a video, or copying text from a web page and then sending it via text message are all activities that can't be done without opening two apps at once, right? No, that's not true.
Thanks to the superpowers of Android and its multi-window mode, all such tasks are like cracking seeds. So how can you use this mode? You will learn about this in our article.
Related modules and main classes
In this article, we mainly focus on implementing multi-window functionality. The main classes and modules for implementing multi-window functions are listed here.
The code path here is relative to the AOSP source path. To find out how to get the AOSP source code, see here:Downloading the Source。
ActivityManager
Code path: /frameworks/base/services/core/Java/com/android/server/am
Code path: /frameworks/base/services/core/java/com/android/server/wm
Code path: frameworks/base/core/java/
Code path: /frameworks/base/packages/SystemUI/
As the name suggests: System Interface, this includes: NavigationBar, StatusBar, Keyguard, etc.
Print to PDF
With Microsoft's Print to PDF , you can "print" (essentially just save) a document to PDF without having to use third-party applications.
Simply select the appropriate "printer" from any application's print dialog. This is useful for saving and distributing documents without editing them.
Virtual desktops
Working with virtual desktops is one of the best innovations in Windows 10 compared to previous versions. The very fact of their support is a significant step forward, because Mac OS X and Linux users have had this opportunity for a long time.
Now you can, for example, place some windows and tasks on one desktop, email and Twitter on another, and surfing the Internet on a third.
To use this feature, click the Task View on the taskbar (immediately to the right of the search field), or press Win+Tab .
On the screen you will see the inscription Create desktop , under which there will be an empty area with a plus sign. You can simply click on it, or you can immediately drag an application onto it.
How to split your smartphone screen into two parts
You can divide your smartphone display into two parts in several simple ways, which we will consider below.
Method 1: using taps
This is the most popular and simplest option for splitting the screen, which is used on an OS no older than Android N. We open several programs or several windows in the browser.
Press the multi-screen button, which should be in the center of the screen panel or on the left. After which a list of all applications will appear on the display. Click once on the selected window and move up and down the display.
After these steps, the screen should split. We do the same with another utility. We move it a little and do a double tap. Then two screens appear with a dividing line that can be adjusted.
Method 2: Using the Quick Settings Panel
This option is not suitable for all smartphones, but it is much simpler than the previous one.
Step by step steps:
Method 3: Using Floating Apps Free
If the above methods do not help, then it is recommended to use the floating apps free utility. It will allow you to create real multi-windows. This means that the user is given the opportunity to create more than two screens on a smartphone or tablet. You can download the software for free on Google Play.
Floating Apps Free features:
Floating apps free has a Russian interface, thanks to which the user can easily master the utility. It is worth considering that the software does not support the mode of dividing the display into 2 windows in all applications.
What is multi-screen mode and why is it needed?
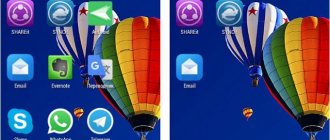
The split display function allows the smartphone to operate in multitasking mode, with which the user can use several utilities at the same time. This mode does not require switching between windows. In this case, you can watch a movie and chat via messenger at the same time. Some games support this feature, so you can perform any action on your phone without being distracted from the game.
When split screen mode is enabled, running utilities work identically and do not overlap each other, so you can use them simultaneously. It is important to note that not all applications support this feature. For example, you cannot turn on the camera and e-reader in this mode.
Split the screen into 2 parts.
It's no secret that phones now have such a feature as splitting the screen into 2 parts. This function allows you to work with each of them simultaneously, but only at a lower resolution. If necessary, their sizes can be adjusted. This action can be performed in several ways.
1 way
By pressing the multitasking button, previously running programs will open. From this list you have to select one application and drag it by the top end to any part of the screen. This is how separation will happen. A list of others will pop up at the bottom of an already open program. All that remains is to choose one of them.
Method 2
We open one application in a simple way. After that, tap the button in the form of a square, and a list of previously opened applications will open. Select the required program.
God 'mode
One of the most hidden and most powerful features, aptly named GodMode , allows you to access a special menu.
Here, in one place, many fine-tuning system settings are collected, including a certain analogue of TimeMachine. Opening this menu is not so easy - you need to create a new folder in the root of the system drive and rename it GodMode. .
Its icon will change, and when opened, a nice, advanced control panel will launch.
Timeline
By clicking the Task View , you'll see a timeline with images of the various activities you've recently performed on your computer, such as working with documents and visiting websites. If it is missing, enable it in system settings as shown below.
This story is ordered by time. It starts from the current moment and rewinds back. Here you can find a document you were working on a couple of days ago, or a web page you opened last week, and go there again.
Making 2 windows or 3 ways to split the screen of an Android smartphone or tablet
As you probably already know, the new Android N mobile operating system comes standard with a special split screen option, which allows you to use two applications on one screen, that is, open 2 windows at once. And in this post - briefly about how to split the screen in the new Android N.
It is worth noting that this feature is somewhat different from the usual “picture-in-picture” function, which is found, for example, in televisions.
In Android N, "split screen" is actually a true multi-window mode, and you can activate it in two ways:
how to split the screen of an Android smartphone or tablet: method 1
#1 — Long tap (press and hold) on the multitasking button (standard on-screen Android “square”) to open the list of running applications;
#2 — We select one of them, “grab” its window by the upper part and drag it to the upper or lower (left or right) side of the screen;
#3 — then in the list that will remain in the second part of the screen, select and tap the window of the second application, and it will open on its half of the screen;
#4 — the separator that appears between the two windows can be moved up and down (left and right), thus adjusting their sizes.
how to split the screen of an Android smartphone or tablet: method 2
how to split the screen of an Android smartphone or tablet: method 3
You can also exit multi-window mode in Android N in at least two ways: either with a long tap on the multitasking button, or by dragging the divider all the way to the top or bottom (left or right) edge of the screen.
By the way, in addition to “split screen”, Android N has a couple of new related features. Firstly, at the top of the list of running applications there is now a “clear all” button, which can be used to close unnecessary programs in bulk, rather than swiping windows off the screen one by one, as before. Secondly, you can quickly switch between the current and last open application by double tapping the multitasking button, i.e. according to the on-screen “square”.
Source
How to enable multi-window mode on Android
To work with the device in multi-window mode, you need to activate this function in the settings of your gadget. For this:
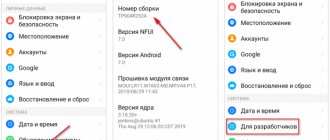
- Go to settings and select the "About device" section.
- You need to click on the build number multiple times for the “For Developers” menu to appear.
- Find the phrase “Resize in multi-window mode” and move the plug next to it to the working position.
- Reboot your gadget and enjoy the new features.
If connecting the option according to the instructions provided does not lead to results, you need to download the special Taskbar application. It's completely free. Do all the manipulations from the instructions above, after rebooting the device, install Taskbar and launch it.
Game Mode
I’ll start with, perhaps, the most valuable feature for me personally, as a gamer. This is a special environment called “Game Mode” for those who like to spend an hour or two killing virtual monsters and saving the world.
This mode is activated as follows: Settings (Win + I keys) - Games - “Game Mode” item.
Game mode allows you to increase performance by redistributing system resources. And using the Win+G , you can launch the Game Panel , which allows you to record game videos, take screenshots, chat with friends from the Xbox Live service, and even stream.
Cloud clipboard
Before the October 2022 update, the Windows 10 clipboard was no different from what it was before.
But today you can save several objects there and paste them on different devices. To enable this mode, open Settings – System – Clipboard and enable the Clipboard History and Synchronization between devices .
Sticky notes on the desktop
Almost everyone knows that Windows 10 has a built-in note-taking application called OneNote. But sometimes all its powerful functionality is not required - you just need to quickly write something down and save it for the future, like on paper sticky notes .
This is where this app will help. It lets you create short notes that, unlike paper sticky notes, can be synced across all Windows 10 devices .
To start, simply enter Notes and click on the proposed option. To synchronize notes between several devices with Windows 10 under one account, you will need to link to a Microsoft account upon first launch.
Yes, since Vista, Windows has become practically convenient for daily use, not least thanks to these small nuances. Admit it, did you know about them before reading?
Privacy Settings
Microsoft has finally managed to properly implement privacy settings, but it doesn't really tell you how to use them properly. By default, Windows 10 collects tons of information about you and shamelessly stores everything on its servers.
To share your data with the “small-soft” ones to a minimum, you need to follow the path Options (Win+I keys) – Confidentiality.
Next, it is advisable to disable ALL items, especially in the “General”, “Speech, Handwriting and Text Input” and “Layout” sections.
Scheduled reboot
If you have ever encountered a Windows update (and you have), then remember that the system asks you to reboot, and does it very intrusively. Windows 10 finally has the ability to schedule a reboot for a specific time, for example, at the hour when you are already going to go relax.
In the world of desktops and laptops, Windows 10 is by far the dominant operating system, and almost everyone can use it. But like any OS, there are a number of hidden, but very useful functions that you might not even realize were there.
For example, did you know that you can quickly jump to a document or web page you opened a few days ago, organize open applications more efficiently, easily take screenshots and videos from games, and take notes that you can then view on other devices?
How to work in several applications simultaneously on Android
In the age of technology, it is necessary to keep up with everything and be as advanced as possible. For this reason, you have to frequently switch from one application to another. There are a lot of ways and tricks for working with several applications at once, which few people know about. But now we will consider only the main ones.
Several "floating" windows.
Floating Apps is an application that allows you to create more than 2 windows. They can be swapped, their sizes and transparency changed. It is worth noting that it has many useful features and is suitable for any person in his field of activity.
In this collection, only the most practical methods are selected. Each of them is unique and will fit any Android phone. You can choose one or more methods. Only for this you need to try each of them. After all, it is convenient for some to work with 2 applications at once, and for others separately.
Source
Several simple ways to open 2 applications on one screen on Android
Often working on a computer, we get used to the multitasking mode on the device, when many tabs are open, between which we often and quickly switch. However, not all smartphones support this mode. Even as phone screens get larger, users still only have to open one app.
Therefore, if you are wondering how to open two applications on one screen on Android, this article is for you. It is worth noting that the split display setting for simultaneous use of two programs has become available on Android 7 version.