Good day, dear readers of my blog. Today we will talk about one very important point. The level of your professionalism depends on how well you learn to use the function that will be discussed today. And despite the fact that I have already written publications on a similar topic several times, this article will also contain something new.
I will tell you how to smooth edges in Photoshop, show you how to work with a finished picture, the edges of which look ugly, pixelated, and also tell you what to do with the photo so that after cutting it out it looks attractive and does not stand out from the overall picture when you need to insert it object in collage.
A few words for those who want more
Well, if you want to quickly understand all the tools and find ways to solve this or that problem yourself, then you, like no one else, need to know as much as possible about all the available tools.
For example, did you know what is in this program? It is not so easy to get to it if you act on a whim. I can recommend you the course “ Photoshop from scratch in video format”
" Thanks to it, you will know much more and within a month you will start working in the program the way professionals do.
Don't believe me? Just try it. Think you might not need this? Meanwhile, thousands of people use these skills to earn extra income. Web design is just pictures that are created by specialists using this program and sent to customers for a lot of money.
Download the free course “ Profession of a web designer in 10 days”
» and find out all the details.
See you again and be sure to subscribe to the newsletter.
Edit Paths in Adobe Photoshop
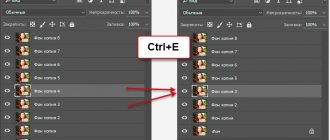
Adding anchor points can give you more control over a path or expand an open path. However, try not to add more points than necessary. A path with fewer points is easier to edit, display, and print. You can reduce the complexity of the path by removing unnecessary points.
The toolbox contains three tools for adding or removing points: the Pen tool, the Add Snap Point tool, and the Remove Snap Point tool.
By default, the Pen Tool changes to the Add Anchor Point Tool, as you place it on the selected path, or to the Delete Anchor Point Tool, as you place it above the anchor point. You must select "Auto Add/Delete" in the Options Bar for the tool to " The Pen tool automatically changed to the Add Anchor Point tool or the Remove Anchor Point tool.
You can select and edit multiple paths at the same time. You can also change the shape of the path as you add anchor points by clicking and dragging them as you add them.
.
How the tool works
Photoshop has many useful features. So, if the user needs to cut out an object and paste it onto a different background, they should use the Refine Edges . It is necessary for the image to look organic.
This function became available starting from version CS3. And for Photoshop CS5, the developers have expanded its functionality and made the tool itself much more convenient. Thus, the user can highlight all the small details of a fragment in a short time.
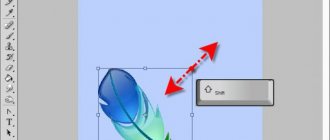
Sometimes, there is a need to transfer an object from one document to another. If the picture has clear boundaries, then there will be no problems. But, if you need to trim hair or other small details, it is better to use the “Refine Edges” function, which will allow you to smooth out the edges in Photoshop after cutting.
Modifying Shapes in Photoshop
In the Stroke Options panel, do any of the following:
- Select the desired stroke style.
- Click the Align icon and choose an option to determine the position of the stroke relative to the path.
- Click the Ends icon and select an end type to define the appearance of both ends of the path.
Cut Ends Creates square ends that end at endpoints.
Rounded Ends Creates semicircular ends that extend beyond the endpoints to half the stroke thickness.
Extended Ends Creates square ends that extend beyond the endpoints to half the stroke thickness. This option ensures that the stroke thickness is distributed evenly in all directions around the path.
Note. Keep in mind that the ends are only shown when the path is open. Additionally, end styles are more visible with larger stroke weights.
- Click the Corner icon to display a stroke at the corner points.
Corner Joints Creates sharp corners that extend beyond the end point if the cut length is within the cut.
Rounded Joints Creates rounded corners that extend beyond the endpoints by half the stroke width.
Beveled Joints Creates rounded corners that end at end points.
Note. Like ends, seams appear more clearly with larger stroke weights.
Highlighting and refining edges
First, open a picture of a wizard in Photoshop, on which we will practice. To do this, select “File - Open...” in the top menu.
The most difficult thing about this method is if you have never encountered it before. But don’t be so scared right away, it’s complicated within this simple method. We'll need the Quick Selection tool. To find it, press W on your keyboard. The "magic wand" will be highlighted in the left navigation. Right-click on it and select the item we are looking for.
Before you begin, you need to adjust the selection size. This is done in the same way with a simple brush. For the size of our image, 25 px is enough.
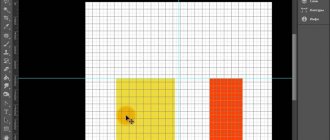
Now you need to “circle” the old man. To start the process, left-click anywhere on his body. The first highlighted area appears. To expand it, click again, but in a different place. The selection area will increase. Your ultimate goal is to completely outline Merlin, that is, so-called “running ants” should appear along his outline:
Tip: if there is a small area left for which the tool size is too large, you can reduce the number of px, as we did above when adjusting the selection dimensions. If the area is smaller than the brush, there is a high probability of “catching” the wrong elements.
We move on to the main essence of this method. Now we need to refine the edges. In the top menu, click on the button:
If it is not there for some reason, right-click in the selected area and select a similar option:
A window with some strange settings will open in front of you. We will not go into their essence in detail; we are only interested in indicating some meanings. I have selected the best option that is suitable for my image. With other pictures, of course, experiments will be required. By moving the sliders you will achieve optimal results. The following configurations are suitable for Merlin:
The changes are immediately visible in the photo. The contour of his body smoothed out and became smooth. I got this result:
5Finishing touches
After you have smoothed out all the spots of light and shadow pattern, remove the small imperfections that remain - pimples, wrinkles. One of the most convenient tools for such tasks is the Healing Brush Tool.
J key. It is used for high quality retouching. We got rid of acne and minor blemishes, see for yourself by looking at the picture below.
Removing skin imperfections
As a result, you should get perfect skin without any visible defects.
Editing Paths in Adobe Photoshop
Adding anchor points allows you to more effectively control the path and also expand the open path. However, try not to add more points than required. A contour with fewer points is easier to edit and is faster to display and print. You can reduce the complexity of a contour by removing unnecessary points.
The Tools palette contains three tools for adding or removing points: the Pen Tool, the Add Anchor Point Tool, and the Remove Anchor Point Tool.
By default, the Pen tool changes to the Add Anchor Point tool when the pointer is over a selected path, and to the Remove Anchor Point tool when the pointer is over an anchor point. So that the Pen tool automatically changes to the Add Anchor Point tool or Delete Anchor Point, the Optimize option must be selected in the Options Bar.
You can select and edit multiple paths at the same time. You can also redraw the path as you add anchor points by clicking and dragging as you add them.
Simple smoothing
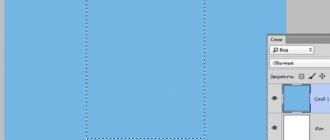
We will start, perhaps, with the simplest method. Open two images (where you will cut and where you will paste). In my case it will be the bride and the beach.
At the end, you can also do a little shading. To do this, again go to the menu “Selection” - “Modification”, but now select “Feathering”. Here you need to set the dimensions of the shading itself. But don't bet too much. See for yourself how much is enough for you. For example, 6 was enough for me, but someone may need 15. Experiment. You can always go back.