Combining (joining, merging) layers in Photoshop is a very, very common task, and therefore, everyone, especially beginners, should clearly understand the methods and results of this operation. Layers can be combined using the main and context menu commands, but it is much faster to use hotkey combinations to perform this task.
In addition, you should keep in mind that merging layers is an irreversible action, and before merging it never hurts to make an additional backup copy of the document by pressing the key combination Ctrl+Shift+S (Save as...).
And one more nuance. This tutorial talks about merging layers with normal blending modes. If the blending modes are different from normal (for example, the bottom merged layer has a normal mode, and the top one has “Overlay”), then the result may differ from the desired one. This situation is described in detail in the lesson “Merging layers with different blend modes in Photoshop.”
Merges a layer with the layer below it.
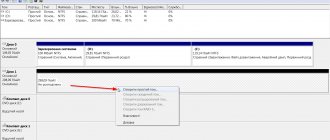
To do this, right-click on the desired layer and select the line “Merge Dovn” in the context menu that opens. The new merged layer will take the name of the lower one. It doesn’t matter which layer(s) are selected in the Layers panel. You can also merge a layer with the bottom one using the hotkey combination Ctrl+E . Here it already matters which layer in the layers panel is selected, because... Photoshop will merge the selected layer with the bottom one. Important! To perform this task, only one layer must be selected in the layers panel!
In the example, the layers “Background copy 4” and “Background copy 3” were merged. The resulting layer is “Background copy 3”
Merge all selected layers
This task is also performed by pressing Ctrl+E , but two or more layers must be selected in the panel. After pressing the combination, the layers will merge, the new layer will take the name of the top selected layer of the stack.
In the example, the layers “Background copy 2”, “Background copy 4”, “Background copy 6” and “Background copy 8” were merged. The resulting layer is “Background copy 8”
Merge all visible layers
To merge all visible layers, press Ctrl+Shift+E , or right-click on any layer -> Merge Visible. The resulting layer will be located in the place of the bottom visible layer and will take its name. If there was a background layer in the layers panel, then the visible layers will be merged into the background layer. Layers with visibility turned off will remain untouched.
Important! When merging visible layers, one or more of the visible layers must be selected, or none must be selected.
In the Layers panel, the visible layers are “Background copy 3”, “Background copy 5” and “Background copy 7”, not a single layer is selected. The resulting layer is “Background copy 7”
Magic panel
Once you start working, you will understand everything, otherwise this process cannot be called magic. It is with her that we will interact today. If you suddenly forgot what it looks like, don’t worry, I’ll remind you. This panel can be detached or fixed to make it more convenient for you.
We look carefully at the picture. Don’t be afraid of a large number of tools, I’ll tell you everything in detail and show you.
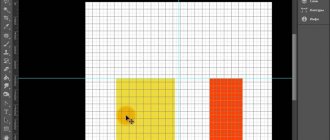
Well, are you ready? Go. Let's start with the simplest thing, add a photo or simply create a white background, on this background you can draw something or insert icons to make it clearer how this panel works.
Merging all layers of a stack to form a new layer.
With this type of layer merging, one new layer is created from all the layers in the stack, located at the very top of the stack, while all other layers (that were in the stack before the merge) remain untouched. For such a combination, press the keys Ctrl+Shift+Alt+E . You can also hold Alt, right-click on any layer and click on the “Merge Visible” line. Attention! The background layer also participates in the merging!
All layers, including the background layer, were merged into a new layer, automatically named "Layer 1". The original layers remained unchanged.
How to Merge Layers in Photoshop Without Aligning an Image
Need to merge layers in Photoshop? Don't smooth out the image and lose all your work. Learn how to merge a copy of existing layers into a separate layer! For Photoshop CC and earlier.
By Steve Patterson.
When working with multi-layered Photoshop documents, you often need to smooth out an image. This is usually done so you can sharpen the image for printing or uploading to the web. Or you can move the image to a different layout or design.
But although Photoshop has an Image Smoothing command, it's not the solution you're looking for. When you flatten an image, you lose all of your layers. And if you save and then close the document after straightening the image, those layers will be lost forever.
So in this tutorial I will show you the best way, completely non-destructive. You'll learn how to merge your layers into a separate layer and keep your existing layers intact!
But there's a trick. You won't find the "Merge all layers into a new layer" command in Photoshop. Instead, you need to know the secret keyboard shortcut. And while not everyone is a fan of keyboard shortcuts, I think you'll agree that it's definitely worth knowing.
Let's get started!
Download this printable PDF guide!
Why you shouldn't flatten a Photoshop document
Before we learn how to merge layers into a new layer, let's take a quick look at why antialiasing an image is a bad idea. I'm using Photoshop CC, but you can use any recent version.
In the Layers we can see that I have added several layers to my document. Along with the original image on the background layer, I also have a separate layer for smoothing the skin. On top is a layer for teeth whitening. And at the top is a layer for changing eye color:
.
The Layers panel showing multiple layers in a document.
If I'm done with an image, I might want to print it, email it, or upload it online. But first, I'd like to sharpen the image. And before I could sharpen it, I needed to merge all my layers into one layer.
Image smoothing problem
One way to combine layers in Photoshop is to simply flatten the image. And I could do this by going up to the Layer in the menu bar and choosing the Flatten Image :
Go to Layer > Flatten Image.
But here's the problem. By flattening the image, I've lost all of my layers. And if I save and close the document at this point, my layers are gone forever, as is my ability to edit any of these layers in the future:
The result after image compression.
I'll undo this and restore my layers by going up to the Edit and choosing Undo Flatten Image :
Go to Edit > Undo Flatten Image.
How to merge layers into a new layer
Here's a better way to work. Instead of flattening the image, we can keep our existing layers and simply merge copies of them onto a new layer!
Step 1: Select the top layer in the Layers panel
Every time we add a new layer, Photoshop places it directly above the currently selected layer. Since you'll likely want the merged copy to appear above the existing layers, start by selecting the top layer in the Layers panel:
Click the top layer to select it.
Step 2: Merge the Copy Layers into a New Layer
Then use the secret keyboard shortcut to merge a copy of your layers onto a new layer.
On a Windows PC, press Shift + Ctrl + Alt + E. On a Mac, press Shift + Command + Option + E. Essentially, it's all three modifier keys plus the letter E.
And if we look at my Layers panel again, we now see a new layer above the original layers. This new layer contains a merged copy of all the other layers in the document:
Photoshop adds a new layer and merges the copies of the existing layers onto it.
Step 3: Rename the new layer "Merged"
At this point, it is recommended to give the merged layer a more descriptive name. Double-click the existing name (in my case it's "Layer 1"), rename the layer to "Merged" and press Enter (Win) / Return (Mac) on your keyboard to accept it:
Rename the merged layer.
And here it is! Here's how to easily avoid image flattening by merging your layers into a new layer in Photoshop!
Check out our Photoshop Basics section for more tutorials! And don't forget that all of our guides are now available for download in PDF format!
.
Merging layers into a smart object
Hold Ctrl and select the layers you want. Then right-click on any of the selected layers and in the context menu that opens, click on the “Convert to Smart Objects” item.
In the layers panel, the layers “Background copy 3”, “Background copy 5” and “Background copy 7” were converted into a smart object (Photoshop automatically named it “Background copy 7”), in the picture on the right panel the smart object is marked with an icon in the lower right corner of the layer thumbnail.
Grouping
A layer group acts as a folder that stores specific files.
Methods for joining a group:
- Click the icon at the bottom of the panel. The default folder is created empty. Drag layers onto the group icon to place them into it;
- select the layers and then click on the same icon.
Combining layers by grouping them
Combining layers by grouping them is not an independent way to combine layers. This method is used when you are working with a complex document with a large number of layers and you need to combine a large number of specific layers. First, you need to select the layers by holding down the Ctrl key and clicking on the desired layers. Then press Ctrl+G to group them. In this case, grouping is necessary so that you make sure that the group contains exactly the layers that you need; if not, then you can always remove or add layers from/to the group. In other words, you are simply checking that you have selected the right layers correctly before merging them. Then, you need to right-click on the group and click on the line “Merge Group”.
Once again, I would like to draw your attention to the fact that these methods (except for merging into a smart object) are suitable for layers with a normal blending mode. If the blending modes are changed, the merging result may differ from the expected ones, i.e. The image in the document may change, and the changes can be either minor or dramatic. To avoid such problems and simply improve your Photoshop knowledge, read the article “Merging layers with different blend modes in Photoshop.”
Blend Mode
The blending mode determines exactly how the layers will interact with each other. Using this Photoshop feature, you can get interesting and necessary effects. Blend modes are often used when retouching photographs . For example, using the “Overlay” mode, you can add detail to the picture, and “ Linear light ” is used to lighten or darken. Horizontal line blending modes are divided into six groups:
- Basic.
- Darkening (Darken).
- Lighten.
- Increasing contrast (Contrast).
- Comparative.
- Component (HSL).