Photographers put a lot of effort into achieving high-quality images. However, the blur of a photo also plays an important role in photography. For example, the blurred background effect allows you to pay more attention to the main subject rather than the background. The movement of the camera when shooting creates the illusion of movement, and by changing the focus to other objects, you will be able to highlight some details of the photo separately from others.
Blurring a photo directly while shooting requires a lot of skill and there is a high probability of ruining the photo altogether.
Therefore, it would be much more correct to do these effects after shooting in Photoshop. The latest version of Adobe Photoshop CC has some interesting new blur tools, but in this article, I won't go into detail about each of them. I'll tell you about the basic techniques that are used when processing photographs.
Blurring the background in Photoshop
Most often, the blur effect is used specifically for the background of a photograph. Blurring the background allows you to highlight the main subject, hide unnecessary details and create more space in the photo.
Unlike other types of blur, it is best to do this when shooting, setting the aperture to the maximum open in the settings and focusing on the main subject.
To blur a background separately from the main subject in Photoshop, you need to select it. This can be done before or after blurring.
Depending on the complexity of the subject, its shape, contrast in relation to the background, you need to select the most suitable lasso tool and select the main object of the photograph. The methods of selection and choosing the appropriate tool are described in detail in this lesson.
When the main object is selected, copy it to a separate layer - Layer / New / Copy to new layer ... (CTRL + J).
Many people use Gaussian Blur in this situation, but it gives the wrong result. If you want to get an effect close to a real photograph with an open aperture, then you need to use - Filter / Blur / Shallow depth of field blur...
Unfortunately, almost always an unattractive glow appears around the object, which can only be removed manually using the Stamp or Healing Brush tools. As shown in the image below, you need to sketch the main subject on a blurred layer.
Working with a layer mask
How to make shading in Photoshop so that you can return to editing it in the future? Especially in order not to lose pixels when “erasing” in Photoshop, work with a layer mask is provided, which involves not deleting, but a kind of hiding of pixels, which can then be easily returned. Visually, this is similar to working with an eraser, but the global difference is that at any stage, even after closing the file, you can return any “erased” pixel. The eraser in this case resembles a tool that erases an image with one end and restores the erased image with the other end.
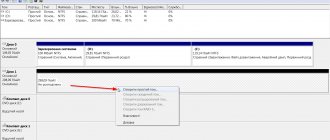
So, for this you need to create a layer mask. Create a duplicate of the working layer, and delete the original layer or make it invisible. Make sure that the desired layer is active (selected) and create a layer mask (“Layers” – “Create a new layer mask”). In the Layers window, you will see that a white rectangle has appeared in the layer row next to the thumbnail rectangle.
Blur Tool
For parts of a photo or individual details of a photo, it is better to use the Blur Tool. It works like a regular brush, which has its own pressure force. It is enough to apply a stroke with this brush and the object will lose clarity.
The Blur Tool is suitable for facial retouching, for example, for quickly blurring uneven skin.
Blurring edges in Photoshop
This technique allows you to blur the edges of the image or fill them with the overall tone of the image.
If the frame has hard edges and a large blur radius, it can serve in place of a regular photo frame. A smooth flow, as in the image below, allows you to draw more attention to the center and smooth out unnecessary details.
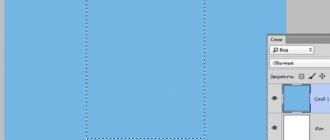
Make a duplicate of the layer so you can revert in case of an error. Select an area with the Rectangular Lasso Tool, as shown in the screenshot below. Invert the selection - Select/Invert... (CTRL+SHIFT+I).
Right-click on the selection area and select "Feather..." Depending on the size of your photo, set the feather in pixels (about 50-150 pixels). This is the distance to which the blur will extend from the border of the selection.
It all depends on the style of photography. Sometimes, you don't need to set Feather values. Your frame will be more visible and have crisp edges.
Now, go to - Filter/Blur/Gaussian Blur... Set the desired value. A large radius value creates a slight shading with the overall background color.
There are photographs in which the blur needs to be done in a different shape than a rectangular one. To do this, select an area with any convenient tool and apply the filter described above.
Darkening edges or vignette
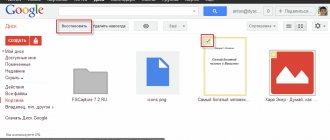
Open the image. In the layers panel at the bottom, click on the adjustment layers button and select “Gradient” here. A panel with gradient settings opens.
Our color will be from black to transparent, so that there is a darkening. The style is radial and check the box next to inversion so that it is transparent in the center and black along the edges.
Here you can increase the scale to 150. Click on the palette, you can move the transparent area closer to the edge if necessary. Or we can do the opposite - compress the dark part towards the center.
We set the slider this way, now we see that everything worked out well for us! We managed to darken the edges of the image.
Creating the illusion of movement
A properly selected blur effect will help you create the illusion of something moving in a photo.
For example, the Motion Blur filter blurs the photo, similar to direct camera movement when shooting. This effect is always used in photographs of moving cars, trains, and airplanes.
The bison in the photo seems to be running forward, thanks to the application of Filter/Blur/Motion Blur to the background...
The settings specify the angle and degree of displacement. Of course, before this you need to select the background so that the main subject is not blurred either.
The Circular Blur filter creates the effect of the camera rotating when shooting. Can be used in photographs with rotating objects.
The ring method imitates the rotation of an object, and the linear method imitates its sharp approach.
Method number one
The simplest way. To blur the edges, we open the desired image, in fact, in Photoshop, and then decide on the area that we want to see blurred as a result of our efforts.
Do not forget that we are not working in Photoshop with the original! We always create an additional layer, even if you already know how to work well with photos - occasional failures should not spoil the source in any case.
On the left small vertical panel in Photoshop, right-click on the tool called “Selection” , and then select “Oval Area” . Using it, we determine the area in the picture that does NOT need to be blurred, for example, the face.
Smooth gradient blur
To prevent text from getting lost in a photograph, many different techniques are used to create contrast with the background. Perhaps one of the best is to blur part of the photo so that small contrasting details do not interrupt the text.
Often this blur is done by smoothly flowing from a clear image into a uniform tone. The inscription on such a blurred background is perceived as integral with the photograph.
Select an area with any lasso tool and set the Feather.
As shown in the picture below, the text against such a background is clearly readable and perceived as one with the photograph.
Simple smoothing
We will start, perhaps, with the simplest method. Open two images (where you will cut and where you will paste). In my case it will be the bride and the beach.
At the end, you can also do a little shading. To do this, again go to the menu “Selection” - “Modification”, but now select “Feathering”. Here you need to set the dimensions of the shading itself. But don't bet too much. See for yourself how much is enough for you. For example, 6 was enough for me, but someone may need 15. Experiment. You can always go back.
How to hide the visibility of photo details
If you need to hide facial features in a photo, hide a car license plate, or remove the recognition of something, use Filter/Design/Mosaic...
This technique covers areas with a mosaic with a large grain so that the details are not recognizable.
If you want to remove a defect without leaving a noticeable mark, use retouching tools such as the Stamp or Healing Brush.
Cutting out a fragment with feathered edges using a layer mask
Click on the white rectangle with the mouse to work not with the layer itself, but with its “mask”.
Now, if you select the Brush tool, black will hide the pixels (make them transparent), and white will restore them. Accordingly, gray color will make the pixels translucent.
Select the Brush tool, adjust it, select black color. You can begin to outline a portion of the image in order to hide the pixels around it. If something in your work doesn’t suit you, you can always change the brush color to white and restore the pixels. Or you can choose a gray shade and make the edges more neat.