There are often situations when when viewing images, they simply do not load or load too slowly. But don't immediately panic and think that you have a bad Internet connection, since the entire gap may lie in your browser. Perhaps the browser settings have gone wrong or the loading of images is simply disabled. Let's consider the solution to this problem for each browser separately. But first, it’s better to check your Internet speed. After all, this could be the problem. But if everything is fine with your speed, read on.
Why don't images load in Chrome?
There can be many reasons why images may not load on web pages when you are using Chrome.
- You don't have an Internet connection and Chrome is loading a cached page.
- Chrome setting blocks images.
- There are problems with the site you are trying to load.
- A browser extension may be preventing the page from loading.
- Your antivirus software is blocking images.
As you can imagine, with so many causes, finding the real problem is not always easy. However, this step-by-step guide should help you solve the problem.
Try a different browser.
The first thing to check is whether the problem is only in Chrome browser or any other browser. Why is it important? Each browser uses its own browser engine to process incoming web page code.
Chrome uses the Chromium engine. So the first test to try is to use another Chromium based browser like Vivaldi.
If images are not loading in Vivaldi, it could be your internet connection or something to do with the Chromium engine on your PC.
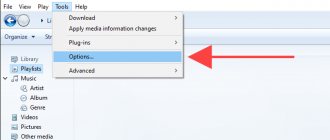
Another good test to try is launching Firefox and visiting the same web page.
Firefox uses a completely different browser rendering engine called Gecko, which launched a new one codenamed Quantum.
If Firefox also doesn't load images, the problem may be with your internet connection. If this is the case, you will need to work on troubleshooting your Internet connection.
Reason #6: Viruses
Although most often malware “clogs” your computer with intrusive advertising, sometimes the opposite happens and images are not displayed in the browser due to viruses. As a rule, errors and malfunctions in the rest of the system appear simultaneously, the computer slows down, does not want to open some files, etc.
Solution:
Full PC scan using antivirus programs. There are subtleties here. Firstly, it is best to scan in Windows Safe Mode - this way the antivirus can find more dangerous files. Secondly, in addition to checking with a standard antivirus (Kaspersky Anti-Virus, Avast, NOD32, etc.), it is recommended to install and use special scanner programs such as Dr.Web, McAfee and GridinSoft Anti-Malware.
Check the "Show all images" checkbox.
If other browsers work fine, the problem is most likely in Google Chrome. So it's time to start troubleshooting Chrome.
First, make sure that settings that may be preventing images from loading are not configured correctly. The first setting to check is Chrome's Show All Images setting.
To find it:
1. Click on the three dots on the right to open the menu and select Settings.
2. Scroll down to the Privacy & Security section and select Site Settings.
3. In the Site Settings menu, scroll down to the Content section and select Images.
4. Make sure that the "Sites can show images" option is turned on in the Images menu.
This setting is one of the most common reasons why people see broken image icons when opening web pages. Hope this option fixed your problem.
Check your JavaScript settings.
Some web pages use JavaScript code to load images onto the web page. Because of this, if you disabled JavaScript in Chrome without realizing it, the images will not load on that web page.
You can make sure JavaScript is enabled in Chrome to see if this is the problem. To do this, use the same process as above to open Chrome Settings. Scroll down to the Content section and select JavaScript to see the JavaScript settings in Chrome.
In your JavaScript settings, make sure that Sites can use JavaScript. This ensures that if a webpage uses JavaScript to load images, it will work in Chrome.
Restart your Chrome browser and try opening the page again. If the problem is with this setting, the web page should load the images now.
Don't check extensions in incognito mode.
Another issue that can cause problems loading images in Chrome is browser extensions. It's difficult to determine which extension is causing the problem, especially if you have many of them.
The easiest way to check this is to run Chrome in incognito mode. This will launch the browser without any extensions loaded. To do this, simply select the three dots in the top right corner to open the Chrome menu and select New Incognito Window.
Try loading the problematic web page in this new window in incognito mode. If the pages are loading, the problem is most likely with one of your extensions. In this case, close incognito mode and open a regular browser window.
Enter the extensions menu by opening Settings, select More tools, and then select Extensions.
Disable active extensions one at a time and continue testing the web page.
Once you disable it and the web page is able to load images, you will realize that the problem is with the extension. Try selecting "Remove" to completely remove it from Chrome.
Clear Google Chrome cache.
Google may have cached a version of the web page when the images weren't working. Until the cache is updated, the cached version of the page will continue to load.
Clear cache to get the latest version of the web page and check if there is a problem with Chrome's cache.
1. Type chrome://history/ in your browser's URL field and press Enter.
2. From the left menu, select Clear browsing data.
3. The Clear Browsing Data window will open. Make sure that at least Clear Images and Files is selected and select Clear Data.
4. Another way to do this is to select the Advanced tab. Make sure cached images and files are selected and click the Clear Data button.
Either one will work. After deleting cached images and files, restart your browser and try reloading the page. If the problem is with the Chrome cache, the web page should load all the images.
Make sure Chrome is up to date.
An outdated Chrome browser can easily cause problems loading web pages, including loading images. This is especially true if the web page has been recently updated and uses the latest web code, which requires the latest version of the Chromium rendering engine.
Updating Chrome is quick and easy. Simply select the three dots in the top right corner and select Help from the menu. Then select About Google Chrome.
When the About Chrome page opens, Chrome will automatically check to see if it's fully up to date.
If not, it will automatically update to the latest build. Please wait until the Checking for updates message on Google Chrome is updated. As soon as you see this message, restart your browser and check the web page again.
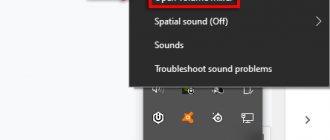
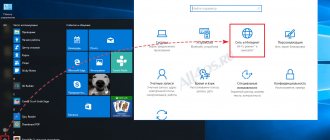
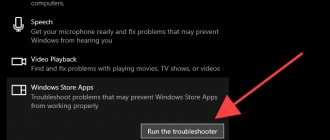
Recommendations from Microsoft
Windows 7 developers offer another tool that allows you to resolve problems with playing slide shows and displaying pictures, even if they do not open. This is Launch FixIt. You will need it to fix the following problems:
- it is impossible to set a picture as a screensaver;
- The photo preview function does not turn on;
- in thumbnails and the preview window, the colors of pictures are visualized in inverse order;
- artifacts and interruptions when flipping through slides.
This concludes the search for problems with displaying pixel images on a computer.
(Visited 52,383 times, 7 visits today)
Try renaming your Chrome data folder.
According to many Chrome users, an issue with the Chrome data folder (files deleted or corrupted) can cause images to not load in Chrome.
You can check if this is the problem and fix it by renaming the default data folder.
1. Select the Start menu, type Run, and select the Run application.
2. In the Open field, enter %localappdata% and click OK.
3. In the Windows browser window that opens, navigate to //AppData/Local/Google/Chrome/User Data.
Rename the default folder to something else. Then restart Chrome. Chrome recreates the new default folder inside user data.
If the old default folder was causing the problem, you should now see images when you visit the problematic web page.
Outdated version
If such problems arise, one cannot fail to mention that it is worth updating the program in a timely manner. If you haven't installed an update for a long time, don't be surprised by errors that appear! It is not surprising that Telegram does not see the contact from the phone book - after all, the application works with difficulty.
- Open the Google Play Store or Epstor software store (depending on the device);
- Enter the name of the messenger into the search bar;
- If there is an update button opposite, click on it;
- Wait until the download completes and re-enter the program!
We will never tire of reminding you about the importance of downloading updates - do it as often as possible! The action is as simple as possible; it will take a few minutes of your time, but will allow you to gain access to the updated functionality. In addition, updates are needed precisely to fix bugs and errors and close vulnerabilities. Do you care about your own cybersecurity?
Reset your Chrome browser settings.
If you've tried all the settings above and nothing worked, resetting all Chrome settings to default may fix the problem.
Open the Chrome Settings window, select Advanced, and scroll down to the Reset & Cleanup section. Select Restore settings to original defaults.
This will reset all Chrome browser settings. Restart your Chrome browser and try opening the web page again. If the images load, you know the problem was caused by one of the many settings in the Chrome browser.
Display of images is disabled
To reduce traffic consumption and increase the speed of browsing the Internet, you can disable the display of images in the browser itself. To do this, just go to the settings, go to the “ advanced ” section and select the “ content settings ” line. It is there that you can prohibit opening images on the Internet.
Installing and updating the Opera browser
To turn them on again, just perform the same actions, placing the icon next to the pictures.
Try different DNS servers.
One last thing you can try is to test your internet connection using different DNS servers. When a web page tries to load images, it uses a URL link to those images. If the site you are visiting uses a Content Delivery Network (CDN) service (which serves images from different servers around the world), the DNS server you use matters.
If your current DNS servers have the wrong IP address for your local CDN servers, your browser will not load the images.
To check if this is the problem, try changing your DNS servers to Google's DNS servers.
- Open the Windows Control Panel and select View network status and tasks under Network and Internet.
2. From the left navigation menu, select Change adapter settings.
3. You will see a list of all network adapters. Right-click the active network adapter you are using and select Properties from the menu.
4. In the Wi-Fi properties window, select Internet Protocol Version 4 (TCP/IPv4) under This connection uses the following. Click the Properties button below that.
5. Select Use the following DNS server address. Enter 8.8.8.8 for the preferred DNS server and 8.8.4.4 for the alternate DNS server.
Select OK. Restart your computer for these settings to take effect. Then restart Chrome and check the web page again.
Format a flash drive via the command line
The formatting process can be divided into three simple stages: searching for the name of the external drive, disconnecting it from the file system and deleting all data contained on the flash drive.
Looking for a flash drive in the file system
You can view all connected disks using the fdisk program.
- Open the terminal. This can be done by pressing the Ctrl + Alt + T keys simultaneously on an empty desktop.
- Enter the command sudo fdisk -l
It will have output similar to the one below:
Disk /dev/sdb: 4048 MB, 4048551936 bytes 54 heads, 9 sectors/track, 16270 cylinders, total 7907328 sectors Units = sectors of 1 * 512 = 512 bytes Sector size (logical/physical): 512 bytes / 512 bytes I/ O size (minimum/optimal): 512 bytes / 512 bytes Disk identifier: 0x0001135d Device Boot Start End Blocks ID System /dev/sdb1 * 2048 7907327 3952640 b W95 FAT32*
In this text we see a flash drive. This can be seen by the size of the disk (4084 megabytes is clearly not the main hard drive of the computer). Its name appears at the bottom of the text. Immediately under the word Device. In my example we are talking about the name: /dev/sdb1.
Now we know the name of our flash drive and we can move on to the next step.
Disconnecting the flash drive from the computer
In Linux, you cannot perform operations such as formatting on a flash drive if it is mounted in a file system. First, you need to disable it to avoid any serious damage at the distribution level.
To disconnect the flash drive, open a terminal and enter the command sudo umount name of the flash drive in the Linux file system
In our case, the command will look like this: sudo umount /dev/sdb1
Format the flash drive
We proceed directly to cleaning the flash drive. This can be done using the mkfs utility.
The command for formatting a flash drive is as follows: sudo mkfs -t name of the file system name of the device that needs to be formatted
Linux supports a lot of file systems, including ext4, ntfs, xfc, btrfs and others. You can specify any one to suit your taste and needs. For example, if you plan to use a flash drive with Windows computers in the future, then it is better to use the vfat option.
The final command for formatting a flash drive for working with Windows will look something like this - sudo mkfs -t vfat -n FLASH /dev/sdb1
The formatting process will take some time. After it is completed, you can remove the flash drive or write new data to it.