Adobe Photoshop has a tool that makes editing graphics much easier. This is a grid. It helps in creating images and putting together collages. Using it you can estimate the size and distance, estimate how objects will be located relative to each other, and make markings. Find out where to place this or that part of the drawing. This is a useful tool if you know how to use it. Learn how to enable the grid in Photoshop, how to adjust its attributes, and how to remove it.
About the grid
The grid helps you arrange elements in a composition more accurately and symmetrically.
Essentially, these are guide lines. Level table. It overlays the image, but does not cover it. It makes it easier to calculate proportions, see symmetry, and place individual elements correctly.
As an analogy, let's take a school notebook in a cage. They built graphs and drew geometric figures in it. On such a sheet it was possible to draw a straight line without a ruler, set an angle of 45 or 90 degrees, without using a protractor. It was used to determine by eye how long the side of the rectangle was and how many cells made up its area. In Photoshop, a table has approximately the same functions.
It can only be seen in the program. It will not appear when printed. In the digital version there will be no pattern of cells either. This is not a part of the image, but an editing tool.
It should not be confused with the pixel grid. The last thing is breaking the picture into points. Useful for detailed editing. It can also be enabled and configured.
Even if you don't need these options, it will still be useful to know about them. For example, to remove a table if it was accidentally activated.
Principle of operation
The grid is a tool that allows you to arrange components efficiently and evenly on your Photoshop work surface. When you turn on the grid in Photoshop, a large number of horizontal and vertical lines are created. They line the canvas like a checkered notebook sheet. Each line attracts objects to itself if you bring them close enough (for this there should be a checkmark in the View - Snap ). Snapping to lines helps position objects evenly relative to each other.
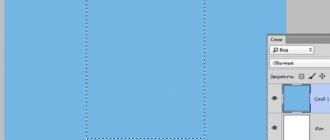
The project is pictured here. On the left – without auxiliary elements, on the right – with them:
Banding does not persist during image output or printing. They will be saved only inside the program document itself (document name.psd).
How to turn it on?
Here's how to make a grid in Photoshop:
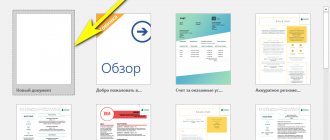
- Open any graphic file or create a new one.
- In the menu bar, click on the “View” button. Usually it is between "3D" and "Window".
- Hover your cursor over “Show”.
- In the drop-down menu, click on “Grid”. It will appear on the layer.
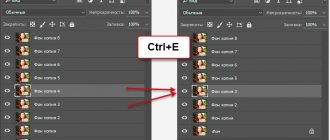
- You can also press the keys Ctrl+' (in the Russian layout Ctrl+E).
Pixel grid
In addition to the usual one, Photoshop also implements a pixel grid, which works only with a large magnification of the canvas. It is turned on by selecting View - Show - Pixel Grid . This tool will be extremely useful for artists working in pixel art or similar styles, because it clearly separates the pixels, making the artist's work easier.
On the left is a project without pixel guides, on the right is with them.
How to setup?
You can make the cells a different size (for example, so that they visually indicate segments 1 centimeter long), choose the type or color of the lines.
- Open the Edit menu in the top bar.
- Hover your mouse over “Settings”. He's at the very bottom of the list.
- Click on Guides, Grid and Slices.
- In the window that opens, set the desired cell size. This can be done in the “Line every...” field. Different units of measurement are available: inches, millimeters, points and so on.
- In the "Style" section, specify how you want the grid to be displayed: solid, dotted, or dotted. This is not so important, since the markup will only be visible when editing the picture.
- Under Color, select a fill. This setting can be used when the table blends into the background.
Show and Use Rulers in Photoshop
ruler, as its name indicates, is an element that allows us to measure the distance between two points. Same as the rule we can use for drawing on paper. Photoshop allows us to add two rules for each project, one vertical and one horizontal.
To show these rules, we can go to the View menu and select the Rules option from the list. We can also use the faster keyboard shortcut Control + R to quickly show and hide the rulers.
We see these rules appear at the top and left of the canvas.
We can right-click on these Photoshop tutorials to see a context menu from which we can select the module in which we want these tutorials to appear. For example, we will be able to measure in pixels, centimeters, millimeters, inches, percentages, etc. D.
If we want the measurements to be as accurate as possible, it is recommended to set the view to 100% and resort to using guides to easily measure the elements on the screen.
Rulers
Another measurement method in Photoshop is rulers. They are located outside the picture. With this tool you can estimate the length and width of objects and the image as a whole. You can activate rulers in the View menu. To select their parameters, go to Editing - Settings - Units and rulers.
The table is useful when drawing diagrams. Or for any other job that requires precision. But this tool is also useful outside the professional sphere. After all, when drawing, a lot of things are “pretended by the eye.” If you turn on the markup, you can navigate by it. And in the end you will get a verified, elaborate and beautiful drawing.
Guides in Photoshop
Now that you have rulers, you can create guides.
Guides are blue vertical and horizontal lines that help create layouts in a Photoshop document.
Guides are auxiliary elements, so they won't be visible when you save the image. But they remain in PSD format.
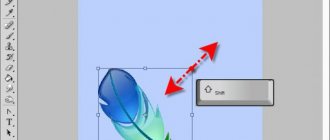
Guides have a sticking effect, that is, when you move any element of the image closer to the guide, you will feel like this element is suddenly stuck to the line. This is very useful for positioning. In this case, you are absolutely sure that you have placed the element pixel by pixel with a guide.
Note
The sticking effect in Photoshop is called Snap . It is turned on and off in the View - Snap menu. Make sure the checkbox is checked.
This is where the whole tactic of use follows: first you need to accurately install the guide in its place. To do this, use a ruler scale if you need to measure the required distance. Then, once everything is in place, drag an image element to the guide and it will stick to that line. That's it, it's positioned!
How to create guides in Photoshop
First you need to make sure that the display of guides is turned on. To do this, make sure that there is a checkmark in the View - Auxiliary Elements menu. The rulers must also be activated.
Now we need to create them. There are two ways for different occasions:
Method 1 Arbitrary guides
This method is suitable when you need to quickly create a line and install it in an arbitrary location.
To do this, click the mouse in the ruler scale area:
- for a horizontal line - on the top ruler;
- for a vertical line - not the left ruler.
Then, without releasing the mouse button, drag your hand towards the document. Then, along with your movement, the still dark guide line will stretch. Next, install it in the right place and it will turn blue.
As you can see, it intersects the ruler scale, which means it won’t be difficult to calculate the distance and place the guide in the right place.
Method 2 Indicating where the guide should appear
Through the menu View - New Guide a dialog box will open. In which you need to indicate in which plane to create it (horizontal or vertical), as well as the field in which you need to enter the value of the desired position. For example, you need a horizontal guide that appears 100 pixels from the top edge of the image.
How to change the position of the guide
To move a line to a new location, select the Move tool, then hover over the line. The cursor will change to two parallel bars. This means you can click on the guide and drag it to a new location.
By the way, the guides can be secured, that is, protected from accidental shifting. To do this, check the View menu - Lock guides.
How to remove/remove guides
Method 1 Move to ruler scale
This method repeats the process of creating a guide. Just to make it disappear, you need to drag it back to the ruler scale area.
This method is ideal for cases when not all of the many guides need to be removed, but only some.
Method 2 Menu command
Through the program menu: View - Delete guides. In this case, all created lines will disappear at once.
Method 3 Disable display
If you need to temporarily remove the guides so that they do not interfere, then uncheck the View - Auxiliary Elements command or use the hotkey Ctrl+H.
All lines will disappear, but if you need to display them again, then put the checkbox back there, and then all the guides will be in their places again and you can continue working with them.
How to determine the center of a figure in Photoshop?
Photoshop | How to find the middle?
- Turn on the display of rulers. Find the “View” item in the top menu. ...
- From the horizontal ruler, pull out a horizontal guide...
- From the vertical ruler, pull out a vertical guide...
- Slowly drag the guide with the left mouse button towards the center
Interesting materials:
How to reduce the resolution in any game? How did the date die in the Hunger Games? How to speed up flash games in the browser? How to speed up the game in NOX? How to speed up game loading in Epic Games? How to install mods in Fallout 3? How to install and start playing SAMP 0.3 7? How to install the game Fallout 3? How to install GTA 5 on Xbox 360? How to install a game on a computer from a flash drive?
How to remove a grid from a photo?
You can quickly remove or add a grid to a photo in Photoshop using the keyboard shortcut (Ctrl+H). Or go to View / Auxiliary Elements / Show / Grid. Uncheck the Grid box.
Interesting materials:
Why were Khrushchev buildings built? What are moxonidine tablets for? What are motherwort tablets for? What is lemon balm herb for? Why is sage brewed? Where does the Dniester flow? Up to what age are children's children given? Until what age are reserve officers liable for military service? What is a GPC agreement with an individual? Dombra musical instrument how many strings?
Setting up guides, grids and sectors
Although customizing these elements is not absolutely necessary for editing, Adobe allows us to customize the appearance of these elements so that we can tailor them to our tastes, our needs, or the needs of the project we are working on.
To do this we must go to Edit > Preferences and select the Guides, Grid and Sectors option. A window like the one below will appear in which we can select the color and style of each of these elements.
As we can see, Photoshop allows us to choose the color of each element and the stroke it will have. Enough to be able to adapt the editing interface even further to our needs.
Bootstrap grid, PSD
When creating website designs in Adobe Photoshop, you cannot do without using some kind of grid system. You can create a grid yourself using guides, or use a ready-made, proven solution - a ready-made Bootstrap grid in PSD format . Despite the fact that the default Bootstrap grid sizes somewhat standardize the design, this option is successfully used in their work by a huge number of web designers around the world. In addition, such standardization allows you to perform HTML layout of the created layout as quickly as possible, which inevitably leads to faster work on the project in the context of online website development or template creation.
Share
Tweet
Share
Cool
Stammer
Watch lesson on YouTube
Parameters of the standard Bootstrap grid in PSD format:
- Total working area width: 1920px;
- Container width with padding: 1170px;
- Column width without padding: 68px;
- Gutter Width: 15px;
- Grid system: 12 columns.
Column spacing and some dimensions may have an error of +/- 1px due to the fact that some odd dimensions cannot be divided equally. But this is not critical on the scale of PSD layout development.
Rules for working with Bootstrap PSD grid
There are certain rules for working with the Bootstrap grid. Some novice web designers do not take these rules into account in their work, which results in misunderstanding between the layout designer and the designer if a team is working on the project. The Bootstrap grid in PSD format for creating a website design was developed based on the “physical” properties of the CSS grid of the Bootstrap framework and the designer must adhere to certain rules to avoid unnecessary collisions during the development process.
1. The margins are used exclusively for indentation at low resolutions and cannot be used to place any design elements or site content.
2. You can use any number of single columns to visualize various blocks of the site.
3. Once the layout is divided into columns and blocks, the spaces (Gutters) between them cannot be used to place any design elements or site content.
4. Don't be afraid to go beyond the grid. If you decide to make some non-standard section or block, implement your idea outside the Bootstrap grid, if necessary. But try to provide your solution with some kind of system, for example, stick to the center of the layout or partially use the Bootstrap grid features, respect the multiplicity of elements, or adhere to any other logical system when creating a custom block. This will greatly facilitate the work of the layout designer if a team of developers is working on the project. They will thank you.
The last point is very important, since many novice web designers are afraid to go beyond the Bootstrap grid and the design, in most cases, turns out to be quite monotonous and boring. Remember that you only need Bootstrap grid guides for laying out website blocks that need to be organized in accordance with the grid system, this can be dividing the layout into basic logical parts - sidebar + content, defining block elements, such as carousel items, news sections and etc. Otherwise, you should not limit yourself to the grid and visualize only along the guides. However, if you are designing a specific section or block according to the Bootstrap grid system, be sure to follow the rules from points 1,2,3 above.
Premium lessons from WebDesign Master
Website creation from A to Z. Comprehensive course
Creating a modern online store from A to Z
I'm a freelancer! Basic course for beginners
Other lessons on the topic "Tools"
- Setting up VS Code for layout
- Simple Starter - a simple starter for layout. We make it simple!
- Windows 11: Making tabs in Explorer. Setting up QTTabBar from A to Z
- Gulp include server side Browsersync + Build
- OptimizedHTML 5: Important Starter Updates for JS Development
- Gulp 4 - An up-to-date and comprehensive guide for little ones