Warning
: Use of undefined constant post__in — assumed 'post__in' (this will throw an Error in a future version of PHP) in
/home/u266276471/domains/mobobzor.com/public_html/wp-content/themes/mobobzor/functions.php
on line
236
You may have decided that you need to combine hard drive volumes into one so that there is more space on one volume (for example, there is not enough space to install a game or programs on drive C, and you want to combine it with drive D).
Or, suppose you bought an adapter from HDD to USB and connected the external HDD to your computer. You'll likely find about 4-6 local drives - 2-3 on your computer, 2-3 related to the external hard drive. It looks a bit cluttered, especially since there is no need for so many sections.
There is no point in splitting an external hard drive into several local ones, because you will not install the OS on it, but simply plan to use it as a flash drive. Usually external drives have one partition, and we will do the same - combine unnecessary local drives into one.
ATTENTION! I advise you to familiarize yourself with using the Adfender program to block advertising on the Internet
How to combine hard drive partitions into one
In this section, we will combine volumes using an external hard drive as an example. To make your partitioned hard drive unpartitioned (i.e. merge partitions), you need to follow the following instructions:
- The first step is to remember well the names of the partitions that belong to the external hard drive. If there are 6 volumes of them in “My Computer” (some friends have up to 10 of them), then you can get confused and make a fatal mistake. But it will be a shame if you format the wrong disks. Remember, or if necessary, write down the names, for example, “X”, “Y”, “Z”.
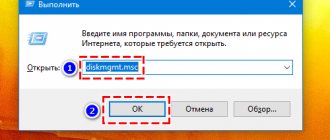
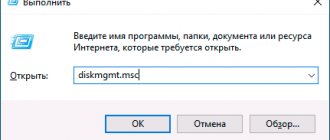
- We find the Windows 7 disk manager. It is “hiding” somewhere in the “Control Panel”. The fastest way to get to it is to open the Start menu and type something like “disk” or “hard drive” into the search bar. In the results you will see the item “Create and format hard disk partitions”, select it.
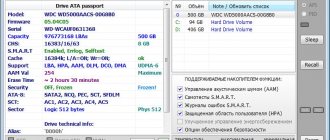
- That's it, you are in the section manager. In my case, there are only 4 disks. “F”, “I” are the partitions of the external disk, “C”, “D” are the “internal” ones. There are also two partitions (with a black stripe) that are not used, not allocated. I will combine these two “black” partitions and two disks “F”, “I” into one whole.
- Before merging or partitioning a hard drive, it must be formatted. Right-click on the disk (for example, “F”) and select “Delete Volume.” Once we delete it, it will erase all data and become an unpartitioned drive with a black stripe.
- The undivided space will eventually be grouped into one "black partition". In my case, this is 120 GB plus 177 GB on disk “I”, to which I will now attach free space.
- Right-click on drive “I” and select “Extend Volume”.
- The merge window opens. On the left side it will write how many megabytes can be attached to the selected partition, in my case - the same 123242 MB. I move them from the “Available” column to another – “Selected”. I press “Next”.
- There are no sections “I”, “F”. There is only one solid unallocated black area left, the volume of which is 300 GB. You need to do something with it, because the system doesn’t see it. We create a new volume from it: right-click on it and select “Create just a volume...”.
- Windows will ask how many GB to allocate for the hard drive? We select everything, because there is no need for other partitions for the external drive. Click “Next”.
- Next is the settings window for the disk being created. All we are interested in is the file system. Select NTFS (Windows file system). Since we have an external hard drive, it may happen that it will need to be connected to a computer that runs Linux. There is no need to worry, Linux recognizes all files on external media.
That’s it, now when you open “My Computer”, you will see one partition of the external drive instead of several. In my case, the section is called "X".
Additional software
In some cases, work on merging disks may be difficult because the user does not have the ability to work on individual sectors. In this case, you can use a special program that will give access to the physical space and allow you to perform all the actions of connecting different volumes.
An excellent example of such a utility is Acronis Director. It can be easily installed on any operating system and will provide access to all system configuration settings. After installing the program and launching it, in the main window you can see all the necessary information for working with disks and volumes. Further actions are of the same nature as in the previous instructions. You need to highlight the volume that you want to clean up and merge in the future, and click the corresponding button to start the process.
Working with merging using a special utility will help you configure your computer in a way that suits you and makes it convenient and efficient to use.
How to delete all HDD partitions and make it unified
To delete hard disk partitions, go to the Windows Disk Management (Start menu) and enter in the search bar, for example, “disk” or “hard drive”. In the results you will see the item “Create and format hard disk partitions”, select it ). Next, in the list, we find the partition that we want to delete, right-click and select the item – Delete volume.
Remember that this will lose data from this partition!
After this, an unmarked area will appear (as in the screenshots above, step 10), indicated in black. Now you can select the disk to which you would like to add unallocated space, right-click again and select Extend Volume.
The Volume Expansion Wizard will appear, click Next. In the next window we need to select the size of the available space. Select and click next, and then Finish.
That's it, now you have deleted the unnecessary partition and added it to another disk. If you have any questions, write them in the comments.
Why is this necessary?
There is an opinion that the HDD should be divided into two sections. One contains the OS, the other is for storing data. This will allow you to reinstall the system, and the necessary information will be intact on another HDD. This is convenient, but does not mean that this is the only way to do it.
If the HDD is divided into two parts, increase one partition at the expense of the other. This is relevant if there is not enough space for software in the volume where the OS is located, or there is no space on the disk with information. How to do it? To do this, it is not necessary to seek help from specialists. Everything can be configured yourself.
What is unallocated area of a hard drive?
Unallocated or unallocated area of a hard drive is space that is not currently occupied by any of your local drives, i.e. not used for its intended purpose. It can be either on an external hard drive or on a regular one.
Such an area may appear as a result of the fact that you did not use it when partitioning the disk. For example, you have a 250GB hard drive, you split it into 2 partitions of 100GB each. In this case, approximately 50GB (actually less) will remain an unallocated area.
In the instructions above, read how to use this area.
A program for merging disks without losing information
To merge hard drive partitions without losing data in Windows 7, Windows 8 or Windows 10, you can use third-party software, namely the MiniTool Partition Wizard disk merging program
Attention! Despite the fact that this utility is absolutely safe for working with disk partitions (checked more than once), we still recommend, if possible, making a backup copy of important documents.
MiniTool Partition Wizard Main advantages and capabilities of the program:
- Create, delete and format primary and logical partitions.
- Changing the partition size.
- Supports disks and partitions larger than 2 TB.
- Convert partitions with the FAT file system to NTFS.
- Copying an entire hard drive to another (cloning).
- Copying one of the sections.
- Changing a dynamic disk to a basic one.
- Recovering the MBR boot area.
- Testing the performance of the hard drive.
- Hide/show section.
- Setting the active partition.
- Changing the assigned partition letter.
| Developer | MiniTool® Solution Ltd. |
| Windows versions | Windows XP, Windows 7, Windows 8, Windows 10 |
| Interface language | English |
| Link |
So let's get started.
- To merge two drives (for example, C: and D:), you need to right-click on the partition to which you want to attach another volume (in our case, drive C). In the drop-down menu you need to select the Merge item (translation from English - “Merge”).
- In the window that appears, select the same disk and click Next
- Next window, you need to select the disk that you want to attach (D). At the bottom of this window you need to define the name of the folder that will be created on drive C (in our case, since we are attaching drive D to drive C). By default, the folder will be named merged_partition_content (content of the joined section). Then click Finish
- The last step is to apply all the changes. In the upper left corner of the program, click the Apply button. Then restart your PC
You might also be interested in
Disk reserved by system
How to disable UAC Windows 7?
How to remove Windows 7 test mode (build 7601)?
Using third-party programs to work with partitions
Using third-party utilities to merge hard drive partitions can be useful in cases where:
- You need to save data from all partitions, but you cannot transfer or copy them anywhere.
- You need to merge partitions that are located out of order on the disk.
Among the convenient free programs for these purposes, I can recommend Aomei Partition Assistant Standard and Minitool Partition Wizard Free.
How to merge disk partitions in Aomei Partition Assistant Standard
The order of merging hard disk partitions in Aomei Partition Aisistant Standard Edition will be as follows:
- After starting the program, right-click on one of the partitions to be merged (preferably the one that will be the “main” one, i.e. under the letter under which all the partitions to be merged should appear) and select the “Merge Partitions” menu item.
- Specify the partitions that need to be merged (the letter of the merged disk partitions will be indicated at the bottom right in the merge window). The placement of data on the combined partition is shown at the bottom of the window; for example, data from drive D, when combined with C, will end up in the C:D drive.
- Click “Ok” and then “Apply” in the main program window. If one of the partitions is system, you will need to restart the computer, which will take longer than usual (if it is a laptop, make sure it is plugged in).
After restarting the computer (if necessary), you will see that the disk partitions have been merged and are presented in Windows Explorer under one letter. Before you begin, I also recommend watching the video below, which mentions some important nuances on the topic of combining sections.
You can download Aomei Partition Assistant Standard from the official website https://www.disk-partition.com/free-partition-manager.html (the program supports the Russian interface language, although the site is not in Russian).
Using MiniTool Partition Wizard Free to Merge Partitions
Another similar free program is MiniTool Partition Wizard Free. One of the possible disadvantages for some users is the lack of Russian interface language.
To merge sections in this program, just follow these steps:
- In the running program, right-click on the first of the sections that are being merged, for example, on C, and select the “Merge” menu item.
- In the next window, again select the first of the sections (if not automatically selected) and click “Next”.
- In the next window, select the second of the two sections. At the bottom of the window, you can specify the name of the folder in which the contents of this section will be placed in the new, merged section.
- Click Finish, and then, in the main program window, click Apply.
- If one of the partitions is a system partition, you will need to restart the computer, during which the partitions will be merged (the reboot may take a long time).