Sticky Keys mode is a standard feature in all versions of Windows, activated by pressing the Shift key five times. You can disable Sticky Mode in the Ease of Access Center in Control Panel, under Make the keyboard easier to use.
Many users do not understand why sticky keys on the keyboard are needed. It interferes with games and prevents you from using the system and applications in the usual way.
In reality, this is a very necessary mode created for people with disabilities. For such users, pressing combinations like Ctrl+Alt+Del at the same time may be a problem. Sticky keys create a delay during which Windows recognizes successive keystrokes as simultaneous keystrokes. Other users can disable this mode without harm to themselves.
Sticky keys mode can be removed in a few clicks:
- Windows 10
- Windows 8/8.1
- Windows 7
- Disabling via the registry
Sticky keys - how to disable them in Windows XP
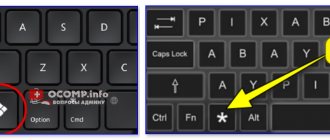
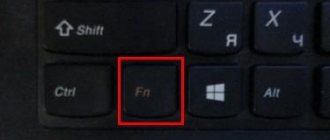
- First, we artificially call the sticking utility - press “Shift” 5 times in a row.
- In the next window we must click “Options” to go to the settings menu:
- Where you see information about sticking, you need to click the “Settings” button to go to a more detailed menu:
- In the next window, we once and for all (only if you do not want to use this special feature again) free the system functionality from being “stuck”:
- We confirm our intentions and close all windows.
We reboot and rejoice.
Keys sticking due to spilled liquid
Even a couple of drops of tea, coffee, or any other drink spilled on the keyboard is enough to cause the keys to stick. If you did not notice the moment when something spilled (or someone else did), you will still experience a problem during operation: the buttons will seem to stick to the base in the lower position and will not return well.
If this is exactly the picture of events that occurs, then the sticking is treated in the same way as with contamination: remove the button, clean all surfaces, return it to its place.
Attention! If you spill more than a few drops of liquid on the keyboard, immediately turn off and unplug the laptop. Water and drinks easily penetrate the device and can damage key components, rather than just cause the keys to stick. The optimal solution to the problem is to contact a service center, where specialists will properly dry and clean the gadget.
Sticky keys - how to disable them in Windows 7
- Go to the control panel:
- We select from the list the item we need, which provides settings for making it easier to work with the keyboard:
- In this window, we need to uncheck the boxes (if any) to enable sticking, voice switching, and input filtering.
- In order to completely remove everything related to sticking, you need to enter the “sticking settings...”:
- Here you can adjust the settings, this is a special feature, and also adjust sounds by pressing keys
Now you know how to disable Sticky Keys in Windows 7 and XP.
In the next part of the article, we will show you a way to disable sticky for NT systems such as Windows 8|8.1 and Windows 10. Since they are similar in the shell of the method for disabling this feature to simplify input, we have combined these three systems into one general category
Causes of Sticky Keys
Problems with the keyboard on a computer or laptop can be systemic or mechanical in nature. The software prompts the user to enable special functions when it is not necessary to hold down 2 keys at the same time. For example, “Ctrl” + “v”, to paste a copied file or text. In this case, you can first press “Cntrl”, and then “v”. The function may turn on automatically, but it is not convenient for everyone. Therefore, it can be disabled in the settings.
The device may stick due to mechanical damage. Which occur when:
- Liquid spills on the keyboard;
- Getting a lot of food crumbs;
- Long-term use and accumulation of large amounts of dust.
One button or most of the keypad may be stuck. Therefore, it is better to carefully respond to the state of the buttons during their operation.
Sticky keys - how to disable them in Windows 8|8.1
We would like to note that the first method of disabling sticking does not differ in any way from the method with Windows 7, so we decided to present for you a second, more convenient method for such systems, on how to get rid of sticking. What do I need to do:
- Go to the side menu:
- Next, go to “Settings” and in the menu that appears, select “Change computer settings.”
- Next, select the “Accessibility” item, and then the “Keyboard” item:
- Since we need to disable sticking, we need to make sure that the position of your sliders matches those in the screenshot.
Windows 8/8.1
In Windows 8 and its variants, sticky keys are removed in the easiest way - in a few clicks.
- Use the side menu (where Start is), select Settings .
- In the tab that opens, select Change computer settings.
- In the settings tab, go to Accessibility.
- Open the Keyboard .
- Find Useful Keys and turn Sticky Keys to Off.
You may need to restart your computer for the changes to take effect.
Sticky keys - how to disable them in Windows 10
With the release of the new operating system into the world, it became necessary to figure out how to disable sticky keys in Windows 10. This is quite easy to do - just follow the instructions.
So, first we need to get to the “Ease of Access Center”. To do this, you need to enter the appropriate query in “Windows Search”. After searching, you will be taken to the following window:
Next, you need to scroll down the window using the slider and find “Make the keyboard easier to use.” Click on this link and you will be taken here:
In this window, in order to disable sticky keys, you need to uncheck the “Enable sticky keys” checkbox. The auxiliary arrows point there.
That's it, after this you can use the keyboard as you wish and sticking will no longer stand in your way.
Sticky keys on a laptop due to dust or dirt
If the cause of a key sticking is dust or dirt, then even before trouble occurs, the movement of the buttons becomes less smooth and an unpleasant crunch appears. And they begin to bounce back, returning to their place, with a slight delay. As a result, these symptoms lead to the fact that some button gets stuck completely.
The reason is that the ubiquitous dust finds its way into the crevices of the keyboard. When exposed to temperature and humidity, it can turn into a sticky mess that prevents the keyboard from working properly. Food crumbs may also be the cause, as many people like to snack while sitting at the computer.
To fix this key sticking, you just need to clean it. At the same time, it’s worth cleaning the entire keyboard, since dust and crumbs usually clog the entire device.
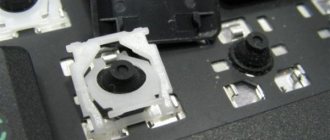
Before cleaning, the laptop must be turned off and then unplugged. If we are talking about a computer keyboard, you need to disconnect it from the system unit or remove the batteries if it is a wireless model. You can use tweezers or a small screwdriver to remove a stuck key. Each button is located on the elevator device, secured with latches. These latches are easily released if you pull the button up or pry it with a screwdriver, like a lever.
Using cotton swabs, napkins and alcohol, you need to carefully wipe all contaminated areas and the damaged button. If dust or crumbs are visible after disconnecting it, you should also gently blow and vacuum the device.
When cleaning is complete, simply place the key back in its original location and then press lightly until you hear a soft click, indicating that the retaining latches have engaged. If the key on your laptop is stuck due to dust and dirt, after turning it on you will get a fully working device. If the problem persists, you need to look further.
How to properly clean a laptop keyboard
If one or just a few buttons stick after crumbs or, for example, a drop of jam gets in, then it will be enough to simply “snap them off” and wipe the landing area with a cotton swab dipped in water. They are detached very simply - the keyboard itself is not dismantled for this:
- Using a flat screwdriver or a thin knife, pry up the non-functioning element and disconnect it from the seat.
- After cleaning the contaminated surfaces, the button is put in place by lightly pressing it until it clicks. If large elements such as space or “Shift” were dismantled, then special metal pins will need to be attached to special holders, acting as stiffeners.
You will still have to turn off the laptop and then disassemble it if the sticking is not the result of an accidentally falling drop of liquid, but, for example, a glass of sweet tea or lemonade spilled on the device. In this case, the conductive tracks on the polyethylene board will rot after some time, after which the input device will become unusable.
How to disassemble the keyboard for thorough cleaning
This procedure is not so complicated that you need to contact specialists. On most mobile computers, the keyboard is snapped on and removed first, so there is no need to do a complete disassembly. It is important not to forget to turn off the laptop and remove the battery before doing this. Disassembly is carried out as follows:
- Use a small flat screwdriver to pry out the very first latch from the edge;
- slightly lift the freed edge and do the same with the next fastening;
- After disconnecting the latches, remove the cable connecting the device to the system board from the special slot, holding only the plastic connector to avoid damage to the contacts.
Once the input device has been completely removed, you can begin direct disassembly:
- Using the previously described method, click off all the elements from it. Don't forget to take a picture of them beforehand so that there are no problems with assembly in the future.
- Next, you need to carefully remove all the plastic elevators to which the button pads are attached.
- Peel off the aluminum backing, after which you can proceed directly to cleaning.
This should be done with a damp soft cloth swab, or you can use a soap solution. You should not resort to using solvents or alcohol, since along with the contaminants, using these products you can accidentally “wash off” the conductive paths themselves, after which you will have to buy a new input device. Once cleaning is complete, reassemble the mobile computer in reverse order.
It happens that cleaning does not help get rid of the problem, and individual keys in games continue to stick. The most common cause is overheating of the laptop due to debris in its cooling system. This problem is solved by disassembling the mobile computer, cleaning the radiator, cooler, and other components of the device from dust. After this, new thermal paste is applied to the processor and graphics chip.
Physical damage to the buttons on the laptop
The keyboard is a fairly delicate device that can easily be damaged by incorrect actions. If a cat lays down on the buttons, you accidentally lean on the laptop, hit the surface, or simply awkwardly set down the bag in which you were carrying the gadget, the keys may become stuck due to physical displacement.
If the displacement is small, it is enough to simply remove the button and then return it to its correct position. But if after removal it is clear that the fastening element has broken off or the keyboard has become deformed, you will have to contact service. Depending on the keyboard model, repairs can be of varying complexity: replacing one button or the entire block.
Software sticky buttons
If the key is often held down, for example, during games or the laptop overheats, then software sticking may occur. You can disable it on your laptop. The easiest way to bring up the required menu is to quickly press Shift several times in a row.
If all the measures taken did not help eliminate sticky keys on a laptop or computer, you should not disassemble the entire device yourself. It is better to contact a professional service, where the craftsmen are familiar with the procedure for assembling and disassembling keyboards of different types. They will diagnose the problem faster and more accurately, and will also help solve it in a qualified manner.
Do you want to receive news regularly?
Leave your email and receive the latest articles from our blog. Subscribe so you don't miss anything
You have successfully subscribed!
Subscribe
0
(No votes)
What is Sticky Keys and why is it needed?
Sticky Keys mode was created to make computer control easier for people with disabilities, and for those who are unable to press several keys at once. The function itself is very useful, but not everyone knows how to use it.
Sticky Keys mode allows you to use the Shift, Ctrl, Alt, and Windows keys by pressing each key individually. Pressing the Shift key five times by default turns Sticky Keys on and off.