Sometimes, as a result of improper handling of the laptop or due to a strong impact, the keys fall out. While inserting it into place on a desktop keyboard is easy, it requires some skill. If you are not ready to put the key back in place yourself, then you should contact a service center. Specialists will be able to perform all the necessary actions within five minutes. And the cost of this service does not exceed 100 rubles.
How to insert a key in a laptop
The main reasons for replacing a key on the keyboard
They can fall out for several reasons. Here are the main ones:
- a strong blow to the laptop or keyboard;
- independent attempt to remove debris from under the buttons. As a result, some of them may fall out;
- excessive pressure on the keys while working with a laptop;
- liquid getting inside.
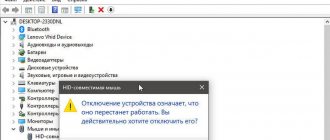
There are several options for keys not working. Depending on this, you should carry out repairs yourself or contact specialists. If the reason is a short circuit or damage to the cable, then you should definitely contact a specialist.
Before repairing, you need to assess the degree of inoperability of the buttons
Important!
The button has so-called antennae. If one of them breaks as a result of external influence on the keyboard, then it is necessary to completely replace the button. Otherwise, it will constantly crash. Replacement of the keyboard is required when the matrix is broken, as a result of which it is impossible to restore full functionality of one or more keys.
Working with large buttons
In the locations of the large buttons - spacebar, Enter and Shift, there are additional ears on the metal backing where the stabilizer frame is inserted. To insert such a key into a laptop, you first need to insert the antennae of the stabilizer into the ears on the backing, and then press the key a little so that the latches catch on the rocker. As in the case of conventional symbolic buttons, the key must be placed strictly parallel to the surface.
On some laptop models, the Enter button has a square shape with a protruding “appendage” - exactly the same as on a regular keyboard. In this case, two stabilizers are used at once, which complicates the installation process. When installing, you need to get the antennae into the ears on the substrate. To make the task easier: hold the button parallel to the surface of the keyboard and draw the antennae using a long thin object - even a regular toothpick will do.
What is required for self-repair
If you decide to insert the key yourself, then you will definitely need a needle and a paper clip or items that can replace them. If you need to make minor repairs, additionally take a soldering iron, knife, screwdriver, glue and small tweezers.
To repair a key you need a paper clip or items that can replace it
Important!
Incorrect actions may result in the need to completely replace the keyboard on your laptop. Therefore, if you do not have the skills to repair computer equipment, it is better to turn to specialists.
Installation procedure for regular square buttons
These tips will come in handy not only when cleaning the keyboard, but also if a key accidentally falls out. If the button falls out along with the rocker, then you must first separate these elements and first install the rocker itself. To do this, install it on the metal base of the keyboard and place the jumper first under the large one and then under the two small fixing lugs.
The button must be placed strictly parallel to the keyboard area, pressing slightly so that the latches on the button catch on the jumpers on the slide. If you insert the button on the laptop correctly, the rocker will rise along with the button under the influence of the membrane.
It may happen that 2 components of the rocker are disconnected from each other. To put them back together, insert one frame into the other, fitting the guides into the grooves. You need to act precisely, since the elements are very small.
What conditions must be met?
You can remove the old keyboard yourself and install a new one. To do this, you will, of course, need a new component, a Phillips screwdriver and a spatula/flat-head screwdriver with a thin edge (so that you can carefully pry off the keyboard).
However, first, remember whether your laptop is under warranty. If so, if you open the laptop, you will lose it. In this case, simply return the device to your manufacturer's service center or to the store where you purchased it. They will have to change everything or give you a new device.
The exact model of the keyboard is on its back side
The new keyboard can be ordered online. An important condition is that it must be designed strictly for your laptop model and its hardware version. Otherwise, the device may simply not work on your PC. Look for a keyboard model with the exact name of your laptop (absolutely all letters and numbers in the names must match).
Before removing the keyboard, turn off the PC completely, disconnect it from the power supply and remove the battery. In some cases, to remove the battery you will need to remove the general back cover of the laptop.
Key repair
The repair procedure depends on the laptop model. Some require more tools, while others require more experience. To disassemble the keyboard of Asus, Acer and Lenovo laptops, you only need a thin tool - scissors or a knife. If we are talking about Dell and HP, you will need glue for plastic.
The repair procedure generally looks like this:
- Disassembling the keyboard panel.
- Cleaning from dust and debris.
- Reassembling the panel.
Repair instructions for keys for an Asus laptop:
- Turn off your device.
- Using a knife, pry the lid off the side.
- Remove the plastic cover.
- Using scissors, pry the swing with the spring until it comes out.
- Clean up the space.
- Put the swing with antennae back. It is recommended to start inserting from the bottom hook near the film.
- Place the lid on top of the cross-shaped swing. Press until you hear a click.
- Check the functionality of the keys.
The manual for HP and Acer is similar:
- Make sure your laptop is turned off.
- Use a knife to pry the plastic cover off the side.
- Remove the rectangular panel that replaces the swing. It is recommended to pry from the side.
- Remove the spring element until it falls out on its own.
- Clear the space.
- Use glue in the middle to secure the spring element. This approach works if the spring is made of rubber.
- Secure the socket on top until you hear a characteristic click.
- Secure the plastic cover to the panel.
- Check the functionality of the keyboard panel.
Note! Lenovo's large buttons are removed from the bottom side, since their springs consist of rubber elements.
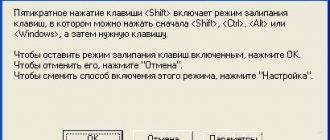
How to disable Windows 7 hotkeys?
Right-click on the DisabledHotKeys parameter and select Edit. Next, you need to enter the characters used in the Windows hotkey combinations that you want to disable.
Sources
- https://nastroyvse.ru/devices/laptop/vklyuchit-otklyuchit-funkcionalnye-klavishi-v-noutbuke.html
- https://ipt-miit.ru/smart-tv/kak-vklyuchit-knopku-fn-na-noutbuke-sovety-polzovatelyam.html
- https://konsultm.ru/kak-na-noutbuke-sdelat-klavishi-f1-f12-bez-fn/
- https://reedr.ru/elektronika/noutbuk/kak-otklyuchit-knopki-f1-f12-na-noutbuke/
- https://exadmin.ru/kak-na-noutbuke-otklyuchit-goryachiye-klavishi-f1-f12/
[collapse]
Instructions for replacing an entire keyboard for different brands of laptops
The course of action will differ not from the brand of the laptop, but from its model. Different laptops use different methods of attaching the keyboard, even within the same company. The removal process consists of three stages:
- unscrew the keyboard bolts under the back cover;
- pry off the keyboard from the front side with a screwdriver;
- disconnect the cable.
Now about each step in detail. If some actions are unclear to you specifically for your laptop, find a video on the Internet on how to analyze your particular model.
Unscrewing the bolts under the rear cover
Everything needs to be done very carefully, without sudden movements, since all the components of the “laptops” are fragile.
What do we do first? We turn the laptop over and unscrew all the bolts that hold the back cover using a small Phillips screwdriver. Be careful not to lose the bolts. We remove the cover and find three bolts that hold the keyboard on the back. We unscrew them and turn the laptop over.
There may be three bolts holding your keyboard on the back - they need to be removed
How to pry off the keyboard itself and, in fact, remove it
Inspect the keyboard - check for small latches on the top and sides. If they are, we do this: push each of them in turn with a screwdriver or other sharp object and slowly lift each part.
Press the latches to remove the button panel
If there is a plastic panel above the keyboard, but no latches, you need to remove it first. Carefully pry one end of the panel and lift it up. Do the same with the second edge. Unscrew the bolts at the top and disconnect the keyboard.
Remove the top panel and unscrew the bolts
If there are no latches or panels, you need to start carefully prying the keyboard through the cracks.
Sometimes you just need to pry off the keyboard panel with a screwdriver
If the “keyboard” is built into the panel of the “laptop” (the entire front part of the case along with the hole for the touchpad), it must be removed entirely. Be careful: this panel is also connected to the motherboard with a cable. From the front panel you already disconnect the panel with buttons and install another “keyboard”.
In some cases, you need to remove the entire front panel at once
When you slightly lift the keyboard up, do not pull it out abruptly - at the back there is a cable, a film that connects the motherboard to the “keyboard”. Slide it forward a little with the top side so that the back part comes away. Now you need to disconnect the keyboard cable.
Disconnecting the cable
Find the clip that holds the ribbon cable. Open it and carefully remove the film. On the back of the keyboard there will be the name of its model. It must match the one you have already purchased.
Remove the cable from the clip
Now you need to install a new “keyboard”. To do this, follow the same steps, only in reverse order:
- Connect the cable to the motherboard using a clamp. Insert the cable into the clip evenly and all the way, without damaging it, and close the holder.
- Insert the lower part of the keyboard into the grooves. It should be at an angle.
- Lower the button panel and secure it (clicks should be heard).
Video: how to change the keyboard on an Asus laptop
Button and its design
Before inserting a button into the laptop keyboard yourself, we recommend that you become familiar with its design. This will help you carry out repairs correctly, as well as make installation easy and simple. It should be remembered and taken into account that, unlike a stationary one, a laptop keyboard has a shorter stroke.
They consist of:
- directly the lid with latches - a rectangular piece of plastic that is pressed with your finger (hereinafter simply “lid”). On the inside there are two pairs of fasteners: latches and grooves, and on the long ones there is also a metal stiffness stabilizer;
Photo: inside of the lid
Photo: folding X-shaped mechanism
A typical keyboard base in a laptop is an aluminum plate, stamped with ears for good fixation of the clamshell and the contact pad, under which there are three layers of film with conductive graphite tracks.
Photo: keyboard base
Reliable fastening of the swing ensures uniform movement and the absence of distortions when pressing the key.
Please note that different manufacturers may have slight design differences in the shape and types of clamps.
Therefore, if you need to disassemble it yourself for the first time, proceed carefully.
Inserting a button on a laptop is very easy
First, we carefully inspect all fasteners, ears, antennas and grooves again. If you have carefully studied the device and design, and familiarized yourself with the disassembly procedure, then putting the missing element in place will not be difficult.
This process consists of two simple steps:
- With light pressure, we fix the lid on the clamshell (a slight click is heard), which we attach with an ordinary paper clip in the raised position.
- install the folding mechanism on a metal base - screw it under the large one, and then, pressing lightly, onto the 2 small ears;
Please note that sometimes the lid falls off along with the swing. In this case, it should be disassembled, repaired and only then installed. Next, we first insert the folding mechanism, and then the lid itself.
The process described may seem complicated, but you just need to try it once and you will see for yourself that inserting a button into a laptop keyboard is very simple!
Disassembly procedure
Situations often arise when it becomes necessary to completely remove and disassemble the button. For example, sagging, lack of response of the screen when pressed, or deformation of the ears of the clamshell attachment. Removing, disassembling and inserting a button into a laptop keyboard is quite simple.
To do this, you will need a thin, flat tool, such as a dental hook. As you know from the previous section, the swing is attached to the lid in four places. You cannot simply fold it and “tear it off” - this will deform the swing and lead to damage.
So:
- First, we insert the tool between the cover fastening elements on ONE part of the lift and, turning it a little along the axis, break it off. Then we lift and disconnect the second half in the same way. When the mechanism is raised, you can see that the upper attachment points are movable and the lower ones are fixed. It is convenient to start removing the swing from the fixed supports;
- remove the folding bed from the base. There are some minor design differences between different manufacturers and depending on the year of the laptop itself, but generally the mechanism feeds forward into one of the release clasps. A regular needle will provide quick and easy removal;
- if necessary, the spring is removed, the base ears are inspected or repaired, and additional dust removal is carried out.