In the event of serious problems with Windows 7, for example, after critical errors occur due to a faulty hard drive or failures as a result of infection with malicious applications that damage system files, it is impossible to restore its normal functionality using standard means of the OS itself. Below is a guide with detailed descriptions of instructions on how to restore Windows 7 through the BIOS.
Quick Windows system recovery
Instructions for quick recovery of Windows 7 and 10, via the command line, BIOS or from a flash drive.
Some users in their lives are faced with the need to restore the Windows system. In this article we will look at what system recovery is, how to do it and all the additional points on this issue. Content:
What is it for? System Restore can help if your computer stops working properly. This condition is caused by the installation of virus software that makes changes to the PC registry or by inept/harmful actions of the user himself.
When might a system restore be necessary?
Windows system recovery is the process of restoring the state of the OS, files and programs on the computer to the point when the problems began. Sometimes the user misunderstands the meaning of system restore and means by it returning a previous version of Windows. For example, from windows 8 to windows 7. In fact, when restoring the system, its version does not change.
There are many ways to “breathe life” into your operating system, but we will look at 2 of the simplest Windows system rollbacks:
What problems arise
When activating the Windows rollback process on a personal device (desktop computer or laptop), various difficulties may arise. The average processing time for information is two hours. If the operation is delayed, it is necessary to check the functionality of the files used (the operating system itself, the recorded image, the selected status points).
BIOS is the main element of the operating system, setting the order of operations and ensuring the interaction of elements of a personal device. Rolling back the OS to the previous version helps fix some errors and malfunctions of built-in files and applications.
How to run (enable) system restore?
It is worth noting initially that Windows 7 system recovery can only be performed if the recovery function (service) was launched earlier, before problems occurred. If it was not enabled, then you can only rollback using the Windows boot disk.
To activate the Windows Recovery service, you need to go to the “Control Panel”, this can be done from the “Start” menu. Next, look for an icon called “System Restore”. Next, click on the tab called “Start recovery”, the system will give us a message - the recovery service is disabled and will offer to activate it.
Typically, the first time you start Windows, a restore point is saved, even if the restore feature has been disabled. To view a list of your recovery points, you need to click the “View other recovery points” button.
If this function has already been launched previously, then we can immediately begin launching the system recovery procedure. Click “start system restore”, select a restore point, click “next” and “finish”. The recovery process has started, as soon as it is finished, the computer will restart, after which you can start working.
What to do if system restore doesn't work?
The most common problem is that the recovery service is not enabled. How to activate it is written above.
Of course, the possibility of its complete inoperability cannot be ruled out. Very often this can be found if a non-licensed version of Windows is installed.
Restoring settings using hotkeys
In order to return your laptop to factory settings, you should remember several hotkey combinations. When the system boots, you should press hot keys to access the BIOS Setup menu, from where you can start the process of restoring parameters.
Photo: hotkeys
Depending on the computer manufacturer, hot keys and their combinations differ:
- Toshiba - depending on the model F8, or 0, or Fn+0;
- Sony - F10;
- Acer – Alt and F10 at the same time;
- HP, LG and Lenovo – F11;
- Samsung – F4;
- Fujitsu - F8;
- ASUS – F9;
- Dell - both Ctrl and F11, but in some models F8;
- Packard Bell - F10. If you have Windows 8 installed, you can use the power button when you log in. You should hold down Shift and at the same time select the “Reboot” menu item;
- MSI – F3, and on some models F11.
Is it possible to restore a system without a restore point?
Most likely, you have already gone to the system recovery center, activated the recovery service and discovered that there is no backup point - which means you cannot choose which state to roll back the system to. Don't worry, your system can still be restored!
System recovery without a restore point can be done using the command line. It is recommended to strictly follow the instructions so as not to break anything. We will look at how to perform a system rollback using the command line below.
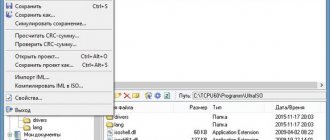
By the way, it is not necessary to use a disk; you can restore the system from an image by first recoding it and recording it on a flash drive.
How to restore Windows 10 from a flash drive or disk
This method is one of the most effective; first you need to create a bootable USB flash drive with Windows 10 on board, according to the video instructions presented below.
Important: The version of Windows on the bootable flash drive/disk must be the same bit size as the one you want to restore!
Next, we connect the flash drive, boot from it and begin installing Windows 10. As soon as the system loads all the system files and the installation menu appears, you need to select “System Restore” and follow the suggested scenarios (depending on your situation).
Method 7: There are two operating systems
This method helps when you have two operating systems, but a completely different one is loading. There may also be problems loading both, especially after installing the second OS. We will now try to make both OSes active so that you can select them when booting. Again, through the bootable USB flash drive, go to the console and write magic spells:
Bootrec /ScanOs Bootrec.exe /RebuildBcd
After this, the system will offer to write both systems into the boot menu. In both cases, you need to enter the usual letter “Y” into the console and press “Enter”.
Before exiting with the “exit” command, enter one more command:
It will help revive some BOOT modules.
Windows OS recovery programs
If your operating system is not completely dead, i.e. it still loads and works somehow. Or, for example, the system recovery tools built into Windows do not help - try using special Windows recovery programs, such as: 1. Windows Repair - a program that will help you both restore the OS (registry, boot areas, access rights) and scan your PC for viruses and errors in files. 2. Acronis True Image - this software is focused mainly on backing up files, logical drives (partitions), but Acronis can also restore Windows and even Mac OSes.
How to restore the system via BIOS?
The huge advantage of this method is the successful recovery of the system even in the most difficult cases, the main thing is that the computer or laptop turns on.
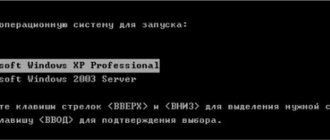
We reboot the PC again, the Windows installer should now start. Often, when booting a PC, a message in English pops up, which requires you to press any key to start booting from the disk. If you do not do this, the computer will continue to boot after 10 seconds in normal mode from your HDD, and not from a bootable flash drive/disk as we need.
So, we booted from the disk and now select “System Restore” in the installation menu and click “Next”. After this, you will have to select a restore point; it is best to use the first successful launch, but the programs you need may not have been installed there yet.
Those. you will lose programs (and the data in them) that you installed after creating a restore point. Click “Next” again, the system will now be restored. When the process is complete, click “Yes, ready.” We reboot the system, first removing the disk/flash drive from the drive.
System Restore via Command Line
This method is recommended if there is no system restore point. Again, we need a boot disk with the Windows operating system. Exactly the one installed on the computer.
You can view the OS version by right-clicking on the “My Computer” icon and going to the “System” tab.
If you have a system restore point, then you just need to boot into command line mode (to do this, press the F8 key when loading the OS and select “Boot in safe mode with command line support”). Then enter the command “rstrui” and follow the instructions.
1. If the boot sector of your OS is damaged. Enter “fixboot” in the command line, press “Enter”, then enter “fixmbr” and press “Enter”. That's it, your windows boot sector has been restored, you can restart your computer as usual.
2. If the boot.ini file is missing. Enter “bootcfg /rebuild” in the command line and press “Enter”. We answer all possible questions of the system by entering “Y” and pressing the “Enter” button.
3. If your config in the system32 folder is damaged. Insert the disk with your version of the operating system into the drive, enter “cd repair copy SYSTEM C:\windows\system32\config” in the command line, press “Enter”, you’re done!
4. If the “ntldr” or “ntdetect.com” files are missing and the system displays messages like: “NTLDR is missing when loading Windows.” Enter in the command line “copy J:\i386\ntldr C:\”, press “Enter” (Where J is the letter of the important drive, and C is the letter of your system drive on which your OS is installed).
If you do not want to restart your computer, you can restore the system via the command line from Windows. We insert the disc into the DVD-ROM, and the computer must be booted. Now you need to launch the command line. To do this, in the “Start” menu, click “Run” or press the “Windows + R” hotkey combination.
Enter the following value there: “sfc /scannow”, click “Ok”. After this, all broken system distributions will be copied from the boot disk automatically. System recovery and rollback are quite quick and trouble-free.
What is the difference between system recovery on laptop brands: Asus, Acer, Lenovo, HP, Sony, Samsung, Toshiba, Bell, Dell, Vaio, etc.?
I would like to note that there are no serious differences here. There may be different versions of BIOS, but the intuitive interface and tab names are preserved. There shouldn't be any problems with this.
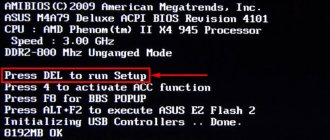
The second point is the BIOS entry key; they differ between these manufacturers. But this is not a problem either, you can see what you need to click in the picture that appears when loading.
Error 0 xc 0000022 during system restore
Sometimes after a system rollback, when you first start a laptop or computer, a message appears with this error - this means that the recovery was not completed successfully and strongly recommends trying again with a different restore point.
Try restoring to a different, earlier restore date. If such an error still appears after this, then the problem is much deeper. This means that the problem is a virus in your system that has corrupted the system restore point information.
To restore a system with error 0 xc 0000022, use the command line method. In this method, these restore points do not play any role. After all the files have been restored and you have checked the system for functionality, you need to delete all existing restore points from the computer and make a new one that you can count on in the future. You can perform such manipulations through the “System Restore” menu in the control panel.
3 more useful articles:
A special style for Windows XP is used by users to decorate their desktop or...
A program that checks the strength of system user passwords. This utility is used by network administrators to calculate users with...
54 comments
I downloaded an antivirus, the computer scanned and additional software to improve performance, and it stopped working completely. When you turn it on, a frame appears asking whether it can be fixed through the BIOS without a disk.
Hello Acer laptop, recently the laptop started to reboot and gives a blue screen. I want to open the recovery system, I click on open recovery service - then the laptop loads the screensaver and freezes... that is, it does not go into the recovery system, thereby preventing you from selecting the last configuration point. I tried to log in through other services - safe mode - reboots and goes back to the screensaver. I choose with the command line, it still reboots and so on for all available commands. The BIOS opens smoothly.
Stas, perhaps the reason is not in OS Windows, maybe the laptop simply started to overheat, try cleaning the laptop from dust. If it doesn't help, reinstall the system.
Actions in BIOS
- Once you get into the BIOS, you will need to find a menu called “1st Boot Device”. Having selected this line, you must press the “Enter” key.
- Then, in the menu that appears, select your CD-ROM (it may be signed with the manufacturer’s brand).
- After the CD-ROM is installed in the “1st Boot Device”, all that remains is to press the Esc key (the top leftmost key). And press the “Y” key (save changes).
This will automatically reboot the computer and then boot from the boot disk. This process can even be determined by ear, because the optical disk will begin to spin, but it still does not know how to do this silently.
What you need to start recovery
It is impossible to perform a “System Restore” purely through the BIOS, so you will need installation media with the version of Windows that you want to “reanimate.” It will have to be launched through the BIOS. You also need to make sure that there are special “restore points” that will allow you to roll back the settings to a working state. Usually they are done by the system by default, but if none are found, then “System Restore” will become impossible.
You also need to understand that when carrying out the recovery procedure, there is a risk of losing some user files or disrupting the functionality of programs that were recently installed. In this case, everything will depend on the creation date of the “Restore Point” you are using.
Method 1: Using installation media
There is nothing complicated in this method and it is universal for almost all cases. You only need the media with the Windows Installer correctly written on it.
The instructions for it look like this:
On our website you can also learn how to create a restore point on Windows 7, Windows 8, Windows 10 and a backup copy of Windows 7, Windows 10.
If you have Windows 7 installed, then skip step 5 from the instructions and click directly on “System Restore”.
Method 2: "Safe Mode"
This method will be relevant if you do not have media with the installer for your version of Windows. The step-by-step instructions for it are as follows:
On our website you can learn how to enter “Safe Mode” on Windows XP, Windows 8, Windows 10, as well as how to enter “Safe Mode” through the BIOS.
To restore the system, you will have to use the BIOS, but most of the work will be done not in the basic interface, but in “Safe Mode” or in the Windows Installer. It's worth remembering that restore points are also vital for this.
Source
Saving a copy (backup)
The user is recommended to take care in advance of creating a copy of the system so that, if necessary, you can quickly restore Windows through the BIOS. For this purpose, Semerka has a function for archiving the OS image.
Note: this method is only suitable for users with a system pre-installed on the computer by the manufacturer, otherwise it is necessary to use external installation media with the Windows 7 distribution kit.
The following sequential steps must be taken:
- Click “Start” and enter “Control Panel”;
- Next, go to the “System and Security” section;
- Open the “Backup and Restore” tab;
- Click on the link “Create a recovery disk”;
- In the menu that appears, it is recommended to specify an external storage medium for saving the image, for example, a USB flash drive or DVD;
Note: the archive size is often several gigabytes, so you need to use media with a memory capacity of at least 4 GB.
- Wait until the creation of a copy of the operating system image is complete and click on “Ok”;
- Ready. Now the user has an image, using which he can always restore Windows 7 through the BIOS.
How to restore Windows 7 via BIOS - system rollback step by step
Often, personal computers and laptops refuse to start the operating system due to their own errors or due to failures that could occur in Windows itself. One of the most common problems that every more or less experienced person who has been using this OS for a long time has encountered at least once. The cause of the failure may be viruses or Trojans entering the operating system, damage to the boot sector of the disk, or deletion (change) of files in the system directory. Sometimes the only way to restore Windows functionality is BIOS. It is necessary to understand how the Windows 7 system is restored through the BIOS and what methods can be used to implement this.
Error 0000000 occurs
Sometimes, during recovery or immediately after the operation is completed, an error with code 0*000000 may occur.
Its different variations can be supplemented by other identifiers, for example, 0*c0000034 or 0*0000007b.
Fig. 15 – example of an error occurrence
The occurrence of a problem informs the user that the system was unable to access the read procedure from the bootable media.
Since the error appeared in an already installed system immediately after it was restored, we can say that its cause is a problem with the drivers.
Most likely, after the recovery procedure, the operating mode of the system disk was changed from IDE to AHCI, so the existing drivers were not suitable for booting the OS.
You can solve the problem by disabling AHCI through the BIOS:
- Turn off your computer and open the BIOS menu;
- Go to the CMOS settings tab and select the SATA serial interface configuration item, as shown in the figure below;
- Press Enter and select the IDE option in the pop-up window;
- Save the settings, exit the BIOS and restart the computer.
Fig. 16 – switching SATA modes in BIOS
After turning on again, the system will complete the recovery and will work without failures.
Thematic videos:
System recovery Windows 7 and XP
This video tutorial will tell you how to perform a system restore in Windows 7 and XP, and in what cases you need a system rollback
Bogdan Vyazovsky
“We live in a society where technology is a very important part of business, our daily lives. And all technology starts with sparks in someone's head
The idea of something that didn't exist before but will one day be invented can change everything. And this activity is generally not very well supported."
How to restore Windows 7 via BIOS: about how BIOS works and when it should be used
BIOS, which stands for Basic Input and Output System, is a set of firmware that allows you to set a series of instructions for the hardware of a personal computer in order to start them and begin activating the operating system. It is the BIOS that allows you to accurately determine the sequence of actions of a personal computer after it is turned on: what it needs to do, what components to use and which sector of the hard drive to look at.
BIOS helps to return the computer to normal state
Physically, the programs are located in a special chip located on the motherboard. The software waits for instructions regardless of whether the personal computer is turned on or off. A special battery, which is located near the microcircuit, is responsible for this. It is this that allows you to control the progress of the system clock and date, which do not go astray even if the PC or laptop is turned off for a long time.
It is recommended to use BIOS only for experienced users who know how to work with it and have done this more than once. It allows you not only to set a number of important settings for launching the Windows 7 operating system, but also provides access to the processor, RAM and other hardware, allowing you to increase their technical characteristics (overclock them).
Important! Regarding OS startup, BIOS can help determine the media from which authorization will occur, as well as indicate the priority of boot drives (hard drives, CD drives and Flash drives).
It is recommended to work in this environment only if a person cannot start his operating system in any other way. If there is a failure in Windows 7 that simply does not allow you to go to its desktop interface, then all you have to do is boot from another medium via the BIOS and solve the problem.
Setting priority for launching from other media
Reset on laptop
While it is quite easy to disassemble the system unit, you may encounter some difficulties when resetting the BIOS on a laptop. It's good if you can go into the BIOS and restore the default settings by selecting the appropriate mode in the “Exit” section. If a password is set on the BIOS, you will have to disassemble the laptop. Turn the laptop over so the back is facing you. Look to see if there is a small hole on the laptop labeled "CMOS".
If found, insert something sharp into the hole - for example, a paperclip. Wait for 30 seconds to reset the BIOS settings on your laptop. If there is no hole, you will have to remove the back cover and look on the motherboard for the CMOS battery or JCMOS pins.
- Disconnect the laptop from the network, disconnect the connected devices (mouse, speakers), remove the battery.
- Remove the back cover (on some models it is enough to remove the protection of the RAM and hard drive).
- Remove the RAM sticks and hard drive.
Under the RAM strips there should be two contacts that are labeled “JCMOS”. They need to be closed with a screwdriver.
Next you will need a little dexterity:
- Connect the power cord to the laptop (no need to insert the battery).
- Turn on your laptop. Wait 20-30 seconds. All this time the contacts must be closed.
- After 30 seconds, turn off the laptop.
Now you can insert the RAM sticks and hard drive into place and cover them with the protective panel. After these difficult manipulations, the BIOS settings will be reset to factory settings.
On some laptop models, instead of two contacts on the motherboard, you can find three pins with a jumper or a special reset button.
To avoid the hassle of finding a suitable element, read the laptop manual, everything is described in detail there.
Recovery using BIOS settings: boot disk to begin the recovery procedure
Before performing any operations with an operating system that does not want to start, you need to configure the BIOS and create a boot disk (using a CD or DVD) or use a specially configured flash drive. How to configure the boot priority of the Basic Input and Output System firmware interface will be discussed later, but now it’s worth talking in more detail about bootable media.
A bootable or installation flash drive is a special medium with an image of the Windows 7 operating system (HP, 8, 10, etc.), which is intended for restoring the OS, correcting errors and a number of other actions. It allows you not only to use standard installer tools, but also launches the command line or gives access to other important functions. These include checking the disk and analyzing the integrity of system files.
System recovery: connecting the device and starting recovery
Once the BIOS is configured, you can begin recovery. To do this, insert the drive into a USB port or disk drive. It all depends on its type. Once this step is completed, go to your personal computer or laptop and turn it on. If the settings have been made correctly, the boot will begin not from the system disk with the operating system, but from a flash drive or disk with an image of this OS.
Important! After some time, an installation window will appear in front of the user, prompting you to reinstall Windows 7. There is no need to do this, since you just need to restore the system. To do this, find the “Recovery” item and select further actions based on the type of problem.
Selecting “System Restore” in the Windows 7 installer window
Uninstalling updates
It happens that the cause of incorrect operation of the OS is incorrectly installed patches or updates. Using built-in tools you can easily get rid of them.
- In the Start menu, look for a program called Windows Update and launch it.
- In the lower left corner of the window that opens, click on “Installed updates.”
- A list of all update files will open in front of you. If you know which update caused the failure, you can remove it using the corresponding item that appears when you right-click. After this, don't forget to restart your PC.
If you are not sure what exactly caused the operating system to become inoperative, then it is better not to touch the patches, much less delete them all. One of the most common signs of an incorrect update installation is error code 0x80070002 .
System recovery via BIOS
BIOS is a basic information input/output system, in other words, a chip that allows you to start a computer even if there is no operating system installed on it. The BIOS stores the basic configurations of the computer and allows you to change them in a special system menu. Among these configurations are those that are necessary to successfully launch an operating system recovery.
If restoring the operating system using built-in programs is impossible due to the inability to start it, recovery through BIOS comes to the rescue. Using this method, your main files will be saved, and the computer will be able to start successfully again.
Recovering the system using BIOS settings
To begin recovery, you must have a boot disk with Windows preinstalled on hand. Alternatively, you can use a bootable flash drive.
Attention! The SETUP system menu stores configurations that are best not changed by an inexperienced user. Changing settings without knowing their functions can lead to improper operation of the computer and, as a result, irreparable damage.
Step 1: Setting device boot priority in BIOS
The external interface version of such a menu may be different, depending on the brand of the motherboard installed in the computer. Accordingly, the key combination for entering SETUP will also be different. So, for example, for HP laptops this will be the F10 key. Mostly on desktop computers, “Delete” is used, as in our version:
Stage 2: Recovering the system using a boot disk
This completes system recovery using BIOS. If you do not have a bootable image of the operating system at hand, unfortunately, this recovery will not work for you. If both the boot image and the recovery checkpoint are missing, you will have to reinstall the operating system. All files located on the system disk will be completely destroyed in this case.
Note! To avoid losing files that are important to you in emergency situations, save them on a second logical drive, separate from the system one.
Never be lazy to copy the operating system image, at least once a month. One hour spent a month can save your valuable files and, most importantly, your nerves.
Source
Go to BIOS
If nothing happens after pressing it, you need to try pressing the F8 or F12 key after rebooting. And in order not to poke at random, it is best to carefully read the instructions for the motherboard that is on your computer - the login key should be indicated there.
In addition, when you turn on the computer, an inscription should flash, which will also indicate the key to enter the BIOS.