With the release of the new Windows 10 operating system, the developers added new account management functions and divided them into two types. The first type of accounts is online
, that is, Outlook accounts are used to log in.
The second type of account is local
.
This type of account is well known to everyone since the days of Windows XP. It was this confusion with the type of accounts that caused many problems when changing administrators. In this material we will describe in detail the process of changing administrator
, both for online accounts and for local ones.
Changing the local administrator account
To change the local administrator in Windows 10, you first need to create a new one
to then delete the old one.
So let's go to Control Panel
.
Start
menu icon and selecting the item we need in the context menu that appears.
In the launched Panel, go to the accounts section and select the “” link there.
In the window that appears, you will see the old administrator account, in our case the name “ User”
"
At the bottom of this window there is a button to add a new user
, clicking on which will take us to the OS settings section.
In this section you can add a new admin and remove the old one. To add it, click the “ Add a user for this computer”
" This action will take us to the New User Creation Wizard.
Since we are creating a local admin, we will skip the email entry point by clicking on the link “ I don’t have this person’s login information”
" This action will take us to the window for creating an online account for Microsoft.
To skip the account creation process, click on the lowest link in the wizard window, which will take us to the local user creation window.
As an example, let's write the name “ New Admin”
"and continue the work of the master. After these steps, a new local account will be created.
Now let's go to our users and select the name " New Admin"
».
In the next window we need to select the “”. This is necessary in order to change our account type from regular to administrator.
Therefore, feel free to go to this point and change the user type.
Having made our user an admin, we can now proceed to directly deleting the old user
.
Now you need to change users
.
Therefore, let’s log into the system under the admin, whose name is “ New Admin
”, and go to the list of our admins, selecting “
User
”. Now to remove the old user, select the “”.
After selecting this item, the system will offer us to delete all user data or save it. Therefore, be careful, if there is important information there, then save it.
We select one of the options in which we can delete or save files. After confirmation, the old admin will be permanently erased from the system.
From the example it is clear that creating a new and deleting an old admin is not at all difficult, although you will have to tinker a little.
Basic ways to switch profiles in Win 10
Each Windows OS user can change the active account if desired. There are several ways in which this can be done. It is recommended to familiarize yourself with the features of each of them in advance.
Most often, changing profiles in Win 10 is done through the login screen
From the login screen
This is the most common method and is used most often. All users, before logging into the operating system, see the login screen on the monitor. It is worth noting that this is where the created accounts for Windows are displayed.
By default, when you turn on your PC in Win 10, the last used account is loaded. However, if necessary, it can be changed to another.
All profiles available for downloading are displayed at the bottom of the screen in the left corner.
Switching from one account to another is quite easy. To change the profile you are using, you must:
- Select another user's name from the list.
- Click on it.
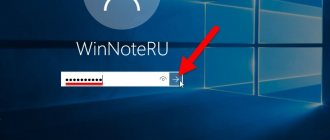
- A special text line will appear on the screen. You must enter your password (if you have one).
Also on the login screen, users can change how the operating system starts. To do this, click on “Login Options”. After this, authorization methods will appear on the screen. You can choose a login method using a password, a picture or a pattern.
If you only use one Win 10 account, you won't be able to switch between users. You will have to create other profiles and only then can they be switched.
To switch between profiles, you need to click on the account icon in the Start menu
On the Start menu
All versions of Windows OS have a Start menu. With its help, users can perform a huge number of different actions.
It is with the help of this menu that you can gain access to any files and folders. It also launches installed programs.
Some users do not know that using this menu you can also change the Windows 10 user.
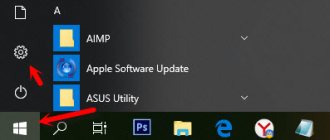
- First you need to open the Start menu. To do this, you need to click on the button in the form of windows on the taskbar located at the bottom of the screen. It's in the left corner.
- By clicking on it, the user will see that a menu will open on the screen, in which there are many different items.
- After Start is opened, you need to carefully examine the icons on the left. There should be an icon with the image of the current profile.
- You need to click on it, after which a list of available profiles for authorization will open.
- You need to click on one of them.
The screen for logging into the operating system will open. Here you need to enter your password and login, after which Win 10 will automatically load.
If the user has forgotten the password for his account, you can try to reset it through the operating system settings. To do this, you will have to log into the OS using another local profile with administrator rights.
To change the user in Win 10, you can use the Alt+F4 button combination
Via the keys “Alt+F4”
Few people know that there are special key combinations that can be used to switch between users in the Microsoft OS.
For example, you can use the Alt+F4 buttons to do this. This method can only be used if the person is already logged in using one of the accounts.
To perform an account change using this method, you must open your desktop. In this case, you need to make sure that there are no running programs on the screen. If there are any third-party applications running, you need to close them, as they may interfere.
After all programs are minimized or completely closed, you can begin changing the user. To do this you need:
- With an empty desktop, press the ALT+ F4 buttons simultaneously.
- After this, the “Shutdown” window will open.
- In it you need to select the “Completion” item and click on the “Change user” option.
- After completing the steps above, the login screen will appear. Here you can change your account to another one.
You must press the key combination on the desktop. Only in this case will it be possible to change the profile to launch the OS.
CTRL + ALT + DELETE - a keyboard shortcut that can be used to bring up a menu for changing an account
Via “CTRL + ALT + DELETE”
Some people believe that you can only use the ALT and F4 buttons to change the profile in Win 10. However, there are actually other hotkeys that are often used to select a different account. For example, you can use the keyboard shortcut CTRL + ALT + DELETE for this.
This method, like the previous one, is used only if the person is logged into the OS using one of the available profiles.
It is worth noting that this method of changing accounts is quite simple. You need to press three buttons at the same time. This will bring up a screen with several options. You need to click on the inscription “Switching users”.
Immediately after completing the above steps, the login screen will appear. Here you need to select the name of the account to switch to. The list of available profiles is located in the lower left part of the screen. You need to click on one of them and enter a password for further authorization in Windows.
Graphic password - often used in Win 10 to protect your account
Via "Windows+L" keys
Some users may find the above methods too complicated.
If you want to quickly change your account, it is recommended to use the Windows + L button combination for this. It is worth noting that this method is one of the simplest. It does not require launching additional menus and windows.
To switch between accounts using this method, you must:
- Go to desktop.
- On your keyboard, press the Windows and L buttons.
- After pressing this key combination, the user will automatically be logged out of the current account.
- A list of other accounts that can be used to further log into the operating system will appear on the screen.
- You need to click on one of the available profiles and click on the “Login” button.
- To log in, you will have to enter a password. If it was entered correctly, the desktop will open on the screen.
If you turn off the computer from an account that does not have a password set, then the next time you start it, the user will automatically log in to Windows using the same profile.
When prompted for a password for an image
Win 10 OS has a new authorization method - through a graphic password. This is an alternative sign-in method that you can use instead of entering your regular multi-character PIN.
It is worth noting that this method of protection is also quite effective. Cracking a graphic password is much more difficult than a regular one.
This method of protection is installed through the OS parameters. You need to go to the account settings section and open “Login Options” in it. Here you select the protection method and download the image that will be used during authorization. Then you will need to enter three gestures in the picture. They will have to be repeated every time the OS starts.
Many people are interested in how to change an account in Windows 10 when prompted for a password in the form of a picture. This is done in the same way as when using a regular PIN code. You must use one of the methods described above and select the desired account. Then you need to log in using the image and log into Windows.
CMD - can be used to bring up the lock screen and further change the profile in use
Changing the online administrator account
To change the Microsoft account, which in our case acts as an administrator, let's go to the same wizard discussed in the previous example.
In the wizard, enter your Outlook account email and click Next. These steps will complete the wizard, and the online account will be added as a new account. Now let's go to our online account and change its type, as in the previous example, to administrator.
After changing the account type, we need to change the user in the system
.
This is necessary in order to remove the old account. The further procedure is the same as in the previous example. Therefore, feel free to go to the Control Panel and disable the old account
.
The example shows that you can change an online user even faster than a local one.
I would also like to note to our readers that if you use an online Microsoft account in Windows 10, you will significantly expand the capabilities of this operating system.
Change your primary email address in your Microsoft account
All the steps that are required to change your login are quite simple, provided that you have not lost access to everything that may be required during recovery.
- Go to your Microsoft account in a browser, at login.live.com (or just on the Microsoft website, then click on your account name in the upper right and select “View Account.”
- From the menu, select Details, and then click Manage your Microsoft account sign-in.
- At the next step, you may be asked to confirm your login in one way or another, depending on your security settings: using an email, SMS, or a code in the application.
- Once confirmed, on the Microsoft Services sign-in management page, in the Account Alias section, click Add an email address.
- Add a new (outlook.com) or existing (any) email address.
- After adding a new email address, a confirmation email will be sent in which you will need to click a link in order to confirm that this E-mail belongs to you.
- Once you've confirmed your email address, on the Microsoft sign-in management page, click "Set as primary" next to your new address. After this, information will appear opposite it that this is the “Main alias”.
Done - after these simple steps, you can use your new email to sign in to your Microsoft account on company-owned services and programs.
If you wish, you can also remove the previous address from your account on the same account login management page.
Create a local user in Windows 10 using the console
First of all, let's launch the console
on behalf of the administrator.
You can do this by searching for Windows 10 and typing “ CMD
.”
Now right-click on the result found and select “ Run as administrator
” from the list.
Now run the command to create a new user whose name is " New_Admin_2"
” shown in the image below.
To change a regular user to an admin for a newly created account “ New_Admin_2”
", run this command.
The last action left is to delete the old admin
.
In our case, the name of this admin is “ Old_Admin
”.
To do this, log in to the system under “ New_Admin_2
” and open the console on behalf of the administrator. In the console, run the command shown in the image below.
After this, the account will be disabled.
The example shows that in Windows 10, using the command line, you can quite quickly both create and delete a local admin.
How to set a PIN to log into Windows
An account password must be pre-set.
In the system settings, go to the “Login Options” section...
...and just add a PIN code...
True, they will definitely ask you for your account password first...
As you can see, it can be complicated with letters and symbols.
Today we won two login accounts in Windows 10 and learned about a convenient PIN code that makes this procedure easier and faster.
To new useful computer programs and interesting applications for Android.
Let's sum it up
In most cases, changing the user is required for the correct functioning of some programs. For example, you need to execute a program that is bound to a specific user
and when running this program under a different name, an error occurs.
This error occurs because the program is trying to access the user's files from his folder
, but
the path to the directory does not match the one included in the utility
, since the name is different. This is one of many cases when you need to change the admin.
In our material, we looked at all the ways to change the administrator in Windows 10. Therefore, we hope that our article will help our readers complete this task.
How to enable user selection when booting windows 10
Messages: 2837
Thanks:
467
| Computer configuration |
| Motherboard: Asrock H77 Pro4/MVP |
| Video card: GTX 960 |
| Monitor: Dell U2312HM |
| [td]I use “Computer Management”, where I previously set them up and distributed the rights. » |
If there is already a checkbox, uncheck it, click apply (a window will appear asking you to enter your login/password - just click ok) and then check the box again and apply again.
Source
How to add an account?
Let's assume that someone else is using the computer besides you. Agree, it’s not very convenient when every “user” adds shortcuts to the programs that he needs for work or entertainment to his “Desktop”. Perhaps you don't like the screensaver your colleague or relative chose. In general, there are a lot of inconveniences. That is why, before learning Windows 8, it is recommended to learn how to create a separate account for each “user”.
So, swipe to the right area of the screen to bring up the Charms panel. Now head to Settings and then go to Control Panel. Here you are interested in the subsection with accounts. After going to it, go to the “Manage another account” item and at the bottom click “Add a new user”.
Now click the “Add account” button and go through all the registration steps one by one. This process should not cause any difficulties.
Changing your own account settings
Changing your own account is a little different from changing other users' accounts. Follow these steps:
- Go to "Control Panel". To do this, go to the legacy desktop, right-click the Windows icon in the lower left corner (or press Windows key + X) and select Control Panel.
- In the top right corner, select “User Accounts”, then “User Accounts” again. Windows gives you the option to change your account. If you want to change your password, picture, or family settings, you'll have access to the Windows Settings app. And from there, if you have a Microsoft account, you can create a link to Windows Live where your Microsoft account is located.
Most of the settings for your own account mirror those of other user accounts, as described in the previous article. If you have the only administrator account on your PC, you cannot delete your account and cannot become a regular user.
It makes sense: every PC should have at least one user with an administrator account. If Windows lost all its administrators, no one would add users or change existing ones, much less install programs or hardware.
Windows 8?
In fact, giving a different name to an “account” in Windows 8 is not as difficult as it seems. Of course, the algorithm of actions will differ from the same “seven” or Windows XP, but even a novice “user” should not have any difficulties.
So, in Windows 8, the following sequence of steps will help you change your username:
- Open “PU” and go to the “Accounts” section.
Select the “Change name” option.
Write your new name in the space provided.
The last step is to click the “Rename” button.
You have learned how to change your username on this operating system. Agree, it’s very easy. The whole process will only take you a few minutes.
By the way, the “Control Panel” can be opened not through the Charms Bar, but in a slightly different way. Call the “Run” utility and enter the phrase “control panel” there.
You can also use the search bar located on the Home screen. In this case, write in Russian - “control panel”.
How to remove username from Windows Welcome screen?
Displaying your account name on the Windows login screen is convenient for end users, but reduces the security of your computer. After all, an attacker who has gained access to a computer can only guess the password (for this there are various methods of social engineering, brute force, or a banal sticky note with a password on the monitor).
You can disable the display of the last username through a GPO. Open the domain (gpmc.msc) or local policy editor (gpedit.msc) and go to Computer Configuration -> Windows -> Security Settings -> Local Policies -> Security Settings (Computer Configuration -> Windows Settings -> Security Settings - > Local Policies -> Security Options). Enable the “Interactive logon: Do not display last user name” policy. By default, this policy is disabled.
Additionally, you can hide the username on a locked computer. To do this, in the same section you need to enable the policy “ Interactive logon: Display user information when the session is locked ” and select the value “Do not display user information” (Do not display user information).
This policy corresponds to the registry key in the same branch DontDisplayLockedUserId with the value 3 .
The login screen and Windows lock screen now display blank username and password fields.
Changing username in Windows 8: Video
Changing your account name using the Run service
First, let's start the required service. You can do this in three ways:
- Using the key combination Win+R;
- Using search;
- Through Windows 8 Explorer.
So, we launch the service and write “lusrmgr.msc” in it. Press "Enter". So you start a service to manage accounts. All accounts are displayed here and you can manage them all. The same service can be opened in Explorer by right-clicking on my computer and selecting “manage”.
In the window displaying all system accounts, select the one that needs to be renamed and right-click. Next, select “rename” and enter the desired name. Press “Enter” and close all windows. It is worth noting that this is the simplest and fastest method on how to rename a user in Windows 8.
However, you should be aware that the first method only changes the full name of the account. However, the login remains the same.
In other words, the login name remains the same as it was - only the name that is displayed on the welcome screen changes. Therefore, you need to choose one method or another depending on what goals you are pursuing. Now you know two methods on how to change your username in Windows 8.
You can switch users in different ways:
- From the Start menu, click your profile icon and select the user account you want to switch to from the drop-down menu.
- Press the keyboard shortcuts Ctrl + Alt + Del and select Change User.
- Press the Win + L key combination to go to the lock screen and select the user account you want to access.
- Using Task Manager (Ctrl + Shift + Esc), go to the Users tab and select the user account you want to access.
Run Service in Windows 8: Video
Change account on the official Microsoft website
In addition to the above methods, you can change your username on the official Microsoft website (https://go.microsoft.com/fwlink/?LinkId=91489). To do this, follow the link and log into your account using your registered email and password.
Next, on the “overview” page, you need to select “Change name” and enter the first name and last name that you want to use in the future. After that, click “save”. Close all windows and reboot the system.
A reboot is necessary because the new account name is displayed on the site immediately, but Windows 8 needs a reboot to synchronize. You will then see your new name when you log in.
These are three main methods that are available to everyone and do not require special knowledge. Which one to use is up to you.
Environmental change
Windows Hello is a big step forward in the Windows sign-in experience. Instead of one login “Hello, Kolya!” Microsoft is keeping all the login experiences you've known for years while rolling out various components of Windows Hello.
The initial release of Windows 10 in July 2015 only included Windows Hello Face ID for a small group of Win10 users who had dedicated cameras. Microsoft has also built some smart fingerprint reading capabilities into Windows Hello.
The November 2015 release of Windows 10 added features for enterprise desktop and Passport for Work, including the cloud-based Azure AD experience. The July (actually August) 2016 annual update added some basic iris scanning capabilities. The annual consumer and work update also dropped the Passport terminology, but not its functionality.
In future versions of Win10, expect to see more features added to Windows Hello. For example, Microsoft is heavily supportive of the Trusted Platform Module (TPM) chip that appears on all new Windows 10 machines. There is a detailed discussion of TPM on How-to-Geek at .
How to change the username on Windows 10: simple examples and related questions
Undoubtedly, many users sometimes have to rename user entries, for example, change the username. Examples of such actions will now be shown. True, you immediately need to pay attention to some important factors that may affect the ability to access documents.
Windows Account: What should you do first?
Before changing the name and type of “account” in the tenth version of Windows, you should be aware that such actions, especially if the user is working without administrator rights, can seriously affect access to some system functions or its settings. The fact is that even the documents of a former user may be inaccessible.
Therefore, first you should copy the necessary information from the user folder to another partition, and then create a restore point (just in case). For copying, it is better to select another volume (other than the system disk).
How to change username on Windows 10 in the simplest way?
Let's start changing the "account". First, let's decide what exactly needs to be changed - a Microsoft account or a local user name. We proceed from the fact that we still only need to change the name to others.
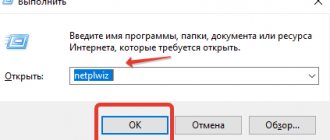
In order to solve the question of how to change the username on Windows 10, first you need to enter the “Control Panel”. The easiest way to do this is to use the control command entered in the Run menu. The latter is called by the shortcut Win + R.
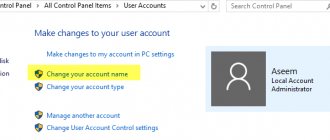
In the “Control Panel”, select the accounts section and click on the line just below, which prompts you to change the “account” type. Next, go to your local account. A name change line will appear on the left, after clicking on which you can enter a new one. Confirmation of the changes made is made using the rename button.
An equally simple way
So, in the first case, we changed the username. The examples given below are no less effective.
Here we need the “Run” menu, in which we should enter the netplwiz command. After that, in the main window, select the users tab and click on the name of the local user. There is a properties button at the bottom. When you press it, you can get the desired menu for changing the name. In addition, if anyone has already noticed, there is also the possibility of changing the local password. True, this method turns out to be ineffective. The fact is that you can change the password, but you can’t get rid of it. The system will still require it when entering or exiting sleep mode (hibernation), if one is provided.
Changing your account type
The question of how to change the username on Windows 10, it seems, has already been resolved. Now let's look at changing the "account" type.
To do this, in the same accounts section, you need to select the family and other users line on the left. All registration data will be displayed on the right. We select the local user type, and after entering “Change type”, set the administrator in the corresponding field. This is convenient in the sense that in the future you will be able to install programs, uninstall them, and change system parameters or settings, as they say, for yourself, without having to ask the administrator of the computer terminal for permission (of course, if there is one).
How to get rid of your password?
Now let's see how to remove the password when logging into Windows 10 or get rid of it when exiting hibernation mode. Let's start with the second one.
In this case, you need to use the power settings, which can be accessed either from the same “Control Panel” or by clicking on the battery icon in the system tray (for laptops). Here you simply select the password requirement item and set the desired value.
To remove your login password, you can simply delete your Microsoft account. But you can do it much simpler by using the same netplwiz command, after which, in the users window, the checkbox for the password requirement at login is unchecked. But in the new window you will need to enter the current password, twice (the second time for confirmation). After saving the changes, you will be automatically logged in to the system.
Conclusion
Of course, the answer to the question of how to change the username on Windows 10 is not limited to these methods. Here are the simplest methods. You can, of course, go into the system registry or the Group Policy Editor, but the question is: why is this necessary if there are the most basic solutions. The use of group policy rules is more suitable for system administrators who fine-tune the system and grant users rights to certain actions. Therefore, as is already clear, this issue was not considered. The average user, in general, does not need this. However, if you dig deeper, it is worth noting that starting from the seventh version, a super administrator also appeared in Windows. But you can’t just get rid of it using ordinary means. This will require certain knowledge and skills. But this is, so to speak, another question.
However, some users should take into account that issues related to changing accounts, both local and Microsoft, can have a rather negative impact on the system. There are known cases when, when renaming “accounts,” it happened that the login to the system was blocked. However, no recovery helped - only a complete or so-called clean reinstallation. So you need to be extremely careful with such things if you don’t want the system to snort at one point and then refuse to provide entry altogether.
fb.ru