Low-level formatting of a drive may be necessary for absolutely any user or organization. This formatting may be needed in the following situations:
- When transferring a storage device (flash drive, hard drive, etc.) to a third party;
- If the drive malfunctions, to restore it.
Low-level formatting is the simplest, but not always effective way to restore a drive. On our website you can read about hard drive recovery in other ways.
You may also be interested in our other articles about flash drives:
- How to create a bootable USB flash drive?
- What to do if the computer does not see the flash drive?
- How to recover deleted files from a flash drive or hard drive?
What is low-level formatting and why is it needed?
Low-level formatting is the process of completely physically removing data from a drive. Deleting a file using standard OS tools does not physically “erase” the information. The binary code sequence still remains recorded on the drive. “Removal” occurs only at the program level. Because of this, it is possible to recover “deleted” information.
Low level formatting is necessary for:
- Complete deletion of data from the drive without the possibility of recovery;
- Restoring normal functioning of the drive.
Application area
The procedure is used to solve the following problems:
removal of viruses and damaged files;
guaranteed cleaning of personal data (cannot be restored);
preliminary preparation for installing the operating system (before creating a bootable flash drive), thanks to which the OS will work more stable;
functional restoration of damaged sectors;
the drive refuses to work without formatting;
file reading errors;
for preventive purposes.
Many users are concerned about the question of how to do low-level formatting on their own. In this case, only highly specialized software will help.
How to low-level format a flash drive
One of the most common storage devices available to most users is a flash drive. Its widespread prevalence leads to the fact that almost every person is faced with a flash drive malfunction. Low-level formatting of a flash drive allows the latter to restore its functionality in many cases.
Currently, there are many ways to low-level format drives. It can be done either using built-in OS tools or using third-party software. The first option does not require the installation of additional software, and the main advantage of the second is simplicity. In addition, a wide variety of third-party software, both free and paid, allows you to choose a program specifically for your needs. To simply completely delete information from the drive, it is more logical to use the simple-to-function HDD Low Level Format Tool . If the ultimate goal is to restore the drive, it is more logical to use Victoria HDD or similar programs. It has great functionality for restoring and analyzing the state of the drive.
To perform low-level formatting of a flash drive, you must:
- Download and install HDD Low Level Format Tool;
- Connect the USB flash drive that needs to be formatted to the PC;
- Launch HDD Low Level Format Tool. When you start the program, a window appears asking you to buy this software. You can politely refuse by clicking “Continue for free”, or you can purchase a key. The functionality of the paid and free versions is identical. The only limitation of the free version is that the maximum formatting speed is 50 Mb/s. However, if you're using a USB 2.0 connector, that 50MB/s isn't achievable anyway;
- Select a flash drive or another drive that needs to be formatted in the list of devices, then click on “Continue”;
- In the drive window that appears, go to the “LOW-LEVEL FORMAT” tab and click on the “FORMAT THIS DEVICE” button;
- Wait for the formatting process to complete;
- After low-level formatting, you need to format the drive in the standard way, selecting the desired file system and cluster size parameters (leave it by default, the system itself knows how it needs it).
Low-level formatting of a flash drive can also be done in Victoria and on the command line. These formatting methods are described below.
Formatting a flash drive through computer control
Important! After formatting, all information from the flash drive will be deleted. It will be more difficult to restore it than before formatting (and sometimes even impossible). Therefore, if you have the necessary data on a flash drive, first try to restore it (link to one of my articles: https://pcpro100.info/vosstanovlenie-dannyih-s-fleshki/).
Relatively often, many users cannot format a flash drive because it is not visible in “My Computer”. But it is not visible there for several reasons: if it is not formatted, if the file system is “broken” (for example, Raw), if the drive letter of the flash drive matches the letter of the hard drive, etc.
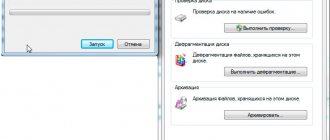
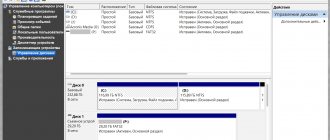
Therefore, in this case, I recommend going to the Windows Control Panel. Next, go to the “System and Security” section and open the “Administration” tab (see Fig. 1).
Rice. 1. Administration in Windows 10.
Then you will see the coveted “Computer Management” link - open it (see Fig. 2).
Rice. 2. Computer management.
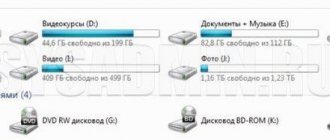
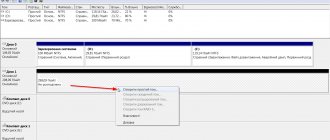
Next, on the left, there will be a “Disk Management” tab, which you need to open. This tab will show all media that are only connected to the computer (even those that are not visible in “My Computer”).
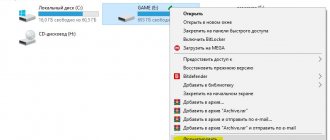
Then select your flash drive and right-click on it: from the context menu, I recommend doing 2 things - replacing the drive letter with a unique one + formatting the flash drive. As a rule, there are no problems with this, except for the issue of choosing a file system (see Fig. 3).
A few words about choosing a file system
When formatting a disk or flash drive (or any other media), you need to specify the file system. There is no point in describing all the details and features of each now; I will indicate only the most basic:
- FAT is an old file system. There is not much point in formatting a flash drive in it now, unless, of course, you are working with old Windows operating systems and old equipment;
- FAT32 is a more modern file system. Works faster than NTFS (for example). But there is a significant drawback: this system does not see files larger than 4 GB. Therefore, if you have files larger than 4 GB on a flash drive, I recommend choosing NTFS or exFAT;
- NTFS is the most popular file system today. If you don’t know which one to choose, stop with it;
- exFAT is a new file system from Microsoft. To simplify, consider that exFAT is an extended version of FAT32, with support for large files. Among the advantages: it can be used not only when working with Windows, but also with other systems. Among the disadvantages: some equipment (TV set-top boxes, for example) cannot recognize this file system; also old operating systems, for example Windows XP, will not see this system.
How to low-level format a hard drive
The hard drive is also a very common storage medium, and many users experience its inoperability. Low-level formatting of a hard drive , as well as other drives, is possible using OS tools and third-party software.
You can perform this type of formatting for hard drives in the HDD Low Level Format Tool. How to do this is described above in the section on formatting a flash drive. For a hard drive, all points of the above algorithm are identical.
Another well-known program that allows low-level formatting of a hard drive is Victoria. To perform this formatting in Victoria, you need to:
- Download the latest version of Victoria for Windows (4.47, 4.47 is the latest version);
- Launch Victoria;
- Select the hard drive you want to format from the list of connected drives. Go to the “Tests” tab;
- Select the diagnostic type “Write” and start formatting by clicking on “Start”.
It should be noted that the above actions in Victoria are not low-level formatting in its pure form. However, Victoria physically deletes the user's files, writing its data over them, thereby checking the health of the drive. “Low-level formatting” in Victoria is primarily suitable for restoring a drive.
Low-level formatting of a hard drive is also possible in the Windows command line. This method is described below.
Determine VID and PID for flash drive recovery
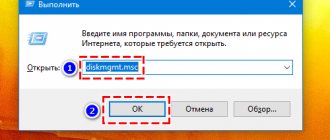
Insert the USB flash drive into your computer and launch Device Manager. Start – Run – mmc devmgmt.msc.
Then go to the Universal Serial Bus Controllers section.
flash drive in the list . Typically, all flash drives are called USB storage device.
Right-click on the device and open Properties.
Go to the Details tab.
In the drop-down list, select Device Instance Code or Equipment Codes (ID).
In this window we see PID and VID .
Low-level formatting via the Windows command line
Windows operating systems have their own tools for formatting drives. To perform low-level formatting via the command line you need to:
- Run command line as administrator;
- Run the console disk management utility with the command “ diskpart” ;
- Execute the commands sequentially:
- list disk. This command displays a list of drives connected to the PC. You need to find (by volume) the one that needs to be formatted and remember its number
- select disk X , where “X” is the drive number
- attributes disk clear readonly
- clean
- create partition primary
- format fs = xxxx , where “xxxx” is the file system. Instead of “xxxx,” you need to enter the desired file system, for example, NTFS.
- Wait until the drive is formatted and close the command line.
Cleaning media using third-party programs
Install any specialized program for formatting a flash drive . Let's look at examples of the most famous software.
HP USB Disk Format Tool
Download, install the tool and run as administrator. A window will open:
Select the USB drive (look by letter in the “My Computer” folder). Check the box next to “Quick Format”. It works somewhat faster than the method with deep cleaning and data deletion. Click “Start” and wait for the wizard to complete its work. If it doesn’t work, uncheck the box and repeat the process.
Easy Recovery
Easy Recovery is a multifunctional tool that can check the functionality of flash cards. In the menu, select “Dist Diagnostics” → “Test for potential hardware faults” (Drive Tests).
D-Soft Flash Doctor
You can use the D-Soft Flash Doctor program. The application interface looks like this:
Doctor allows you to scan micro SD flash drives for errors. Here you can restore the functionality of the storage medium. Any additional explanations are unnecessary. Select the desired flash card and enable the appropriate command. There is no official website of the manufacturer on the Internet, so you can find and download the software using a search engine.
EZ Recover
If the flash drive cannot be formatted , EZ Recover can help. The only limitation imposed by the program is the size of allowed flash cards. The application restores the functionality of flash drives up to 4 GB. Recovery occurs quite quickly - within 2-3 minutes. The program can be used for flash cards with formatting problems or those that appear in the device manager with a size of zero.
After the message appears, you need to disconnect the flash card from the computer and connect it again (the application will instantly recognize the removable drive). In the window that opens, enter the nominal size of the memory card (disc size). You need to indicate the number of megabytes specified in the drive initially (1GB = 1024MB of flash drive memory ). When the settings are determined, simply press the "Recover" key.
Well-known manufacturers of USB flash drives try to take care of their products and provide their users with the appropriate software. Kingston has released a convenient tool: a program for formatting a flash drive , Kingston Format Utility, Transcend - JetFlash Online Recovery. Alcor, A-Data, etc. have similar applications. To work with controllers from other unknown Chinese manufacturers, use the appropriate software. This will be discussed further.
JetFlash Recovery Tool
A proprietary utility from Transcend. An excellent choice for owners of USB devices from this brand, as well as devices from ADATA. Using JetFlash Recovery Tool, you can not only format flash drives, but also recover data on them. It will be especially useful if your flash drive contains unreadable sectors, it takes a long time for the computer to detect it, or information cannot be written to it. The utility is incredibly easy to use, and even a child can master it. There are only two buttons available on the start screen: to start the recovery procedure and to exit.
The interface is absolutely intuitive and clear. The disadvantages include the lack of a Russian-language interface and support for USB drives of other brands. Not long ago, Transcend recently posted on its official website an alternative software product JetFlash Online Recovery, which operates on a cloud service. We recommend you try it too.
HP Drive Key Boot Utility
A convenient and functional program for cleaning a flash drive with bad sectors. Allows you to format flash drives from SanDisk, Transcend and Kingston. Three file systems are supported: FAT32, NTFS and FAT. It is worth noting that using the first of the file systems mentioned, it is possible to wipe a device larger than 32 GB, which, in fact, exceeds the FAT32 threshold. The main advantage of HP Drive Key Boot is its interface. All program options are concentrated in one window, and all operations can be performed without literally leaving it.
It is possible to create bootable flash drives based on the OS distribution using only the included tools. The application is portable, so you can use it on any PC without installation (simply by copying the folder with the executable file and libraries). The disadvantages of the utility include the lack of HDD/SSD support and the ability to correct system errors. In addition to this, on Windows Vista/7/8.1/10, the presented data formatting program is available to work only in compatibility mode. For modern operating systems, the development company has created an alternative product called HP USB Disk Storage Format Tool. All HP Drive Key Boot functionality has been successfully transferred here.
Search for service tools
To find tools that work individually with your flash card, you will need to determine its VID and PID (USB unique identifiers). The first index displays the manufacturer's identification number (VID), and the second represents the PID number of the device itself. In some cases, a utility defined this way may not work. Because some cards may have the same identifier, but the controller model is different. You can accurately identify the controller by disassembling the flash drive and checking the number on its microcircuit.
To determine VID and PID, use one of the applications at the link: https://flashboot.ru/files/vidpid/
Alternatively, open Device Manager and look for the USB Controllers section. Inside it there is a subsection “USB Mass Storage Device”. On the details tab, look for its ID.
By identifiers you need to select a utility on the page: https://flashboot.ru/iflash/ For convenience, use the search. The last column of the "Utils" table provides a link to download a custom utility that works with your controller. If the box next to the USB drive is empty, you will have to look for information on the Internet.
This method, even if the programmer shows a failure, can revive your USB drive. Once the operation is complete, safely remove the flash card and reinsert it into the USB port. After this, the flash drive should work.
We hope this article was helpful. If none of the tips worked, this may mean that the drive has failed or suffered some kind of mechanical damage. It's easier to buy a new one. Repair is justified only if important data is stored on the flash drive. Sometimes it is not possible to repair a flash card.
Data is our everything!
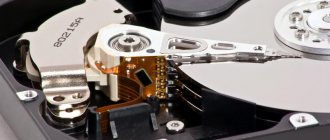
Alas, HDDs are very vulnerable devices for storing information. A slight physical impact is enough to disrupt the operation of the device. As a result, “Bad-blocks” - damaged blocks - may appear. And this is a big threat to valuable data.
Low-level formatting can eliminate such problems, but it should not be used in every case. Such “treatment” is prescribed only in exceptional situations.
Low-level format is essentially an exclusively factory action that is used in the manufacture of hard drives. In this case, tracks and memory sectors are created on the clean surface of the drive, which are assigned unique addresses. But we will not delve into the technical features of production, because we are more interested in implementing the process at home.
I would like to note that as a result of such manipulations:
- All data from the drive is deleted forever, without the possibility of recovery. This is definitely worth remembering. By the way, this approach is optimal when you intend to sell your laptop or desktop PC, and do not want your information to be restored or viewed by unauthorized persons;
- All damaged sectors are “clogged”, that is, excluded from the list of used memory. No more files will be written to them;
- “Remapping” is carried out - redistribution, when defective areas are replaced by working ones. The latter are taken from the reserve that is always present on any HDD (thanks to the manufacturers for this).
This is what happens after low level formatting.
It is effective in the following situations:
- When a small number of bad blocks appear on the media and they cannot be eliminated using regular software;
- If the cause of the defects is not severe mechanical damage (shocks, falls), but overheating or a software failure, for example, after a sudden shutdown of the PC;
- To remove viruses that infect the boot area. Other tools may turn out to be useless, but low-level formatting can “kill” everyone and everything.
Initially, I recommend scanning the disk with the HD Tune application to determine the level of the problem - the number of “bad” blocks:
Alas, NU formatting will not save you if there was an attempt to disassemble the HDD case (depressurization occurred), it fell, was immersed in liquid; when during its operation strange sounds are heard, reminiscent of loud clicks, grinding. Treatment in such situations will be useless (the screenshot shows that a large number of disk elements are damaged):