04/24/2018 Category: Installation and activation of the system Author: Dmitry Maidan
Optical media is becoming a thing of the past, like its predecessors floppy disks, and the size of distributions is growing every day. And if Windows 7 could be recorded on a single-layer DVD with a capacity of 4.7 GB, then this trick will no longer work with Windows 10 - its distribution kit “weighs” about 8 GB. Instead of scouring computer stores in search of expensive double-layer DVD discs, the smartest thing to do is buy an inexpensive flash drive with a capacity of 8 GB or more and create a bootable image of the distribution on it. Installation from such media will be 3-4 times faster than from an optical disk, and for nettops and netbooks without an optical drive, a flash drive will be the only possible way to install the Windows 10 operating system.
- Preparing the computer for system installation
Setting up the computer with BIOS - Setting up a computer with UEFI
- Selecting a partition for installing the system
Video: Converting a disk using Paragon Partition Manager
Preparing a bootable USB flash drive with Windows 10
You can create bootable media with Window 10 using half a dozen third-party programs, but the most logical way to do this is using a standard tool available for download from the Microsoft website, Windows 10 Installation Media Creation Tool. Before using the utility, make sure that the flash drive has a capacity of 8 GB or more, and that there is at least 10 GB of free space on the system partition of the hard drive. Also find out the processor capacity of the computer for which you are creating bootable media. Next follow the instructions:
- Download the Windows 10 Installation Media Creation Tool from the official Micosoft website.
Do not download the Media Creation Utility from questionable resources, do it only from the official Microsoft website - Run the utility, read the license agreement and accept its terms.
- The program allows you to both create installation media and update your computer online. Select media creation.
Choose to create installation media if you don't want to just update your system - In the next step, uncheck the “Use recommended settings” checkbox and select the required operating system edition, interface language and bit depth. You should not choose the 64-bit version of the system for computers that have less than 4 GB of RAM.
Be sure to disable the use recommended settings setting if you plan to use bootable media on other computers - The program will prompt you to choose to create a USB drive or burn an ISO file for subsequent burning of an optical disc. Select create a flash drive.
If you do not plan to burn the media with third-party programs, select a USB device to unpack the distribution package - From the list of connected removable media, select the one to record to. To eliminate the possibility of errors and destruction of important data, before writing a bootable flash drive, disconnect any other removable drives (disks) from the USB ports.
If several flash drives are connected to your computer, select the one on which you want to write the boot image - The program will begin downloading Windows 10 installation files and writing them to the USB flash drive. When the progress indicator reaches 100%, you will have in your hands a system installer on a flash drive, with which you can install Windows 10 on any computer.
When the progress indicator reaches 100%, the bootable media will be ready for use
During operation, the utility downloads a significant amount of data from the Internet (more than 8 GB). To prevent the media creation process from taking a whole day, make sure that the computer on which the manipulations are performed is connected to a fast Internet channel.
PHOENIX BIOS signals:
1-1-3 — error in writing/reading CMOS data.
1-1-4 — checksum error on the contents of the BIOS chip.
1-2-1 - the motherboard is faulty.
1-2-2 — DMA controller initialization error.
1-2-3 — error when trying to read/write to one of the DMA channels.
1-3-1 - RAM regeneration error.
1-3-3 — error when testing the first 64 KB of RAM.
1-3-4 — error when testing the first 64 KB of RAM.
1-4-1 - the motherboard is faulty.
1-4-2 - RAM testing error.
1-4-3 — system timer error.
1-4-4 — error accessing the I/O port.
3-1-1 — error initializing the second DMA channel.
3-1-2 — error initializing the first DMA channel.
3-1-4 - the motherboard is faulty.
3-2-4 — keyboard controller error.
3-3-4 - video memory testing error.
4-2-1 — system timer error.
4-2-3 - line error A20. The keyboard controller is faulty.
4-2-4 - error when working in protected mode. The CPU may be faulty.
4-3-1 - error when testing RAM.
4-3-4 — real time clock error.
4-4-1 — Serial port testing error. The error may be caused by a device using this port.
4-4-2 — error when testing the parallel port. The error may be caused by a device using this port.
4-4-3 — error when testing the math coprocessor.
Preparing your computer for system installation
In order for a computer or laptop to successfully boot the system from a flash drive, it needs to make a number of settings related to the boot order and media selection. On computers with a classic BIOS and with a newer UEFI, these settings are different.
Setting up a computer with BIOS
On computers running a classic BIOS, booting from a flash drive can be activated in two ways. All manipulations must be performed with a USB drive connected to the port.
In the first case, you can simply use the boot menu selection key by pressing it immediately after turning on the computer. In most BIOS editions this is the F12 key. Follow these steps:
- Turn on the computer and wait until the start screen appears on the monitor.
- Press the F12 key and hold it until the boot media selection menu appears on the screen.
- Select USB-HDD, and from it select your flash drive, then press Enter.
- The computer will boot from the USB flash drive and begin the Windows 10 installation process.
In the second case, you can change the boot order from media through the corresponding BIOS menu item. Let's look at the BIOS settings of the AWARD family:
- Turn on the computer and wait until the start screen appears on the monitor.
- Press the Del or F1 key to get to the BIOS settings menu.
- Go to Advanced BIOS Features.
- Open the First Boot Device item and select from the list any device with the USB prefix (USB-ZIP, USB-HDD, etc.).
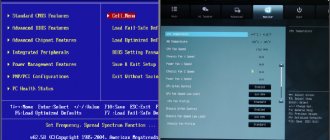
- Return to the main menu using the Esc key and save the configuration with the Save & Exit Setup command.
- The computer will boot from the USB flash drive and begin the Windows 10 installation process.
Setting up a computer with UEFI
BIOS and UEFI versions are very different from each other in design, location of tabs, settings and set of capabilities. In order for a UEFI computer to boot from a flash drive, it must be formatted in the FAT32 file system. Keep this in mind when creating bootable media. To configure UEFI follow the steps:
- Turn on your computer. When the start screen appears, press the special key to bring up UEFI. Depending on the manufacturer, this may be the F2, F10 keys or a special button on the keyboard (ThinkVantage for Lenovo, Assist for Sony).
To further configure your computer, use the appropriate button to call up the UEFI settings - Translate the UEFI interface into Russian by selecting the appropriate item from the drop-down list in the upper right corner of the screen.
- To boot from a flash drive that is not UEFI compatible (there is a 90% chance that this will be the case), you need to disable Secure Boot, a security option that prevents boot code from executing without a Microsoft digital signature.
- Enable BIOS compatibility mode (Launch CSM, Legasy BIOS). After this, the menu where you can disable Secure Boot will become available.
Activate CSM to access the boot menu - Disable Secure Boot using the appropriate menu item.
If CSM is activated, all removable media are available in the boot menu - Open the Boot menu using the F8 key and select your bootable USB flash drive in it.
Select the flash drive and press Enter - To save the settings, click Exit - Save Changes. Unlike systems with BIOS, the computer will not reboot, but will immediately start from the selected media - a bootable flash drive with the Windows 10 distribution.
What is the POST Self-Test Program?
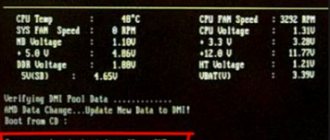
POST is a very important procedure when turning on your computer. BIOS uses POST to test equipment for faults and malfunctions. Hard drives and SSDs are checked, system bus frequencies are adjusted, equipment such as video cards, sound cards, monitors, disk drives, random access memory (RAM), and external connected devices are initialized.
In general, using POST, a lot of tests are carried out to check the hardware, and if there is something wrong with one of the components, the BIOS will display a corresponding message on the screen and a sound signal. If the tests are successfully completed, you may hear one sound signal - a squeak. Provided that the system unit has a built-in speaker. This is not the case on laptops.
In addition, the BIOS allows you to configure a lot of parameters that will help you install Windows or new hardware, as well as speed up your computer a little. There are many secrets and nuances when working with this technology that will not fit into this article. Therefore, I recommend that you read a wonderful book - 1000 and 1 BIOS secrets by A.V. Kubin P.A. Dmitriev. In this book you will find a lot of information on working with BIOS, including all types of manufacturers - AMI BIOS, AWARD BIOS and Phoenix BIOS.
In fact, BIOS is a very old technology that has somehow survived to this day. Although now there is a more advanced technology - BIOS UEFI. Created in 2007 together with Intel, Microsoft and AMD. Unfortunately, it is not possible to flash a regular BIOS to UEFI.
The process of installing Windows 10 from a USB flash drive
Connect the USB flash drive with the Windows 10 distribution to the USB connector and turn on the computer. After the start screen, the installer will load and help you install the operating system with step-by-step instructions. Just follow its points:
- Basic regional settings (language, date and time format, and primary keyboard layout) are the first thing you need to select in the installer. After that, move on to the next settings by clicking the “Next” button.
Select your region and language to continue installing Windows 10 - The installer program allows you not only to install the operating system, but also to correct errors in an existing copy. To do this, there is a “System Restore” link button in the lower left corner of the window. And to continue the installation, click the “Install” button in the center of the screen.
Click the "Install" button to continue the process - In order for your installed copy of Windows 10 to be successfully activated, you must enter the correct product code. It can be indicated as part of a boxed distribution, on a sticker on a system unit or laptop, and even embedded in UEFI. In the latter case, its value will be automatically inserted into the input field. If you don't have a key, see the Microsoft Help Guide in the "More Information" section.
Enter your product key if it was not entered automatically - If you are installing without a product key (this is acceptable), the installer will ask you to select an operating system edition. Depending on the type of distribution and the actual bit depth of your computer, different installation options may be offered.
Select the build and bit level of the system you want to install - Be sure to read the license agreement from beginning to end and accept it, otherwise further installation of the operating system will be impossible.
Read and accept the terms of the license agreement - The next step is to select the Windows 10 installation type. Although the system allows updating on top of an existing copy of Windows while preserving already installed programs, the best solution would still be a clean installation with preliminary formatting of the system partition. The time spent on re-installing applications is more than compensated by the stability of operation and the absence of “glitches” that inevitably arise when updating an already installed system.
Upgrade or clean install Windows 10 - the choice is yours - If you proceed to a custom installation, a window will open for you to select a disk partition for installation. What to do about it - read the paragraph below.
Selecting a partition for installing the system
The ideal option for installing the system is to install it on a new, clean hard drive. Unfortunately, this possibility is not always available. When updating the system, the window for selecting a partition for installation will not even open: the installer program itself will find where the previous version of the operating system is installed. During a clean installation, you will definitely see a window for selecting a partition for installation. To make the right choice, follow these principles:
- In the partition selection window that opens, you will see many more options than logical drives that are displayed in Explorer. A laptop will definitely have a hidden partition with an OS distribution that uses an automatic recovery system, while a stationary PC may have service partitions left over from previous versions of Windows. The most correct course of action would be to delete the system and all service partitions and install the OS in an unallocated area. If there is a separate user partition on the disk (with work files, documents, etc.), you should not delete it.
If the system is not installed on a new disk, choose the partition carefully - If the hard drive previously had 32-bit Windows XP, Vista or 7 installed, then with a 99% probability it is formatted with the MBR partition system. On modern computers with UEFI, installing Windows 10 on such a disk is impossible without completely deleting the partition table and losing all information on the disk. If you need to save your data, before running Windows 10 Setup, convert your drive from MBR to GPT and save your data. This can be done using one of the many partition manipulation programs, for example, Paragon Partition Manager or Partition Magic.
On computers with UEFI, installation to MBR partitions is not possible; this will require formatting - If the previous system is installed on partition or drive C, and you select another partition or drive to install Windows 10, then as a result, you will have two operating systems installed on your computer at the same time and select the one you need when you boot the computer.
Video: Converting a disk using Paragon Partition Manager
Copy files and complete OS installation
To complete the system installation, follow these steps:
- Once you have provided all the required information and made the desired settings, the installer will begin the process of copying and unpacking the files to your hard drive. The duration of this stage depends entirely on the speed of the flash drive with the distribution and the characteristics of the system hard drive.
The process of copying files takes a significant amount of time - A setup process that lasts an hour or more with dozens of reboots should not scare you, as this is normal. A large number of file operations are performed faster if your computer has an SSD.
The process of installing and configuring the system may take more than one hour - Once these processes are complete, you will be prompted to connect to a network that will be detected automatically. However, the connection prompt may not appear if Windows 10 does not detect the required hardware.
Video: how to install Windows 10 on your computer
BIOS settings
You can determine the BIOS settings for a specific motherboard by looking at them in the motherboard data sheet. Important! Incorrect BIOS settings can damage your computer or reduce its power rating.
Information for management.
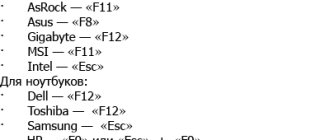
How to install Windows via BIOS , booting from DVD, USB, HDD depends on several Boot Menu keys:
Determining the hard drive structure
There are two options for hard drive structure:
Finding out this information is very easy. You need to go through the following path:
- Right-click on the “My Computer” icon and go to “Manage”.
- Next, click on “Disk Management”.
- In the window, select the disk and open its properties.
- Select the "Volumes" tab and pay attention to the "Partition Style" item.
Ready! The structure of the hard drive has been determined and now you can proceed to the UEFI settings.