Here are the TOP 10 most common malfunctions of LCD monitors that I have personally experienced.
The rating of malfunctions was compiled according to the personal opinion of the author, based on his experience working in a service center. You can take this as a universal repair manual for almost any LCD monitor from Samsung, LG, BENQ, HP, Acer and others. Here we go. I divided the malfunctions of LCD monitors into 10 points, but this does not mean that there are only 10 of them - there are many more of them, including combined and floating ones. Many of the breakdowns of LCD monitors can be repaired with your own hands and at home.
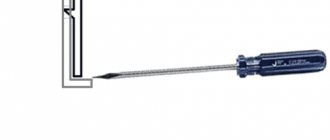
PS: How to disassemble the monitor and TV (how to unclip the frame)
The most common questions when disassembling LCD monitors and TVs are how to remove the frame? How to release the latches? How to remove the plastic case? etc.
One of the craftsmen made a good animation explaining how to remove the latches from engagement with the body, so I’ll leave it here - it will come in handy.
To view the animation , click on the image.
Video card malfunction
This is another reason why the monitor goes dark while the computer is running. What to do in this case? As a rule, the video card is replaced, but before that you still need to make sure that the problem is caused by it. Remove the video card, check it for swollen capacitors, traces of oxides, etc., make sure the contacts are working properly, and then put it back in place. If you have another computer at hand, test the video card on it.
DIY LCD monitor repair
A common malfunction is when the LCD monitor lights up for a second and goes out. What to do in this case and how to use this TOP of faults.
It's simple. To repair your LCD monitor, follow these steps:
- Step 1. Disconnect the monitor from the 220 V network and from the computer and decide whether we will repair it ourselves or take it to a service center for diagnostics at an inexpensive price.
- Step 2. If you decide to figure it out yourself, then take the tools: screwdrivers, a knife or scalpel and a soft base to lay the monitor down with the matrix.
- Step 3. Disassemble the LCD display, observing safety precautions and remembering the latches. How they open is shown in the animation above.
- Step 4. Discharge the high voltage capacitor. It is necessary! Especially if you want to achieve a positive result of the repair.
- Step 5. Inspect the board for swollen capacitors, burnt transistors and microcracks.
- Step 6. If any findings are found in Step 5, replace the burnt ones and solder the cracked ones.
- Step 7. Check the functionality of the monitor, observing safety precautions. If everything is ok, then go to Step 10.
- Step 8. Take a multimeter and test the fuses, diode bridge, transformers and transistors. Replace burnt radio elements.
- Step 9. Check the operation of the LCD monitor. If the monitor continues to blink, check the voltage at the test points on the board. This requires knowledge of circuit design, as well as a service manual with an ideal circuit. Further actions are difficult to describe in general terms. This is where the creative process of the Repairman begins. To discuss, write in the comments or contact.
- Step 10: If you successfully repair the flickering LCD monitor yourself, do a test run for 2-3 hours in a disassembled state. After this, the monitor can be assembled and used.
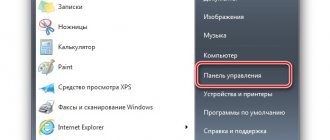
System Settings
First of all, let's consider a situation where we are not actually talking about any problems. A very common reason why the monitor turns off while the computer is running is the function of turning off the display after a certain time, which is available in all popular versions of Windows. True, it is activated only if the user does not perform any actions on the PC. If this is your case, open your current power plan settings and see if you have the Timeout setting set to Turn off display. If yes, select "Never" from the drop-down list.
Control buttons
Does the monitor turn on for 2 seconds and then go off? Samsung or any other - it doesn’t matter which company created the device. Some device models have monitor control buttons. Sometimes the reason lies in them.
For example, damage to these buttons. Some users say that the slightest crack in the monitor's power controls causes the component to spontaneously turn on and off. This is caused by vibration, which simply activates the "Off" mode on the monitor.
There are several ways to correct the situation:
- Soldering the contacts of the buttons on the monitor. It is recommended to contact specialists for this.
- Replacing the monitor. An extremely effective, but radical option.
- Repairing buttons. Usually the procedure boils down to replacing them.
Accordingly, there are a lot of options. It is difficult to predict why the monitor turns on for 2 seconds and then turns off.
Dim picture
But that's not all. The proposed scenarios are relevant for situations where, when the PC is turned on again, the monitor completely refuses to show signs of life. But, as already mentioned, other situations are also possible.
What should I do if the monitor turns on for 2 seconds and the backlight goes out? Or, for example, the user can see his desktop, after which the image fades?
The cause of the breakdown is either burnt fuses or damaged backlight bulbs. As already mentioned, it is best to take the monitor to be repaired. Service centers will help you correct the situation for a small fee.
If you have the desire and at least some skills to repair complex mechanisms, you can try to replace the lamps and fuses yourself. After correct actions, the monitor will work again.
Turn off the display
Let's start with the simplest. Your monitor turns on, works great, but goes out after 10, 15 or 30 minutes. What is the problem?
By default, Windows is set to “turn off display after N minutes.” It's all about her.
“This can’t be true!” – you say. Maybe. But it's worth checking out. It would be stupid if, because of such a trifle, you spend a lot of time and nerves trying to figure out why the monitor goes out. In addition, the check will only take 2 minutes.
Instructions for Windows 7 users:
- Start - Control Panel - Power Options.
- Select “Set up power plan”.
- In the “Turn off display” item, select the “Never” field.
On Windows 8 and 10 the procedure is approximately the same.
Instructions for Windows XP users:
- Right-click on the desktop and select “Properties”.
- Go to the "Screensaver" tab and click the "Power" button (bottom right).
- See the familiar “Display off” field and select “Never” (or any other value).
Poorly connected wires
The next reason the monitor turns off is poorly connected wires. We are talking about a cord from the monitor to the system unit (more precisely, to the video card). Perhaps you accidentally caught it or pulled it. Perhaps one of your family members did this, or maybe even your favorite cat or dog.
In any case, this should be checked first. To do this, simply disconnect the wire on both sides, wipe (blow), and then connect it again. May I help.
Another common problem is cable damage. To check this, you need to find a similar cord and connect it.
Description
The monitor turns off by itself while the computer is running. At the same time, the computer continues to work - sounds are heard. After rebooting, the screen works for a while, then goes blank again. Most often this happens during:
- Games.
- Watching the video.
- Working with any program.
- Using scrolling on a laptop.
- The video card may start to make a lot of noise.
- The monitor may go dark on both a desktop computer and a laptop/monoblock.
- The time that the computer works after loading Windows varies - from a few seconds to several hours.
- The longer the monitor runs, the more often it turns off.
- The monitor may turn off and on, or it may turn off with the message “no signal”.
- It can be permanently turned off. But when you turn it on, you can see the loaded operating system desktop.
If, in addition to the monitor, the computer also turns off, go to the article The computer turns off.
Incorrect resolution
When the monitor turns off while playing or just working, sometimes the wrong resolution is to blame. If, using third-party tools, you set a resolution that exceeds the capabilities of the monitor, it is very possible that the latter will turn off, especially when launching games. A clear sign of an incorrectly selected resolution is the “Out of range” message.
In this case, you need to boot into safe mode and lower the resolution to the system default.
Bottom line
As you can see, it is quite difficult to definitively answer the question of why the computer monitor screen goes blank while working. The reasons for this may be a carriage and a small cart; finding the true one for an ordinary user who does not have the appropriate knowledge is often a difficult task. Checking the system settings, contacts and load on components is, perhaps, within the power of everyone; as for diagnosing and repairing equipment, it is better to entrust this matter to specialists from the service center.
- 37shared
- 0Facebook
- 35Twitter
- 0VKontakte
- 2Odnoklassniki
Various manifestations
The first thing you need to pay attention to is how exactly the computer and its components behave. Does the monitor turn on for 2 seconds and then turn off? What's going on with the PC? Is it still working? Or did the machine turn off completely? By answering these questions, you can eliminate about half of the various reasons for failure.
If the monitor turns off, the device may behave in the following ways:
- the screen stops working a few seconds after turning it on;
- a complete shutdown occurs, after the next boot of the PC the functionality does not return;
- refusal to work after a while;
- the image on the monitor does not disappear completely, it is visible, but very poorly.
- instant shutdown of components (turns off immediately);
It is important to understand that in some cases this behavior can be corrected on your own, and one day you will need the help of professionals. Why might such failures occur? How can I fix them?
Boards
Only a professional can independently notice the following alignment. Does the monitor turn on for 2 seconds and then go off? LG, for example, often suffers from damaged boards. If these components of the monitor are damaged or poorly soldered, the screen will not work properly.
It follows that failure of a monitor to work is not just a breakdown. This phenomenon may be caused by improper soldering of the boards or their damage. For correct diagnosis, it is best to take the screen to a service center.
As a rule, damaged boards are not repaired. Experts recommend just buying a new monitor and not thinking about the problematic device. It is possible to resolder and even replace the boards, but it is unlikely that after such actions the device will work normally for a long time.
Overheating of hardware components
Overheating of components, including the graphics card, does not always lead to a BSOD or shutdown of the computer. Increased loads that occur, for example, when running particularly demanding games, may well cause individual components to shut down. If the monitor goes out during a game, but the system unit continues to work and the audio is also played normally, then overheating is very likely. The problem can be solved by cleaning the system unit, installing a more efficient cooling system, and replacing thermal paste.
Wear
Does the monitor turn on for 2 seconds and then go off? LG or any other manufacturer is not that important. The main thing is that the main causes of problems and methods for eliminating them always remain the same.
Sometimes this phenomenon occurs due to simple wear and tear of the device. Any equipment has its own warranty period. After its completion, you should not be surprised by failures, malfunctions and refusals of devices to perform their functions. That is, the monitor may simply “die of old age.” This is normal. It’s not hard to guess that this arrangement is relevant mainly for older devices.
What to do? Your best bet is to buy a new monitor. It will 100% work fine for a long time. Devices that are already worn out, even after repair, either will not cope with their tasks, or they will quickly fail.
Mini-instructions for soldering radioelements
For those who have not soldered radio components before, I will give some simple tips. For repairs you will need a soldering iron, solder, rosin and... a wooden toothpick. Instead of a toothpick, you can use a needle or pin.
After you have soldered the capacitor, you need to remove the solder from the holes for its terminals. To do this, heat the soldering area and insert a toothpick or needle into the hole.
Heat the solder at the soldering site and insert a toothpick into the hole
Please note that the toothpick or needle must be inserted from the soldering side, otherwise you can tear the printed conductors from the board. Now you can insert a new electrolytic capacitor, remembering to check the polarity.
Everything is ready to install a new capacitor - the main thing is not to confuse the polarity of the connection
Important! For electrolytic capacitors, the connection polarity cannot be changed. We connect plus to plus, minus to minus. Otherwise, the capacitor will fail.
On the housings of electrolytic capacitors, on the negative terminal side, there is a light stripe
If for some reason the polarity of the capacitors is not indicated on the printed circuit board side of your monitor, then look at the markings on the radio components side. In this case, the light stripe of the capacitor is aligned with the light mark on the printed circuit board.
The light stripe of the capacitor is aligned with the light mark on the printed circuit board
It is no coincidence that he said a lot about maintaining polarity. One of the site users, when repairing a monitor, soldered in an electrolytic capacitor incorrectly and for a long time could not understand why the monitor stubbornly did not want to work.
RAM malfunctions
Another common cause of the phenomenon when the monitor lights up and immediately goes out is incorrect operation of the RAM. You can identify a RAM malfunction using Windows or using third-party software. The built-in system memory test tool is called using the Run window (Win + R) and the mdsched command. To diagnose memory, you can use AIDA64 or check the strips with the Memtest86 utility (burn a bootable USB flash drive with the program, set the boot priority from a USB drive in the BIOS in the “Boot” section, and boot from removable media to perform memory testing).
Even one faulty RAM module can cause the problem in question, even if several of them are installed. So, if problems are detected, the faulty RAM sticks will need to be replaced.
Computer connection
Does the monitor turn on for 2 seconds and then go off? The reasons for this phenomenon are varied. The first thing you need to do is make sure that the device is connected to the computer correctly.
In general, it is recommended to disconnect the monitor from the PC and then reconnect it, checking all wires for integrity. The fading problem may be caused by some contacts coming loose. No one is immune from this.
Solution
Monitor problem
Monitor malfunction can manifest itself in different ways - from periodic shutdowns to complete inoperability. The monitor itself may simply turn off or make sounds - hissing, clicking, crackling. Also, the monitor may first blink and then turn off.
Most often, this occurs due to overheating. We check the monitor by touch - if it is hot, try pointing a room fan at it or placing it in a cool place. Also, capacitors in the monitor itself may burn out.
As a diagnostic option, you can try connecting the monitor to another computer. In case of malfunction, it is better to return the monitor to service. If the cost of repairing it is not worth the cost of a new one, it is better to buy a new monitor. It’s more difficult with a laptop—you’ll have to take it in its entirety for repair.
Bad contacts (wires, connectors, adapters)
This reason is characterized by the disappearance of the image without any pattern - at any time. This can also happen when your foot touches the system unit or when the side cover of the case moves. In this case, the screen can turn off and on by itself.
a) First, you should try to tightly secure the cable from the monitor to the video card.
b) Then we try to connect the wire to another connector on the video card, if there are several of them:
* in this image the connectors are different - in this case you will have to use different wires or adapters.
c) If an adapter is used to connect the monitor to the video card, try replacing it.
d) On laptops there may be problems with the contact connectors that connect the monitor to the case. In some cases, this can be repaired by disassembling - cleaning contacts - reassembling.
Video card malfunction
If the video card malfunctions, the problems can be of various types, in particular, the monitor may turn off.
To check the functionality of the video card, you can run a system stability test in the AIDA64 program. You can also try replacing it temporarily or using an integrated video card (if available).
Video card overheating
When overheating occurs, the problem usually occurs under high loads - while working with demanding programs or while playing games. In this case, the fans may begin to make a lot of noise. And the longer the computer works, the more often the monitor turns off.
First, we measure the temperature of the video card. If it exceeds the permissible norm (more than 100 degrees or close to it), it is necessary to solve the cooling problem - for this you need to clean the computer from dust and change the thermal paste of the coolers.
Software errors
In this case, the problem occurs when entering the game, while playing or watching a video. In some cases, the problem can be solved using software methods.
a) Reinstall the video card driver. It's best to update it. You can also use a specialized program, for example, DriverHub, to update the driver in a semi-automatic mode.
b) Update DirectX.
c) Update or install codecs, for example, K-Lite Code pack.
Power problems
With this problem, not only the monitor, but also the computer itself may periodically turn off. This can happen more often under load, for example, when running games or demanding programs.
To check you need:
a) Test the socket with a multimeter. It should show a voltage close to 220. The minimum threshold is 190. If it shows lower, the socket needs to be repaired.
In the same way, we check the voltage at the surge protector, if one is used.
b) If a UPS is used, and the multimeter shows that the socket is working, we try to connect the computer directly to the power source.
c) We change all power cables - both for the computer and the monitor itself.
d) Temporarily change the power supply of the computer itself.
e) Check the tightness of the cables for supplying additional power to the video card (if any).
RAM malfunctions
Memory problems have completely different effects on computer performance. Turning off the monitor is one of the symptoms when it malfunctions.
To test memory, you can also use the AIDA64 stress test or check the memory strips with the Memtest86 program.
Incorrect setting in BIOS
Typically typical for laptops, an incorrect touchpad operation mode leads to the monitor blinking when scrolling.
To solve the problem, go to the BIOS. We are looking for an option related to the touchpad operating mode - it can be called differently, but as a rule, Touchpad in the Main . We check that the mode is Basic .