The Notes feature on iPhone is a classic and indispensable feature that allows you to record important information. Using this application, you can also perform many other tasks, and most importantly, design them beautifully.
“Notes” is built into every iPhone out of the box, and when you switch to a new device, you don’t have to look for the app in the App Store. Another thing is that the saved recordings on the old smartphone were not transferred to the new gadget. If you need to transfer notes from one iPhone to another, we recommend using one of the methods described below.
Transfer from iCloud to Google, Yandex mail
iCloud synchronizes well with other cloud services. The only condition is that the storage facility supports the postal service. After import, a folder called “note” is automatically created in the mail. Yandex.Disk or Google Drive are suitable for these purposes. In general, synchronization is carried out as follows:
- Find the “Passwords and Accounts” tab in the settings;
- Select one of the linked accounts: either Yandex or Google;
- Once in your account, swipe right on the Notes option. After this, synchronization will occur automatically.
Follow the same steps on your new iOS device. All data should be transferred.
Now, to access your notes, all you need to do is sign in with your account on another Apple device. You can also simply go to Yandex or Google and access all your notes in a separate folder, and for this you do not need to have another iPhone, since authorization is possible from a computer or tablet.
Transfer to a new iPhone via Tenorshare iCareFone
Tenorshare iCareFone is a useful tool that replaces iTunes. What is the advantage compared to the classic program? The utility has many more functions. Moreover, the program works perfectly with iOS 15 and other versions, including iPhone 13, 13 Pro Max, iPhone 12, 11 and many others.
In order to be able to import Notes, you need a computer. You can download the free application with Russian language support on the developer’s official website. Suitable for both Windows and Mac.
How to transfer data:
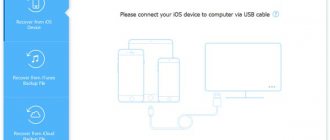
- Download Tenorshare iCareFone and launch it. Select “Backup and Restore” in the top menu;
- Connect the new and old device to your computer or laptop via a USB cable;
- If you have iTunes installed, the program will most likely launch automatically. Close it as it will not be needed;
- After the PC recognizes the devices, they will appear in the program. If necessary, swap the devices - place the iPhone from which you want to transfer information on the left, and the iPhone receiving the data on the right;
- After that, do a memory analysis. The files on the old device will be shown on the left, and the storage of the new gadget will be shown on the right (information about what the capacity is filled with will also be displayed here. This is necessary to understand whether there is room for importing notes);
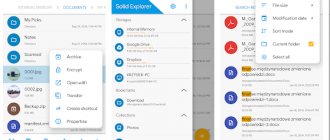
- In the Personal Data section, find the Notes tab and check the option. You can select other files if you wish;
- Next, click on “Start Transfer” and wait until the transfer is completed. This usually goes quickly, but the final time depends on how many notes you need to transfer and whether they contain media files.
Import notes from iPhone to Android
There are several ways to transfer documents from iOS to Android. Everything is complicated solely by the fact that to create notes you used the native Notes application, and not any other downloaded from the App Store. There is no such program for Android devices. Therefore, simply copying will not work.
The easiest way is to use a Google or Yandex mailbox. We described this method earlier. In this case, a “note” folder will be created in the mail.
- Launch “Settings” on your Apple gadget;
- Go to “Passwords and Accounts”;
- Select a Google or Yandex account. If it is not there, then create a new one by clicking on “Create a new account”;
- After adding an account, click on it and move the toggle switch on the “Notes” option. Wait while the data is synced and copied;
- After that, check your mailbox. If a new “note” folder appears, then you did everything right.
Next, all you need to do is log in to this account on your Android device and you will have access to your notes.
It's different if you used Evernote. This utility is available on Mac, Windows, iPhones, and Androids. So, by logging into your account on any platform, you will have access to your records.
- Launch the program and log in. Check the content on your iOS device;
- Download the application from Google Play to your new device. Enter the login and password for your account. The data will be transferred instantly, and you will be able to view, edit, and delete it.
Evernote also lets you sync data from the native Notes app into the program. To do this, create an account and select synchronization with Notes. There are manual and automatic modes. To launch the first one, you need to go to the “Settings” of the utility and then click on the “Synchronize” option.
Transfer notes via AirDrop
Another classic method that does not require installing third-party applications is the standard AirDrop function. Works on most modern devices (from iOS 7 and older). Ideal for transferring a small number of notes. The downside is that you will have to import each document separately if there are many of them. The procedure will be as follows:
- Make sure both gadgets are connected to the Internet via Wi-Fi or mobile. Activate Bluetooth on both devices and make sure that AirDrop transfer is allowed for all devices (to do this, launch the settings, go to “General”, then to “AirDrop” and check the “For everyone”) box. To quickly navigate, pull the curtain upwards and, once in the control center, press your finger on the menu where there are Wi-Fi and mobile Internet icons;
- On your original iPhone, go to the Notes app;
- Next, select the required file and click on the “Share” icon (a square with an arrow coming out). Click on AirDrop (the icon is displayed at the very top);
- Select your paired device and confirm the transfer on your new iPhone.
Transfer notes from iPhone to Windows (iTunes + Outlook)
Importing to Mac computers is easy - if you are logged in under the same account where you recorded the notes, the folder will be transferred to your PC automatically. New entries will sync immediately. Things are a little more complicated with Windows computers. You will have to install third-party software, and there are two such programs: iTunes from Apple and Outlook, included in the Office package from Microsoft. You can download and install both programs on your computer in a few clicks.
How to import from iPhone to Windows PC:
- Download the above programs. Launch Outlook and leave it active in the background;
- Connect your iOS device to your computer via a USB cable (preferably the original one from the box);
- Launch iTunes if the program does not open automatically when you connect your device;
- Next, go to the “Information” section (located on the left in the side menu);
- A new window will open, in it select the action “Synchronize with...” and among the list of programs, click on the above-mentioned Outlook.
If you did everything correctly, a new “My notes” folder and a “Notes” subfolder will appear in the Microsoft utility. All transferred documents will be signed as they were called in the original application.
Transfer notes via iCloud
The easiest and fastest method is synchronization via Apple cloud storage. Do the following:
- Make sure your device is connected to Wi-Fi;
- Go to “Settings” on your old iPhone, click on the first line with the name and make sure that you synchronize all files (in this case, it’s enough to save it to the “Notes” backup). If this feature does not work for some reason, please create a backup copy. Also check if the icon is next to the Notes option (it should glow green). To do this, swipe right;
- Next, move the slider to the right on the iCloud Drive value. Allow access to other programs to store and copy information;
- On your new iPhone, enter your Apple ID username and password. Log in to your account;
- Go to the iCloud menu, and if the checkbox is not checked, move it to the right. Check to see if the recordings are still there.
If for some reason the method described above did not work, then try following another instruction below.
How to access notes through a browser
It is known that Apple's iCloud cloud service has a full version via a web browser. This makes viewing records much more convenient, and you can access them in a short time. What should be done:
- Go to the website https://www.icloud.com/;
- You will be taken to the main page where you will need to enter your login and password for your Apple ID account;
- After successful login and find the “Notes” icon. Here you can not only view them, but also edit them (the same functions are supported as on the iPhone), record new ones, and also send data to the new iPhone gadget. How to send a “Note”? Just find the one you want to import in the list, click on the square icon with an arrow and enter your email. Remember that you can enter any recipient domain name: not only @icloud, but also @mail.ru, @gmail.com and others.
This article explained how to transfer notes made on an iPhone in the original application, what are the advantages of this particular utility from Apple, and what functionality does Notes have. As you can see, the number of ways to import notes to other devices (not only iPhone, but also Android and Mac and Windows computers) is very large. The main thing is to strictly follow the instructions and enter the data carefully. If any of the methods did not work, try any other of the above.
But at the same time, always try to create backup copies of your data, including notes, so that they are always stored in iCloud or any other cloud services, because when you delete an account, all notes associated with it will also be automatically deleted from the device.
Share link: