When the hard drive capacity on a computer becomes insufficient for a user, the only correct and logical solution to this problem is to install a new HDD.
If you decide on such a procedure, then you need to start this process with preliminary preparatory work.
Before directly purchasing a new hard drive, you should find out its interface and method of connection to the motherboard. In addition, you need to find out which device model is already used on your PC.
| Types of jobs | Price |
| Diagnostics | 0 rub. |
| Call | 0 rub. |
| Installing/Replacing a Hard Drive | 120 rub. |
| Installing Windows OS | 260 rub. |
| Installing a driver for a hardware or device | 100 rub. |
HDD interface
The HDD interface is a method for connecting this component to the motherboard and the procedure for processing incoming information. The IDE interface is considered one of the most popular. This type of hard drive is easily recognizable due to the increased width of the cable connection socket. It can contain from forty to eighty contacts.
IDE slots provide connection to the motherboard both directly to hard drives and to a wide variety of components that perform various manipulations with optical storage media.
Only one or two devices can be connected to all the connectors available on the motherboard. In addition, almost all components of this type have an integrated two-channel controller. Thanks to this, it becomes possible to connect four IDE devices to the board at once: 2 per channel.
To connect two components at once to a single IDE connector, you must use a cable with three connectors. One of them is connected directly to the motherboard, the others are connected to various drives.
Current motherboard models are equipped with a special controller that has one channel. Thanks to this, only two devices can be connected to such a board. The main reason for this is the relevance and popularity of the relatively “fresh” interface called SATA.
This is a relatively new development that allows you to connect external and internal HDDs.
As for the width of the cable of devices of this type, it does not exceed one centimeter, and the transfer of data to the device, thanks to the interface, is much higher. All latest motherboard models are equipped with a SATA controller. Plus, they already have IDE connectors installed.
If, when purchasing a new hard drive, you are offered a device that works with SATA connectors, and the controllers on your motherboard are equipped with suitable sockets, opt for such components. After this, you can proceed directly to connecting the second hard drive.
- Choosing an internal hard drive for a laptop
However, when SATA connectors are not available on the board, you will need additional adapters. Before purchasing, you should consult with specialists to find out which adapters are suitable for your device.
Installing HDD device
Installing a hard drive on a computer begins by removing the four screws that secure it. Next, you should remove the HDD from the mounts on the system unit, and install another hard drive in its place. If the previous hard drive had an IDE interface, you managed to figure out its connectors, and you have all the necessary cables with adapters at hand, then all that remains is to insert the hard drive and connect it to the power supply and the motherboard.
When installing a new HDD as a second one, you should definitely select a place where it will be mounted. In most cases, it is located in the area where the optical drive is mounted.
To connect the HDD, it must be secured with four screws to ensure high-quality cooling of this element. In turn, this will help to significantly reduce the mechanical impact on the device.
Summarize
So, a hard drive is a storage device for very valuable and important information in a computer. Therefore, you need to put a lot of effort into choosing a high-quality hard drive. You should also take care to regularly maintain your device. In addition, it is important to pay attention to the security of information, if any, on your computer. If you make all these efforts, then your hard drive will serve you for a long time, and the information on it will be completely safe. The operation of your device is entirely in your hands, so take all measures to ensure its normal functioning.
Setting up your PC before installation
There are two scenarios in which you may need to configure your computer:
- In case of replacing the hard drive;
- In case of installing an additional HDD.
Let's consider each of them separately.
If the device connection was made correctly: the cables are correctly connected to the power supply and the motherboard, then when you turn on the processor you will see a message that there is no formatting or partitioning on the hard drive. There will also be a proposal to perform this procedure.
- First you need to install the OS and carry out all the necessary manipulations in the BIOS.
- Then the installation media is inserted into the drive and the PC is rebooted.
- Direct installation of the OS begins on the newly installed disk.
- Next, you have to split the hard drive into the appropriate partitions during installation. Beginner users may not be able to do this, since such a procedure requires certain skills and knowledge. Therefore, it is best to entrust such a task to our masters.
- If an operation such as adding a HDD was performed, then the operating system was saved on the old hard drive. In such a situation, you will need to create partitions and also format the newly connected device using the OS.
- When the PC boots, the “Found New Hardware Wizard” window should pop up on your monitor. You will need to find the new hard drive again in the drop-down list and step by step follow all the advice that the “Installation Wizard” will give you.
- To create the necessary partitions, as well as to clean the new device, you should open the Start menu. A menu should open on the monitor. Next, you need to select “My Computer”, which will result in a context menu appearing. There, select the “Management” option.
- In the window that appears, there will be a list where on the left side you can find the “Disk Management” button. In the right part of this window, a list of all connected hard drives of the personal computer will appear.
- Next, you need to click on the rectangle where you plan to create a section. In the Computer Management window, select Action after All Tasks and then create a partition. If all the above steps were performed correctly, the “Disk Creation Wizard” should appear on the monitor.
- In it you need to click on the “Next” button, after which the corresponding window will be displayed on the monitor. Here you need to select the type of partition that the user plans to create before installing the hard drive. There are two options: additional and main. However, you can only create the second option, in which case the entire capacity of the hard drive will be transferred only to it. Alternatively, it is possible to create a primary one along with a backup one. However, it is impossible to create only an additional option without the main one.
- After all the manipulations have been done, the time comes to install the switch. To do this, in the “Main partition” item, select the part of the disk to be created and select the “Next” function. The third program window should appear on the monitor, where you will need to indicate the volume of the main part.
In the “Selected partition size” item, you must specify this parameter in the number of megabytes and continue working by pressing the corresponding button.
- The 4th program window will open on the monitor. Here you can assign the corresponding letter to the part of the hard drive you are creating. To do this, select the appropriate option from the list that opens. Designations already used will not appear in the list. Having selected the one you need, click “Next” and the 5th window of the wizard appears in front of us.
- Here you should set the switch to “Format partition as follows”.
- In the list that opens, you need to select the file system option, and then click on “NTFS”.
- In the next list that opens, you need to select “Cluster size”, where you select the required one.
- You can specify this parameter in the “Volume Label” column, but this is not necessary.
- By clicking on the “Next” field, we expect the 6th dialog box to appear, which is the final one. All information that was specified during the creation of the section will be reflected here. After carefully checking all the selected parameters, click the “Finish” button, as a result of which the corresponding section is created.
If the partition that was created differs from the hard drive parameters, then its rectangle will be divided in two. Its left side will indicate the main section, where the words “Formatting” will appear for a certain amount of time. When this process is completed, the inscription will change to “Good”. It is worth noting that the rectangle of the base partition contains data about its parameters and the selected type of file system.
As for the rectangle located on the right in the “Computer Management” window, it indicates an additional part of the hard drive. If it has not yet been created, the field will display “Not distributed.” This disk space can be used until a logical disk with an additional partition is created and formatted.
- Want to improve your laptop's performance? Replacing the hard drive with an SSD
So, through these simple steps, a new partition is created in the newly installed hard drive. This means that the personal computer is already ready for subsequent activities.
Now you can copy all the information contained on drive D, which is located on the old device, to the new one in the base partition. This will allow you to combine partitions on the old hard drive, thereby expanding the disk space where the operating system and other important programs are located.
Before installing the disk, you need software
Before installing a hard drive, you need to install special software designed to manage the device. This will allow for simple and quick manipulation of the configurations of all parts of the hard drive.
One of these programs allows you to perform various options with partitions. Plus, using it, you can restore a partition that was damaged or accidentally deleted. If you create a bootable USB flash drive using it, you will be able to perform all repair and restoration work and connect the hard drive even if it is impossible to boot the PC.
The program can be launched in autonomous or manual mode. A password is set in the menu, and commands from the wizard menu are launched (there are 4 in total).
However, a user who does not have sufficient experience and knowledge of how to connect a hard drive will find it quite difficult to complete this procedure on their own. Any careless action may damage the device.
To avoid negative consequences and worsening the problem, it makes sense to seek qualified help.
Contact us for help and we will install the hard drive
Therefore, if you do not know how to connect a hard drive, it is better not to take risks and do not try to do it yourself, but call a specialist.
A hard drive or hard drive is one of the main components of any computer - desktop or mobile. It is on it that the operating system is installed, and all data, files and games are stored there. Without it, the computer will never start working, so it is important to know where the hard drive is located in the computer and how to recognize it in the system.
Windows 7 does not see the hard drive
But there are times when the hard drive is visible to the BIOS, but the operating system does not boot or Windows is constantly rebooting. In what cases does this happen? Then, when working with the operating system, one of the system files was deleted or an error occurred during rewriting and the file is read incorrectly. Physical damage to the hard drive, scratching or chipping of the disk surface may also occur. If one of the system files was located in this location, then the operating system will not be able to read it and will display, as system administrators say, a blue screen of death, which prompts you to reboot the system. If the error repeats, it is better to contact your system administrator. Sometimes such software errors can be easily fixed without reinstalling the operating system. But it happens that they are fatal, and they can only be fixed with a complete reinstallation of the system. To solve this kind of problem, system utilities are usually used that deal with the recovery of software errors. What are these programs?
Location of the hard drive in the system unit
If you do not assemble a computer yourself, then the question may well arise: “Where is the hard drive located in the computer?” To find out, you'll need a pair of eyes and a screwdriver.
First you need to get rid of the side panel of the computer, which is removed after removing the bolts. You need to move it away carefully, pressing lightly and holding onto the recess on the panel itself. Almost all cases are made to the same standard, so the panel is moved towards the rear of the case.
After this, you can see all the “stuffing” of the computer, including where the hard drive is located. You can see that two cables come from it, one of which is responsible for powering the hard drive, and the other connects to the motherboard and the entire system as a whole. Where is the hard drive located in a computer? See photo above.
- USB Cables for External Hard Drives
Hard drive problems
One of the most frightening messages that can be seen on the screen says that the computer does not see the hard drive. Why is this so scary for computer users? With such a malfunction, the device does not load the operating system, and accordingly, practically no actions provided for by this system can be performed.
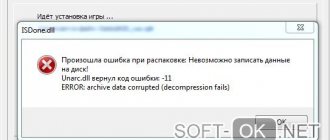
What could cause this problem? The simplest problem leading to this result is a violation of the integrity of the power cables or the system interface. Often, dust or dirt getting inside such a connector leads to this malfunction. And most experienced users are not particularly scared when such a message appears, but simply reconnect the power and interface connectors. This inscription may look something like the one shown in the photo above.
Location of the hard drive in the system
If you already physically know where the hard drive is located in the computer, then all that remains is to find it in the system itself.
To begin with, you should open the “My Computer” window, it is sometimes also called “This Computer” (depending on the operating system). It immediately shows the presence of two disks - C and D. The first disk stores all system information, including the operating system, and the second disk contains secondary data, for example, movies, music, and sometimes games.
When a hard drive is formatted, data is deleted only from drive C, and information on the other drive is not affected.
So, by right-clicking on any of the drives, you need to select the “Properties” option. After this, a window opens with the available properties of the selected disk. When you select the “Hardware” tab, you will notice that all drives that are currently available are displayed or displayed there.
You can only see the name of the model and nothing more, but if you need to not only find out where the hard drive is located in the computer, but also its condition, then you should install the Crystal Disc program, which displays the data and general condition of the hard drive.
If you need to find out how much is occupied or how much free space is available, you should open the “My Computer” window. It displays all available disks and the remaining space on them, as well as how much is currently occupied.
What is a hard drive?
So, what exactly is a storage device, the performance of which determines the well-being and good mood of its owner? In fact, a hard drive is a high-tech equipment that stores digital information even when the computer is turned off.
To be more precise, a hard drive consists of several magnetic disks onto which information is applied and read using a magnetic head. These heads, together with magnetic disks, are in a vacuum, which allows the drive to operate without the influence of the external environment on the process of writing and reading information.
Connecting a second hard drive
There are often cases when the release of new games or movies in high quality forces you to purchase a new drive, that is, a hard drive. The speed of installation and recognition of it in the system can take a different amount of time, depending on the newness of the motherboard and the skills of the user.
So, it's time to find out where to find the hard drive in your computer using the BIOS program. First you need to make sure that the equipment you are looking for is correctly installed and connected to the motherboard. The condition of the hard drive itself is also important, since if it was purchased at a thrift store, that is, it has already been used, then it is worth checking its serviceability at the place of purchase.
To get to the BIOS menu, after restarting the computer, you need to instantly and repeatedly press one of two buttons: F2 or Del. Which one exactly depends only on the motherboard. When the desired menu appears, you need to select the Advanced line, where configuration settings, sometimes called Configuration, will become available. It is in the configurations that there is a controller line where you need to change the Disabled value to the Enabled value. After this, the computer restarts and the manipulation is repeated to get into the BIOS menu. After this, you can notice the appearance of a second hard drive. Thus, using the BIOS program, you can find out where to look at the hard drive in your computer.
Hard drive test program Crystal Disk info
One of the popular programs for assessing the condition of a hard drive is Crystal Disk info, which not only has a clear menu, but also supports the Russian language.
This program demonstrates a complete description of the technical characteristics of the hard drive. Here you can measure the current temperature of the device, find out the number of starts, total operating time, rotation speed, and so on. Based on the presented data, the program draws a conclusion on the technical condition of the hard drive.
Hard drive recovery
Often, many users are faced with the problem of recovering data from a problematic hard drive. As mentioned above, often the information stored on it is valued much more than the hard drive itself. Therefore, the work of recovering lost data is not only valuable, but also highly paid. Much depends on how the information disappeared. It is important to remember how Windows deletes information from your hard drive.
The operating system does not erase information that the user wants to remove. It simply deletes the hard drive's table of contents, which allows you to find this information. This table of contents is called a FAT table. And if after that no other information was recorded on the body of the Windows 10 hard drive, then it is quite easy to restore it. There are many programs that can do this job. According to many users, one of the best is Acronis Recovery Expert.
Program for measuring hard drive parameters Crystal Disk Mark
This utility is also very popular among users who purchase goods through online stores and in person. Since it supports all types of drives, including solid-state hard drives, it is capable of using a wide variety of algorithms to capture real data.
Thanks to this program, you can, for example, find out what the real read/write speed of any hard drive is.
Hard disk (HDD) is one of the basic elements of any computer. It is he who is responsible for storing all information - from the operating system to individual user files. In recent years, classic hard drives have been replaced by more reliable but also more expensive solid-state drives (SSDs), but they come in the same form factor and serve the same functions. Therefore, all the information presented here applies to both types of data warehouses. We will tell you how to remove them from your computer and what rules you need to follow.
How to remove a hard drive from a computer
Physical examination
If the hard drive has failed and you want to remove it or are simply not afraid to disassemble the laptop, then you can find out the type of media as a result of a physical inspection. But first you need to get to the disk:
- Disconnect the laptop from the electrical outlet and turn it upside down on a flat surface. Remove the battery.
- Unscrew the lid covering the bottom of the laptop. Some models have separate small covers, under which there are compartments with RAM or hard drive. If you are lucky and have just such a laptop, then all you need to do is remove this small cover.
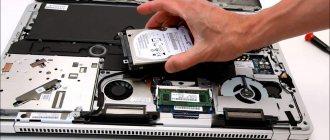
The hard drive is mounted inside the laptop on a special slide. Unscrew them and carefully remove the device from the case. Now you can find out the model, volume, speed and other important parameters.
About sizes, location and interfaces
To remove a hard drive, you need to know what it looks like, where it is located, what and how it is connected. Experienced computer scientists can skip this section, for others - a small theoretical basis.
The specific operation of a hard drive requires its protection from excessive vibrations, as well as the impossibility of free movement of the part in the computer system unit. Therefore, the HDD is usually installed in a special pocket equipped with two guides, and fixed in it with bolts or clamps.
Note! Although SDD is less demanding in terms of mechanical stability, it is usually located there. The pocket on most system units is located in the lower front part.
Hard drive mounting location
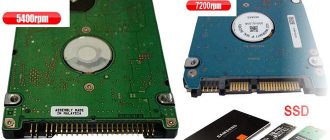
Externally, the hard drive is a rectangle with a standard width of 2.5 or 3.5 inches (70 or 102 mm), corresponding to the width of the mounts. Other form factors are also less common. The standard sizes have official names: Small Form Factor (SFF) and Large Form Factor (LFF). Thickness can vary between 7-15 mm.
The thickness of hard drives varies
The hard drive has an all-metal or semi-closed metal casing, while solid-state drives come in aluminum or plastic casings. Data exchange interfaces are installed on the rear end panel. They come in two types:
- IDE (ATA) - widely used from the 1990s to the 2000s, easily recognizable due to its wide 40-wire cable with a rectangular plug;
- SATA is a modern high-speed interface, much thinner than its predecessor and has only seven pins hidden under the plug hood.
As you can see in the figure, the shape of the four-pin power plug for hard drives with IDE and SATA interfaces is also different.
Distinctive features of the plugs
Data buses connect hard drives or solid-state drives to the computer's motherboard. Well, the electricity necessary for the operation of the components comes directly from the power supply via a standard four-wire branch.
How to distinguish SATA 2 from SATA 3?
There are no design differences between SATA 2 and SATA 3. By definition, SATA 2 is a data exchange interface with a bandwidth of up to 3 Gbit/s, while SATA 3 provides data exchange speeds of up to 6 Gbit/s. Both specifications have a seven-pin connector.
Interesting materials:
How to turn on headphones on a laptop? How to turn on headphones on a laptop? How to enable headphones on the front panel of the computer? How to turn on headphones on a tablet? How to turn on headphones on Samsung Galaxy? How to turn on headphones on a smartphone? How to turn on QCY t5 headphones? How to turn on Redmi AirDots headphones? How to turn on Sennheiser headphones? How to turn on wireless headphones?
Disconnecting and removing drives on a PC
Dismantling a hard drive can be carried out for various reasons: to diagnose a part, clean the system unit, replace a faulty or outdated drive with a new one.
Important to remember! After removing the HDD or SDD from the computer, all the data stored on it will be inaccessible, and if an operating system is installed on this drive, the PC will not turn on at all until the disk is returned to its place.
The work is performed in the following sequence:
- Turn off the computer and unplug the power cord from the power supply. Let the system unit stand for 10-15 minutes. This time will be enough for the mechanical elements of the HDD to stop rotating, the parts heated during operation to cool down, and the capacitors to release their residual charge.
Unplug the power cord from the power supply - Find the bolts securing the right side cover on the rear end panel of the system unit and unscrew them. To remove the cover, slide it back and pull it towards you. proceed carefully so as not to damage the wires. If there are any electronic elements on the cover (fan, cooler, backlight, control buttons), open the cover slightly and remove the plugs from the corresponding sockets on the motherboard.
Unscrew the fastening bolts - Disconnect the power cord and then the data cable from the corresponding hard drive connectors. Do not pull the wire - this may damage the interface contacts. Place your fingers around the plastic rim of the connector and pull.
Disconnect the power cord and then the data cable - Unscrew the two screws securing the hard drive and pull it towards you. Please note that instead of bolts, spring or sliding clamps may be installed, which must be installed in the free position.
Unscrew the hard drive mounting bolts - Remove the drive from your pocket. If it does not give in, remove the left cover - sometimes the part is secured on both sides for a more reliable fixation. In this case, you will have to unscrew the screws or loosen the clamps on the other side.
This completes the removal of the hard drive. Installation is performed in reverse order.
Disabling and removing drives on a laptop
All stationary system units are designed almost identically. There are differences in size, location of some elements, types of fastenings, but not in the basic configuration of the block. Therefore, removing a hard drive from a PC is relatively easy. Working with laptops is much more difficult, because each manufacturer, in pursuit of compactness, develops its own device layout.
Finding and removing the hard drive on a laptop
Note! First of all, carefully inspect the bottom cover of the laptop. It can be general or consist of several parts.
The second case is preferable, as it allows you to directly access the hard drive through a special window. In the same case, when the entire lower surface of the gadget is covered with a common cover, you will have to get a little confused with finding the drive and clearing the way to it. Let's look at the general technique for removing an HDD or SDD from a laptop using the example of a device with separate covers.
- Turn off the laptop, disconnect the power connector and all other cords from it. Close the laptop and turn the bottom cover up, then remove the battery (it is usually secured with one or two sliding latches). Leave the gadget for 10-15 minutes.
We take out the battery - Remove the screws securing the hard drive bay cover. In the case of a common cover, unscrew all screws at this stage. It is better to immediately put them away in a safe place - due to the small size of the screws, they are very easy to lose.
Unscrew the screws securing the hard drive compartment cover - Under the lid there is a metal basket, inside of which the disk drive is located. The basket has several ears (usually four), which are fixed to the laptop frame with screws. Unscrew them. Remember that these screws may differ in size and thread from the cover screws, so place them separately.
Unscrew the screws - Lift the plastic tab of the basket, first pull it to the side to disconnect the hard drive from the data bus and power connector, and then pull it up to remove the basket from the pocket. Disconnect the hard drive from the data bus and the power connector
- Unscrew the four disk securing screws located on the sides of the basket. They are also not compatible with cover screws. Now the hard drive is free of all auxiliary elements. Unscrew the four screws securing the disk on the side surfaces of the basket
This completes the removal of the hard drive. Installation is performed in reverse order. It is better to strengthen the threaded connections, and especially the lid fastenings, with a small amount of sealant.
Read interesting information in the new article - “How to remove drive C from a computer.”
The intricacies of working with MacBook Pro
Replacing the HDD with an SSD in the MacBook Pro has recently become widespread among users. This is not surprising, because replacing an HDD with an SSD in a laptop is driven by the desire for faster and more comfortable operation of your pet, and Apple fans are no exception.
For esports players, installing an SSD in a laptop is mandatory.
After the upgrade you will receive:
- productivity increase;
- noise reduction;
- weight loss;
- increase in operating time;
- The device will heat up less.
To replace the SSD on a MacBook there can be various reasons, breakdown or lack of space, and it is not at all necessary to contact service centers. Anyone who can use a screwdriver can replace the hard drive on a MacBook Pro. Below you can watch a very detailed video on replacing an SSD drive on a MacBook Pro. We prepare the PH0 and T6 screwdrivers and get to work:
Turn the device over and unscrew the screws. Carefully lift the lid and remove it. The hard drive is held in place by a 2-part fastener; unscrew the one closest to the HDD. Since it is necessary to remove the hard drive from the laptop carefully without damaging it, manufacturers have provided the device with a special tongue. By pulling the tab, we lift the hard drive and remove the second part of the mount. Replacing a laptop hard drive requires caution
Carefully disconnect the cable connecting the hard drive to the board. We unscrew the hexagons located on the sides and screw them into the new SSD. We install the new media and assemble everything in the reverse order, replacing the hard drive in the laptop is completed. The old hard HDD can be used as an additional external drive.
The nuances of connecting incompatible hard drives
Sometimes you need to connect your computer's hard drive to your laptop or vice versa. Due to differences in product form factors or interface types, a number of problems may arise, which, however, can be solved very simply. Follow these tips and you will succeed:
- to connect a hard drive with an IDE interface to a SATA motherboard, use a special adapter; it also allows for the reverse sequence of connecting the part; Hard drive adapter
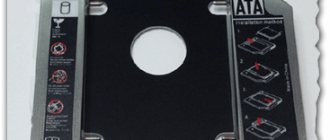
- to install a 2.5 standard hard drive into a case that supports the 3.5 form factor, you will need a magnifying pocket, which can be purchased at any large computer hardware store; Magnifying hard drive pocket
- any hard drive can be connected to a laptop or PC using a USB interface if you use a special adapter and provide an external power source (this advice is primarily useful for those who need to use a 3.5-inch drive on a laptop); Special adapter for connecting a hard drive
- If for some reason you are unable to securely fix the hard drive in the device case, provide it with maximum protection from vibrations and mechanical shocks, for example, place a soft lining in the free niche of the system unit, and secure the part at the edges with cardboard spacers (however, do not forget , that the hard drive heats up during operation and requires sufficient heat exchange with the environment through the surface of the case), also remember that the wires and cables should not be over-tensioned; Securely fix the hard drive in the device case
- in system units or servers with several hard drives located close to each other, intensive air cooling of the entire internal surface of the case is necessary, otherwise overheating of the drives is inevitable; In addition, there are pockets for HDDs with forced cooling. Air Cooling for Hard Drive
Removing a hard drive, replacing it, or installing an additional drive is difficult only at first glance. Follow the instructions outlined here exactly, be careful and careful, and you will definitely succeed!
What types of hard drives are there?
So, we found out that a hard drive is an information storage device for a computer. Now let's figure out what types of HDD there are. First of all, it should be noted that hard drives can be divided into two categories:
- External drives that can be connected to any computer via a USB interface. In some ways they resemble a flash drive, only larger in size. Such hard drives do not need special software.
- Internal HDD drives are installed inside computers and have specific connectors for both power and information transfer.
Internal HDDs are also divided into several categories. There are several criteria by which a hard drive can be classified. This is the physical size of the hard drive. There are three standard sizes:
- 5.5 inches. Typically, hard drives of this size are used in desktop computers where there is a lot of free space.
- 3.5 inches are used mainly in laptops where space is limited and large amounts of memory are needed.
- 2.5 inches are used in ultrabooks where space is very limited.
Another feature by which drives are classified is the data exchange protocol between the hard drive and the computer. What protocols can the hard drive use? They are as follows:
- IDE is an older version of the protocol that was used mainly on computers and laptops before 2000.
- SCSI is a contemporary of IDE, a faster version of drive management, which was used mainly in server machines. It required special drivers to use such hard drives.
- SATA is a modern version of the protocol, which has several variants and has a high speed of writing and reading information. Used in almost all modern computer systems.