Friends, welcome to WiFiGid! Botan is in touch and today’s error correction instructions will be devoted to connected USB devices. Exact error text:
The USB device is not recognized. The last USB device connected to this computer is not working properly and Windows cannot recognize it.
In this formulation it is found on Windows 10, appears in the tray:
On earlier versions of Windows, the error also occurred, but the text here is slightly different: “The USB device is not recognized. One of the USB devices connected to this computer is not working properly and Windows cannot recognize it. For help troubleshooting this issue, click this message."
Well, in conclusion, if you go to the device status, there will be something like “This device cannot be started (Code 10).” And periodically - code 43 (but we wrote another article about this).
Method 2: Check if the device itself is damaged
If the USB device was working before upgrading to Windows 10, it is unlikely to be faulty. But coincidences do happen. It's possible that your device simply died at the same time as the Windows update. So it's better to rule out this possibility before spending time on more complex problems.
To check if a USB device is faulty, simply unplug it and connect it to another computer. If it works, the device is ok. If this is not the case, then you have isolated the problem! You just need to buy a replacement.
Android connection
Separately, I consider connecting Android devices (phones, tablets). I myself periodically debug applications when they are connected directly, and this is where these errors often appear. But I understand that an ordinary user can run into them and panic.
Friends, in notes format. I am writing this section as an addition, so you will have to think a little here too. But I hope the tips are useful.
- Why are you connecting your phone? To transfer files? In my practice, usually Android phones and tablets for some reason very rarely immediately go into file transfer mode. Usually this is either charging, or even the same debugging mode of the phone.
- Often the message about choosing a connection is hidden in the curtain - and without unlocking you may simply not see it. I highly recommend opening the top curtain of your phone and looking at all the notifications. Usually, the choice of connection type for your device will be hidden there - just switch to File Transfer.
- If, by accident or intentionally, you connect your phone for debugging, the new system does not have drivers for this mode. The device is not recognized, which turns out to be the error of this article. How to fix? Download the drivers specifically for your smartphone chipset (those who know the subject will understand), and the SDK you need is rolled on top - and so it starts up perfectly.
- Do you also remember about the presence of Modem Mode? Well, this is when you connect your phone to your computer via USB to distribute the Internet. To transfer files, it must also be disabled (Settings - Wireless networks - More - Modem mode), but in my memory the modem mode itself did not lead to the “USB device not recognized” error. Although they say that it happens.
Method 4: Disable Fast Startup
Fast Startup is enabled by default in Windows 10. This may prevent USB devices from booting. To fix USB ports not working on Windows 10, you can try disabling Fast Startup.
To do this, follow these steps:
- Open Control Panel.
- Switch to small icons, select "Power Options".
- Click Power Button Actions.
- Click Change settings that are currently unavailable.
- In the shutdown settings, uncheck the box next to “Enable fast startup (recommended).”
- Click Save Changes.
- Restart your computer and check if the problem is resolved.
Option #3: Windows Update
Sometimes errors with USB devices can be resolved by updating the system itself. To do this, we will take the following steps:
- Launch the “Settings”
from the start menu or using the keyboard shortcut
“Win + I”
.
2. Next, go to the “Update and Security”
.
3. Open the update center and on the right side of the window click on the “Check for updates”
.
The system will begin searching for available updates and install them automatically after downloading the files to your computer.
Method 5: Reinstall device drivers
To fix USB ports not working on Windows 10, you can remove and reinstall USB host controllers. To do this, follow these steps:
- Open Device Manager (type "Device Manager" in the Windows search box).
- Expand the USB controllers branch.
- Look for USB items.
- Right-click one of the USB items and select Uninstall (in some cases this may be Uninstall Device).
- When a dialog box appears asking you to confirm the deletion, click Delete. If you see the Uninstall device driver software checkbox, select it and click Uninstall.
- Repeat the steps above to remove all USB Host Controller items.
Please note that if you are using a USB mouse or keyboard, it will be disabled when the USB host controllers are removed. You can unplug your USB mouse or keyboard and then plug it back in to get it working again.
- Restart your computer to see if the problem is resolved.
What to do if Windows 10 does not see a USB flash drive
In fact, there can be a lot of problems due to which the operating system does not see your flash drive. First of all, it is recommended to check whether the flash drive itself and the ports into which you insert it are working. The best way to do this is by connecting the media to another device via a similar USB port. If everything is fine there and the device is displayed, then the device is physically working. If you suspect that the USB port on your computer is faulty, try inserting another device into it. Provided that it connects and displays normally, proceed to solving the problems described below.
Option 1: Virus infection
In such cases, the system will usually show the connection of the media itself, but you will not be able to open it (you will receive an error) or when opening it you will receive an empty directory. If this is the case, be sure to scan your computer using special antivirus programs. As a rule, after scanning, you will be able to remove detected threats or place them in quarantine.
In new editions of Windows 10, the standard Windows Defender is a fairly powerful program for finding and eliminating viruses. Instructions for its use in this case will look like this:
- Open Windows Defender. This can be done by calling the search bar using the magnifying glass icon in the taskbar. Type “Windows Defender Security Center” into the search bar. Select the appropriate one from among the delivery options.
Now, in the antivirus interface, click on the “Protection against viruses and threats” tile.
Look for the words “Run a new advanced scan.” Click on it.
Select a verification option. If there are real reasons to suspect a virus infection, then it is better to put a marker next to the “Full scan” option. After that, click on the “Run Scan Now” button.
Wait for the scan to complete. This usually takes several hours. The time depends on the number of objects being scanned, as well as on the characteristics of the computer itself. While the scan is in progress, you can use your computer, but it is not recommended to download anything from the network at this time. Upon completion of the scan, a list of detected malware and files will be generated in front of you. You can remove it directly from the interface, quarantine it, or add it to exceptions if you are confident in the safety of this program.
If the antivirus scan does not give clear results, you can try to find the Autorun.inf file on the flash drive and delete it. Unfortunately, you can only use this option if you can open the flash drive and it appears in Windows Explorer.
Do the following:
- First, you will need to make sure that all files on flash drives that have the “Hidden” attribute are displayed. Viruses usually assign this attribute to all files on the media. In the Windows taskbar, click on the magnifying glass icon and enter “Show hidden files and folders” in the search bar. Select the desired result.
Now open the View tab. In the Advanced Options window, scroll all the way to the bottom. There, be sure to uncheck the box next to the “Hide protected system files” item, and also check the box next to the “Show hidden folders” item. Click “Apply” and “Ok”.
Now open your flash drive in Windows Explorer. In it you will need to find the Autorun.inf file and delete it. Just select it by clicking the left mouse button and press the Delete key. Pull out the drive and reinsert it.
Option 3: USBOblivion program
Sometimes it happens that after installing updates, the system stops correctly displaying connected USB drives. In this case, you can fix the problem using the USBOblivion program. It is recommended to back up the registry before starting the procedure. This can be done using third-party programs, such as CCleaner.
Before you start using USBOblivion, it is recommended that you remove all flash drives from your computer. Now do the following:
- Run USBOblivion. If you downloaded it from the official website, then you will have an archive with two versions of the software - for 32-bit and 64-bit operating systems. Select the appropriate file for the OS and run it.
- In the window that opens, check all the boxes located at the bottom. These are “Do real clean” and “Save backup”. Afterwards you will need to use the “Clean” button.
Wait for the cleaning to complete. After this, you will need to restart your computer. Now reconnect the flash drive to your PC and check its functionality.
Option 4: Outdated drivers
For the normal functioning of your computer and all devices connected to it, you must have new versions of drivers installed. Fortunately, this problem can be easily resolved by updating or installing the correct drivers. You can do this by using special programs for automatically downloading and installing drivers or the built-in Windows tools - “Device Manager”.
Let's look at the example of the DriverPack Solution program on how to update and/or install the necessary drivers on a computer:
- Go to the official website of the software developer. There, click on the “Install all necessary drivers” button.
The program's executable file will begin downloading to your computer. Launch it after downloading. You can install all the necessary drivers right away if you use the big green button. However, in this case, along with the drivers you need, additional software will be downloaded to your computer, for example, various browsers, etc. If you do not need this, then go to “Expert Mode” using the corresponding inscription at the bottom of the window.
In the left menu, click on the icon in the form of four squares. There you will need to uncheck the programs you do not need. Return to the main menu of the program. This can be done by clicking on the wrench icon. Now you only need to click on the “Install all” button.
DriverPack Solution will create a restore point for the operating system. It will take some time. You don't need to do anything. Then the setup of your computer will begin. When the procedure is completed, click on the “Next” button, and then restart the operating system.
As a standard method for updating/installing drivers in Windows, you can consider using the “Device Manager”:
- Open "Device Manager" in any way convenient for you. For example, this can be done using the magnifying glass icon. In the search line that appears, enter the name of the object you are looking for. Among the options found, click on the one you need.
Your flash drive with which you are experiencing problems may be located in one of three branches: “USB Controllers”, “Disk Devices” or “Other Devices”.
After you find your drive in Device Manager, right-click on it and select Update Drivers. Windows will prompt you to choose how to update drivers. Since you most likely do not have pre-downloaded installers on your computer, select “Automatically search for updated drivers.”
Wait for the search and installation of drivers to complete. If you already have the latest version installed, Windows will tell you about it. Otherwise, the missing software will be installed. When the installation of the required software is completed, it is recommended to restart the computer and check the flash drive for functionality.
If you were unable to update your drivers through Device Manager in this way, then follow the alternative instructions:
- Expand the branch with your flash drive and right-click on it. From the context menu, select the "Properties" option.
- Next, open the “Drivers” tab. Here you will need to remove the old driver. Use the button of the same name. Confirm deletion if the system requires it.
Now return to the main Task Manager window. In it you need to use the “Action” button. Next, in the context menu, select “Update hardware configuration.” Restart the computer and check if the flash drive works as expected.
Option 5: Troubleshooting from Microsoft
Windows 10 already has a utility installed by default to troubleshoot problems with your computer. Sometimes it can help resolve the problem with displaying a USB drive when connected to a computer. If you do not have such a utility, then download it from the official Microsoft website.
Perform troubleshooting according to the following instructions:
- Run the Diagnostics and Troubleshooter. Here you will only need to click on the “Next” button.
- Wait while the program scans your computer for system errors.
- When the scanning procedure is completed, you will be able to view a detailed report. To fix a detected problem, you only need to click on its name.
- The troubleshooting process will begin. Wait for it to complete and do nothing.
Option 6: Recovering a flash drive
This option is in many ways very similar to the previous one, as it involves checking and correcting errors on the media using utilities built into the system:
- Open This PC to access all drives on the system.
- Right-click on the icon of the faulty device and select “Properties” from the context menu.
- Next, open the “Service” tab. Here you need to use the “Check” button.
- The media will be checked for errors. If any are detected, the system will prompt you to eliminate them.
Option 7: Incorrect USB drive letter
If the letter that your flash drive is designated in the system is the same as the letter of some other device, then the system simply will not be able to display it correctly. In this case, all you have to do is try to change the drive letter manually. This is done as follows:
- Click on the magnifying glass icon in the taskbar and enter “Computer Management” there. Open the element displayed in the search results.
Now you need to expand the “Disk Management” section, which is located in the left menu of the program. Right-click on your flash drive, which is displayed at the bottom of the program interface. From the context menu, select "Change drive letter or drive path."
In the window that opens, select your drive and click on the “Change” button. Now place a checkmark next to the “Assign a drive letter (AZ)” item. From the context menu, select the letter that you are going to assign to your flash drive. Click “Ok”.
Remove the media and reinsert it.
Option 8: Format USB
It often happens that the system cannot open a flash drive, but at the same time offers to format it. If there is no important data on the media, then it is better to agree and format it. If there is something important on it, then try to extract this data using special programs. Provided that you were able to obtain this data, format the media, since information from it can still be recovered using special programs.
The system may not show notifications that the flash drive needs formatting, or you may accidentally turn off this notification. Then format the media according to the following instructions:
- Open This PC and right-click on the faulty media. There, click on “Format”.
A window with formatting options settings will open. Here you can only disable the “Quick” item, which is located in the “Format methods” block. However, in this case, the files located on the flash drive will be very difficult to recover.
Use the button of the same name to start the procedure.
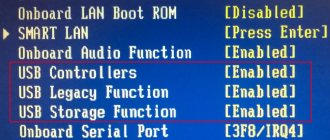
Option 9: Incorrect BIOS settings
If you don’t see any USB drives at all, then most likely the BIOS is configured in such a way that it does not allow connecting via USB ports. In this case, all you have to do is try to change its settings:
- Restart your operating system and press F2 or Delete before the Windows logo appears on your computer screen. However, for different BIOS versions, the key or combination thereof responsible for startup may differ. You can find out more about this in the specifications of your computer or motherboard.
- In the BIOS interface that opens, open the “Advanced” item, and then go to “USB Configuration”. Please note that switching between menu items in the BIOS interface is done using the arrow keys. Also, depending on the BIOS version, the interfaces and names of menu items may differ.
- Opposite the item “USB Configuration” should be the value “Enabled” or “Auto”. If something else is installed there, then select the one you need from the menu and install it.
- Now you need to save the changes and exit the BIOS. In most versions, you can use the F10 key to do this. If it does not work, then find the “Save changes and exit” item in the menu.
Method 6: Check your power management settings
To save power, Windows by default turns off your USB controllers when they're not in use and turns them back on when they're needed. Unfortunately, sometimes this approach does not work as expected and Windows cannot enable your USB controllers again.
To rule out this as the cause of your USB problems, simply don't let Windows manage power to your USB controllers and devices:
- Open Device Manager (type "Device Manager" in the Windows search box).
- Expand the USB Controllers branch.
- Double-click the first USB device in the list (if you only see one USB device, that's okay).
- Go to the Power Management tab.
- Uncheck Allow the computer to turn off this device to save power and click OK.
- Repeat steps 3-5 for each USB Root Hub device in your list of Universal Serial Bus controllers.
We solve the problem through the device manager
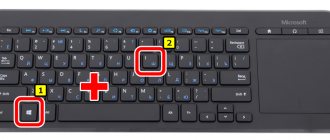
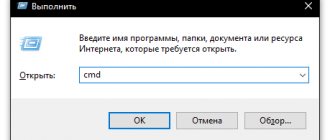
In this method we will use the task manager and I would like to immediately note that this method will help some, but not others. So, first, by pressing the Win + R keys, open the “Run” window and enter a phrase there that will open the device manager for us: devmgmt.msc.
Since today we are talking about problems with USB, most likely the problematic device is located in the “USB Controllers” section. There are also unidentified devices that you should also pay attention to.
If the device is unidentified, that is, with a yellow exclamation mark, then you can try to update it via the Internet by right-clicking on it. Or, if that doesn’t help, use the online version of Driver Pack Solution, which will help you find the missing driver. We wrote about it here.
Here are a couple more methods, in case the unidentified device is located in the USB controllers tab.
- Right-click on the device and in “Properties” select the “Driver” tab, where you need to click roll back. If there is no such item, then simply click delete, and then update the equipment configuration and see if the unidentified device has disappeared.
- In this case, we need to go to the “Generic USB Hub”, “USB Root Controller” and “USB Hub” items. In the properties of these devices in “power management” you need to UNTick the “Allow the computer to turn off this device to save power” option.
The next method that works on Windows 8.1 is that for all the devices that we listed above, you need to click on the “Update drivers” button in the properties and then, in the window that appears, select search on this computer. The most compatible drivers should already be on your computer, and you will see them in the window. You need to select it and click next. If everything went well, you can try connecting the USB device that was not working. By the way, before connecting, I would advise you to restart your computer again.
Method 7: Check USB device drivers
Your USB ports are not working problem, probably due to driver issues. The steps above may resolve this issue, but if you try updating your USB drivers, it can be done automatically using DriverHub.
DriverHub will automatically recognize your system and find the correct drivers for it. You don't have to know exactly what system your computer is running, you don't have to risk downloading and installing the wrong driver, and you don't have to worry about installation errors.
To update drivers automatically
- Download and install the DriverHub program.
- Launch the program.
- Click the Find Now button.
- Once the scan is complete, click “Install”.
Error correction options
The reasons for the above-mentioned problem may be either a faulty USB port or cable, or incorrect functioning of the device itself or its drivers. Let's take a closer look at what can be done to fix the problem.
Option #1: Checking the device's functionality
Before you start solving the problem using software, you should check the functionality of the device itself and the connectors where it is connected. To do this you need to do the following:
- disconnect all USB devices and connect only what you need;
- insert the device into another connector;
- check the cable used;
- connect the device to another system.
If these methods do not resolve the problem, the software is most likely causing the problem. To resolve this type of problem, you can use the following methods.
Option #2: Update or reinstall the driver
The first thing you should do to resolve software problems is update the device driver. In some cases, it can be found and downloaded from the official website of the device manufacturer.
Most devices work with standard Windows drivers. To update the software, you will need to do the following:
- Open the search bar by clicking on the icon in the Windows taskbar or using the keyboard shortcut “Win+S”
. - Next, enter the request Device Manager in the line.
- We launch the program from the search results.
4. Now in the manager window we find the “USB Controllers”
and open it.
The error still occurs...
Every Windows 10 user sooner or later becomes familiar with the situation when, when connecting to a USB port, an error suddenly pops up that it is not recognized “USB device_descriptor_request failed” (Code 43).
Such problems can arise not only if the device is connected for the first time - for example, your good old flash drive, and no matter how trivial it may sound - you need to update the drivers, along with checking the power supply, we will update the firewood one by one for all categories - until the problem disappears . Step by step:
- We follow in “Device Manager” - there are 2 methods indicated above
- In the drop-down list “Controllers_USB” → right-click “Root_USB-con”
- You will be asked to choose exactly how to search for software → select “Perform a search for drivers on this computer”
- Click on “Select_driver_from_list…” → “Next”
- The driver “Root_USB-con” must be offered
At this point, drivers have been successfully installed - restart your computer.
Tip #8: Install the latest motherboard driver
As mentioned above, sometimes complaints should be made not to a single entry in the “Controllers” section, but to the motherboard as a whole. Well, if, as at the beginning of the article, you are experiencing connection difficulties, take a few simple steps:
- Using the specification supplied by the seller or a special hardware identification application, find the name of the board you are using. It includes the name of the manufacturer and the model name. For example, you can look up the motherboard model in the free Aida64 program.
- Find the newest driver using the criteria you received (it’s best to do this on the manufacturer’s official website), download and install it.
When finished, restart your PC as always. Instead of searching manually, you can use a special application that automates the update process.
conclusions
If suddenly you cannot connect your phone, external hard drive, flash drive and other devices via USB, you don’t need to get upset right away. Firstly, failure of one port out of ten in the system is common. Trying to simply use a different connector is as easy as shelling pears. Secondly, even if nothing worked for you in terms of software, you can try reinstalling Windows.
Of course, reinstalling the OS is not a panacea for all problems and the process is quite difficult, especially for those who have never encountered it. However, even he can help you.
Perhaps your micro-USB connector is not working due to an actual controller failure. It cannot be replaced on the motherboard. This means either buying a new motherboard, or, as an option, purchasing an external controller with a PCI interface.
When working with some flash drives, a message appears stating that the USB device is not recognized, and it becomes absolutely impossible to work with it. There are several very effective ways to solve this problem, and we will look at all of them.
And if nothing helps then, then it’s better to throw away the removable storage device or check the USB port. Let's get started!
To start
To get started, I recommend following a few simple steps. It may be possible to quickly overcome the cause of the malfunction.
Check settings
If charging is in progress, but the cell phone is not detected as a portable drive, be sure to check the settings. Modern Android smartphones have several modes of connecting to other devices:
- Charging only (no data transfer),
- USB modem
- MIDI (not on all models),
- File transfer (MTP) - select this option,
- Transferring photos (PTP), pictures.
Perhaps, when you connected your smartphone, you did not notice that a frame (request) appeared on the screen, prompting you to select the desired mode.
If the prompt has already disappeared, reconnect the device to the same USB port and select file transfer mode (MTP). As a rule, by default, the Android mode automatically turns on - charging only. Therefore, the computer may not see the phone and user intervention is required.
Restart your computer and phone
Often the problem of non-working synchronization between devices can be solved with a regular reboot. This is explained by the long operation of the equipment and possible technical failures.
In 90% of cases, this helps solve the problem when the laptop stops seeing the smartphone.
Check the USB cable for damage
Long-term use (more than 2 years) of even a factory-made USB cable will certainly lead to connection difficulties. There can be several reasons for cable damage: the cat is partial to computer equipment, the cable is broken inside or outside (broken veins are visible), or a broken cord. The type of connector in this situation is not important, be it micro-USB, Type-C or Lightning, the principle is the same.
If you recently upgraded your cable and decided to save money by purchasing a Chinese product, this may be another reason for file transfer problems. Even if you often buy goods from China, the wire must be of high quality, work reliably and for a long time. Don't go after cheap prices.
Port not working on PC
Sometimes the USB ports on computers, desktop or laptop, fail. If you suspect that the problem is in the connector, check this way:
- Connect the same phone with the same cable to another port;
- Connect anything with any cable to the questionable port.
If in the first case the phone is recognized, but in the second the device is not found, then the problem area is most likely the port. What to do:
- If you connected through a hub, replace it. A defect in one port can easily spread to the others;
- If you connected directly to your computer, use a different port for now. But as soon as possible, send your PC to a service center for inspection and repair.
Not working connector on the phone
If you suspect that the port on your smartphone has become worn out due to frequent connections and may turn out to be a “weak link,” check your phone.
- Make sure your phone is connected in data mode.
- Connect the phone to the same PC with the same and then a different cable.
- Connect it to another PC with the same and then another cable.
If in all cases the connection is not detected, then the problem is with the phone. What to do:
- Send your smartphone for repair. If it is equipped with wireless charging, then you can work with it for some time without using the port. But such use will be inferior, so it is better to correct the defect immediately;
- In the future, use a wired connection as little as possible, and use wireless charging and file transfer via Wi-Fi or the cloud as often as possible.
Unlike the first two cases, nuances with the “recessed port” are possible here. Sometimes in smartphones (especially in “off-road” models), the MicroUSB or Type C port is slightly “recessed” into the body to increase security. To connect through such a port, you need a special cable with a slightly elongated plug. Therefore, if you have a secure phone, use it only with the included cable or immediately buy an appropriate spare one.
A standard length plug will most likely not work in this case. As you can see, in most cases the problem is solved without the involvement of specialists; if the defect is serious, then it is necessary to hurry with the repair. And then your smartphone will easily connect to your computer again.
Install updates
Be sure to install Windows and Android updates. I recommend updating all programs installed from the Play Market. In 80% of cases, if the PC stops seeing the cell phone, this helps.
Turn on airplane mode
If Windows stops seeing your phone, launch airplane mode through the quick settings panel in the curtain or by going to “Settings - More”. Often after this the device is recognized by the PC. This is a simple method, so don't be lazy to try it.
USB devices malfunction due to power problems or static electricity
Quite often, problems with the operation of connected USB devices and failure of the device descriptor can be solved by simply turning off the power to the computer or laptop. How to do it for PC:
- Remove the problematic USB devices, turn off the computer (by shutting down, it’s better to hold Shift while clicking “Shutdown” to turn it off completely).
- Unplug it from the outlet.
- Press and hold the power button for 5-10 seconds (yes, with the computer unplugged), release.
- Plug your computer into the network and simply turn it on as usual.
- Connect the USB device again.
Other errors, freezes, "Insert disk"
The following steps will help the computer see the flash drive if one of the points applies:
- Drivers are installed and working;
- A new device is detected, but the flash drive does not appear in “My Computer”;
- A message appears such as “USB device not recognized”, “Insert disk”, “Error 43 / Error 43” or “Access denied”, especially in Windows XP;
- When connecting a flash drive, Windows freezes, especially in Windows XP