As a rule, when it comes to rolling back a Windows 8 system, many users mean completely different things. For example, the most basic topics include:
- deleting downloaded updates;
- return using a restore point;
- restoration of the original state of the system.
Let's look at various cases in more detail, since sometimes in critical situations you have to use everything. Especially if Windows won't boot at all.
Uninstalling updates
Sometimes recently downloaded Windows updates can be the cause of crashes. Problems that arise include:
- Some application stopped working;
- problems with the functioning of drivers;
- changing the appearance of the system (and at the same time you don’t like it, because you are used to the way it was before) and much more.
Rolling back all updates is quite easy. To do this, you need to do the following.
1. Open the Start menu.
2. Click on the “Arrows” icon, which is pointing down.
3. After this, you will have a large list of applications. You need to scroll it to the right.
4. Scroll until you see “Control Panel.”
5. By clicking on this link, you will see a list of “All Control Panel Items”. You need to click on “Windows Update”.
6. Next, click on the “Installed updates” link.
7. Immediately after this you will have a large list of everything that was downloaded by the update center.
8. Select any item and you will see the “Delete” button.
9. Select any update and click on delete. As a result, you will be asked for additional confirmation.
10.After agreeing, you will need to wait a little. The waiting time depends on the size of the update.
Before you start, it’s worth thinking about: “What updates need to be removed?” After all, there are a lot of them there. Carefully! The “poke” method will not do anything good. On the contrary, the situation can be worsened.
Use sort by time.
It is logical to assume that the latest updates are to blame for the latest problems and system failures. Remove them all and see if the OS returns to full functionality.
Using the command line
You can also work with these add-ons through the console. This is done as follows.
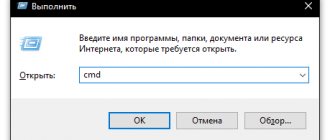
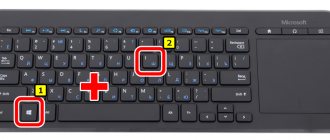
1. To get started, press the + key combination. In the Run utility window that appears, enter the command “cmd”. To start, press on the keyboard or the “OK” button.
2. Then enter the following command.
To enter, press the key.
3. Immediately after entering you will see help about this utility.
Using this description, you can do almost the same thing as shown above.
How Refresh Your PC works
I was more interested not in how to perform the restoration, but in the principle of its operation. I want to share some finds with you. I will consider the scenario of creating and restoring your own image, since it is more interesting.
Saving data in shadow copies
After executing the image creation command, I immediately noticed the line “Creating snapshot”
This suggested that the data included in the image was first stored in shadow copies. Process Monitor confirmed my assumption.
After which I could not resist and looked into the shadow copies. With one command you can list them and see the path to the shadow copy volume. And access from the file manager is already a matter of technology, thanks to.
vssadmin list shadows mklink /dc:\shadow \\?\GLOBALROOT\Device\HarddiskVolumeShadowCopy2\
Creating a WIM image
Shadow copies allow you to create an image of a running
currently in the system, and this is a new feature in Windows 8.
In Windows 7 and Vista, the imagex utility was used to capture a volume into a WIM image, and the operation had to be performed when the system was not running (for example, from another installation or Windows PE). Now the main tool for working with images, DISM, has acquired the functions of creating and using WIM images.
DISM /Capture-Image/? DISM /Apply-Image/?
Obviously, recimg uses the same technology, but does not involve the DISM utility in the process, otherwise its log and Process Monitor would reflect this fact.
Image Contents
Having created the image, I did not fail to look into it:
DISM.exe /Mount-Wim /WimFile:D:\backup\CustomRefresh.wim /index:1 /MountDir:C:\mount
System folders and programs located on the system partition are present in full, which cannot be said about user data.
Of the user data, only the shared folder and the standard user profile are included in the image.
As a result, the WIM image itself is not suitable as a backup copy, for example, in the event of a disk failure. Obviously, it does not contain data or user settings. However, when you restore Windows 8 using Refresh Your PC, your data will not be lost!
Restoring Windows 8 in Windows PE
The recovery procedure is performed in the Windows PE environment, regardless of whether you launched Refresh Your PC from a running system or a recovery environment (Windows RE).
And this is where the already familiar mechanism of reinstalling the system comes into play, preserving the data and settings of the user environment. The sequence in brief is:
- The contents of profiles and other folders are moved to a separate area on the disk.
- A new system is being installed.
- Your files are returned to their original locations
The difference from reinstalling on top is that the contents of the profiles are not restored entirely, which is why program parameters and personal settings are lost in particular.
If you created your image CustomRefresh.wim
, it is used as the installation WIM image, and not the standard install.wim file from the distribution.
As in the case of reinstalling a system over an existing one, the old OS is stored in the Windows.old folder, which can be deleted.
As you can see, Refresh Your PC uses a combination of new DISM capabilities and time-tested data transfer technologies to restore Windows 8 using Refresh Your PC.
Factory reset
If the problem cannot be resolved in any way, then the only option is a full reset and return to the default parameters and settings. You can do this as follows.
1. Press the + key combination on your keyboard. In the right pane that appears, click on “Change computer settings.”
2. Then go to the "Update and Recovery" section.
3. Here you will see brief information about updates: exactly when the last check was and the installation time of new additions. Open the "Recovery" category.
4. You will be offered several system rollback options to choose from.
Let's look at them in more detail, since each method has its own characteristics.
Recovering your computer without deleting files
This method is intended for those who want to eliminate flaws in the operation of their PC, but at the same time save all the important files located on the “C” drive. To do this, you need to do the following:
1. Click on the appropriate button.
2. An analysis of the system state will start. We need to wait a little.
3. Most likely, you will be told that some files are missing and you need to use installation media to restore.
This situation, as a rule, arises as a result of installing various programs for optimizing Windows 8, which remove various services (updates, spying, etc.) and new applications that were not previously in the “Seven”.
4. This message will remain until you insert the disk. Immediately after this you will see information about further actions. Click on the "Next" button.
Video
Below you can watch a training video that clearly shows all the steps from this article. Together with the video instructions, you will be able to figure out the difficulties and restore your computer without outside help.
The Windows 8 (8.1) operating system has several high-quality recovery and reset mechanisms. You can reset the system completely , clearing all user data, and also perform a recovery, leaving the data , you can also roll back the OS to the state at a certain point in time .
If your Windows is installed in such a way that it has a recovery partition, then you will not need any additional disks to return to the original settings. This happens when you buy a PC with a pre-installed system.
If you installed Windows yourself from a distribution kit , then most likely you will need it when performing a return to the original state.
If the preinstalled system was Windows 8, and then it was updated to 8.1, then after the reset you will need to install updates for this version again.
Restore points
Let's look at working with recovery points.
Creation
Automatic saving of recovery points occurs in the background. But in some builds of Windows this feature is disabled. To create it manually, you need to do the following.
1. Press the + keys on the keyboard at the same time. Then select “Control Panel” from the menu that appears.
2. After that, click on “Recovery”.
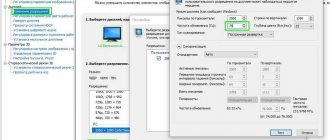
3. In the window that opens, click on “System recovery settings”.
4. Then click on the “Create” button.
5. You will then be asked to provide a name to further facilitate identification of this point. To create, click on the appropriate button.
6. Wait a bit.
7. As a result, a message about the result of the operation will appear.
Rollback
Reverting Windows to a restore point is very simple. This is done in several steps.
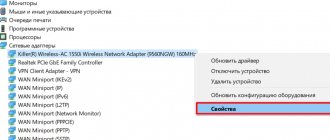
1. First, in the system properties, you need to click on the “Restore…” button (how to get to this window is written in the creation section).
2. You will be offered a recommended option. To view other points, select the second option and click Next.
3. As you can see, our previously created “Test Moment” is in the list.
4. Select any of the proposed options and proceed further (the button will be inactive until selected).
5. At the end, you need to click on the “Done” button.
6. You will be additionally warned that you will not be able to return anything later and you will not be able to interrupt the process. We agree, because our goal is to roll back the system.
7. After reboot you will see the following.
8. At the end of the operation, you will see the desktop. In addition, a notification about the actions taken will be shown.
Video on the topic
Good publicity
The Windows 8 operating system has made a big step forward compared to its predecessors in terms of rolling back to factory settings. Now there are several tools here that allow you to perform this operation. Read more in our article.
Note! Let's make a reservation right away - the differences in the rollback architecture in Windows 8 and Windows 8.1 are so insignificant that we will consider them in one instruction. It will work both there and there.
How to reset a laptop to factory settings in Windows 8
What to do if you can't log into Windows
Sometimes you can't log in. Of course, everything can be demolished and reinstalled again. But what if the information needs to be saved? This can be done in two ways:
- use save points (provided you created them);
- reinstall the OS without formatting.
Let's consider both options.
Restore point
Previously, we showed how to rollback using various system snapshots. But we were talking about working in functioning Windows. If you can't log in, here's what you need to do:
1. While turning on the PC, press the + buttons at the same time. Let's move on to diagnostics.
2. Then – to additional parameters.
3. Next, click on “System Restore”.
4. Select an account.
5. If you do not use a password, immediately click on continue.
6. In the window that appears, click on the “Next” button.
7. Select any moment you need and click “Next”.
8. Complete the settings with the “Finish” button.
9. We agree that you understand that it is impossible to cancel the process.
10.Wait for a message about successful recovery and click on the “Reboot” button.
As a result of this, you will get a working operating system, although before you could not even log into it.
Reinstalling Windows from BIOS
If you are desperate and you have neither a system image nor checkpoints at hand, and Windows does not boot, you will have to do a system rollback using a radical method.
1. Insert the installation disc or USB drive. Go to BIOS. Go to the "Boot" section.
2. Use the and keys to move the USB-HDD to the first line. Click to save. After this, the computer will restart and the installation will begin. Click on the "Next" button.
3. Then click on the “Install” button.
4. We agree with the license and go to “Next”.
5. At this stage, you will need to select “Update”, and not the usual installation.
This way you can reinstall Eight and save all your files.
Errors during system rollback and ways to fix them
If the ability to restore the system has failed, the buttons are not active, or the rollback process simply does not work, using safe mode will help. For this:
- While turning on the computer, press the F8 key.
- Choose to start in Safe Mode.
- After starting, try again to run the rollback tool that did not work for you before.
System rollback hangs
If the system rollback freezes during the process, try the following options:
- select an earlier recovery point - this will be helpful if the error already existed at the time you created the rollback point or if the recovery point is damaged;
- try to rollback through safe mode;
- reset the system to its original settings if “softer” rollback methods do not work;
- Reinstall the system if a reset is not possible.
Another option is to restore the system from a boot drive:
- Connect the boot drive from your bootable system.
- While the system is booting, press F11 or F12 to open the Boot Menu and specify the desired drive to start.
- Instead of installing Windows, select "System Restore" in the lower left corner.
- Your system will be scanned and any missing files will be installed from the disk, fixing broken recovery features.