Wireless Wi-Fi Internet is becoming more and more part of our everyday life every year. In order to use this technology, you need to know how to connect Wi-Fi on a laptop, smartphone or tablet. Modern youth can cope with this without problems, but the older generation is not always able to do this. Therefore, in this article we will show you in the simplest possible terms how to connect wifi on your laptop. And we’ll also look at ways to connect a desktop computer to a wifi network.
How to enable wifi on a laptop Windows 10, 8, 7
Before you try to connect to Wi-Fi, you need to make sure that the radio module is running. Now we will show you the simplest and fastest options for turning on the WiFi module.
Method No. 1: Turn on Wi Fi using the slider or button
Some manufacturers place a special slider or button somewhere on the laptop body. Therefore, you need to carefully inspect the entire body for such switches. Usually there is a Wi-Fi icon next to them. Or there may be a power button on the top row of the keyboard. When you click on it, it should light up, this will mean that you have activated the radio module. The photo below shows an example.
Method No. 2: Turn on Wi-Fi using a combination of buttons
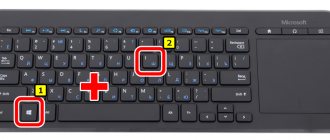
Didn't find any slider or power button? No problem, let's try to activate it in the second way. Modern models provide activation of the Wi-Fi module by combining several keys at the same time. The first mandatory button is “ Fn ”, hold it down, as well as F12, F3, F2 . On different models, the “ F... ” button is different, look at all the keys, you may find a Wi-Fi network icon. If you find it, then press Fn + this button with the icon. Below in the photo we give an example of the most common combinations.
Method No. 3: Soft launch WiFi
The third option is to enable Wi-Fi through the Options . We'll show you how to do this now.
- Click on “ Start ”, “ Settings ”.
- A window will appear, in it select “ Network and Internet ”. Next, “ Configure adapter settings .”
3 A window will pop up in which all adapters on this PC will be displayed. Wireless LAN adapter is gray, it means it is turned off. Right-click on it and select the first item “ Enable ”. Once turned on, the Wireless should turn bright.
The easiest and fastest way to start on Windows 10. Where the clock is, left-click on the network icon. If the Wi Fi button is gray, press it once, it should turn blue (enabled).
Common problems and solutions
Methods to solve the most common problems with setting up Wi-Fi on Windows 10 are listed below.
How to solve the limited connection problem
The main ways to connect to Wi-Fi on Windows 10 if the network icon in the system tray has the “Restricted” status (yellow exclamation mark next to the icon):
- Check the IP and DNS address settings.
- If the OS limits the power of the Wi-Fi adapter when running on battery power, you should prevent the device from turning off in power-saving mode.
- Update drivers.
- Make sure that the checkbox next to “IP version 4 (TCP/IPv4)” is activated in the adapter properties.
- Check the region in the router settings.
- Enable Federal Standard Information Processing Compliance mode in the advanced settings of wireless network properties.
Additional Information. You can use not only a router, but also a cell phone as an access point to a wireless network.
A limited connection error can appear both with a Wi-Fi connection and when accessing the network via a LAN wire
Tips on drivers for Wi-Fi
To determine whether the drivers for the Wi-Fi adapter are installed, you need to go to Device Manager and check its status. To open a list of hardware that is on your Windows 10 computer or laptop:
- open an explorer window using the keyboard shortcut Win+E;
- right-click on the “This PC” icon in the directory tree, which is located on the left side;
- in the context menu that opens, select the last line - “Properties”;
- when the “System” window opens, click on the “Device Manager” item located in the left column;
- expand the “Network adapters” section by clicking on the arrow next to the corresponding heading, and check the list of available devices.
Find the name of your wireless equipment (its title will always contain the word “Wireless”, as well as the manufacturer and model of the device) and look at its parameters.
Wireless adapter in the list of devices connected to the system
Depending on the status and availability of the Wi-Fi adapter, the “Device Manager” section may display the following information:
- The item name is not in the list - the part is not installed in the computer, is not connected correctly, or is damaged.
- In the “Network adapters” section there is a line with the heading “Unknown device” - the adapter is available, but the drivers for it were not installed (or the wrong version was selected).
- If the name of the adapter and its status are displayed correctly, but you still cannot turn on the wireless network, you should also manually update the drivers.
Installing or updating Wi-Fi drivers
To find the required installation package, laptop owners just need to go to the official website of the device manufacturer, select their model, and download the required file in the driver download section (if it is possible to select an operating system, you should download it specifically for the “ten”).
Users of personal computers can find drivers for their device on the official website of the adapter manufacturer, according to the device model (it can be found in the documentation for the PC, or look at the Wi-Fi board labeling).
Information about the manufacturer and modification of the internal Wi-Fi adapter
After downloading the installation package, you must:
- unpack the downloaded archive;
- start the process by double clicking on the exe file;
- follow the wizard's prompts and install the driver;
- restart your computer or laptop;
- check the adapter status in Device Manager;
- If the name of the board is displayed correctly, then all that remains is to turn on Wi-Fi and try to access the Internet again.
Additional Information. If the laptop came with a driver disk, you can try to look for the required bootloader on it (although it is unlikely that there will be files for Windows 10, since this is a relatively new operating system).
If the adapter is not active
When the system tray icon shows "No connections available" or "Disconnected", this means that the device is turned off at the software level. How to enable Wi-Fi on a Windows 10 laptop if the adapter icon is not active:
- Open an Explorer window and right-click the mouse to activate the system menu of the “This PC” section.
- Select "Properties".
- Click on the line “Device Manager”
- In the menu that appears, expand the section containing information about the installed network equipment.
- Find the disabled wireless device (it will be marked with a gray icon with an arrow pointing downwards).
- Right-click on its name and in the context menu that opens, activate the “Engage” item.
Enabling a deactivated device
What to do with Airplane mode
Enabling Airplane Mode in Windows 10 disables all wireless adapters (Wi-Fi and Bluetooth). To enable or disable this option, just click on the corresponding icon in the connections menu, which is called up by clicking on the Wi-Fi icon in the system area.
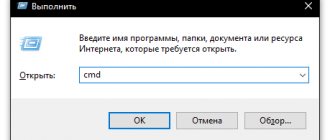
If the mode switch button stops responding to user actions, you need to restart the computer or the WLAN AutoConfig service. You can disable and re-enable the function using the command line:
- by pressing the “hot” keyboard shortcut Win+R, bring up the “Run” menu;
- enter (or copy/paste) the services.msc command into the query line;
- Find the item “WLAN Auto Configuration Service” in the “Services” window that opens;
- right-click on the selected line to open the context menu;
- click on the “Properties” item;
- in the menu that appears, click the “Stop” button and wait for the process to complete;
- set automatic startup type;
- Click on the “Launch” button.
Rebooting the Wireless AutoConfig Service
How to easily connect Wi-Fi on a Windows 10 laptop
After you have activated the radio module, the networks you can connect to will be displayed at the top.
- Select your network and click the “ Connect ” button on it. You can check the box, if it is not there, in the “ Connect automatically ” section. Now after startup, the laptop will automatically connect to the Internet on Windows 7, 10.
- If there is a password for the wireless network, then you will need to register it. If you forgot it, read the article on how to find out the Wi-Fi password on Windows 10.
- Sometimes the system may ask if you want to participate in your home network. It’s better to click “ Yes ” so that there are no problems with setting up the local network in the future.
Wi-Fi on the laptop should now be connected. To disconnect, click again on the network you are connected to and select “ Disconnect ”. That's all, now you know how to connect a laptop to wifi on Windows 10.
What to do if there is no power button?
There are situations when the laptop does not have a button to turn on Wi-Fi - neither the hardware button nor the one on the bottom right. In this case, take these steps:
- enter Windows 10 settings;
- click on Network and Internet;
- go to the Wi-Fi section;
- At the top, find the “Wireless network” toggle switch;
- move it to the right side.
If this method does not work, or some error occurs, Wi-Fi is incorrectly configured on a laptop with Windows 10. To solve the problem, use the recommendations below.
How to connect Wi-Fi on a Windows 7 laptop
In Windows 7, the easiest way to connect is through the network icon, which is located at the bottom of the tray. By looking at the icon you can tell whether your Wi-Fi is connected or not.
To connect to any network you need to follow a few steps:
- Click on the network icon, you will see all the networks that are nearby. Click on the Wi-Fi network you need, the “ Connect ” button will appear, click it.
- If this wireless network does not require you to enter a password, then you will connect immediately and can try using the Internet.
- But usually most people set a password for the Wi-Fi network, so you will see a window in which you need to enter the password in the “ Security Key ” column. Click " OK ".
That’s it, you’ve read how to connect a laptop to Wi-Fi on Windows 7. Suddenly, for some reason you still couldn’t connect, then see the solutions to the problem in the article: why a laptop won’t connect to a WiFi network on Windows 7. 8, 10.
Removing an unnecessary connection
You can delete an unnecessary connection through the options that open through the “Networks and Internet” window in the lower right corner of the screen. Once there, you need to click “Manage Windows network settings” in the “Wi-Fi” section. A list of connections will appear that you can easily delete.
What are the differences between 3G and 4G networks: features, advantages and disadvantages
There is a more difficult way. In the command line, which can be opened via search, you need to enter 2 commands:
- netsh wlan show profiles
- netsh wlan delete profile ..., instead of the ellipsis, you need to insert the name of the connection to be deleted.
Note! Once a point is forgotten, it will no longer appear in the “Networks” section, only if the device is within their range.
The system will also forget the password and will not connect automatically when the device starts.
How to connect your computer to a wifi network
Many users would like to know how to connect to the Internet via Wi-Fi on a desktop computer. Now we will show how this can be implemented in several ways.
Option one: make connections using an external Wi-Fi adapter
- We buy a USB adapter.
- Next, you need to connect the adapter to the computer into the USB port.
- Install the drivers from the disk that came with the kit
- After installation, the wifi wireless network icon will appear, click on it. You will see different networks, select yours and click connect. If there is a security password, then enter it.
Option two: use an internal adapter to connect
- We buy an internal adapter. We put it in the system unit. In the photo below you see an example.
- Install the driver from the disk that should be included.
- The Wi-Fi application icon should appear on the desktop. Launch it. A list of networks will appear, select the Wi-Fi network you need.
We figured out the question of how to connect to wi-fi on a desktop computer. It is possible that you were never able to connect to Wi-Fi, in which case you can always use a cable to connect. See the article on how to quickly set up wired Internet on your computer.
Interaction with networks
User popularity in Windows is explained by the ability to fine-tune almost every parameter. Having lost a little time, the owner of a personal computer can independently debug the operating system to suit his own preferences.
The rule also applies to the functionality for regulating virtual and cable lines, which makes it possible to:
- view IP addresses;
- set certain security and sharing options;
- transfer information from one computer to a second within the same work grid.
These actions are available not only in the tenth, but also in previous versions of the OS.
View your network password
The new Windows has retained the basic functionality that helps you find out the code from the connected line. If the user needed identification data to transfer to a second party, then a certain step-by-step algorithm should be performed:
- From the menu you go to the “control panel” and the “sharing and network control center” block.
- In the window that appears on the screen, select the “connections: network name” subsection.
- Then you need to go to “wireless line properties”.
- Click on the “security” item.
- Check the box next to the “display entered characters” subsection.
An encoding will appear on the display, which will be used to connect to the Internet.
You can view your Wi-Fi password and tell others
“Forget saved grid” function.
You can activate this functionality and the computer will not be able to connect to it on its own even if it is available. The execution scheme is simple:
- from “system parameters” you need to go to “Internet and line” and select the “Wi-Fi” block;
- in the window that appears on the display, select the “manage Wi-Fi networks” link;
- the page that opens is scrolled to the very bottom, and from the list provided, the option that should be disabled is selected;
- after clicking on the shortcut, the “forget” icon will appear on the display;
- activating it completes the task.
After the end of the algorithm, Windows will not connect to the line on its own; you will have to log in manually.
Forgetting a connection is sometimes necessary too
Difficulties when connecting to a Wi-Fi network
Usually, most often problems arise with the driver. It could be installed incorrectly or infected with a virus, or perhaps it is missing altogether. Therefore, the first thing you need to do is check the driver.
- On the “ My Computer ” icon, right-click and select “ Properties ”.
- Click " Device Manager ". In it, find your wireless network adapter “ Wireless LAN ”.
- If there is a yellow triangle or an exclamation mark, there is a problem with the driver. Download the newest ones and install. Don't forget to restart your computer after installing the driver.
It is also possible to use the “ Driver Genius ” utility, it will help identify all the drivers that are missing and install new ones.
Also, do not forget that the Wi-Fi signal may not reach your device or the signal level may be poor. To increase the coverage radius, use a repeater. We have a useful article: read how to choose and configure a WiFi repeater.
Increased network security
To keep your network connection secure, we recommend following these tips:
- In the settings on the router, specify WPA2 as the type of protection used.
- It is mandatory to set a password and make sure that it is complex (contains numbers and letters, characters of different case, and is at least 8 characters long). In addition, it is recommended to update it once every three months.
- Do not use the WPS function and ensure that it is disabled.
- Turn off the router when it is not actually in use. Such simple steps will help protect yourself from connection by intruders while you are away and not using the device.
WiFi Security
In order for WiFi to become safe for the user, preventing uninvited guests from entering, protecting the computer from viruses and fraud, it is enough to follow only 6 rules:
- Changing the password is the most difficult. This has already been mentioned earlier. The stronger the password, the safer it is.
- Disable remote control. This can be done on the IP addresses https://192.168.0.1 or https://192.168.1.1 under Security, then Remote Management, setting the Remote Management IP to 0.0.0.0. Without disabling this function, data can change or be erased unnoticed by the owner.
- Disable SSID Broadcast. If this function is enabled, the network ID can be broadcast to others. This button is located in the “Wireless Network Settings” section at the addresses listed above.
- Connecting a data encryption algorithm. In the “Wireless network security” section, you need to check the WPA2 encryption algorithm, which will protect data even if attackers try to steal it through an unsecured connection (not always, data transfer is still possible).
- You need to disable all those functions that are not used. The chances of becoming a victim of a vulnerability hidden in the software are much lower.
- It is recommended to constantly update the software. This way, attackers will have less chance of hacking the user than if the security algorithms remain the same.
Note! The combination of all these rules will reduce the likelihood of hacking to a minimum.
WiFi is now almost indispensable in the home. The enormous capabilities it provides are dwarfed by the relatively small effort required to set it up.
Podgornov Ilya Vladimirovich All articles on our site are audited by a technical consultant. If you have any questions, you can always ask them on his page.
How to view saved keys
Connecting and setting up the ZyXEL Keenetic router model Lite II
There are 2 ways to find out the saved keys (passwords). The first is the Win + R key combination, entering the “cmd” command. A command line window should pop up. You need to enter 2 commands there. First - netsh wlan show profiles, then - netsh wlan show profile name=”…” key=clear, where the ellipsis is the name of the connection. One of the lines that appears will be “Key Contents” - this is the correct password.
The second, simpler method: click on the “Networks and Internet” button in the lower right corner of the screen, “View active networks”, selected connection, “Wireless network properties”, now you need to check the box “Display entered characters”. The security key will appear in the line above.