In MS Office documents, sections specify specific layout options as well as Word formatting. These could be columns, headers and footers, line numbering, etc. If they are missing, the program considers the entire file as a single block. About how to remove a section break in Word, what happens after it is removed, and is it possible to get rid of inter-page divisions.
How to Remove a Section Break in a Word Document
Microsoft Word provides many tools that let you format the text you add to your document.
But it also includes some formatting options for the document itself. This can be either columns or other features such as section breaks. A section break in a Word document allows you to divide a document into separate sections, which you can then format without affecting the rest of the document. This is typically used to change the orientation of a single page of a document while leaving the rest of the document in the current orientation.
But if you've previously created a section break that you no longer need, or if you're editing someone else's document and want to remove one of the section breaks you added, then our guide below will show you how to do it.
How to Remove a Section Break in Microsoft Word
The steps in this article were performed in the Office 365 version of Microsoft Word, but will also work in most other recent versions of Word. The first section of this article gives a quick overview of how to remove a section break in Word, but you can continue scrolling to see the full tutorial with images, or you can click here to jump to that section.
Result: Remove a section break in Word
Learn how to find a section break in a Word document and remove the break if you no longer want to include it in the document.
Active time 2 minutes
Total time 2 minutes
Difficulty Medium
Instructions
- Open the document in Word.
- Select the Home tab.
- Click the Show/Hide button in the Paragraph section.
- Select the section break you want to remove.
- Press the Delete key on your keyboard.
Notes
New section breaks can be added by clicking the Breaks button on the Layout tab.
You can also delete a section break by placing your cursor to the left of the break and then pressing the Delte key on your keyboard.
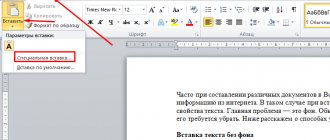
Delete the gap using the “Delete” button
Step 1: When page breaks are used in a Word document, they are not visible. In order to see them, go to the Home tab - then “Display all characters” (CTRL + *), as in the screenshot
Step 2. Select the gap with the mouse, or place the cursor on the left side of the gap.
Step 3. When everything is ready, click on the “Delete” key
As you can see, this is not a complicated way to remove a gap in a document. But what if you don’t have a dozen of them? Of course, you can hold down the CTRL key and select all the breaks in the document, and then delete them with the key, but this is a long way, so if you have a huge document, then go to.
How to Remove a Blank Last Page in Word
The instructions below are suitable for all versions of Word, starting from 2007 and ending with 2016-2019. The course of action and the names of the buttons will not differ.
Delete key
Pressing Delete is the easiest way to remove the last blank page:
- Go to the end of the document. Left-click in an area of a blank sheet to position the cursor.
- Press the Delete key.
- If necessary, repeat the procedure if the blank sheet does not disappear.
Don't forget to save your changes to the document. To do this, click on the floppy disk icon in the upper left corner of the document. Alternatively, click the cross to close Word at the top right and select “Save.”
Removing non-printing formatting characters
A seemingly empty page is not always empty in reality. It may contain symbols for new paragraphs. They are usually hidden from the user's view. If you remove them, the empty sheet will also disappear.
How to display non-printing formatting marks and remove them from a document:
- Press the key combination Ctrl + Shift + 8 on your keyboard. Symbols in the form of a column or a mirrored letter “P” will appear on the screen, as in the screenshot below. They indicate the ends of paragraphs and spaces.
- If nothing appears, click on the button shown in the screenshot in the “Home” tab of the “Paragraph” section.
- Left-click on all the paragraph marks that are located on the blank page. Click Delete.
If your worksheet has Page Break symbols (shown below), try highlighting those as well. And then click Delete.
Removing a non-printing character after a table
Word creates a non-printing formatting mark not only after each paragraph, but also after tables. If the table is located at the bottom of the sheet, this sign may go to a new page.
Simply deleting paragraphs will not help in such cases. To solve the problem, you need to reduce the font in which this symbol is written:
- Enable showing hidden characters using the key combination Ctrl + Shift + 8 or the column button in the “Paragraph” section of the top menu.
- Select the icon after the table or paragraph with the left mouse button.
- In the font size input field that opens, enter 01 (it is located to the right of the name of the font itself). The icon will become almost invisible and the blank page will disappear.
Remove page and section breaks
If you are unable to remove a sheet break using the Delete key, do the following:
- In the Home menu tab, click Replace.
- In the Find and Replace window that opens, click More.
- From the Special menu, select Page Break or Section Break depending on what you need to remove.
- In the new window, leave the “Replace with” line blank. Click "Replace". All breaks in the document will be replaced with empty elements.
Bottom line
Break in Word is a function that allows you to format text in accordance with the requirements for printing or simply make it more convenient to read. The program has several ways to make a transfer, as well as customize it. Unnecessary divisions can be removed - also using several options. However, it is recommended to keep an eye on the items at once, as it can be difficult to deal with all the transfers at once.
In many documents, new sections or chapters begin on a new page. This may be due either to the desire of the author himself or to the requirements for the document. Page breaks may also be present in the text that you copy from the Internet.
Considering that such formatting is not suitable for all users, in this article we will look at how to remove page breaks in Word
.
To make sure that the document contains page breaks in the text, and not consecutive characters at the beginning of a paragraph, we will display non-printable characters. To do this, on the “Home” tab, in the “Paragraph” group, click on the “Display all characters” button.
If after this, the inscription “Page Break” appears between two parts of the text, let’s remove it.
To do this, set italics in front of the inscription and click “Delete”.
The page breaks between parts of the text will be removed.
In order to remove the empty space caused by paragraph marks, place the cursor at the end of the first part of the text and press “Delete” the required number of times.
Now let's look at another way. It is useful if you have a very large document and there are many page breaks that need to be removed. We will use the built-in replacement and autocorrect function in Word. By clicking on the link, you can read a detailed article on this topic.
Press the key combination “Ctrl+H”. The Find and Replace window opens. In it, on the “Replace” tab, click on the “More” button.
Place the cursor in the “Find” field, click on the “Special” button and select “Page Break” from the drop-down list. A symbol will appear in the field.
You can leave the “Replace with” field empty. Then click Replace All. After all page breaks in the document have been removed, an information window will appear indicating the number of replacements made. Click “OK” in it. Close the Find and Replace window.
If you do not need to remove all page breaks in the document, then click the “Find Next” button, and when the unnecessary page section mark is highlighted, click “Replace”. Go through the entire document like this.
This is how, using one of the methods described in the article, you can remove unnecessary page breaks in Word.
Rate this article:
When copying or editing articles and works, Word users are faced with the fact that the text (new chapter or paragraph) begins on the next page. Meanwhile, either for the purpose of economical printing, or for the use of some fragments of this document, such design turns out to be inappropriate and undesirable.
This article is devoted to how to remove page breaks in Word.
Removing a sheet split
If you applied a division by mistake or, while checking a document, realized that it was not needed, you can delete it. At the same time, the transition that occurs in Word automatically when the text reaches the end of the sheet cannot be deleted or changed - this is a mandatory feature of the program. You can only remove hyphens added by users.
Removing a gap manually
This method is the opposite of creating a hyphen by pressing Enter. It is the simplest, but not as convenient and fast as the others:
- Place the cursor at the end of the last line of the paragraph;
- Click Delete;
- If the hyphen does not disappear, continue to press the key - perhaps a fragment of text is separated by a large number of line breaks;
In order to understand that the transition has been deleted, pay attention to the cursor at the end of the line. If the paragraph is the last one, and it occupies the final position, then all the empty lines have disappeared
Removing a gap via “Display”
Separating sheets in Word is a technical symbol - like a tab sign. It is not visible in normal file viewing mode. In order to delete a symbol, you need to use advanced features:
- Open “Home”, click “Show all characters” (the button in the form of a special symbol, which is located to the left of the text style selection menu) - this will make all breaks visible;
- To delete a transition, select the symbol, then delete it using the Delete button.
When you remove a sheet break, the text that followed the character is formatted in the same way as the text that preceded it. The method is most relevant if you need to remove several characters - for a large number it is too time-consuming and inconvenient.
Removing a gap via “Draft”
This method is also great for manually removing multiple transitions in a document:
- Click on the “View” tab;
- Select the document display type “Draft”;
- Place the cursor near the division (before the line of text that is already on the new sheet);
- Press the Delete key.
Remove a gap using document search
This method is great when you need to remove a large number of transitions or all at once:
- Open “Home”, click “Show all characters” (the button in the form of a special character, which is located to the left of the text style selection menu) - this will make all separators visible;
- Copy one of the break icons to the clipboard (Ctrl + "C");
- Press the key combination Ctrl + “F” - this will activate text search;
- Insert a special line break character into a line if you need to remove multiple transitions;
- Select a character and press Delete, after which you can use the up and down arrows;
- If you need to remove all separators at once, use the “Replace” command - Ctrl + “H”;
- Instead of using the “Find” field, use the option at the bottom of the window - “More” - “Replace” - “Special” - “Page Break”;
- For "Replace with" enter a space;
- Click “Replace” as many times as necessary or “Replace All” to do this throughout the document.
Option #2. Delete by displaying invisible characters
Another equally simple way to correct a command error is controlled deletion of characters in the Word text editor.
Proceed like this:
Find the “Show all characters” icon on the taskbar and click on it.
Notice that you can now see any page breaks that are present in your text.
- If your text is formatted in such a way that certain characters are duplicated during indentation, then press the Delete key.
- And in the case when there is no need to delete any piece of text, press the Enter button.
This method of removing indents will be especially relevant if there are several breaks in the text editor, and only part of them needs to be removed.
This will be especially convenient when working with texts, where each individual chapter must begin on a new page.
Advice!
Use the second method of removing gaps when working with medium-sized text (no more than 15 sheets).
How to remove a page break in all text at once in Word?
Good day everyone! We continue to study the Word editor, and today we will talk about how to get rid of page breaks. If it is necessary for each section to begin on a new sheet, use the page break function. It often happens that users create such breaks quite by accident, for example in the form of a black line.
As usual, today we will use several examples to study how to work with page breaks in various editions of Microsoft Word. We read and take it into account.
And sometimes, when copying a very large amount of text into another document, the new paragraph goes to the next page, that is, a gap is formed again. This upsets us; many people do not know how to remove, for example, a black line. Naturally, there is a need to remove these breaks so that the text runs consecutively, in the form that we need at the moment.
Option #1. Delete using the Delete button
The space between sheets in a text editor can be eliminated in the following way: move the mouse cursor to the end of the last line of the text you typed.
This is where page breaks begin, which can be removed by the Delete button on your keyboard.
Advice!
If pressing Delete once does not correct the situation, then do not rush to panic. Your text in the editor has duplicate paragraphs or spaces after the last character you typed, so repeat the delete command until you eliminate the space.
It also happens that the user does not understand whether he has corrected the existing inconvenience in his work or not.
You will notice the removal of the indentation between pages at the moment when the text that moved to the bottom page returns to the original one and, most likely, the paragraph will continue.
This option for eliminating spaces between pages is best suited for the Word 2007 text editor, relatively small texts, no more than seven sheets in size, and provided that there is only one gap.
Removing a manual page break
You will need to remove such a gap manually. Word does not provide hotkeys or other ways to do this. Just follow the simple instructions:
- First, you should turn on the display of non-printing characters to make it easier to navigate the document. This can be done on the top panel in the “Home” tab in the “Paragraph” section. The icon for this function is located in the right corner of the category.
- All non-printing characters, including page breaks, will now be visible. Select the one you want or click in front of it.
- Press "Delete" or "Backspace" on your keyboard.
This way you can remove all the necessary breaks in Word.
What is a page break
A page break in Word 2010 is a non-printing character, such as a space, end of paragraph, or tab. This is a command sign. After it, all subsequent text will be located only on the next page. This opportunity is used when the idea of document layout assumes that each section begins on a new sheet. Often, instead of page breaks, repeated paragraph marks are mistakenly used for this purpose, but this is very inconvenient. With this solution, after changing the volume of the section, the initial lines of all subsequent sections will “move”, that is, they will either start from the middle of the next page, or continue the already filled one, but after some distance. This is absolutely natural, since a large number of spaces only determines the distance between lines. They do not give the command to start a new page.
A similar sign is a line break. It is used when it is necessary that all subsequent text be printed on a different line, without starting a new paragraph.
There are several ways to remove page breaks in Word. It is advisable to use them depending on the volume of the document, how many deletions are expected in it and what their purpose is, etc.
First way
You can remove a page break in Word by simply placing the cursor at the end of the very last line after which the break begins, and pressing the Delete key. You may have to press it several times, since there may be duplicate spaces or paragraphs after the last character you type (usually a period or other end-of-sentence character). However, eventually they will all be deleted, followed by the page break. Most often this happens after the second or third key press. This will be noticeable when the text from the next page moves to the current one and, most likely, continues the paragraph. Then just separate it by pressing the Enter key.
This method is suitable for working with small documents and single breaks.
How to remove sections from a document in Word
Working in the Microsoft Word text editor, you probably had to create several documents in one file so that each of them had its own formatting, separate from the rest of the parts. There are sections for this in Word. Having learned to work with them correctly, you will be able to draw up more complex documentation, reports, articles and, in general, use the program more professionally. In this article, we’ll take a closer look at how to delete sections in Word, and also talk about how to work with them in general. Let's figure it out. Go!
In some cases, you need to split the text into separate parts with different formatting
Before we move on to deleting, let's look at the adding process. First you need to open the header and footer window. This is done by double-clicking on the top or bottom area of the sheet, or go to the “Insert” tab and in the “Header and Footer” block, click “Footer”, then select “Edit”. Now place the cursor at the end of the sheet after which a break will be added. Open the Page Layout tab. In the Page Setup section, click Breaks. In the list that appears, in the “Section Breaks” group, select “Next Page”. All. Ready. In the latest versions of Microsoft Word, in the “Insert” tab there is a separate “Page Break” button, which is located at the very beginning of the tool ribbon. In this case, just place the cursor at the end of the sheet and click on this button.
Please note that deleting partitions must be performed strictly in a specific order. Otherwise you risk corrupting the entire text file
Before you start deleting, you need to adjust the orientation of the pages of one document in the same way as in the second. The same should be done with headers and footers. To do this, go to editing mode and click on the “Same as in the previous section” button. This button will appear on the “Design” tab in the “Transitions” block. The algorithm of actions is as follows:
- Activate the display mode for all characters. In the toolbar, in the “Paragraph” block, there is a special button. After clicking it, all paragraphs, spaces, etc. will be marked;
- In your document, find the line “Section Break”;
- Remove this line.
When working with a large volume, you can use the functionality of the “Replace” tool, for this:
- On the top panel, find the “Replace” button;
- Next, click “More” to open a window with advanced functionality;
- In the “Replace” block, select “Special” – “Section Break”;
- Click on the "Replace All" button.
An additional option that also automates the solution to the question posed:
- Press the key combination “ALT+F11” to go to “Microsoft Visual Basic”;
- Click on the “Insert” tab, select “Module”;
- Paste the following code into the window that opens:
- VBA code for removing all section breaks in Word:Sub DeleSectionBreaks() Selection.Find.ClearFormattingSelection.Find.Replacement.ClearFormattingWith Selection.Find.Text = “^b”.Replacement.Text = “”.Forward = True.Wrap = wdFindContinue. Format = False.MatchCase = False.MatchWholeWord = False.MatchByte = False.MatchAllWordForms = False.MatchSoundsLike = False.MatchWildcards = False.MatchFuzzy = FalseEnd WithSelection.Find.Execute Replace:=wdReplaceAllEnd Sub
Press the "F5" button to initiate the macro run.
Third way
The third method is to automatically remove absolutely all page breaks in the document or replace them with a paragraph mark or a space (depending on your goals). To do this, use the Find and Replace window.
Place the cursor at the beginning of the text and press the Ctrl and F keys. A search and replace window will appear. Click on the "Replace" tab. Next, click on the “More” button. Additional settings and options will open. Place your cursor in the "Find" field. Find the “Special” button and in the drop-down list, click on the “Page Break” line.
Place your cursor in the Replace field. If you just need to remove breaks, don't type anything on this line. If you need to replace them with spaces, type a space (with a regular key, as you do when working with text). If you want all sections to be replaced with the beginning of paragraphs, click on the "Special" button and select the appropriate line.
After that, click on the “Replace All” button. The operation is completed. The program will provide a report on how many replacements have been made. All page breaks have been removed.
This method is suitable for working with voluminous documents or with texts where page breaks are inserted erroneously and haphazardly. This happens, for example, when copying materials from a browser with complex layout.
How to Add or Remove Page Breaks in Word 2016
If you want to format documents so they print and look the way you want, you need page breaks. The page break tool in Microsoft Word allows you to control where one page ends and the next begins. Here's how to add page breaks, choose from the many types of page breaks you can add, and how to remove them.
How to add a page break
Word automatically adds page breaks when you add more content than can fit on one page, but sometimes you may want to add a break somewhere else—for example, if you're creating a new one in a long document or you want to free up more space around an image or chart.
There are two simple steps to create a page break:
1. Place your cursor where you want to start a new page. If you want to, for example, break up a long document and insert a page break between paragraphs, make sure the cursor is before the first character that starts the new page.
If you just finished a paragraph and want to start typing on a new page, the cursor will be at the end of the paragraph and you can skip to step 2.
2. Select Insert > Pages > Page Break. Word will start a new page wherever the cursor is.
Additionally, you can use the CTRL+Enter keyboard shortcut to quickly add a page break.
Other types of page breaks
Word also offers additional types of breaks that you can add to your document.
Column Break: If your document is formatted in multiple columns, you can force text to move from the first column to the next one. This is a better option than pressing Enter multiple times to move text to the next column, as this can mess up the formatting if the font size changes or you edit the text.
Text Wrap: If you have an image or other object in your document and want to add a title, breaking the text wrap will keep the title with the object while the rest of the document wraps both objects and your signature.
Next Page: This works the same as the page break in the Insert menu, except it also creates a new section with the ability to use completely different formatting from previous sections. For example, you can use a different section to rotate the page into landscape or portrait mode, add a different header or footer, or format a section into columns without affecting the rest of the document.
Continuous Break: Creates a new section like the following page break, but does not start you on a new page.
Even and Odd Page Breaks: Insert a section break and also move you to the next even or odd page (depending on which type of break you choose) so you can format alternating pages in the document differently (eg., g., right or left pages in a book).
How to remove page breaks
You can remove added page breaks and also customize where Word's automatic page breaks appear.
To remove a page break manually:
1. Click the Show/Hide icon, which appears as a paragraph mark (¶) on the Home tab. This will show hidden non-printing characters such as spaces and page breaks.
2. Double-click the gap you want to remove
3. Click Remove.
Although you can't remove automatic page breaks, you can adjust their position and thus keep individual paragraphs or lines together.
1. Select the paragraphs or lines you want to keep together.
2. On the Layout tab, open the paragraph settings by clicking the advanced options icon.
3. On the Line and Page Breaks tab, select one or more of the following options:
- Orphan Window/Control: Make sure at least two paragraph lines are at the top or bottom of the page
- Leave with the following: Ensures there are no breaks between the selected paragraphs
- Keep lines together: Prevents page breaks in the middle of a paragraph
- Page Break Before: Adds a page break before the paragraph you select
All of these options will help you have more control over the formatting and flow of your document.
Insert, delete, or change a section break
Important:
The procedures described below must be performed in markup mode.
If you are using a different mode, on the View
, select
Page Layout
.
Inserting a Section Break
- Click where you want to start a new section.
- Click Page layout
>
Breaks
and select the type of section break you want.
Types of Section Breaks
| Start of a new section on the next page. | |
| On the current page | Start of a new section on the current page. This section break is useful in documents with columns. It allows you to change the number of columns without starting a new page. |
| Even page | Start a new section on the next even-numbered page. For example, if you insert an Even Page break at the end of page 3, the next section will start on page 4. |
| Odd page | Start a new section on the next odd-numbered page. For example, if you insert an Odd Page break at the end of page 3, the next section will start on page 5. |
Removing a section break
If you've added section breaks to your document, the easiest way to see where they start and end is to turn on show all formatting marks.
- On the tab home
Click
Show all non-printing characters
. - Click a section break to highlight it and press DELETE. Section breaks look like this:
Note:
When you remove a section break, Word combines the text before and after it into one section. The new merged section will use the formatting from the second section (the one that followed the break).
Changing the section break type
- Click the section you want to change.
- On the menu Format
Select
Document
and open the
Layout
. - On the list Beginning of section
Select the desired section break option.
Important:
The procedures described below must be performed in markup mode.
If you are using a different mode, on the View
, select
Page Layout
.
Inserting a Section Break
- Click where you want to insert a section break in your document.
- On the tab Layout
In the
Page Setup
, click the
Break
and select the type of section break you want.The table below provides examples of the types of section breaks that you can insert. In each figure, a double dotted line represents a section break.
| Section break type | Description |
| From next page | Inserts a section break and starts a new section on the next page. |
| On the current page | Inserts a section break and starts a new section on the same page. |
| From even page | Inserts a section break and starts a new section on the next even-numbered page. |
| From odd page | Inserts a section break and starts a new section on the next odd-numbered page. |
Removing a section break
- Click in front of the section break you want to delete.
Standard toolbar
press the button.
- Press the key.
If your keyboard doesn't have a key, hold down the SHIFT key, press the Right arrow key, and then press the DELETE key.
Note:
Removing a section break also removes text formatting in the section before it. This text becomes part of the next section and the appropriate formatting (including margins) is applied to it.
Changing the section break type
- Click the section you want to change.
- On the menu Format
Select
Document
and open the
Layout
. - In the popup menu Start section
Select the type of section break you want.
Removing a gap using the Find and Replace function
Compared to the first method, using the Find and Replace function can save a lot of time. Instead of having to select all the page breaks one by one across a huge document, you can remove them all at once by following these steps.
Step 1. Open the “Find and Replace” window: “Home” - “Replace”.
Step 2. In the open window, click on the “More >>” button.
Step 3. In the “Special” list, select “Page Break”.
Step 4. In the “Find” field, type “^m” and click on the “Replace All” button.
If you did everything correctly, then everything should work out for you and, now, you know how to remove page breaks in Word.
Hello, dear readers of the blog site. If you have landed on this page, it means that you often work with documents and, in particular, encounter some task in Microsoft Word. In this article, let's look at some not-so-complex page formatting tasks - how to create a page break in Word, what a non-breaking space is, and how to remove a forced page break.
When typing documents, the Word program automatically inserts a page break based on the specified print margin width parameters. As soon as you go beyond these parameters, Word inserts a special page break character. But very often, for normal formatting and giving the document a readable appearance, it is necessary to manually insert a break exactly in the place where it is logically justified.
There is nothing complicated about this operation and in all versions it is done almost the same way. Place the cursor in the place after which you need to start a new page (insert a forced break). I'm using the 2013 version of Microsoft Word, but by analogy you can do this in any previous and subsequent versions.
- Place the cursor in the place where you want to force the page to break.
- In the tabs (or menu if you are using earlier versions) click on the "INSERT" tab
- Click on PAGES if you have a narrow screen and this menu area is collapsed for better display.
- Select Page Break.
The location where the cursor was will now be the beginning of the next page.
If you paid attention to the image below or read the annotation when inserting, you may have noticed a keyboard shortcut for this operation. If you often use the break, I recommend remembering it and using it for faster typing
You placed the cursor in the right place or while typing you simply pressed Ctrl+Enter and got a gap.
Inserting a break between paragraphs
In addition to inserting a break, you can use the function to prevent inserting a page break for a specific paragraph. This option tells Word not to wrap the lines of a given paragraph to another page when editing a document. The program will move the entire paragraph to the next page rather than just one or more lines.
To prevent inserting a paragraph break:
- Select the required paragraph or simply place the cursor inside this paragraph.
- Go to the “PAGE LAYOUT” tab.
- Click on the “Paragraph Options” link
It will open the parameters of this selected paragraph. Go to the “Page Position” tab and check the “do not break paragraph” checkbox. Click OK.
ABOUT
In the same way, you can prevent the program from separating certain paragraphs that follow each other. In this case, the program, just like with one paragraph, will transfer the entire group to the next page. To set this property:
- Select the necessary paragraphs, or if you need to link one paragraph to the next one, just select one.
- Go to the PAGE LAYOUT tab
- Click on the Paragraph Options link
In the “Page Position” tab o and Ok.
Combining different methods
How can I remove page breaks in Word? Use the second and third methods together. Let's say you have a very large document, but you would like not all sections to be deleted. Repeat the preparation for automatic replacement, but instead of the “Replace All” button, click “Find Next”. If the page break that the program shows you needs to be deleted, click “Replace”; if not, then instruct Word to look for the next character. This will speed up the work significantly.
In addition to a page break, a section break mark can also be used in a document. It can be removed in a similar way.
When working with documents made in MS Word, you may notice that the text in some of them is divided. This is very convenient, since you can apply a separate text style to each fragment, create columns, number the pages of one part separately from the entire document, and so on. At the same time, by formatting it, you do not change the text in other parts in any way. You can read more about creating sections in Word in the article by following the link.
But it also happens that it is necessary to combine two parts of a document into one. This is not at all difficult to do, and in this article we will figure out how to remove sections in Word. These recommendations are suitable if you have Word 2007, 2010, 2013 or 2016 installed.
Before we start deleting, let's make it clear in which parts of the document they are located. To do this, you need to enable the display of non-printable characters. Go to the “Home” tab and in the “Paragraph” group, click the button.
You can now see various symbols in the document that were not displayed before.
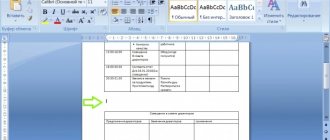
For example, let's take these two paragraphs. Place italics at the end of the first one so that it flashes to the right of the paragraph symbol, and then press “Delete” on your keyboard.
The section break will be removed. To remove extra lines between parts of the text, click the mouse at the end of the first paragraph and press “Delete” the required number of times - in the example 3 times.
Now let's remove another break that is placed on the current page. Place italics at the end of the first part and press Delete.
Please note that after you remove the separation, the same formatting as the second paragraph will be applied to the first paragraph. Let's consider this example: in the second fragment, the material is divided into columns, and the margins on the right and left are reduced.
After removing the page break, the first one will also be divided into columns and the margins on the right and left will be the same as in the second.
If you have a certain style applied to your writing, then you can make a merger in such a way that the style of the first part is applied to the second.
Place italics at the end of the first paragraph and press “Delete” as many times as necessary. In the example, I pressed it 2 times.
As a result, the gap was removed, the text style in the second paragraph is the same as in the first, but the division of the material into columns was applied to the first.
If you need to remove this inscription so that the style of the second paragraph does not change, then in the line with the inscription, place the cursor on the right side of the character at the beginning of the paragraph and press “Delete” once.
The style of the second paragraph will not change, but the first will be divided into columns.
I think everything is clear to you. The main thing when deleting assigned partitions is not to forget that the formatting of the section that is lower is applied to the one that is higher.
Rate this article:
Section breaks are an extremely useful feature for convenient document editing. Breaks are easy to insert and remove when the document is small. But what if you have a huge document with a lot of breaks and you need to remove them all? Today we will figure out how to remove section breaks in Word.
Removing a page break in the form of a black line from a Word 2003 document
Often, when working with documents, you may encounter such a phenomenon as a black stripe (line) appearing among the text. Moreover, it is impossible to remove it with a simple “delete”, just as it is impossible to place the cursor on it. It appears mainly when copying documents from websites. But removing such a feature is not at all difficult.
The first step is to select the entire document. This can be done either with the mouse, holding down the right key, or through the “Select All” menu command, or by pressing the key combination CTRL+A. Next, open the “page settings” window, where you need to go to the “paper source” tab, and here we select “borders”.
A new window will open, here in the “Type” section select “No”.
Click "OK". That's it, the strip has disappeared. Good luck in mastering the Word editor!
Method 2: Cutting
Select the bottom table by clicking on the “snowflake” in the upper left corner, and then use the CTRL+X keys (the object is cut and placed on the clipboard).
Place the cursor close to the top table and press CTRL+V (paste from clipboard). Both objects will merge into one, but only if you select the “Merge tables” option in the insertion options.
Setting up a page break in Word added automatically
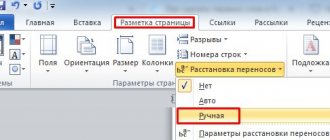
In Word, you can set up automatic page breaks. Accordingly, you can remove them in the same way, and not just manually. You can do this as follows:
- Select the desired fragment or the entire text (Ctrl + A).
- Open the "Home" category on the top panel.
- In the “Paragraph” section, click on the arrow icon in the lower right corner.
- In a new window, open the “Page Position” tab.
- In the “Pagination” category, check the appropriate boxes.
In total, it is possible to set 4 parameters in Word:
- prohibition of dangling lines;
- do not be distracted from the next;
- do not break the paragraph;
- from a new page.
Control automatic splitting in Word
Automatic functions for tearing sheets are needed so that you can transfer this work to the program. Word offers a large number of settings - for the functionality to work properly, you need to be able to manage them. In addition, settings that are correctly set in a particular case protect the document from loss of formatting when the text is changed.
How to prevent one paragraph from tearing into 2 sheets
Sometimes you want to keep one of your content paragraphs from breaking into two when you split the page. For example, if you want to maintain its integrity for a neater appearance or to make it easier to read. To do this you need:
- Select the paragraph you want to protect from hyphenation;
- Right-click on it to bring up the context menu;
- Select “Paragraph”;
- In the new dialog box, go to the “Page Position” tab;
- In the "Pagination" area, activate the "Don't break paragraph" function;
- Save the settings by clicking "OK".
How to prevent two or more paragraphs of text from splitting (moving one of them to a new sheet separately)
Sometimes you need to not only protect a paragraph from being carried over, but also from being broken from another. This is done so that parts of the text that are related in meaning are located nearby. For this:
- Select two or more paragraphs that you want to protect from splitting and place on one sheet of paper;
- Open the “Paragraph” menu and the “Page Position” tab, as in the description of the previous function;
- Activate the “Keep in touch with the next” option.
How to add a separation before a paragraph
Thanks to this function, the data fragment will always occupy the top position on the new sheet:
- Select the required paragraph;
- Call the context menu by right-clicking the mouse;
- Follow the link “Paragraph”;
- In the “Page Position” tab, in the “Layout” area, set the “From New Page” option;
- Click OK.
Prohibition of leaving one line of a paragraph on a sheet
In a professional environment, one line that is torn off from a paragraph and located on another sheet is called “dangling”. The sheet should not begin or end this way. For strict requirements, only two or more lines are allowed. To automate this principle, you need:
- Select paragraphs that should not contain hanging lines;
- Open the context menu with a right click, then “Paragraph” and the “Page Layout” tab;
- Activate the “Prohibit dangling rows” option;
- Click "OK" to save the changes.
Usually this option is activated in Word by default, but sometimes, on the contrary, you need to disable it - this is done by clicking on the same checkbox.
Prevent table rows from wrapping when moving to a new page
In order for the table to look neater and be easier to read, it is recommended that all its rows be on one sheet in Word or when printing. To do this you need:
- Select the table to make a special context menu available;
- Right-click on the selected area and select “Work with tables”;
- Go to “Layout” - “Table” - “Properties”;
- In the window that opens, click on “Line”;
- Remove o;
- Save your changes.
Usually this feature is turned off in Word by default.
Removal
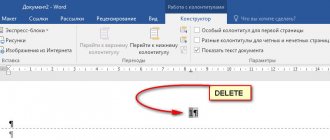
To remove a page break in Word, follow these steps:
1. Click the “Home” tab in the top panel of the program.
2. Click the Show All Characters button to make all formatting characters visible in the text.
3. Place the cursor at the end of the section before the break mark. Press the "Del" key and it will disappear.
You can also remove a gap using the “BackSpace” key, after placing the cursor in front of the control character.
Upon completion of the procedure, all subsequent text will be “pulled” to the place of deletion.
Second way
The second way to remove page breaks in Word is to remove characters in a controlled manner.
Click the "Show All Characters" button and you will see all the page breaks in the document. Scrolling down, select them and press Enter or Delete, depending on how the text is formatted, so that either the break is replaced with the end of the paragraph or simply deleted.
This method is indispensable if you need to remove only part of the breaks. Let's say it is necessary that chapters begin on a new page, and paragraphs continue on the previous ones.
It can also be used if you are working with a medium-length document.
Removing breaks manually
Each gap is marked in the text with a special symbol. But in normal text format it will not be visible. To do this, you need to click on “Display all characters” on the “Home” tab in the “Paragraph” section.
We follow the gap removal algorithm:
- We are looking for a gap in the document. It is marked with a symbol as follows:
- Remove the gap with the key
- Select each gap one at a time by holding “Ctrl”.
- Selected? Now just press delete.
Not the most convenient way, because you have to go through the entire document from beginning to end. You may also accidentally miss a page break.
Such willfulness will modify the text, shifting its component parts. Therefore, take this factor into account and study the text after removing breaks.
Why is there such a need?
A document in which necessary, important information is replaced by empty space and materials that do not correspond to the meaning is difficult to read. Logic and meaning are lost. Chaotic attempts to remove unnecessary things lead to the fact that the text becomes visually crooked and the formatting gets lost.
The need to destroy Microsoft Word sheets arises for the following reasons:
- blank pages interfere with reading and perceiving information;
- when appearing in the middle of the file, they violate the numbering and make the presentation of the material inconvenient;
- at the end of the document, the volume and amount of paper used when printing are artificially increased;
- when preparing materials using information from the Internet and alternative sources, a bunch of unnecessary, superfluous data appears that distort the meaning;
- there are extra chapters, headings, which in a particular case have lost their relevance, clog the text;
- reproduction of text material from another source violates uniqueness;
- the title page or other page does not completely correspond to the meaning of the document;
- you need to edit the existing file in accordance with the tasks.
What is a "section break"
The use of sections is associated either with the correct markup of the formatting style, or with the competent use of one single tool. This tool is Section Break, which depending on the type of use may look like:
- Paragraph. If the section is made on the current page.
- Page break. If you start a new part this way.
- By skipping space until the next even or odd page.
The tool is multitasking and useful for competent drafting of documents, especially before secondary formatting. For example, such a function is convenient to use when titles are added to the text after it has been typed (if you need to type the document quickly and there is no time for formatting).
Things to consider when using a hard divider
A user-created transition works exactly the same as a normal transition that occurs when a worksheet is filled with data. The only difference is that you decide which paragraph should be moved. In order to do this, left-click in front of the fragment that you want to transfer.
Splitting data using Ctrl + Enter is no different (except for the Breaks feature, which provides more options). This combination is recommended for speed and convenience. Both when pressing Ctrl + Enter, and when dividing sheets in another way, a technical symbol is added to the text, which creates a transition.
If you used a hard delimiter in a Word file, check the document carefully before printing. You can do this in preview mode. It happens that when dividing content into sheets, the file structure changes and there is no need to use the function.
Do not use strict division of text to organize numbering in the file. Word offers enough options to solve this problem - no need to use formatting.
How to delete a blank page in Word
There are several ways to delete a sheet in Word:
- delete paragraphs on a page;
- remove page break;
- delete the entire sheet in Word.
To understand what causes a blank page to appear in Word, turn on non-printing characters.
Important! The sequence of actions and location of settings differ in different versions of Word. But the algorithm of actions remains the same... Home tab → Paragraph block → click the Show all characters button
Home tab → Paragraph block → click the Show all characters button.
How to remove page breaks in Word
To remove a page break in Word, place the cursor in front of the page break symbol → click Delete.
The video shows the process clearly.
How to remove a section break
If the symbol appears at the end of the document, place the cursor before the section break symbol → press Delete.
Important! The section break may not appear. In this case, go to: View tab → Document Viewing Mode block → Draft... If the section break is set in the middle of the document, the text formatting will be broken after deletion
So if you need to keep the same formatting after this point, don't delete anything. Otherwise, the formatting of the text located after the section break will extend to the rest of the document
If the section break is set in the middle of the document, the text formatting will be broken when deleted. So if you need to keep the same formatting after this point, don't delete anything. Otherwise, the formatting of the text located after the section break will extend to the rest of the document.
To keep two different types of formatting and remove the blank sheet, set the section break type to "On Current Page":
- place the cursor after the section break icon → Page Layout tab → Page Setup block → Page Setup button;
- Paper Source tab → Start Section line → select On Current Page.