Probably many people are familiar with the situation when it becomes necessary to connect a computer to the Internet using a network cable or via Wi-Fi, and it turns out that the connection does not work because there is no network adapter in the device manager. And here it doesn’t even matter whether you have a laptop or a regular PC. Windows 10, Windows 7, 8, or even Windows XP are installed on it. As a result, we simply will not be able to connect to the Internet. Very often people encounter this problem after relocating Windows. Below in the article I will try to explain why this happens, what network adapters should be in the device manager and what to do if they are not there.
Let's first figure out what network adapters are. Apart from Bluetooth (we are unlikely to connect to the Internet through it), then there are two left:
- Wireless network adapter – also known as Wi-Fi. It’s easy to guess that it is responsible for connecting to the Internet via Wi-Fi. As a rule, it is built into every laptop and is not initially found in desktop computers. But you can buy it in addition.
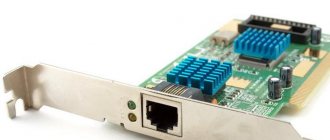
- Network card, or Ethernet adapter (LAN) - it is used to connect via a network cable. Available on all PCs (LAN port on the motherboard, or a separate card). LAN is also available on almost all laptops. Except ultrabooks. USB-LAN adapters are used there.
In the screenshot below you can see what these network adapters look like in Device Manager. Please note that depending on the manufacturer of the laptop, PC, or adapters, they may be called differently. There may also be many other adapters, such as WAN Miniport.
To open the device manager, you can use the search in Windows 10, open it through properties in “My Computer,” or by pressing the Win+R key combination, run the command mmc devmgmt.msc.
As practice shows, an adapter (or both) is missing mainly for three reasons :
- The adapter is simply not in your device. As I wrote above, PCs usually do not have a built-in Wi-Fi module. And accordingly, it cannot be displayed in the device manager. But you can always buy such an adapter and install it. You can read the article: how to connect a regular computer (PC) to a Wi-Fi network. Or the same network card may not be in the laptop.
- The driver for Wi-Fi or Ethernet adapter is not installed. This is the most popular reason. In this case, there should be unknown devices in the device manager (if the adapter is physically present). On the "Other devices" tab. This also includes BIOS settings. In some cases, the WLAN or LAN adapter may be disabled in the BIOS settings.
- The adapter is simply broken. It’s not uncommon for network cards to burn out on desktop computers. And Wi-Fi modules on laptops fail. You can always buy a network card (USB or PCI) and install it in your PC. The wireless module can also be changed. You can choose a USB Wi-Fi adapter for both a PC and a laptop. And here's another article on the topic: Wi-Fi adapter for laptop. How to replace the built-in Wi-Fi module.
Let's look at each adapter in more detail.
How to find out the adapter model
The first thing to do is check whether the card is connected to the computer and whether it is recognized by it. The adapter is included with all laptops and computers by default, so if you didn’t assemble your device piece by piece yourself, you shouldn’t think about its absence. But there are times when the wires going to it become disconnected or come off.
A network card (or network adapter) is a device that allows a computer to communicate with other devices. On modern PCs and laptops, the components of this device are integrated into the motherboard.
You will need to open the computer case and check this only if the network card is not displayed in the “Device Manager”:
- To expand the list of all devices connected to the computer, you need to open the computer properties by right-clicking on the “Computer” block in the “Start” menu.
Open computer properties - In the computer properties window, click on the “Device Manager” section located in the upper left block.
Click on the “Device Manager” section - Expand the sub-item “Network adapters”. It displays all network cards connected to the device. The name of the adapters corresponds to their model. We look at the “Network adapters” branch
Viral infection
Sometimes the reason a network card disappears from sight is a viral infection. Scan your computer with an antivirus. Try to disinfect the system using the Dr. utility. Web CureIt. If it's a virus thing, everything will work out.
One of the problems that a user may encounter after reinstalling Windows is the lack of a driver for the network adapter (network driver) for a wired or wireless network.
And if you don’t have a driver disk at hand, you will have to look for the driver and download it using another device that has Internet access.
In this article we will look at an algorithm that will allow you to avoid troubles that may arise after installing the OS.
What is a driver? This is a program with which the computer operating system interacts with the device hardware (motherboard, video card, network card, printer, scanner, MFP, etc.).
Drivers are developed by companies that produce computer components and peripherals that interact with PCs (for example, office equipment).
Often, modern operating systems (including Windows 7) already have a certain set of drivers that allow you to work with the main components of your computer; we will consider the case when such programs are missing.
The peculiarity of the situation when the network driver is not installed is that it is not possible to use programs to automatically install drivers, since they all use an Internet connection for their work, and since the network driver is not installed, there is no access to the Internet.
The user usually encounters installing network adapter drivers in the following cases:
1. After purchasing a new computer and not having an OS installed on it.
2. After installing the operating system.
3. After a network adapter driver failure.
To solve the problems that arise in the first case, you need to look for the disks that come with your computer. The driver disk for the motherboard contains what we need.
Over the past few years, a trend has clearly emerged that involves the abandonment of the use of optical disc drives not only among manufacturers of laptops, but also desktop PCs.
Users who independently choose the components from which their computer will be assembled also refuse to install a DVD drive.
Advice!
We recommend downloading all the necessary drivers (not just the network one) to a separate directory on your hard drive and/or flash drive. This will avoid situations where, after installing the operating system, you will need to look for a drive or PC (tablet, phone) to download drivers from disk or the Internet.
Card activation
If the network card is connected but not enabled, it must be enabled manually. There are several ways to do this. If the card is not damaged, turning it on will not cause errors.
Via "Device Manager"
The previous section described how to view the card model through the “Device Manager”. Find the adapter you need and right-click on it and select the “Enable” function. If the card is successfully turned on, the down arrow icon will disappear from its icon.
Click on the “Enable” button in the “Device Manager”
Using the Control Panel
- Using the Start menu or any other method, launch the Control Panel on your computer.
Open the “Control Panel” - Go to Network and Sharing Center.
Go to the “Network and Sharing Center” - Click on the sub-item “Change adapter settings”.
Click on the sub-item “Change adapter settings” - A list will open, which will most likely contain several cards. One serves as a connection to the wireless network, and the other serves as a connection to the wireless network. There may be additional adapters in the list. Select the one you need and right-click on it and select the “Enable” function. Wait until activation is complete: the red cross icon on the card icon should disappear.
Click on the “Enable” button to activate the adapter
Via BIOS
If the card cannot be activated using the previous two methods, then perhaps this can be done through the BIOS settings.
- Entering the BIOS is done using the Delete key, which must be pressed while turning on the computer. Perhaps the key that activates the BIOS will be different: this will be indicated in the hint that appears in one of the corners of the screen when the logo appears. If you find out the model of your motherboard, you can find on the Internet the button responsible for entering the BIOS. Enter the BIOS by pressing the Delete key
- The design and location of BIOS items and sections may differ depending on its version and motherboard model, but the following algorithm of actions is approximately the same for all versions. Go to the "Advanced" tab.
Open the “Advanced” tab - Go to the “Onboard Devices Configuration” subsection. Open the subsection “Onboard Devices Configuration”
- To enable the card, set the “Onboard Lan” line to “Enabled”. "Disabled" means the card is disabled. Set the “Enabled” parameter for the “Onboard Lan” line
Video: how to enable a network card in Windows 7
Checking Device Manager
- To quickly enter the device manager, press the same keys again and enter the command “mmc devmgmt.msc”.
- Go to the “Network adapters” section. Now you need to be very careful to find both the local module and the wireless one. Wireless usually has the following words: Wireless, WLAN, 802.11. If you see an arrow pointing down on the adapter icon, click on it and select “Enable”.
- If there is no adapter you are looking for, then look in the “Other devices” section.
- The surest way is to install drivers. Right-click on the module that does not have drivers installed and select “Properties”. You can also try updating your drivers from here if you are currently connected to the Internet through a different connection. To do this, also right-click and then select “Update drivers” – “Automatically search for updated drivers.” If you can’t update the “firewood” in this way, then move on to the next step.
- In the properties, go to “Details”, then set the “Equipment ID” and copy it.
- On the website – devid.info, insert this name into the top line and click search.
- Download the latest driver for your operating system. Just don’t confuse the “bit”: 32 or 64 bits.
- After this, install and restart the module.
Deactivating the card
You can disable an extra card using the same methods that allowed you to enable it: through the “Device Manager”, “Control Panel” and BIOS. Only in the last step of the method through the “Device Manager” you need to click the “Disable” or “Delete” button, in the “Control Panel” click the “Disable” button, and in the BIOS change the value from “Enabled” to “Disabled”.
Disable the card through the “Control Panel”
Reasons for the error The network adapter does not have valid IP settings
Most often, the network adapter does not work and the error “The network adapter does not have valid IP settings” appears for the following reasons:
- Damaged Ethernet cable;
- Damaged or outdated drivers;
- Incorrect configuration settings;
- Expired cache files;
- Required Windows services are disabled.
It is important to note that such a problem can also occur due to the fault of the provider. Therefore, before performing any actions, you should restart your PC and try connecting to the network or website again.
Updating and installing drivers
Drivers are necessary to ensure that the card does not conflict with other components and fully performs all its functions. Usually they are installed automatically when you first connect the computer adapter, but sometimes the drivers fail or become outdated. In both cases, you need to reinstall them yourself. This is done through the “Device Manager”.
Automatic update
The positive side of this method is that you will not need to search for drivers manually, the negative side is that you will need an Internet connection, which may not be available if the network card does not work. But if you have the opportunity to connect to the network, you can update the drivers in the following way:
- Right-click on the desired card and select the “Update drivers” function.
Click on the “Update Drivers” button - Select "Automatically search for updated drivers." Wait until the computer automatically searches for new drivers and, if found, installs them. Be prepared that this method usually does not work, so it is better to use the second method - manual installation. Select automatic system update
Manual update
The advantage of this method is that you can download the card drivers manually from another computer that has Internet access, and then transfer them to yours and install them. It is recommended to download card drivers strictly from the official website of the company that created it.
- To find the necessary drivers, you need to know the card ID or any other unique identifiers. You can find them out through the “Properties” of the adapter.
Open the “Properties” of the network card - In the “Properties” window, go to the “Details” tab and scroll down to the “Hardware ID” value. As a result, you will receive several unique adapter numbers, with the help of which you can find suitable drivers for it. Find and download them, and then use a flash drive to transfer them to the computer to which the card that requires driver updates is connected. We look at “Equipment ID”
- While in the “Device Manager”, right-click on the desired card and select the “Update Drivers” function.
Click on the “Update Drivers” function - Select the manual installation method, specify the path to the previously downloaded drivers and wait until they are installed. After the process is completed, restart your computer and try connecting to the network again. Let's move on to the manual method of installing drivers
What to do if drivers are not installed
If at any stage errors occur that prevent you from installing drivers, you must remove the adapter from Device Manager and restart the computer.
Removing the card from the “Task Manager”
After the reboot, open the list of connected devices again, and in it there is the “Other devices” sub-item. It will contain the “Network Controller”, which is your card. Install drivers on it using one of the methods described above.
The network controller is located in the “Other devices” sub-item
Video: how to update the network driver
Recovery options
- Restore Windows to an earlier restore point. It is quite possible that after carrying out such an operation and rebooting the computer, everything will work for you. And not only will the network card appear, but also something else good will restore its functionality. Sometimes restoration needs to be done several times. All the same, it’s better and safer than starting to rearrange blocks and buses in the system unit. Moreover, you don’t need to buy anything yet.
- A more radical remedy is a complete reshuffle of the Windows operating system. This path may turn out to be the most rational, provided that your system has been installed for quite some time and recently you have begun to notice a general deterioration in the performance of your computer. Regular cleanings do not provide tangible improvements? It's time to update Windows. New RAM, Seven and Eight are reinstalled within half an hour, so no problem.
Why is it useful to reinstall Windows? Because the distribution includes all the drivers necessary for operation. When installing the system in automatic mode, all the necessary settings are made for all devices, and the user does not need to do anything other than press the Enter button from time to time. Updating drivers separately is not an easy task. More suitable for advanced users.
In addition, to reinstall drivers you will need an Internet connection, which you don’t have. If there are backup Internet connections, you are sure that you are able to find exactly the driver for the network card that you need - then try this path.
You can download a whole package of drivers from the manufacturer’s official website and then let the computer itself determine the most suitable option automatically, using the Driver Installation Wizard.
If the problem really was with the driver, after the update the computer should work normally.
View map options
If you want to find out the physical address, IPv4 parameters, gateway address and other possible information about the adapter, then follow these steps:
- While in the Network and Sharing Center, open the adapter settings. Click the button “Change adapter settings”
- This section provides a list of all physical and virtual wired and wireless adapters. Right-click on the desired one and select the “Status” value. Open the “Status” section
- In the window that opens, click on the “Details” button.
Click on the “Information” button in the adapter status window - A list will open in which you can view all the card data.
List of all network card data
Additional method
You can also find out the card parameters through the “Command Line” using the “ipconfig /all” command. “Command Prompt” can be found by going to “Start” - “Accessories” - “Command Prompt”. Running this command brings up information about all physical and virtual adapters recognized by the computer.
Run the command “ipconfig /all” to obtain information
The driver did not install
If you have difficulties installing the driver - it did not install or an error appeared that there is no such module on your device, then most likely it is burned out. There is, of course, a possibility that it is simply turned off in the BIOS and you can try to enable it there, but most likely it is simply broken. Don't despair; you can buy a separate network card or wireless adapter for your PC at any computer store. Or take it in for repairs.
One of the common situations for Windows 10, 8 and Windows 7 users is problems with the Internet and a message that the network adapter (Wi-Fi or Ethernet) does not have valid IP settings when using the standard network troubleshooting utility.
This instruction will describe step by step what to do in this situation in order to fix the error associated with the lack of valid IP settings and return the Internet to normal operation. It may also be useful: Internet does not work in Windows 10, Wi-Fi does not work in Windows 10.
Note: Before following the steps below, try turning off your Wi-Fi or Ethernet internet connection and then turning it back on. To do this, press the Win+R keys on your keyboard, enter ncpa.cpl and press Enter. Right-click on the problematic connection and select “Disconnect”. Once it is disabled, enable it in the same way. For a wireless connection, also try turning your Wi-Fi router off and on again.
How to change card settings
The previous paragraph described how to view information about the network adapter. But you can not only see it, but also change it by following these steps:
- While in the map status window, click on the “Properties” button.
Click on the “Properties” button in the map status window - Find the item you need, select it and click on the “Properties” button again. Select which property needs to be changed and click on the “Properties” button
- A window will open in which you can set your options or change their default values. Enter the required information yourself
Video: how to configure a network card
Additional reasons that the network adapter does not have valid IP settings
In addition to the actions described, in situations with “valid IP parameters”, third-party programs may be the culprits, in particular:
- Bonjour - if you have installed any software from Apple (iTunes, iCloud, QuickTime), then most likely you have Bonjour in the list of installed programs. Removing this program may solve the problem described. Read more: Bonjour program - what is it?
- If you have a third-party antivirus or firewall installed on your computer, try disabling it temporarily and check if the problem goes away. If yes, try uninstalling and then installing the antivirus again.
- In Windows Device Manager, try removing your network adapter, then select “Action” - “Update hardware configuration” from the menu. The adapter will be reinstalled, sometimes this works.
- You may find the instructions useful. The Internet on the computer via cable does not work.
That's all. I hope one of the methods suits your situation.
An IP address allows a computer or laptop to identify itself to the network it is about to connect to. If during such a connection a message appears stating that the Network Adapter does not have valid IP settings, then this indicates that there is something wrong with the network card.
Resetting the adapter
You can reset the adapter settings, namely TCP/IP and DNS, using standard Windows tools or using a third-party program from Microsoft. Conditions under which a reset must be performed:
- Internet connection speed is low or unstable;
- files are downloaded broken, this happens due to the same instability of the Internet;
- When connected, the Internet works fully, but after a few minutes problems begin;
- Manually changing the adapter settings led to other problems with the Internet.
Standard method
Launch “Command Prompt” by going to “Start” - “Accessories” - “Command Prompt”, and enter the commands “netsh int ip reset c:\resetlog.txt”, “netsh int tcp reset” and “netsh winsock reset”, which will perform a factory reset. Done, the registry branches and system files will see changes, and you may need to restart the computer.
Execute the commands “netsh int ip reset c:\resetlog.txt”, “netsh int tcp reset” and “netsh winsock reset” in the “Command Line”
Through a third party program
You can download the NetShell program from Microsoft, which does not require installation, from their official website. Once you launch it, follow the instructions that appear on the screen to reset all changed settings.
Download the program to automatically reset the card settings
No network adapter in device manager
Check again that the adapter is not in the “Other devices” section. There is, of course, a possibility that the adapter is simply hidden somehow. Most often, network modules are simply tied to the motherboard. Therefore, you can simply find the driver on the official website of the motherboard page. For laptops, everything is simpler; we simply enter the name of the laptop model into a search engine and then look for the required driver.
- To search on the motherboard, run the command line: Win+R=CMD;
- Next we write two commands:
wmic baseboard get Manufacturer wmic baseboard get product
- The first shows the manufacturer, and the second shows the exact name of the motherboard.
Solving adapter related errors
During setup or use of the adapter, the errors described below may occur, which will prevent you from using the Internet or local network. Most of them can be fixed without replacing the card.
The card does not have valid IP settings
You may encounter a similar error when setting IP parameters or scanning a network module using standard Windows tools designed to automatically resolve errors.
Manually obtaining settings
If you have not changed the settings of the adapter, that is, it obtains an IP address automatically, then manually requesting an IP address may fix the problem:
- Type “cmd” in the Start search bar. Expand Command Prompt using administrator rights.
Open Command Prompt as administrator - Run the commands “ipconfig /release” and “ipconfig /renew” sequentially. Done, all that remains is to check if the error has disappeared.
Execute the commands “ipconfig /release” and “ipconfig /renew”
Reset
Resetting settings to default values is the most reliable way. How to do this in several ways is described in the section “Resetting the adapter settings”.
Manual adapter configuration
If the previous methods did not help, you should try setting the settings yourself:
- While in the map status window (how to open it is described in the “Viewing map parameters” section), click on the “Properties” button. Find the IPv4 item, highlight it and click on the “Properties” button again. Open “Properties” IPv4
- Disable automatic search and set the following parameters: for the main and backup DNS servers, the values are “8.8.8.8” and “8.8.4.4”, respectively, the IP address and the default gateway are the same parameter, which can be viewed on the router itself or in instructions for it usually looks like “192.168.1.1”. The remaining parameters will be entered automatically.
Setting parameters for IPv4 manually
Error "This device cannot start"
This error appears in the “Device Manager” not only with the adapter, but also with other connected devices, and has code 10. To fix it, you need to update the card drivers. How to do this is described in the “Updating and installing drivers” section.
The adapter does not work, does not install, or does not appear
If the adapter does not work, does not install or is not displayed, then the reasons may be the following:
- It is disabled in the BIOS, you need to start it manually. Or it is disabled in the system itself, since there is another physical or virtual adapter. You can check where it is enabled and where it is disabled using the “Card Activation” item.
- If the card is not displayed in the “Device Manager”, then click on an empty space in any area of the window and select the “Update configuration” function. Then look for the card in all the items on the list. It may not be recognized by the system and will be located under a different name or in the wrong section. Sometimes it is transferred to the “Other devices” block under the name “Network controller”.
While in the “Device Manager”, click the “Update system configuration” button - Update or reinstall the adapter drivers, first remove the already installed ones. It is important to install only official drivers that exactly match your card model. How to properly update and install drivers is described in the “Updating and installing drivers” section.
Changed map settings disappear
If, after you close the window with the changed settings or restart the computer, all the changes you made disappear as if you never made them, then there are two ways to solve this problem: set the settings by running commands and change the incorrect values in the registry.
Making changes via the Command Line
Launch “Command Prompt” with administrator rights and sequentially execute the following two commands: “route delete 10.0.0.0” and “route -p add 0.0.0.0 mask 0.0.0.0 X”, in the second command “X” is the IP of your router, which usually looks like "192.168.0.1", but in your case it may have a different meaning.
Driver Updater from Carambis
If you have a need to search for universal programs that can function on different operating systems: I mean utilities for creating group policies, programs for cleaning the system from viruses and, of course, software for working with OS drivers - the best solution would be to use the Carambis program Driver Updater.
Thanks to Driver Updater, you can not only get the software you need, but also save big. After all, one subscription purchase allows you to connect two computers at once.
As for the work process, the utility copes well with the assigned tasks. Now you no longer need to fix errors in connected hardware components on each computer.
Setting up automatic search and installation of updates now automatically updates all devices.
But, if you need to speed up your computer, we recommend using another utility from the same manufacturer - Carambis Cleaner.
Its capabilities:
- Comprehensive optimization of the operating system;
- The ability to delete components and temporary files that are no longer used and are not needed for the operation of the OS;
- Delete all OS error reports;
- Quick registry cleaning;
- Ability to delete files that the user selects;
- Uninstall installed programs in the main program window with a few clicks.
Remember, files that have been deleted by the program cannot be restored (unlike the usual deletion procedure using built-in OS functions). Run diagnostics on your computer several times a month to keep your system in good working order.
Identifying the causes of the malfunction
To identify the cause of the problems, you first need to check the reliability of the Ethernet connectors.
Step 1. Press the connector tab and remove it from the RJ-45 connector. Then insert the connector back into the port until you hear an audible click.
We press the connector tab and remove it from the RJ-45 connector, then insert it back again until a characteristic click is heard.
Step 2. Slightly tug the connector by the wire back and forth, making sure that the connection is established normally.
Pull the connector by the wire back and forth to make sure the connection is normal
Step 3. If all connectors are connected securely, you need to check the integrity of the Ethernet cables. Follow the cable from the computer to the place where it goes into the shield, inspecting it for physical breaks and damage.
Checking the integrity of Ethernet cables
Step 4. If the cable connecting the PC and the router is damaged, replace it with a working one.
If the wire connecting the PC and the router is damaged, replace it with a working one
Step 5. If the Internet cable coming from the provider is damaged, cut off the damaged area, extend the cable and re-crimp it with an RJ-45 connector.
On a damaged Internet cable from the provider, cut off the damaged area, extend the cable and re-crimp it with an RJ-45 connector
Reference! You can also call the Internet provider company so that they check the connection on their part, and call a specialist to carry out extension and re-crimping of cables.
A malfunction in the cable connecting the PC and the router may also result in a “burnout” of the router port. In this case, you need to switch the cable coming from the PC to another LAN port of the router for testing.
Switch the cable coming from the PC to another LAN port of the router to check the functionality of the router port
Another possible cause of problems with the cable connecting the PC and the router when setting up the connection for the first time is the use of a “crossover” (cross-) cable instead of a “straight” (patch cord).
Older network device models do not support the Auto-MDI(X) crossover and straight-through cable switching interface. If both the network card and the router do not support Auto-MDI(X), the Ethernet cable must be replaced with a “straight” one.
To connect, you need to use a “straight” (patch cord) Internet cable instead of a “cross” (cross-)
We install Internet software ourselves
First of all, let's find information about the board itself. Knowing the device model, finding suitable software becomes much easier.
How to find out what kind of network cards are installed in the system?
Step 1. Open “Device Manager”.
Step 2. We look for the item in the catalog of components (see photo below).
Step 3. Expand the category by clicking on the “+” icon. We see the name of our hardware.
Downloading and installing the driver
Now that we know the manufacturer of the network card, we can begin to manually search for software.
Step 1. Enter the model name into the search engine.
Step 2. The first link is to the website of the Intel company that manufactured the device. Let's go to the website.
Step 3. Click on the link to download the software.
Step 4. Select exactly the program that suits your operating system. The download begins.
Step 5. Open the downloaded exe file.
Step 6. Follow the installer's instructions. Click “Next”.
Step 7. Then we accept the license terms and wait for the software to install on the computer.
The tips below will help you install drivers without connecting to the World Wide Web.
If your wireless network was working and now there are no connections available
If everything worked recently and now you have a problem, try the methods listed below in order. If you don't know how to complete steps 2-6, everything is described in great detail here (opens in a new tab). And if these options have already been tried, go to the seventh point, from which I will begin to describe in detail (because everything is not so simple there for novice computer users).
- Unplug your wireless router(s) and plug it back in.
- Try the Windows troubleshooting that the OS suggests by clicking on the Wi-Fi icon with a cross.
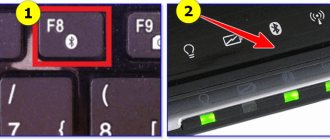
- Check to see if your laptop's hardware Wi-Fi switch is turned on (if it has one) or if you turned it on using your keyboard. Take a look at the laptop's proprietary utility for managing wireless networks, if available.
- Check if the wireless connection is enabled in the connection list.
- In Windows 8 and 8.1, in addition, go to the right panel - “Settings” - “Change computer settings” - “Network” (8.1) or “Wireless” (8), and see that the wireless modules are turned on. In Windows 8.1, also look at the Airplane Mode item.
- Go to the official website of the laptop manufacturer and download the latest drivers for the Wi-Fi adapter and install them. Even if you already have the same driver version installed, this may help, try it.
How to enable or disable a network card (including using BIOS)
First of all, let's look at the process of turning the board on/off directly through Windows OS. When the settings of a network card are regularly lost, this instruction can troubleshoot the problem.
Step 1. Launch the “Device Manager” familiar from the previous instructions.
Step 2. Find a list with our network equipment.
Step 3. Right-click on the icon marked in the screenshot. If it works properly, the “Disable” option will appear. If the card is disabled – “Enable”.
Thus, we can change the operating mode of the adapter from the system itself. Now let's try to perform a similar operation, but through the BIOS:
Step 1. Go to BIOS. To do this, turn on/restart the computer. Press the “F2” key (on some PCs “Delete” also works).
Step 2. Move through the tabs using the keyboard arrows (left-right). Moving within tabs – up and down. Go to “Advanced” and select “Integrated Peripherals”.
Step 3. Next is the “OnBoard Lan” parameter. Set the parameter value to “Disabled”.
Step 4. Save the result - find the “Save and Exit” parameter, press “Enter”.
The LAN port on the computer does not work, what should I do?
To check your network card for a hardware fault, you need to:
- Turn the computer back;
- Pay attention to the socket where the Internet cable is inserted;
- When the cord is inserted and the computer is turned on, the light diode on the port will light up;
- If the LAN port diode is not lit, turn off the computer;
- Disconnect all wires, starting with the power supply;
- Open the cover of the computer system unit;
- We clean the case from dust (you can carefully use a vacuum cleaner);
- Unscrew the network card and pull it out of the socket;
- Using a regular eraser, wipe the board contacts (golden stripes at the bottom of the board)
- Gently wipe the entire network card with a cloth containing an alcohol solution;
- Install the network card back into the socket;
- Assemble the computer and turn it on.
You can also look at the LAN port on the motherboard. It may be in working order. You just need to move the Internet cable into this socket. Then you can use this port. If this procedure did not help to revive the network card, then you need to purchase a new card.
Cards, waves, wires: how to configure a network card in Windows 7
Why configure the network card in Windows 7? If drivers are installed incorrectly, the following problems may occur:
- No Internet connection. Windows simply won't see the hardware.
- Connection failures. At the most inconvenient moment, the network may disappear. Such failures can occur at different intervals, thereby irritating the PC owner with poor performance.
How to install network hardware drivers on Windows 7
This method is used during normal Internet operation - when Windows is able to connect to the World Wide Web. The first question that arises is where to download and how to install the software for the network adapter?
- use special software (Driver Pack);
- or find out the card manufacturer and select software specifically for it.
Each method has its own advantages and disadvantages.
Where can I download network drivers for Windows 7? We recommend downloading software only from trusted sources. Third party resources may introduce malicious software into the package contents.
The interface in Driver Pack is intuitive; the necessary software is searched automatically from a large database. The program will do everything for you - you just need to launch it and make a couple of clicks. The downside is the weight of the utility (more than 10 GB). When you load the driver knowing the manufacturer of the network card, you save disk space. But the disadvantage of this method is the long search for the necessary software. First we'll look at a quick installation using the Driver Pack. And finally, we’ll tell you about a way to find information: what network card you have.
Installing drivers using the Driver Pack utility
“DPS” is a driver package that has proven itself to be reliable, large and easy to install. It includes software for the network, processor, video card, etc. This is the reason why the utility has a significant weight (about 9-11 GB). The developers regularly update the database, so you can safely download the latest edition of the package.
Driver for network adapter installation instructions
Step 1. Download the Driver Pack by following the link https://drp.su/ru.
Step 2. Launch the program.
Step 3. The utility automatically finds uninstalled or outdated drivers and offers to install them. When you select the “Set up your computer automatically” option, additional software will be installed along with the drivers, which is visible on the right side of the window.
Step 4. To avoid installing unnecessary things, find the “Expert Mode” option at the bottom of the window and click on it.
Step 5. Check the box for the software that needs to be installed and press the green button (see screenshot). Done - the driver for the Windows 7 network card has been installed.
If you want to learn in more detail how to install drivers on your computer, you can read an article about this on our portal.
Checking router settings
Router settings can go wrong, and not always through the user’s fault. Perhaps the network access password was simply changed.
If your wireless network icon is muted and has a yellow star next to it, click on it with the mouse, select the network and try to connect to it, after finding out if the access password has changed. This may be the reason.
Now let's go to the router settings. There is already a detailed article on this topic on the website; by clicking on the link, you can read it.
If, for some reason, they are lost for you, you need to adjust them. In my case, you need to follow the link “Wireless Network Settings Wizard”. You may have slightly different menu items, it all depends on the router model, but you need to do the same.
Make sure that you have a checkmark in the “Enable wireless connection” box.
Then you can change the network name and access password, select wireless mode (b, g, n). This is what concerns the router itself.
Also pay attention to the network information (LAN) section. You may need to change the settings here according to your provider.
For those who get the error when trying to connect: The network settings saved on this computer do not meet the requirements of this network, the article at the link can help.
I hope that at least one of the tips helped you solve the question: why the laptop does not connect to Wi-Fi, and now your device is successfully connected to the network.
A fairly common problem among owners of laptops with Windows 10, Windows 7 or 8 (8.1) - at one point in the notification area, instead of the usual wireless Wi-Fi connection icon, a red cross is displayed, and when you hover over it, a message stating that there are no available connections.
Moreover, in most cases, this happens on a completely working laptop - just yesterday, perhaps, you successfully connected to an access point at home, but today this is the situation. The reasons for this behavior may be different, but in general terms, the operating system believes that the Wi-Fi adapter is turned off, and therefore reports that there are no connections available. And now about ways to fix this.
Additional funds
Experienced administrators use specialized software with a universal driver database for all models of parts. This will greatly speed up computer maintenance after reinstalling Windows. They weigh several gigabytes and work as a set of programs for all occasions. It is enough to copy them to a flash drive and use them on an ongoing basis. Let's look at several similar products.
DriverPack Solution
One of the most popular utilities with extensive functionality. The product is distributed in two variations: online and local version. In the case of installing utilities for Windows 7, the offline edition is preferable since it does not require Internet access.