Some Windows users encounter a "Transmission Error: Code 1231" message when trying to ping or track a computer that is not in the local workgroup. This issue is reported to occur on Windows 7, Windows 8.1, and Windows 10.
Transmission error code 1231
After taking a closer look at this particular issue, it turns out that there are several different scenarios that can cause this error code. Here's a short list of potential culprits:
Error 1231 Network folder is unavailable
The moment came when the topics that interested me regarding PXE installation, as I thought when I encountered the current actions below in this note, were discussed. I loaded the PXE + NFS + SAMBA service onto the Ubuntu 18.04 Server amd64 , which also performs the functions of Web + Mercurial + Dokuwiki on HP MicroServer Gen8 . The network installation option for Ubuntu 18.04 Server & Desktop on any of my hardware goes without problems, but installing “ Install Windows 7 Pro SP1 x64 Gigabyte GA-970A-DS3P motherboard over a network (PXE) results in an error. So, in the BIOS , I chose to enable PXE and set the network card first in the boot list, although you can also select through F12 what to boot from first.
X:\windows\system32\wpeinit
X:\windows\system32\net use M:\\172.33.33.25\install\x64 and I get
The network folder is not accessible. For information about resolving network problems, see Windows .
When installing on a virtual machine ( Virtualbox : W7Test ), everything was fine, installation works, but not on the motherboard.
And then, after a lengthy analysis, a decision or understanding comes to me the next morning. I ping to 127.0.0.1 , the answer comes, but I ping 172.33.33.25 - I get:
PING: transmission failed. General Failure. The fact is that the winpe_amd64 does not see the network card, it does not have drivers and it does not know about the hardware. Even calling taskmgr and the network tab does not show any hardware.
I wanted to solve this problem - because I would gain experience.
I go to the official website through my home laptop Lenovo E555 Ubuntu 18.04 Desktop amd64 Mozilla Firefox browser and, for a specific motherboard model, download the driver package ( LAN: Realtek LAN Driver ) to the network subsystem: motherboard_driver_lan_realtek_8111_w7.exe, unpack them onto a USB Flash drive
Method 2: Reinstall the network adapter
According to some affected users who managed to resolve this issue, this issue can also occur due to a fault in the network adapter that makes the machine invisible to the local workgroup.
If this scenario is applicable, you may be able to resolve the issue by reinstalling the network adapter and installing the latest available driver.
If you don't know how to do this, follow the instructions below to reinstall your network adapter using the Device Manager utility:
- First, make sure you are connected to the Internet via an Ethernet cable.
- Open the Run dialog box by pressing the Windows key + R. Then type devmgmt. msc and press Enter to open Device Manager.
Launching Device Manager - In Device Manager, scroll through the list of installed devices and expand the drop-down menu related to network adapters.
- From the Network Adapter drop-down menu, right-click the default network adapter and select Uninstall from the network menu.
Removing a network adapter - Confirm the deletion attempt, then wait for the operation to complete.
- Once this procedure is completed, Internet access will be disabled. In this case, reboot your computer to give your OS time to install the generic equivalent.
- Once your computer boots and the standard network adapter driver is installed, Internet access should be restored.
- Ping or trace the machine that previously caused the error code and see if the problem is resolved.
If the same transmission error: problem code 1231 still occurs, move on to the next potential fix below.
Lack of Administrator rights
An equally frequent situation is when a user in a multi-user system has to log into his own session (and not the administrator’s). When you try to open or change some objects created by the Administrator, you may also receive the error “Access is denied...”.
Here the whole essence of the problem is that, as a rule, an ordinary user has limited rights in his session, which are set in the system by the Computer Terminal Administrator. It is clear that restrictions may concern certain actions performed by the user in the system, or simply the lack of rights to open, change, delete, move and edit certain types of data.
In this case, you need to either log into the system as an Administrator, or obtain the necessary advanced rights from him.
In all the methods described above, there is no saved password
If the password is not saved anywhere, but access to the shared network folder is possible, then the most likely reason for this is that the remote computer allows connection to the shared folder without entering a password.
Otherwise an error will occur:
Another option:
To fix it, you can set a password in the described way using “Saving usernames and passwords”, or using the “quick method” by specifying an IP address instead of the computer name (or vice versa).
See also the complete Guide to SMB and Samba.
Error 1231: Causes and Solution
Error 1231: its appearance means that there is no transport for remote network access. This error occurs on computers running Windows Vista or Windows 7. In these operating systems, the VPN connection is often blocked after installing an automatic security update.
Reasons for this error:
To resolve the error, first check your local network connection. To check, click the “ Start ” button, go to “ Control Panel ” and select “ Change adapter settings Network and Sharing Center . Then double-click on the Local Area Connection icon.
After this, perform a system restore to a time when this error did not exist. Open the “ Start ” menu, click on the menu item “ Programs ” → “ Accessories ” → “ Tools ” → “ System Restore ”. Then select an earlier system state to restore.
Finally, manually uninstall the latest system update and restart your computer.
Enable file and printer sharing in Firewall
If file and printer sharing is disabled in the firewall, then problems with network drives cannot be avoided.
If you are using a third-party firewall, you will need to find this setting yourself. Since many people don't use other firewalls, Windows Defender is enabled by default. To enable the setting, follow these steps:
- Display the Run window (Windows + R), enter the command “control panel” to enter the Control Panel.
- Switch your view to the large icons in the top right corner and go to Windows Defender Firewall.
- From the left side menu, select Allow an app or feature to interact with Windows Defender Firewall. A list of installed applications will be displayed. To allow editing, click on the “Change parameters” button.
- Find the File and Printer Sharing option, check the box next to it, and apply the changes. Click OK and restart your computer.
Method 4: Performing a Hard TCP/IP Reset
As it turns out, this problem is often related to a TCP/IP configuration issue. In most cases, this is due to a network adapter-related error, or it is a classic case of an incorrect DNS range.
If this scenario is applicable, you should be able to resolve this issue by performing a full TCP/IP reset on each computer that is part of the local workgroup.
This operation has been confirmed as successful by many affected users who have previously experienced Transfer Error: Code 1231.
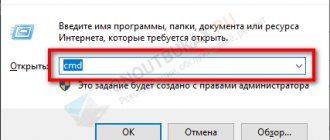
Here's a quick step-by-step guide on how to perform a hard TCP/IP reset:
Note. The instructions below are universal and will work no matter what version of Windows you are currently using.
Type "cmd" into the Run dialog box.
If the problem persists, move on to the next potential fix below.
How to fix “transmission error code 1231”
Some Windows users encounter a "Transmission Error: Code 1231" message when trying to ping or track a computer that is not in the local workgroup. This issue is reported to occur on Windows 7, Windows 8.1, and Windows 10.
After taking a closer look at this particular issue, it turns out that there are several different scenarios that can cause this error code. Here's a short list of potential culprits:
- The machine name contains lowercase letters. Keep in mind that Windows 10 has made some changes to NETBIOS resolution that will essentially make machines containing lowercase letters invisible in workgroups. In this case, you can solve this problem by renaming the problematic machines in uppercase only.
- There is a problem with the network adapter. As it turns out, this issue can also occur due to a bad network adapter driver or a glitch that is causing it to not properly communicate to the workgroup admin. To fix this problem, you need to reinstall the network adapter or replace it with a generic version.
- Network discovery is disabled – It is a known fact that you will see this error if some of the computers in your workgroup do not have network discovery and automatic configuration enabled in their Network and Sharing Center. If this scenario is applicable, you should be able to resolve this issue by making these changes on each machine that is causing this ping or trace error.
- TCP/IP inconsistency. Under certain circumstances, this problem can also be caused by a TCP or IP failure that makes the computer unavailable to other computers that are part of the same workgroup. In this case, performing a full TCP/IP reset on each affected PC should resolve the issue for you.
- Windows 10 Requirement – Keep in mind that Windows 10 has a requirement that every machine that is part of a workgroup must be in uppercase only. However, you can solve this requirement using a script. bat and avoid the error by not manually renaming every machine involved.
Troubleshooting on Sony Bravia TVs
Smart TVs from the Sony Bravia line, like any other household appliance, break down. This does not happen very often, but since we are talking about a high-tech product, breakdowns of these devices have their own characteristics. In particular, many of the problems are similar to computer ones. This means that the technician who will have to repair the Sony KLV 32s550a TV must have a good understanding of the software.
This TV may have some problems
One of the main reasons for problems with smart TV is its integration with Internet networks, both wireless Wi-Fi and wired Internet. This integration creates a risk of virus infection. The latter can cause:
But the impact of viruses on the operation of software is not the only problem that owners of such TVs have to face. Mechanical damage is an equally common cause. The most common breakdowns due to impacts, falls and exposure to water:
In this video you will learn more about repairing such a TV: Every time, to find out the cause of the breakdown, correct, professional diagnostics is necessary. For it, a number of methods and special equipment are used, available only to masters who deal with such equipment. We're talking about:
In addition to these tools, software specialists conduct software testing.
There are breakdowns that cannot be corrected by other methods other than replacing the broken part. This is the case, in particular, with matrix failure. Any damage cannot be repaired. Be it chips on the glass, cracks or internal damage to the display unit.
In addition to the matrix, the X1 Extreme processor, which is responsible for exactly how the image is displayed, also breaks down. It is on this that the increase in resolution to 4K HDR (that is, 3840 by 2160 pixels) depends. Without 14-bit signal processing, colors would be segmented and gradients would not be smooth enough. Thanks to the processor, even with an 8-bit source, you can watch videos with maximum quality. Replacing a processor can be quite expensive.
In addition to the processor, the following are subject to replacement:
Brief description of the problem.
This error code means that for some reason the computer is blocked from accessing resources located on the server. That is, Windows, when connected to the Internet, simply “does not see” the folder necessary for correct work on the network, and, accordingly, limits the user’s access to the World Wide Web. Such a failure can occur either due to the fault of the provider or due to internal problems on the subscriber’s side.
If you don't want to rename every PC in your workgroup to upper case only, there is one solution that will remove this requirement from Windows 10.
If you are ready to go this route, start following the instructions below to create a bat script capable of resolving the transmission error: code 1231:
Opening Notepad with Administrator rights Note: When prompted by UAC (User Account Control), click Yes to grant administrator access.
Using the Save As menu
Run as administrator
Method 1: Rename missing machines
As it turns out, this issue is most likely due to a NETBIOS resolution change that was implemented with the Windows 10 update that eventually made the machines part of the CASE-SENSITIVE workgroup.
So if you have a workgroup migrated from an older build of Windows (as a result of an upgrade), you may find yourself in a situation where machines whose names contain both lowercase and uppercase letters will no longer be visible.
This can be achieved by accessing a machine containing lowercase and uppercase letters and changing the PC name to uppercase only.
However, depending on your version of Windows, the steps will be different. We have created 2 separate guides for each Windows user. Feel free to follow additional guidance related to the version of Windows you are using.
A. Changing the machine name in Windows 10
- Press Windows key + R to open the Run dialog box. Then type ms-settings: about and press Enter to open the About tab in the Settings app.
Accessing the About tab in the Settings app - Once you're in the About tab, go to the right side, scroll down to Device Features, and click Rename This PC.
Rename PC in Windows 10 - Inside Rename your PC, enter your machine's name in uppercase only and click Next.
Renaming a car in capital letters only - Wait for the operation to complete, then click Restart Now and wait for the next startup to complete.
B. Changing the machine name in Windows 7 and Windows 8.1
- Press Windows key + R to open the Run dialog box. Then enter "sysdm. cpl" into the text box and press Enter to open the System Properties screen.
Launch dialog: sysdm. cpl - Once you're on the System Properties screen, click the Computer Name tab, then click the Change button.
Changing the name in Windows 7 and Windows 8.1 - In the Change Computer/Domain Name window, change the text in the Computer Name field to capital letters only.
Changing the machine name in Windows 7 and Windows 8.1 - Restart your computer and wait until the next startup completes.
Once you change the machine name to uppercase only, ping or trace it again and see if you still encounter the same transmission error: code 1231.
If this issue still occurs, move on to the next potential fix below.
Uninstalling an antivirus
In many cases, system error 6118 can be encountered as a result of an antivirus blocking communication between the SMB protocol and other network devices. Therefore, first of all, disable real-time antivirus protection and run the “net view” command.
If you are using an antivirus with a built-in firewall, disabling the firewall or real-time protection will not bring any benefit, since all protection rules remain in place. Therefore, completely remove it while searching for the cause of the error.
Find your antivirus program in the list, right-click on it and select “Uninstall.” Confirm any prompts that may appear during the removal process.
After the computer restarts, run the commands that were interrupted by system error 6118. If the problem persists, reinstall the antivirus and proceed to the next step.
Error code 0x80070035
Error 0x80070035 is displayed when trying to access files and printers over the network.
Solution 1: Error 0x80070035, Kapersky products and more.
The first thing you can pay attention to, and what users have repeatedly complained about, is the antivirus. It blocks access to shared folders to other machines on the network. Kaspersky Lab products are especially jealous of this.
Especially if you have this product installed on your laptop, and you are trying to access other people’s files and printers over a Wi-Fi network
Kaspersky Lab products are especially jealous of this. Especially if you have this product installed on your laptop, and you are trying to access other people’s files and printers over a Wi-Fi network.
If you have this mixture - a laptop, Kaspersky, and Wi-Fi access to a local network - try disabling Firewall in the settings.
Now try accessing the network resource again. If you succeeded, configure the rules for your network.
Click on the word “Firewall” itself, then “Networks”.
In the list of networks that appears, click on the network through which you are trying to connect to other computers on the network, right-click and select “Trusted Network” from the drop-down menu.
If you have another antivirus (firewall), the principle will be the same, with adjustments for your product.
Solution 2: Register the gateway address in WINS
Try the following. Open Network and Sharing Center, find the name of your connection, and click on it. And in the window that opens, click on the button.
The field whose contents we need to remember is highlighted in red. In our case, gateway: 192.162.1.1
Now, close the window with information and do the same thing, only instead of “Information” we click on the button. In the new window, immediately uncheck the IP protocol version 6, select IP version 4 protocol and press the button.
Now we will find ourselves in the properties window of the fourth version of the IP protocol.
Here we need:
- press the button
- then switch to the WINS tab
- press the button
- enter the previously remembered gateway IP address
- confirm by pressing the button
- press
Click again to close the window.
Now try to open the “ball”. It is possible that you will need to reboot.
Problem
The figure below shows a small local network. We are trying to gain access to the STM computer.
And we are still haunted by the same error.
There is a suspicion that the computer name “STM” could be written in Cyrillic, which resulted in the error.
If you have something like “Katya-PC”, go straight to the end of the article - the solution.
But we have “STM” - we won’t know until we check it ourselves.
How can I check this? It’s very simple, you need to ping this computer through the command line.
We write:
ping CTM //("STM" - we write in English. )
and press .
As you can see in the figure below, there is no such computer on the network. This indicates that the computer is turned off (inaccessible) or that the owner, during installation, wrote the computer name “STM” in Russian. But we know for sure that it is turned on and working normally.
To check, they also pinged another computer. As we can see, everything is fine with him.
Solution
You need to find out the IP address of this computer on your local network. We found out - 192.168.1.5
We try to enter the following line in the address bar of the explorer:
\\192.168.1.5\ and press .
As you can see, we have opened network folders, printers, and in addition to the “STM” computer, another computer has appeared: 192.168.1.5
You can use it this way, or you can ask the owner to rename the computer by writing the name in Latin letters.
neoshibka.ru
Error 1231 Network folder is unavailable
In the previous article, we talked about how to create and configure a network folder in Windows 10. If the network folder is not detected or does not open, go through all the steps again. Important:
On "tens" problems arise due to updates. There are two options: either shared folders and files are not displayed, or they are visible, but cannot be opened.
Note! The workgroup name must be identical for all PCs included in it.
Reboot the computer and see if the network folders are now visible.
Working group
The workgroup must be the same on all devices. As a rule, this is true. But it is advisable to check. To do this, open the computer properties “System” and go to “Advanced system settings”.
“Working Group” will be indicated there. To change it, you need to click on the “Change” button.
Once again: the workgroup name must be the same on all computers.
If you have a problem with access to a network storage device (a flash drive via a router), then the workgroup is also specified in the sharing settings on the same ASUS router. You can look at the screenshot above in the article. It should be the same as on the computer.
Resetting network settings
Now let’s try not to configure the network, but rather, let’s reset all parameters. Sometimes this helps, and shared files and folders are detected. Go to Internet and network settings. We need to click on “Network reset”.
Agree to "Reset Now". The computer will reboot and the network settings will be updated. This method often solves not only network detection problems, but also other network and Internet errors.
Method 3: Enable Network Discovery and Automatic Configuration
As it turns out, Transfer Error: Code 1231 can also occur in cases where computers that are part of a homegroup are not configured for network discovery or automatic installation is not enabled.
If this scenario applies, you may be able to resolve this issue by accessing advanced sharing settings on each affected computer and configuring the default network discovery behavior.
Here's a quick guide on how to make this modification in Windows 7, Windows 8.1 and Windows 10:
Note. The steps below are universal and should work no matter what version of Windows you are using. Keep in mind that you will need to repeat the steps below for each computer that is part of the workgroup.
- Press Windows key + R to open the Run dialog box. Then type "control. exe/nameMicrosoft. NetworkAndSharingCenter" in the Run box to open the Network and Sharing Center menu.
Opening the Network and Sharing Center using the Run command - In the Network and Sharing Center, click "Edit advanced sharing center" in the vertical menu on the left.
- Then expand the currently active profile and enable "Enable network discovery."
- After you enable network discovery, select the Enable automatic configuration of a device connected to the network check box. Enable network discovery and automatic configuration
- Save the changes you just made, then repeat this operation on each computer in your homegroup.
If the same issue still occurs, move on to the next potential fix below.
SMB 1.0 on Windows 10
There is often a problem with the SMB protocol. It is with its help that you can access shared folders on your work network. It supports Network Explorer, a service that generates a list of active computers on the local network.
Starting with update 1703, the browser works very poorly. Since version 1709, the SMB 1.0 protocol is not supported at all. Not everyone can update SMB to version 2.0. Often network equipment simply does not support it.
But let’s try to enable the first version on the “ten”. We go to the control panel.
In the list of settings, select “Programs and Features”.
Go to “Enabling and disabling...”. In the list, look for “Support for shared access...” and place markers opposite the client and server. Thus, we enabled the first version of the SMB protocol.
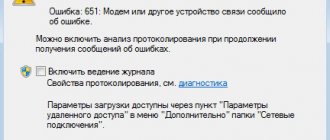
Error 619
Appears due to:
• incorrect security settings; • inaccuracies in VPN connection settings; • blocking traffic with other applications (antivirus, firewall).
To fix this problem, we recommend that you follow the instructions below, consisting of 3 steps or points that will solve your problem.
First step.
Let's go to Start.
Second step.
Launch the Control Panel.
Third step.
Go to the Network connections section. Let's examine the status of our connection shortcut. Specifically, look at what is written in parentheses next to the WAN miniport - PPTP/L2TP or PPPoE.
If it says PPPoE, do the following:
• right-click on the connection shortcut; • go to Properties; • select the Security tab. Set it up like this:
If you are using a VPN connection, repeat the sequence until you get to the Security section. Here we deactivate the line “Require data encryption”.
Sometimes this error also appears among modem owners when the computer cannot detect the USB device.
First step.
Go to the Control Panel.
Second step.
Open the System category.
Third step.
Go to the Equipment section.
Fourth step.
In the Device Manager, look to see if there are any warning notifications like yellow and red icons near our equipment? If so, reboot. Nothing changed? Plug the modem into another USB port. If there are no changes in this case, we test the modem on another laptop or computer. Does not work? We contact the modem supplier.
Problems with Windows 10 (1803)
Since update 1803, Microsoft developers do not provide the ability to create workgroups and discover network folders at all. They believe that this method of accessing files and folders is outdated. Why work with Network Neighborhood, create folders, endlessly change settings if there are more convenient alternatives. For example, OneDrive.
But many users are more accustomed and even more comfortable to work in a workgroup.
Network discovery responsibilities are performed by the Function Discovery Resource Publication service. Starting from build 1803, it does not start when the computer boots. But we can turn it on ourselves.
Press the Win+R keys and in the “Run” line type the command services. msc.
In the Russian version it will read “Publication of discovery resources...”. Find it in the list and double-click with the left mouse button.
Select the “Automatic” option in the “Startup type” line. It is best to choose the delayed start settings. Click “OK” and restart the computer.
So, we looked at several ways to fix the problem of detecting network folders in Windows 10. The latest Tens updates are completely unfriendly to working on a shared local network. In addition to the settings for the network folders and workgroup themselves, we need:
Typically, the operations performed help to see and open network folders. Otherwise, use the proposed alternative - the OneDrive file storage and management service.
This is interesting:
Setting up the Windows 10 firewall - detailed instructions.
How to quickly disable the proxy server on Windows 10?
The Internet does not work after updating Windows 10. What should I do?
Every modern person has a computer or laptop at home, which provides access to the world's information bank. But, as with any other technology, glitches, breaks and malfunctions often occur here. And in this article we will look at what error 1231 means when connecting to the Internet, and what to do if “the network folder is unavailable.”
Setting up sharing
Often, error 0x80070035 - network path not found appears due to incorrectly configured sharing in Windows 10. Therefore, it is advisable to check this whole matter.
For this:
- Right-click on the desired object and go to its properties.
- Go to the “Access” tab and click on the “Advanced settings” button.
- Check the box next to the “Open shared...” option and click “OK”.
- Now start the search by clicking on the magnifying glass icon and entering “Control Panel”.
- Open the “Network and Internet” section. In this case, you must have the “Category” view state enabled at the top of the screen.
- Go to “Network Control Center”.
- Go to the section for changing sharing settings.
- We set permissions for all existing items, except for the password protected option, which needs to be disabled.
- After this, network access will be open; all that remains is to save the changes and restart the PC.
Now check the result, error 0x80070035 should be resolved.
In some cases, combining computers into one common group with a “Home” or “Private” profile helps. In Windows 7, you can change the profile through the Network Center by clicking on the network option.
Couldn't solve the problem? Contact a specialist for help!
Solve my problem
Then we return to the main menu and go to “Selecting a home group and settings...”.
Create a group and set permissions.
In Windows 10, the profile changes a little differently:
- Using the search, open “Network Status”.
- Then we find the item “Change properties”.
- Then change the profile to “Private”.
- Then you need to re-open the “Network and Sharing Center” and go to the “Home Group” section, create it and make all the necessary settings, setting all permissions.
Attention! Starting with update 1803, the homegroup was completely removed from the system. As an alternative, the developers suggest using the “Share” panel at the top of Explorer
Couldn't solve the problem? Contact a specialist for help!