A network card driver is an important component of the operating system. It allows the computer to exchange data with other similar devices. The article we bring to your attention describes in detail the installation procedure for this software, as well as its configuration. All this will allow you to easily connect your computer to a computer network and start exchanging data with other similar devices and more.
What is it and why is it needed?
A driver for a network card is a special program that is part of the operating system. It controls the operation of this particular device. Without installing this software, the operating system will identify it as an “unknown device”. And the adapter itself will not fully function. Therefore, the installation of this software is very important and relevant. The problem is solved as follows:
- Determine the type of network card installed on the computer.
- Find the driver and install it.
- Set the network connection settings.
- We carry out visual inspection and performance testing.
It is in connection with this algorithm that the installation of adapter drivers will be described in the future.
Possible problems with Wi-Fi drivers and how to fix them
Drivers for a Wi-Fi adapter on a laptop do not always take root, and sometimes their settings may go wrong. If the check shows that the firewood is not working correctly, you should find out the cause of the problem and try to solve the problem yourself.
Inappropriate driver
If the wrong software is installed, it must be removed through the “Network Adapters” tab. When deactivation is confirmed, you will need to download a new virtual package according to the instructions described above and carry out the installation.
If this does not help solve the problem, you will have to reinstall the operating system Windows XP, 7, 8.1 or another version.
Wi-Fi disabled on laptop
Problems arise if Wi-Fi is turned off. To activate it, just find the antenna icon on your laptop keyboard (F7). By pressing it in combination with the Fn button, the computer will turn on Wi-Fi automatically.
How to turn on Wi-Fi on a laptop
The router asks for a password
Versions such as XP sometimes, after updating individual system files, enable protection and require you to enter a password for the router. This digital value is written on the bottom of the device cover. You only need to enter information once.
Types of network cards
According to the installation method, such adapters can be soldered to the motherboard (they are sometimes also called integrated), internal (installed inside the system unit) and external (connected to external connectors of a personal computer). In the first case, this is a microcircuit with connectors that are located on the main board of a personal computer. It is in this design that such devices can most often be found today. The second version of the network adapter can be seen much less often in practice. This is a separate board that is installed in the PCI expansion slot of the motherboard. And in the latter case, such a component of a computer system resembles a flash drive that is connected to the USB universal serial bus port. The second classification of such devices is based on the method of data transmission. The first one is wired. That is, information is transmitted using twisted pair cables. The second one is wireless. In this case, electromagnetic radiation is used, and information is transmitted using the Wi-Fi standard.
Plug and Play
On the most popular and most common models, the driver for the network card is installed automatically when installing the operating system. This can be checked as follows:
- Place the mouse pointer over the “My Computer” shortcut (it can also be found in the “Start” menu). Right-click on it to bring up the menu.
- In the list that appears, select “Properties”.
- Next, in the left column, select “Device Manager”.
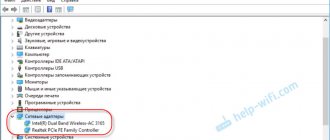
- In the window that opens, pay attention to two sections. The first of them is network adapters. It must contain all devices of this class. Then expand the “Unknown devices” section (if there is one) and move on to the next paragraph of this article. If this section is missing, then you can immediately begin setting up the adapter, since all the necessary software for its full functioning has already been installed.
Update drivers using Device Manager
It’s easy to update drivers for a Wi-Fi adapter, if they are present in the system, yourself. The process goes through the “Control Panel”.
Step-by-step instruction:
- Find the "Device Manager" section.
- Go to the “Network Adapters” tab.
- Click on the “Other devices” item.
- Find the item with the name of the adapter module.
- Enter the “RMB” subsection.
To update the firewood, on this page you need to click on the button of the same name and set the system to “Automatic search”.
Determining the installed network card
If the adapter came with a CD and it is available, then we proceed directly to the installation. First, we study the documentation for the personal computer. It must indicate the manufacturer and model of the adapter. If the documentation is irretrievably lost, you can use specialized software, for example, AIDA 64. Download this utility and install it. After startup, we look at the hardware configuration and find out which adapter is installed in the computer system. The next step is to download the adapter driver from the manufacturer’s official website. All other sources cannot be used, since you can download the wrong software from them.
Another solution
The previously described manipulations can be made much simpler. To do this, just download the DriverPackSolution program and run it. Then it will scan the list of equipment installed on the computer and update all software of that class. The advantage of such a solution is obvious - minimal user participation in the process. But the disadvantage is that the DriverPackSolution utility takes up a lot of space and takes a long time to download. It contains a driver for each Realtek network card model. The situation is exactly the same with equipment from other manufacturers. As a result, its size today is more than 7 GB.
How to check the adapter's operation
When the driver for the Wi-Fi adapter is updated or installed, you need to check that it is working correctly. Algorithm of actions:
- Press Win+R at the same time.
- Enter the character “b” in the RUN window.
- Enter the literal value - devmgmt.msc.
- Confirm the entered information with the “Ok” button.
- Go to "Device Manager".
To assess the status of a network card, just select the tab with the same name and the network and click on the “Record” button. A window with this information will indicate that the card is functioning correctly.
Setting up a network connection
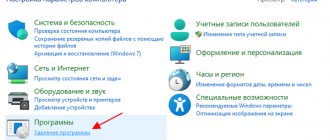
At the next stage, after the Realtek network card driver has been installed, you need to configure the connection parameters. All required values must be specified in the contract that you entered into with the provider. Next, go to “Start”, then select “Control Panel” and find “Network Center”. Then in the right column, click on the line “Change adapter settings”. A window will open containing all the network cards of this personal computer. Open the properties of the custom adapter by double-clicking on its icon. In the window that opens, we gradually expand the configurations for each of the parameters using the same action. Then enter the values and save them. Usually it is enough to configure only 2 parameters: “Internet Protocol version 6” and “Internet Protocol version 4”. This is where the PC network addresses and DNS are set. This information, as noted earlier, must be provided by the provider. By default, the system is configured to automatically accept these parameters.
Visual functional check
Any network adapter is equipped with indicator lights. After correctly installing the software and setting up the network connection, one of them should definitely work. As a rule, this is a green LED that blinks periodically. It is usually located next to the twisted pair connection (for internal and integrated adapters) or on top of the flash drive (for external devices). If this is all true, then we proceed to the next stage.
Using IDs
But let's see how to choose a network driver if the above tools are not at hand. This is done quite simply, and in ways that ordinary users don’t even know about.
To get started, use the same “Device Manager”. Apply RMB on the network card and go to the properties item. After that, use the details tab and select show hardware ID from the drop-down list below. The longest line containing the DEV and VEN identifiers will fully contain information about the device.
Further, in the question of how to find out which network driver is needed, there is only one solution left to apply - go to a specialized website with drivers, search for the specified line, download the software and install it yourself.
Note: if the installation distribution is in EXE format, it must be run with administrator rights. In the case of an INF file, installation is selected via RMB. And if the installation is impossible, when the system reports that installation in this way is impossible, you should indicate to the system the location of the file during a standard update.
Due diligence
The last step is to perform a comprehensive connection check. To do this, you need to find out the IP address of the network router or another computer on the local network. You can obtain this information from your system administrator. Home routers have the address “192.168.1.1”. Using his example, we will consider a comprehensive check of connection to a local area network. Press the key combination “Win” (it shows the Windows logo) and “R”. The Run window will open. In its field, enter the command “CMD” and press “Enter”. A command prompt window will open. You need to type the following command into it: “ping 192.168.1.1”. As it is not difficult to understand, the last 4 digits are the address of the computer on the network. In response, connection testing will begin. Based on its results, a message will be displayed with the number of packets sent and received in response. If the quantity is equal, then everything is fine. Otherwise, check the network connection settings. Then, if our PC is connected to the Internet, we can launch a browser, enter the address of any portal (for example, rambler.ru) into it and press “Enter”. After this it should open.
For personal computer
On a PC, everything is a little more complicated, since the network card for the Internet is most often built into the motherboard. And as you may have guessed, we just need to find the name of the “mother” model. This can be done in 3 ways. In my opinion, the easiest one is through the command line. Next I will show you using my motherboard as an example. The principle itself should be clear, but the instructions at some steps may differ.
- Please press two keys on your keyboard: “Windows” and “R”;
- A window like this will pop up where you will need to enter the command: “cmd”;
- Now we write two commands:
wmic baseboard get Manufacturer wmic baseboard get product
- The first command shows the manufacturer of the motherboard, and the second shows the model. Now you need to enter this name into a search engine.
- On the website you need to find the “Support” or “Drivers/Software” section.
- Of all things, we are interested in the “LAN” drivers. Although if you just reinstalled the system, you can download everything. Also look at the release date and download new drivers.
On a laptop
In order to install the driver for the latest version of the network adapter, you can simply go to the official website of the laptop manufacturer. First, we take the full name of the laptop model, which is most often written on the label under the case. Next, we enter this name into the search engine. You can also simply go to the manufacturer’s official website and find the laptop there manually, but the first method is a little more convenient.
Next, simply download the driver for LAN or Wi-Fi connection. Therefore, on this occasion, I wrote a detailed article with different models, which you can read here.
Automatic and manual installation of Wi-Fi drivers in Windows 7/10
The driver for the Wi-Fi adapter must not only be downloaded, but also installed. Most often, the package of necessary virtual elements has the prefix “wlan” in its name. Automatic installation and updating are available through special utilities. It is enough to install them on your computer, but if this option is not available, you will have to install the firewood manually.
After downloading the file package, follow the standard procedure:
- Press the WIN+R button combination.
- In a new window, enter devmgmt.msc.
- Confirm your actions with the Enter key.
- Find the “Wi-Fi module” tab.
- Go to the “Network adapters” subsection.
After this, you need to left-click and select “Properties”. Then go to the new position - “Driver” and select the “Update” option.
Installation