Hello! This article will focus on a common wireless network connection problem where there is no connection. Situations can be different - maybe the networks are simply unavailable and the red cross is on, or maybe the wireless network icon is nowhere to be found. Here I will show my algorithm, which we usually use to help our readers solve this problem. Read from top to bottom, try it.
But if suddenly something still doesn’t work, write about your problem in the comments. At a minimum you will help others, at a maximum you will get a separate solution.
We will assume that the network itself is working properly and other devices can easily connect to it.
Screenshots are from Windows 7 (the most common source of the problem). But everything is suitable for versions from Windows XP to Windows 10.
What does it look like?
As I wrote, it can all look different. There may be an icon, but the nets will not catch. Or maybe not, but only the wired adapter lights up or is completely absent. In my case it looks like this:
If you hover your mouse over the icon, the message “No connections available” appears. In fact, the situation is unpleasant, but in most cases, in our experience, it is solved programmatically and on our own. But exceptions are possible; a burned-out module will give exactly the same result. So we try, test and hope for the best.
Manually entering an IP address
If previous solutions did not allow connections to be established, you can set its IP address manually.
Step 1. In the “Network Connections” folder (see above), right-click on the wireless network and select “Properties”.
Right-click on the wireless network and select “Properties”
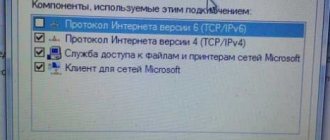
Step 2: Select TCP/IPv4 Protocol and click Properties.
Select “TCP/IPv4 Protocol”, click “Properties”
Step 3. Click “Use IP Address” and enter the required connection information. Click "OK".
Check the box “Use IP address”, enter the data required for connection, click “OK”
Note! You will need to enter your own IP address for the connection. The photo also shows Google's public DNS, but you can use 192.168.1.1 as your preferred DNS server.
Main reasons
Here I will briefly go over the possible causes of the problem. Let's take a quick look, perhaps your obvious problem will be here too. In our WiFiGid experience, there have been many strange situations related to the disappearance of Wi-Fi, and some of them were very comical. So, here is the TOP list:
- No Wi-Fi adapter. Well, it’s true, many users try to turn on Wi-Fi on a computer that never had such an adapter. It’s one thing if everything worked successfully before, but it’s another thing if everything didn’t work from birth. For reference, there were laptop models without a Wi-Fi module, so let’s take a closer look.
- It burned and broke. Also a common reason, devices sometimes fail. You can’t do anything special here; it’s easier to buy the most inexpensive external adapter.
- Driver failure. Moreover, drivers fail even under very strange circumstances - indeed, almost without reason. Either something was updated, or the disk sector cracked, but sometimes the hardware stops working for such a trivial reason.
- The adapter is turned off - either in the adapter settings or simply by a keyboard shortcut.
- Viruses and antiviruses are a common point. Some infections block the network, some antiviruses and firewalls also sometimes go crazy.
That's the whole list at a glance. Now I propose to go over each of the points separately.
Before you start doing anything, be sure to restart your computer or laptop and router. This usually helps.
Checking for viruses and malware
The Wi-Fi connection may be damaged by some malicious software. If there is a virus on your PC that is blocking the connection, the antivirus will probably remove it.
Step 1. Right-click the antivirus icon in the notification area and click “Open interface...”.
Right-click on the antivirus icon in the notification area and click “Open interface...”
Step 2. Select “Run scan...”.
Select “Run scan...”
The scan will start.
Step 3. After checking your PC, click “Repair all”.
Click “Remove all”
No Wi-Fi adapter
As strange as it may sound, many people try to include what they don’t have.
Do you have a desktop computer? Most PCs come without Wi-Fi out of the box.
If you purchased a separate Wi-Fi adapter, but everything worked previously, or you have a laptop with built-in Wi-Fi, feel free to go to the following sections in search of your reason.
For those who have doubts, there is another universal cool way. To do this you need to go to “Device Manager”. One simple way without entering strange commands:
- Right-click on Computer in the Start menu and select “Properties”:
- Device Manager:
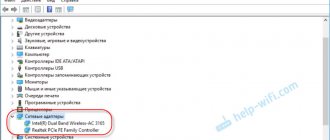
- The entire list of our devices opens. And here we are looking for our adapter. There may be the words Wi-Fi, Wireless or something similar. In addition, there may be different exclamation marks or other designations next to our adapter. For me it now looks like this:
In my case, everything is fine with the adapter, but the main thing is that it is there. Look at yourself, at the same time on the go with various warnings here you can understand that there is a problem with the drivers. The task is to find out whether or not there is an adapter.
If you suddenly find out that you don’t have an adapter, the easiest way is to buy one. No program will help.
Setting up the router
To connect via a Wi-Fi network, you need to correctly configure the router (router) you are connecting to, especially if other devices cannot connect to it.
Step 1. Connect your computer to the router using an Ethernet cable, inserting it into the RJ-45 connectors on the PC and into the LAN connector of the router.
We connect the computer to the router using an Ethernet cable, inserting it into the RJ-45 connectors on the PC and into the LAN connector of the router
Note! Router ports labeled “WAN” or “INTERNET” are usually marked in a different color and are used to connect the cable coming from the Internet provider.
Step 2 . Find out the default registration data of the router - its IP address, username and password on the bottom label of the device, in its documentation or on the Internet. If the data has been changed, remember it.
We find the default settings of the router on the device label at the bottom, if you have changed we look for your information
Reference! Since the procedure for changing router settings depends on its model, it is recommended to refer to the user manual of the specific device or look up the required steps on the Internet.
Step 3. Open an Internet browser and type the router's IP address in the address bar by pressing "Enter".
Open an Internet browser, type the IP address of the router in the address bar, press “Enter”
Step 4. In the login menu, type the “Name” and “Password” of the router and click “Login”.
Enter the “Name” and “Password” of the router, click “Login”
Step 5. The router menu will open. In the “Maximum Number of Users” column, set the number of DHCP users.
In the “Maximum Number of Users” column we set the number of DHCP users
Note! The usual limit is 50 DHCP users, but it's best to check your specific device's user manual for more details.
Step 6. Click on the “Wireless” tab.
Click on the “Wireless” tab
Step 7. Click “Basic Wireless Settings” and oh.
Click “Basic Wireless Settings”
Step 8. In the menu that opens, change the “SSID” name to any other name.
In the “Network Name (SSID)” line, change the name to any other
Step 9: Click “Save Settings” at the bottom of the page.
Click “Save Settings” at the bottom of the page
Step 10. Click on the “Wireless Security” tab and in the “Passphrase” line enter a different password for logging into the Wi-Fi network.
Click on the “Wireless Security” tab, in the “Passphrase” line, enter a different Wi-Fi password
Step 11: Click “Save Settings” at the bottom of the page.
Click “Save Settings” at the bottom of the page
Step 12. Click “Security”, and in the “SPI Firewall Protection” lines click “Disabled”.
Click “Security”, and in the lines “SPI Firewall Protection” click “Disabled”
Step 13: Click “Save Settings” at the bottom of the page.
Click on the “Save Settings” button at the bottom of the page
Step 14. Turn off the router by pressing the power button on the router itself; if there is no button, unplug the plug from the socket, wait about a minute and turn it on.
Press the power button on the router itself to turn it off, after a minute to turn it on
Step 15. Also make sure that the router is not overheating.
Reference! You may need to reset the router to factory settings according to the user's instructions, but it is best to perform such a reset after exhausting other methods of connecting to Wi-Fi.
Driver
Yes, the Windows 7 and higher operating system itself does an excellent job of selecting drivers. But sometimes something doesn’t go according to plan - either the update goes wrong, or Windows itself plans a stupid update, or simply a third-party program spoils everything irrevocably, so that the operating system cannot cope on its own.
As a rule, if there is a driver problem in the Device Manager, which we accessed earlier, there will be some kind of warning next to our adapter, usually an exclamation mark.
Here you can describe for a long time the procedure for a standard driver update - but as a rule, if for some reason it does not install on its own, then nothing good will come of it. The easiest way is to install the official driver using third-party means - from the manufacturer’s website or special programs for selecting drivers. So my super method:
Download the DRP.su program and install the drivers it offers. It is better to refuse third-party imposed programs; usually all these browsers and antiviruses are not so necessary, but the drivers install almost perfectly.
Adapter turned off
Another common cause of problems with a wireless network is that the adapter is simply disabled. There are several options for enabling it. Most versatile:
- Go to Control Panel
- Network and Internet
- Network and Sharing Center
- Change adapter settings
- Here we find our Wi-Fi adapter (will be there if the drivers are installed correctly). And look at its status:
- We see that the adapter is now turned off. Right-click and select “Enable”. Everything should turn on and work on its own.
The method above is universal and suitable for almost everything. If we have a laptop, then there is usually an option to turn on the adapter in the same way using the Fn + F (1-9) keys. The key combination varies depending on the manufacturer, just look at your keyboard to understand:
On my ASUS, the most common combination is Fn + F2. What do you have - there may be other things, for example, special buttons and switches:
Why the network does not work and turns off on a laptop with Windows 10 and 7
If Wi-Fi stops working on a laptop running Windows 7 or 10, often after performing diagnostics a notification pops up that “Wireless connection is disabled”, and the error itself has the status “not fixed”.
What does the message “Wireless disabled” mean?
The appearance of such an error indicates that the network adapter used in the laptop for wireless communication is disabled. In such a situation, a red cross appears on the notification panel next to the connection icon, and when you click on the icon, the current status “No connection” will be shown.
If this happens, it means Windows itself cannot fix the problem automatically and you will have to do it manually.
Reasons for the error
On new models, sudden disconnection of access to the wireless network may occur:
- in order to save energy consumption;
- due to outdated drivers;
- or as a result of using inappropriate network adapter settings.
There may be several ways to fix the error and enable Wi-Fi on Windows of different versions.
Updated – AutoConfig Service
I initially forgot, but sometimes the whole reason is that Wi-Fi does not search for networks - the Wi-Fi auto-configuration service is disabled. Correcting:
- In Start on a familiar computer, right-click again, but select Manage:
- Services and Applications – Services – WLAN AutoConfig Service:
- The status should be “Working”, the startup type should be “Automatic”. In my case, for some reason the service does not work, and the startup status is manual. Double-click on the service, launch it and set the desired startup type:
Delete a wireless network profile
If a connection profile is damaged, the best way to restore its functionality is to delete it and create it again.
Step 1: Click the magnifying glass icon next to or in the Start button menu.
Click on the magnifying glass icon next to or in the Start button menu
Step 2. Type “cmd” in the line, and right-click on the utility and run it as an administrator.
We type cmd in the line, and by right-clicking on the utility, run it as an administrator.
Step 3. Type the command “netsh wlan delete profile name = “Profile_name” and press “Enter”.
Type the command “netsh wlan delete profile name = “Profile_name”, press “Enter”
Note! “Profile_name” must be replaced with the real name of the wireless connection on the PC .
Step 4: When the process is completed, you need to reconfigure the wireless connection according to the remote connection settings.
Updated – The icon just disappeared
Sometimes there's nothing wrong with the network, but there's just no icon. Or maybe it's turned off? Here is a method to correct this situation:
- Click on the Taskbar and select Properties:
- Tune:
- Opposite the “Network” icon, make sure that the “Show icon and notifications” status is set:
Troubleshooting connection problems
This tool can be used for various problems in the system, including the problem with the Wi-Fi network.
Step 1. Open the search bar (see above). Type “Troubleshooting...” and click on the utility you found.
Type “troubleshooting…” into the search field and click on the utility found
Step 2: Run the Internet Connection troubleshooter.
Left-click on the Internet Connection troubleshooter
For Windows 10, on the right side of the window, in the “Internet Connection” section, click the “Run the troubleshooter” option.
Step 3 : Click Next.
Click “Next”
The tool will inform you about possible problems with the Wi-Fi network.
Read the information about the problem, click “Next”
Step 4. Restart your PC and try to connect.
Updated – Airplane mode
This problem is relevant for Windows 8 and 10. If you enable Airplane mode, Wi-Fi will become unavailable. Disable it:
Click on the notification panel (the button in the corner) and here we click on our aircraft tile:
That's all my methods to help solve the problem when there is no wireless network connection! But there are other underground ones that ordinary people do not need to know about in everyday life. Try to go through all sections - it will help in 99% of cases. And that's all. Write comments!