Moving from one smartphone to another starts with the phone book, but not everyone knows how to transfer contacts from iPhone to Android and vice versa.
Such a procedure is fraught with some difficulties. At the same time, if you have enough time, you can do everything manually, but why, if there are automatic and low-cost methods in terms of time and effort.
What do you need to transfer your phone book? There is a wide choice among methods. But you still can’t do without a Google account and an Apple ID account. Access to a PC is required. In this case, an optimal transfer from iPhone to Android is also possible. And most importantly, don’t forget about synchronization. Otherwise, loss of numbers cannot be avoided.
Transfer phone numbers from iPhone to Android via Gmail
To transfer contacts via Gmail, you need to set up synchronization to create a backup copy. Transferring data from iPhone to Gmail is carried out in two ways:
- sync iPhone with Gmail
- import iPhone data to Gmail using iCloud
Sync iPhone with Gmail
- In iPhone settings, scroll down to “ Mail, Contacts, Calendars ” and click.
- Click “Add an account“, enter your login details, click “Further“.
- Once you sign in, Gmail will ask you to sync. Make sure Contacts is enabled and agree to the transaction.
- On Android, in the settings, find “ General ” and “ Synchronization ”. Drag numbers.
Import iPhone data to Gmail using iCloud
The option is simple and therefore popular. The algorithm is as follows:
- In the iPhone settings we find iCloud functions.
- Next, uncheck the “ Contact synchronization ” box.
- Add your old or new Google account.
- The next step is to note what to copy and click “ Next ”.
- On your Android smartphone, find “ Settings ”, “ General ”, “ Synchronization and accounts ”.
- Here we activate synchronization automatically.
- Add a Google account and enter information.
After such manipulations, contacts will be synchronized in Google in the future. The only drawback of the method is that the book is transferred completely, so if the numbers are repeated, or some of them are written incorrectly, you will have to manually delete them.
Via Google account
This method involves transferring phone book entries not through a computer, but specifically through your Gmail email account. This way, the contacts will be saved in your account and displayed on all devices from which you log into your Google account. If mail is not added to iPhone, follow these steps:
- Go to "Settings".
- Then in “Mail, addresses, calendars”.
- Click on “Add account”.
- Select Google.
- Enter your email address and click Next.
- Then enter the password and “Next” again.
- Select the data to sync (including contacts) and save.
Useful note: immediately after these steps, go to your email from another device and check whether the data transfer has occurred. Now it's a small matter - log into your Google account from Android and select the data to copy. That's all! Contacts were successfully transferred.
Transfer data from iPhone to Android via computer
You will need an iPhone and a PC.
- We enter the data on the official ICloud website using your ID account.
- In the “ Contacts ” item, select the numbers using the combination Ctrl+A.
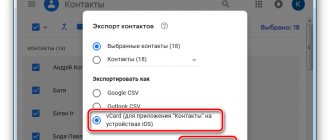
- The next step is to click the gear, open settings, go to “ Export ”. After these steps, the download of the archive file with the “vcf” extension will begin.
- We transfer this file to Android. Click “ Import ”, opening the phone book or phone numbers, indicate the path to the downloaded archive.
- After selecting the storage location, click “ Next ”. If there is no access to a PC, then we can transfer the numbers using copying via iCloud. The algorithm is identical. In this case, the site opens in the browser of the mobile device.
Restoring a backup
You can restore an iTunes backup on Android using Android ToolKit - Android Backup & Restore. With the program, you can easily download, view and restore your iTunes backup in minutes without overwriting your existing Android data and settings.
Algorithm for completing the task:
- Launch the program, connect the Android phone to the computer and select among the Backup & Restore functions.
- Connect the Android phone to the computer via a USB cable.
- Once the connection is complete, click “Restore” to begin the process.
- On the next screen, select “Restore” in the left column. The program will locate the backup files on the computer, list them one by one, and detect the iTunes backup files.
- Perform data preview and recovery.
- Select one of the files and click “View”.
- The program will read and display all the file details by data type.
- Confirm the Android device for recovery.
- Perform a preview, select all or some of the data and click "Recover" data from the iTunes file.
- Back up data for recovery.
- In the dialog box that appears, select the desired device. Click “Continue” to confirm the restoration.
- The selected data cannot be recovered if the device does not support this data type.
- Confirm recovery on Android: d_win d_mac.
Transfer contacts from iPhone to Android via Yandex disk
You can solve the problem of how to transfer numbers using the new Yandex Moving tool.
Moving algorithm:
- install the Yandex Moving application for Android and activate the account where the numbers are saved
- on an iOS smartphone, create a Yandex entry in the “ Mail, addresses, calendars ”
- install Yandex Disk for Android if the move is carried out using it
- the application will transfer the numbers
Description of the Mi Mover application
Mi Mover is a proprietary application from the Chinese manufacturer Xiaomi, which simplifies the process of transferring data from one smartphone to another. You can use it on any gadget that runs the Android operating system. You can transfer data packages from any gadget, but they will disappear on a Xiaomi smartphone.
How to use Mi Mover app
For your information! To move information using the program, you need to install it on both devices. This utility is installed initially on Xiaomi devices. You can find it by following the path: “Settings” - “Advanced settings” - “Mi Mover”.
There should be no difficulties in using the utility, but it cannot be used when transferring data from an iPhone, since these smartphones run on the iOS operating system.
Transfer Contacts from iPhone via iTunes
- Install iTunes for PC.
- We connect the iPhone via USB. If the phone is not recognized by the system, install the appropriate drivers.
- In the connected gadget in the “ tabInformation“add a check mark opposite”Synchronizing contacts“.
- Be sure to check if the “Contacts"section"Add-ons“. This means that the numbers that are on your iPhone will be replaced with the numbers that are currently in the macbook. By checking this box, all contacts on your iPhone may be deleted, so be careful and do not check this box.
- Once you are sure that everything is correct, click the “ Synchronize ” button. Synchronization will occur in three steps: preparation of synchronization, synchronization itself and the final stage.
- Select Google and enter your account information. Confirm the transfer by clicking “ OK ”.
Method 4: Using GMail
- Select the contacts you want to save (this must also be done in the desktop version of iCloud).
- Click the gear icon and select Export vCard.
- Just like method 2, you will receive a VCF file containing the exported contacts.
- Then, on your PC, sign in to your Google account. Click on the Gmail logo located in the upper left corner of the control panel.
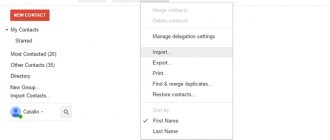
- Select Contacts, click the More drop-down menu, and select Import.
- Once imported, contacts will be automatically synced to your Android device connected to this account.
Transfer numbers using the phone book
If you have few numbers and don’t want to install third-party applications or connect a PC, you can transfer data manually:
- open iPhone phone book numbers
- We mark one of them for further sending
- the next step at the very bottom of the page is to click “ Share Contact ”
- There are two options for sharing: send a message via E-mail or SMS
You will have to repeat the procedure several times - separately for each number. Long, monotonous, but if this option suits you, then why not?
Copy contacts one at a time
Copying one at a time is suitable when you only need to import a few - say, up to ten. It is better to use another option if there are more than several of them - manual transfer will be long and tedious. No third party apps or services required. You just need to correctly use the functions built into the system and know how to transfer contacts from iPhone to Android:
- First you need to open the built-in phone book, where all the numbers are collected.
- Then select the user to transfer so that all information about him opens.
- Scroll down the page, click on “Share contact” and select a sending method from the list provided.
- The last step is to get the file on Android and open it.
Transfer contacts from iPhone to Android via Outlook
This option is an alternative to Google. The number portability algorithm is largely identical to the procedure for other services. But there are some nuances.
- In “ Settings ” of the iPhone, open “ Mail, addresses, calendars ”, click “ Add account ”.
- In the new window that opens, select the mail service by clicking “ com ”.
- Enter your email and password, leaving the “ Description ” field blank. Or we go through the registration procedure first.
- The next step is to determine the category of data to synchronize. Possible options include: “ Calendars ”, “ Mail ”, “ Reminders ”, “ Contacts ”. Select the last one - “ Contacts ”.
We carry out a similar procedure using an Android smartphone. As a result, you will be able to successfully transfer numbers from iPhone.
Transfer via iMyFone TunesMate
iMyFone TunesMate simplifies the whole relationship between iCloud and Android, the program works in 1-Click to copy contacts to your phone, 100% safe and no data loss.
Work algorithm:
- Download and run the program on your computer. In the first interface, select “Restore from backups > iCloud”.
- You will be prompted to log into your iCloud account directly through the login section.
- Select an iCloud backup from the list and download it.
- Make sure the network connection is working correctly during the process.
- Once the download is complete, connect the target Android device.
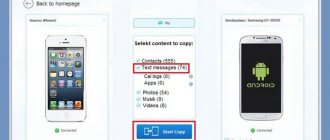
- To transfer iCloud contacts to Android, select only the contact. Then click on the "Start Copy" button to transfer all the contacts from the iCloud backup to the target Android device.
Transfer contacts from iPhone via SIM card
The method is simple, intuitive, familiar, but largely outdated. After all, the SIM card can be damaged or lost. The result is that the information will be hopelessly lost, unlike data stored in the cloud. But it is quite possible that this method will be chosen by you.
Please note: iOS does not officially support transferring numbers from a gadget to a SIM card. Use SIM manager.
To work with such a service you will need an unlocked Jailbreak. The service is free and therefore comes with advertising. Plus, there is a limit on the number of characters, signs and numbers when copying to a SIM card.
Click Phone-to-Phone Transfer Program
Click Phone-to-Phone Transfer is a data synchronization program that supports users to transfer files directly from one phone to another, from iCloud to phone, back up phone to computer, and also delete old image. There is a trial version that you can try before purchasing a paid version. The sequence of transferring data from iCloud to Android:
- Before transferring from ICloud to Android, install the “Telephone Transfer” program, having first downloaded it from the official website by clicking the “Download” button. The program is clean and safe, without information leakage.
- Double-click the “Phone Transfer” icon and launch it.
- Select the green field and restore from backups. You will be asked to sign in to iCloud. Enter your Apple ID and password.
- Connect your Android phone to Windows via a USB cable.
- When you select "Restore", backups created by other mobile managers such as iTunes, Blackberry, Samsung and Kies are supported.
- After you sign in to iCloud, you can view your iCloud backup files in the left column. Check the box and select the one you want to transfer. Then click “Download”. A notification will show the process. This may take a few minutes.
- When the download progress reaches 100%, Phone Transfer will sort the files into various categories, including contacts, text messages, calendar, call logs, apps, photos, music and videos. Select the desired content and click “Start Copying”.
As phones and other mobile devices become more popular, the amount of data people store on them increases. It is becoming increasingly important to have a good backup strategy for mobile devices, in addition to the one you might use for your laptop or desktop computer.
Transferring data via apps
Exporting numbers is possible using special programs. Of course, you will have to provide additional space for installation, but transferring with their help is a task in just a few clicks. There are several similar applications.
My Contacts Backup
My Contacts Backup is just such an option. This popular utility has an intuitive interface, is accessible and easy to use.
- After downloading the program to the Apple Store and launching it, we give it access to the phone book.
- Click the “Backup” button to start the backup.
- Next, select a file with vCard resolution and send it via E-mail to Android.
Number transfer is automatic. You can also launch it manually using the Contacts application.
Qikshare
You can also use Qikshare.
- You can download this simple program for Android and iPhone at the same time.
- Launch it, including geolocation.
- As a result, the utilities are connected (the closest gadget, taking into account the geodata, will be your Android).
- Select the icon for transferring contacts, selecting the necessary ones, and confirm the transfer. We import the numbers into the “ Phone Book ”.
Method 2. Via iCloud
- The second way to transfer contacts from iPhone to Android is to use Apple's cloud system. Or rather its desktop version. Sign in to iCloud Contacts app. Next, select the contacts you need by marking them in the list, or all at once by clicking the gear icon and selecting “Select All”.
- Click the gear button again and select “Export vCard.” Your computer will download a VCF file containing the selected contacts.
- Connect your Android smartphone to your computer, copy the VCF file to local storage on your phone, and then import contacts from the Contacts app on your smartphone. The Contacts app has the ability to add data from various sources, including internal memory or SD cards. Therefore, where you originally saved the VCF file does not matter.
How to transfer contacts from Android to iPhone
Your whole life is on your phone: photos, videos, notes, access to social networks and your email account. And also phone numbers. It’s been a long time since we memorized the phone book. Only the most important numbers, and even then occasionally, as an exception rather than a rule. Therefore, if you are planning to move from Android to iPhone, the first thing you should take care of is the correct migration of phone records. Of course, no one wants to bother transferring such information manually, especially since there are several quick and convenient ways.
Synchronizing data using your Google account
This is one of the most convenient options - just a few clicks, you're done. The algorithm is quite simple.
- On Android, open system settings, “ Accounts ” section, select Google and click sync in the drop-down window.
- If you do not have an account, you will have to create an account. It's not difficult, you just need to return to the previous window.
- The next step is to open “ Settings ” and “ Mail , Addresses , Calendars ” on your iPhone.
- Next, go to Accounts. Add Google here. After synchronization, the list of numbers will appear automatically in your new phone.
Move to iOS app
This is another and convenient way in which phone numbers can be easily migrated to a new device through a wireless connection. Of course, you will have to install the appropriate program for Android.
Using a SIM card
If you are the kind of person who still saves phone numbers on a SIM card, then the task becomes much easier for you.
All you have to do is move the card to your iPhone. After that, in the settings, open “ Mail, addresses, calendars ” and select the “ Import contacts from SIM ” option.
But if you are not in the habit of saving phone numbers to a SIM card, but still want to use this method, you can do this:
- Launch the Phone application
- In “ Settings ” of Android, open “ Manage contacts ”
- select “ Import/Export ”
- further “ Export to SIM card ”
- select the required numbers and click “ Export ”
Please note: you cannot store more than 255 numbers per SIM card, so anything that exceeds this limit will be lost.
Via Import/Export of a file with a phone book
Does your phone book contain more than 255 entries? Is each of them of great value to you? The solution is a backup. How to create it? The algorithm is as follows:
- in the Android “ Directory ” select “ Export/Import ”
- further – “ Export to storage device ”
- Next, select the phone numbers that you want to save, click “ Export ”
The file is saved in the root section of the internal memory. It is easy to transfer it to the required device using the cloud or E-mail. In the first case, in iCloud, select Contact and on the gear select “Import VCard”. The main thing is to remember to indicate a convenient place to store such information.
Transfer contacts from Android to iPhone using MobileTrans
MobileTrans is a utility with which data is sent between different platforms. The algorithm is like this:
- install and run the program
- after that, connect both devices to your laptop or PC
- select “ Phone to Phone Transfer ”
- Mark iPhone as the receiving device, and Android as the data transfer device
- mark the files you plan to transfer and click “Start transfer”
Wait just a few minutes until the end of the data transfer.
Transfer contacts using Android apps
You can transfer contacts from Android to iPhone using a number of applications. Among these are Xender, Zapya, SHAREit, Send Anywhere, AirDroid. How it works: download and install one of the listed programs simultaneously for both gadgets. Launch the program on Android. After that, mark the required files and click “ Submit ”.
The next step is to open the appropriate application on your iPhone and accept these files.
Moving to a new gadget is a long process. After all, the telephone has long ceased to be a device that is used exclusively for making calls. It contains a huge amount of important information and, above all, telephone numbers that are of great value to the user. That is why such migration should be as thoughtful and correct as possible. Choose any of the methods suggested above and enjoy your new device without losing your history, what matters to you.
Transferring videos and photos
FoneCope iPhone Data Recovery is the most effective way to recover photos from iPhone. The program cannot be used for free. But you can find a trial version on the FoneCope website to try out its capabilities. It not only retrieves photos from backup, but also selectively restores permanently deleted photos from iCloud.
Sequencing:
- After launching iPhone Data Recovery, select “Recover from iTunes Backup” on the main screen. Then click “Start”, a list of files will open.
- The backup files will appear in the window, you can select the one where the photos are stored.
- Next, “scan” and select the iTunes backup to scan.
- Once scanning is complete, photos will appear on the screen. You can view them.
- There is also a "Show deleted files only" option which can save a lot of time.
- Before clicking "Recover" to begin extraction, make sure the correct image is selected.
- You will then be asked where to send these photos. Just choose any convenient folder.
- The most important thing is that FoneCope iPhone Data Recovery is very easy to use. No special technology is required.
Yandex.Moving
The Yandex service has developed a special “Moving” application that will allow you to synchronize two devices with different operating systems with maximum accuracy.
Activate your new smartphone and download the corresponding application on it, also install it on your iPhone.
- Download the application for your iPhone using the link.
- To download for Android, go to https://www.computer-setup.ru/distr/yandex-pereezd-v1.0.apk.
Once the installation process is complete, you can proceed directly to the “moving” process.
To do this, follow the algorithm described below:
- Launch the application on your Apple device - on the first page you will need to enter your username and password for Yandex services - do this.
- Immediately after this, the process of copying contacts from the iPhone’s memory will begin. It will take, depending on the amount of data, from a few seconds to several minutes. Upon completion, you will receive a special pin code (displayed on the main screen) - this is exactly what you need in order to carry out the “move”.
Rice. 2. PIN code
- Launch the app on your new phone. Log in, making sure to use the same data you used to log in on your iPhone.
- On the updated page, in the lower right corner, find the settings button and tap on it. It looks like a horizontal row of three dots; after tapping the Settings button, a small drop-down menu will open in which you will need to select the “Settings” item.
Rice. 3. Settings
- In the window that opens, scroll down to the item “Moving from phone to phone” - tap on it.
Rice. 4. The right option
- In the new window you will find an input field - enter the PIN code you received when copying data from your iPhone. After entering, click on the “Start Transfer” located below.
Rice. 5. Entering a PIN code
- These actions automatically start the moving process, which is completed after 3-5 minutes.
There are quite a lot of programs of this type, but Yandex.
Moving is the simplest and most convenient for the Russian user, since it is written in Russian, has the simplest and most intuitive interface, works quickly and is distributed free of charge.
Common problems
A special case is a problem with the vCard file, when contacts are not automatically copied despite the fact that the file starts normally.
In this case, you need to request a forced copy. The situation may arise regardless of how the file got to your phone - via email or from the cloud.
To start the forced import process, first run the downloaded file and then go to the Contacts of your Android device.
In the lower right corner, find the icon with a vertical row of three dots and click on it. A drop-down list will open - in it, go to Import/Export .
Specify the source, that is, the file from which you want to import. Then click Save to phone memory.
Rice. 12. Import
