After reinstalling the OS on a personal computer or laptop, many are faced with a lack of drivers. If you have an Internet connection, installing them is easy. It is much more difficult to do this when there is no network access. To avoid problems, you need to figure out in advance how to install drivers on a laptop without the Internet and what to do for this.
Installing drivers is a procedure that often has to be done after reinstalling Windows.
We install Internet software ourselves
First of all, let's find information about the board itself. Knowing the device model, finding suitable software becomes much easier.
How to find out what kind of network cards are installed in the system?
Step 1. Open “Device Manager”.
Click on the “Start” menu, enter “device manager” in the search engine, open the result found
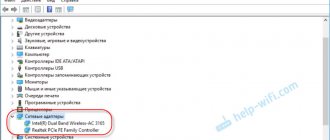
Step 2. We look for the item in the catalog of components (see photo below).
We find the item “Network adapters”, open it by left-clicking on the “+” icon
Step 3. Expand the category by clicking on the “+” icon. We see the name of our hardware.
In the list of devices we see the name of network cards or cards
Downloading and installing the driver
Now that we know the manufacturer of the network card, we can begin to manually search for software.
Step 1. Enter the model name into the search engine.
We enter the name of the network card model into the search engine of any browser
Step 2. The first link is to the website of the Intel company that manufactured the device. Let's go to the website.
Step 4. Select exactly the program that suits your operating system. The download begins.
Select a program that suits the operating system
Step 5. Open the downloaded exe file.
Step 6. Follow the installer's instructions. Click “Next”.
Follow the installer’s instructions and click “Next”
Step 7. Then we accept the license terms and wait for the software to install on the computer.
Check the box “I accept the terms of the License Agreement”, click “Next”, follow the instructions of the “Setup Wizard”
Click the “Next” button
The process of installing drivers on the computer; upon completion, close the window
The tips below will help you install drivers without connecting to the World Wide Web.
Changing and removing existing permissions and creating new rules for programs in Windows 7
When writing a rule to block Internet access for an application, you must follow the following instructions.
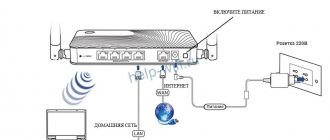
Review and configuration of the D-Link Dir-320 modem
Its creation in Windows takes several steps:
- First you need to select a rule type. To do this, indicate that it will be for the program.
- Next, you need to clarify which applications the new rule will apply to. Move on to the second step. You will be given a choice: we are talking about all programs or just one specific one. In the latter case, you will need to specify the path to it.
- At the new stage, you need to decide on the action to be taken. To do this, select the third line in the menu on the left side of the window. From the list presented, you have to select the third line and mark it. We are talking about blocking the connection.
- Now you need to decide which profiles will be banned. The user is presented with three options: the domain of his computer, connection to a private network or to a public one. To completely prohibit communication with the Internet, check all three boxes.
- The last step requires you to create a name for the newly created rule. It is possible to enter the text of its description, where you can, for example, note the reasons for its creation.
After completing the configuration, the specified rule can be seen in the general list.
Important! If a rule has already been created, it is easy to change it. To do this, click on the corresponding line with the right mouse button
In the menu you need to select an item related to properties.
In the window that opens you will be given a choice:
- Block communication.
- Allow connections only if they are secure.
- Make any kind of connection possible, no matter how secure it is.
When selecting, you are only allowed to select one row. After confirmation, the appearance of the specified property will change.
Important! Usually they block connection to the Internet for the main executable file of the application in question. In some cases, such measures do not lead to success.
This does not mean that the specified blocking option is not effective.
These problems occur because other files may be accessing the network for this application. They need to be found and access to the network must be closed.
In addition, sometimes when a program starts, it creates services that communicate with the network on their own. To block, you need to determine which ones work for this application.
Solutions to problems with connecting to a wi-fi network
Let's look at the solution to each of the problems mentioned above one by one, and also study general recommendations for those who have encountered this problem in their system.
Error “Windows could not connect to Wi-Fi” and how to solve it
When you try to connect, you may see the message “Windows was unable to connect to the Wi-Fi network.” This error can have several causes... You can determine the source of the problem as follows:
- Try to connect to the network as usual.
- If an error appears about the inability to connect, close it. Remember the name of the network to which this error appears when you try to connect.
- Next, it would be good to find out whether the problem is in your laptop or in the settings of the router itself. To do this, try connecting to the same network from another device.
- If connection is impossible only from your device, then you should reinstall the network driver. If the problem is in the router settings, then you should reset them. The process of resetting its settings is discussed in detail in the same article.
Video: fixing internet connection problems
Security key mismatch when connecting to a Wi-Fi network
A security key is a security code for your Wi-Fi network. The user sets it independently so that strangers cannot connect to the network. And if you encounter an error about entering the wrong password, then it is likely that it was indeed entered incorrectly. Do the following to be sure to correct the situation:
Do not enter characters blindly - when you enter characters, they are automatically replaced with hidden characters. Uncheck "Hide Characters" to display normal text. This way, before sending, you can make sure that the password is entered correctly;
check the input layout - with hidden characters, you might not have noticed that you entered the password in the wrong language
Change the language and try entering the password again;
make sure that the Caps Lock key does not enable you to enter in capital letters - the security key is case sensitive. Therefore, when entering, it is important to pay attention to the Caps Lock key, which locks the input in capital letters;
check your password - if your password is written down somewhere, then you should check those records. Human memory can sometimes fail. And also to compare your information, you can ask for help from another person who knows the password.
You should not tell your security key to strangers - this will lead to additional connections, which in turn will slow down your Internet speed.
Inconsistency between saved network parameters
After creating a new connection, you may often see an error with the text “The network settings saved on this computer do not meet the requirements of this network.” This problem often occurs after setting up the router yourself. To fix this situation, all you have to do is delete the connection and then create it again. This will update all settings and establish a connection again. This is done as follows:
- Click on the Internet icon in the lower right corner using the right mouse button and select the “Network and Sharing Center” section.
- After this, you need to open the management menu for wireless networks. This is done using the corresponding button on the left side of the screen.
- Call the context menu for the network that is generating the error and select “Delete network”.
- And then try to connect to the network again. Now that there is no data stored about this network, the connection should work fine unless the network is password protected.
In Windows 10, this problem is solved a little differently:
- Open the "Network Settings" section in the network connections menu.
- In the Wi-Fi tab, select the “Manage network settings” section.
- In this section, find your connection and click on the “Forget” button to reset the network settings.
Bottom line
In this article, we looked at several ways to install a driver on a network adapter without an Internet connection. Take care of this in advance, make a backup so that you don’t have to look for another computer and determine the device model later. Also, do not forget to remove old unnecessary drivers to free up space on the C: drive. Good luck.
If you find an error, please select a piece of text and press Ctrl+Enter.
After reinstalling old versions of Windows, a person is faced with a lack of drivers, including network ones. Because of this, the computer does not have an Internet connection. Installing a network driver is not difficult, and in this material we will tell you how to do it.
A driver is a connecting element between the OS and the computer hardware. They are responsible for the interaction of all systems and are developed by part manufacturers. Each element has its own middleware created. Even connecting a printer, router or flash drive requires a separate application.
Downloading the driver using another PC
If you lose the installation disk, it is recommended to download the software through another device; to do this, you need to know the network adapter model information. This is an affordable solution for updating computer drivers without the Internet.
Connecting to Wifi on Dell Laptops - Common Problems
By downloading the network card driver from the device in the hardware identification section, as done above, you can install it on a computer with a non-working Internet. To do this, you need a flash drive, where you must first transfer it, and then transfer it to the problem PC.
Note! To find out the exact data, you can use the box from the device or a warranty coupon where the card is indicated. If this is not the case, then you need to use the software method
It is recommended to try turning on the network card if the Internet does not work. To do this you need to follow these steps:
- Launch "Device Manager" as in the previous instructions.
- Find a list with the necessary network equipment.
- Click on the video adapter sign.
If the adapter is working, the word “disable” will appear. If not, then use it.
3DP NET program
There is a wonderful program that can install drivers on a network card without the Internet . This is a utility that contains many drivers specifically for network adapters. And with a 95% probability, the driver for your adapter is also there.
Download the current version of 3DP NET from the Internet in advance. I specifically do not provide a link, because the program is constantly updated, drivers are added for new devices. Launch 3DP NET. The drivers will begin unpacking into the specified folder. Then the program will automatically detect your network adapter and in 1 click you can install the driver. I strongly recommend recording this program on a flash drive so that you can install the driver at any time.
Updating and installing drivers
Drivers are necessary to ensure that the card does not conflict with other components and fully performs all its functions. Usually they are installed automatically when you first connect the computer adapter, but sometimes the drivers fail or become outdated. In both cases, you need to reinstall them yourself. This is done through the “Device Manager”.
Automatic update
The positive side of this method is that you will not need to search for drivers manually, the negative side is that you will need an Internet connection, which may not be available if the network card does not work. But if you have the opportunity to connect to the network, you can update the drivers in the following way:
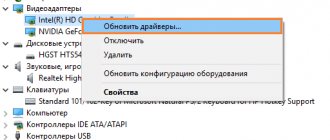
- Right-click on the desired card and select the “Update drivers” function.
- Select "Automatically search for updated drivers." Wait until the computer automatically searches for new drivers and, if found, installs them. Be prepared that this method usually does not work, so it is better to use the second method - manual installation.
Manual update
The advantage of this method is that you can download the card drivers manually from another computer that has Internet access, and then transfer them to yours and install them. It is recommended to download card drivers strictly from the official website of the company that created it.
- To find the necessary drivers, you need to know the card ID or any other unique identifiers. You can find them out through the “Properties” of the adapter.
- In the “Properties” window, go to the “Details” tab and scroll down to the “Hardware ID” value. As a result, you will receive several unique adapter numbers, with the help of which you can find suitable drivers for it. Find and download them, and then use a flash drive to transfer them to the computer to which the card that requires driver updates is connected.
- While in the “Device Manager”, right-click on the desired card and select the “Update Drivers” function.
- Select the manual installation method, specify the path to the previously downloaded drivers and wait until they are installed. After the process is completed, restart your computer and try connecting to the network again.
What to do if drivers are not installed
If at any stage errors occur that prevent you from installing drivers, you must remove the adapter from Device Manager and restart the computer.
Removing the card from the “Task Manager”
After the reboot, open the list of connected devices again, and in it there is the “Other devices” sub-item. It will contain the “Network Controller”, which is your card. Install drivers on it using one of the methods described above.
The network controller is located in the “Other devices” sub-item
Creating a Backup
Before reinstalling Windows, it is better to back up your drivers. This will help restore the functionality of all devices in a few clicks. Windows has a built-in utility called DISM.exe. In fact, DISM.exe provides many options, but we will use the function of creating a driver backup.
Run Command Prompt as Administrator. To do this, right-click on Start and find this item there. In newer versions of Windows 10, it is called Windows PowerShell (Administrator).
Enter the command:
dism /online /export-driver /destination:E:Backup
E:/Backup – folder where to save drivers. Create it in advance. You can also save drivers to other media, such as USB flash drives. The export of drivers to the specified directory will begin. Wait until the process is completed, and only then proceed to reinstall Windows.
When you have a “clean” OS in front of you, it’s time to restore all the drivers. Just like with the installation disk, you need to open the device manager, find the network adapter and start the driver installation from your computer, selecting the folder where you saved the backup copy.
Configuring the Realtek PCIe GBE Family Controller network adapter
By default, the settings are set to optimal to ensure maximum performance, speed, and compatibility. But it happens, for example, that the data transfer speed through a Realtek network card is very low. For example, you have a gigabit router, modem, or a direct connection from an Internet provider, and the gigabit connection does not work. Again, to ensure maximum compatibility with older hardware, some restrictions may be set on the factory settings. There are a lot of different parameters in the properties of the Realtek PCIe GBE Family Controller. But let's take things in order.
In Device Manager, right-click on the network card and open “Properties”.
A window will open where, on the “General” tab, we can view the installed driver version, device status and other information.
On the “Power Management” tab, I immediately recommend unchecking the “Allow the computer to turn off this device for...” item.
Two more interesting tabs: “Information”, where you can see various information about this network adapter and “Driver”, where information about the installed driver is displayed with the ability to rollback and update. There you can disable/enable, or delete the device.
Well, the “Advanced” tab, where all the subtle and professional settings of the Realtek PCIe GBE Family Controller are collected.
Don't change the settings unless you are sure of what you are doing. This may cause problems with the network adapter. You change any settings at your own peril and risk.
Depending on the version of the network card, the installed driver and other factors, the number of additional settings may vary. For me they look like this:
Everything is simple there. On the left, select a property, and on the right, in the drop-down menu, select a value. By selecting the “Network Address” property (MAC Address), for example, you can change the MAC address of the Realtek network card.
Unfortunately, I did not find a description of all these parameters on the Realtek website (or on other sites either). But this, incorrect, is even better. Fewer unnecessary settings – fewer problems. Some properties of these additional settings need to be changed in the process of solving various problems in the operation of the network adapter. Including problems with low speed, when the Realtek network card does not see the cable, does not work as it should, produces various errors, etc. I will return to some of these parameters when I write about solving certain problems.
How to disable?
You can disable Realtek PCIe GBE Family Controller in the same device manager. Just right-click on it and select “Disconnect Device”.
You need to confirm the shutdown. After which an icon will appear next to the adapter, indicating that the network card is disabled.
How to turn it on?
There, in the device manager, right-click on our Realtek network adapter and turn it on by selecting “Enable device”.
Realtek PCIe GBE Family Controller will be turned on and start working.
You can also enable/disable the network adapter in the “Network Connections” window (to start, press Win+R and execute the command ncpa.cpl). In Windows 10 the connection is called "Ethernet". In Windows 7 – “Local Area Connection”.
There you can also run diagnostics, rename the connection, open its properties, etc.
How to delete?
You can uninstall Realtek PCIe GBE Family Controller in Device Manager. You need to right-click on it and select “Remove device”.
You can remove the network adapter along with the drivers. To do this, check the box next to “Delete driver programs for this device” and confirm the deletion.
Advice: if you want to remove a network card to reinstall it in order to solve some problems, then first try to remove it without uninstalling the drivers (don't check the box). Then restart your computer and the network adapter should be installed automatically. If this does not solve your problem, then try removing it with the software uninstall (as in the screenshot above). After you restart your computer, you will most likely need to download and install the necessary driver again.
Installation disk
Typically, motherboards, network adapters and other hardware are sold along with a disk containing drivers and installation instructions. Look among the disks lying around, maybe you will find a disk with the necessary drivers.
Found it? Insert it into the drive. Now you need to go to “Device Manager”. In Windows 10, you can right-click on “This PC” -> “Manage” and find the manager there. Find the network adapter among all devices and select “Update driver” in the context menu. In the window that appears, click “Search for drivers on this computer” and select the drive. The driver installation will start and soon you will have Internet access.
Installing drivers for network equipment
There are several ways to install Internet drivers. Some methods may not be suitable for all users, so choose the most suitable method for yourself. It is worth noting that to implement most methods you must have access to the Internet. Therefore, you can use another computer or ask a friend for help.
Method 1: For laptop owners
This method is only suitable for laptop owners. You can install network drivers in two ways. If you still have the disk that came with your laptop, you can use it. It contains all the necessary drivers for the laptop to work correctly. Just insert the disc into the drive, run the program and install the drivers.
If there is no disk, then you can use the Internet to find the necessary drivers on the official website. You need:
Even without access to the Internet, you can use this method if you have another computer in mind with access to the network.
Method 2: Without identifying the network equipment model
This method is suitable for PC owners who cannot determine the model of their network equipment or suitable drivers are simply not found. In this case, you can try a method that requires determining the manufacturer and model of the motherboard. This can be done as follows:
You can enter the information into a search engine and find all the necessary drivers for your network card on the official website of its manufacturer.
Method 3: Helper programs
There are programs that automatically determine which drivers need to be installed or updated, after which they download them from the Internet. But if there is no connection, then you can use the DriverPackSolution program, where almost all the necessary drivers are downloaded along with the program, and then it itself detects your device and installs the necessary drivers.
To install network drivers using this program, on a computer with Internet access, you must do the following:
This method is great for those who often reinstall the operating system or deal with installing drivers. It is enough to download the program onto a USB flash drive and driver updates will always be available, even without access to the Internet.
Method 4: Download the driver from the Internet
If the previous method did not suit you because you do not have the ability to connect your computer to the Internet, then to implement this method, you must have another computer with a network connection.
Once you have found out the model and exact ID of your equipment, you need to use a search engine. Enter the copied equipment ID into the search bar and click on “Search”
.
You can now move the downloaded files to your computer and manually install drivers through Device Manager. To do this, follow these steps:
Method 5: Automatic driver update
Since in Windows 7 in subsequent versions, certain drivers are already present when the system is installed, most likely you already have a driver installed so that you can connect to the Internet via a local network. This method is suitable for those who need to install Wi-Fi drivers:
After installation, restart your computer so that the new drivers work correctly.
If you do not have experience installing drivers or do not understand this, then it is better to use the services of a service where a wizard will install everything you need. Also, if the drivers are not installed for any reason, it is recommended to contact a service center; perhaps the problem lies in the hardware itself, and not in the drivers.
Drivers are special intermediary programs that establish interaction between the operating system and computer hardware. If the driver is outdated or missing, then the PC component for which it is responsible may not work correctly or not work at all. This explains why your computer should always have up-to-date drivers.
The DriverPack service automates the process of installing and updating drivers for Windows XP, Vista, 7, 8, 8.1 and 10. It can save your time and nerves: the entire installation and configuration process fits into a few simple steps.
DriverPack offers different options for downloading drivers. Which one to choose depends on whether the Internet is working or not.
Carefully! DriverPack Solution is not as simple as it seems..
Apparently, the times when we didn’t expect tricks from our favorite utilities that we had already become accustomed to are gone forever. I had one such lifesaver for automatically searching and installing drivers for Windows and it was called DriverPack Solution . It’s only now that this mega-convenient tool, which made it possible to significantly reduce the time spent searching for suitable drivers, has finally slipped, going over to the dark side.
Starting from version 15, the developer began to gradually fill the assembly with all sorts of advertising modules, telemetry, and other rubbish. Along with the drivers, you got a bunch of browsers, an antivirus, a couple of archivers and some other little things.
I won’t say that this is, frankly, completely junk, but why force me to install programs that I didn’t order? You could disable this disgrace by selecting only the necessary drivers (not always everything that is offered by the utility is required) by switching to expert mode . However, inexperienced users do not even suspect that this can be done, and receive the entire set from the author of DriverPack.
Additionally
And now a couple more interesting programs for advanced users.
Adobe Photoshop
. The most mega super-duper photo editor and more. If you search on the Internet, you can find and install it for free.
Free Studio
.
A set of programs for converting various files (for example, from .avi
to
.mp4
), recording monitor screens, quickly editing video and audio, downloading videos from YouTube and photos from Instagram. A very useful set.
Picasa
. A convenient program for viewing and quickly editing photos. Support has already been discontinued and new versions are not being released, but for those who are used to it and who like this program, I left a link.
(14
ratings, average:
5.00
out of 5)
If the Internet does not work for you after reinstalling Windows, then in most cases there can be 2 reasons:
- When reinstalling, the drivers were removed (most often).
- Providers themselves block the Internet, thinking that this is unauthorized access to the network from another computer under your login.
The reasons for missing drivers may be the following:
- The disk was formatted, a new OS was installed, and drivers for your hardware are not included in the standard Windows set.
- A Windows build was installed in which someone specifically disabled what he considered to be “unnecessary” standard drivers.
NetWorx
NetWorx is an excellent program for monitoring traffic and Internet speed. The application also offers the user additional settings that allow you to monitor the following parameters:
- The number of megabytes consumed in one day or week.
- Peak traffic consumption hours.
- Outgoing and incoming Internet speed.
- Data packets sent and received.
We can say for sure that this program will become an indispensable assistant for those users who use limited 3G or LTE networks to access the Internet. After all, this program also allows you to set limits so that you don’t accidentally spend all your traffic in one day
It's also worth noting that it collects statistics for each account separately, so you can see which users are consuming the most traffic