Official Windows 10 system requirements
Before proceeding directly to installing a new operating system, it is worth checking your computer to ensure it meets the system requirements. The system requirements of Windows 10 are completely similar to those of Windows 7, Windows 8 and Windows 8.1. Therefore, if you have one of the above systems installed, then Windows 10 can be installed on your computer.
The minimum system requirements to run Windows 10 32-bit are as follows:
- at least 1 gigabyte of RAM;
- 16 gigabytes of free space on a hard drive or solid-state drive (SSD);
- video card supporting 9.0 DirectX and WDDM drivers;
- a processor with a frequency of at least 1 gigahertz that supports PAE, NX, SSE2 systems.
If you have more than 4 gigabytes of RAM, we recommend choosing a 64-bit system. The difference in system requirements will be minimal:
- two gigabytes of RAM instead of one;
- 20 gigabytes of free storage space.
Information about the required free space when using Windows 10
Despite the fact that the Microsoft website gives clear requirements for hard drive space, you should not take them literally. There are several reasons why Windows 10 requires more space than specified:
- growing paging file size - the more RAM is used, the higher the system recommends setting the paging file value. This is necessary for the computer to work quickly. And although some users prefer to abandon it altogether, purchasing even more memory sticks, the majority still simply allocate space on the hard drive;
- saving data during hibernation - here everything again depends on the size of the RAM. All data from RAM when entering hibernation mode must be saved to a separate file, and this requires free space;
- many service processes also temporarily store data on the hard drive.
All this requires a lot of free space for the system to work correctly. Also, Windows 10 itself often takes up much more than what is specified in the requirements. Thus, Windows 10 Professional during use can easily begin to take up more than twenty gigabytes, and this is without all the system processes described above.
Over time, the operating system begins to take up more and more disk space
Based on this, you should allocate at least 50–70 gigabytes of free space for the system, despite completely different figures in the official system requirements. This way you will ensure fast and stable system operation without worrying about running out of space for various processes.
Windows 10 installation time
Installation time can also hardly be called a constant value. If you have fast and stable Internet, and you are not going to completely format the hard drive when installing the system, then you will need no more than an hour for all processes, including downloading drivers and configuring the system after installation. However, for some users, for one reason or another, installation may take several times longer.
Low internet speed
There is also such a problem as Internet speed. Let’s say the speed was good, and then it decreased, and you think that the computer is working slowly. Of course, it’s immediately noticeable whether it’s a computer, or whether the brakes occur when your browser pages open slowly. Perhaps everything is fine with your computer, but the Internet speed needs to be measured - Checking the Internet speed.
If it turns out that the speed is lower than stated in the contract with your provider, then be sure to demand that they fix everything, or change the provider if you do not achieve the desired result.
Different versions of Windows 10
Like other Microsoft operating systems, Windows 10 comes in different versions. It is worth choosing a system based on the purpose of the installation. It is worth understanding the differences between the main versions:
- Windows 10 Home is the most basic edition of Windows 10. It contains everything necessary for home use of the system, but is very limited in other functions. For example, you can’t even control which updates should be installed. However, what is offered in this version is quite sufficient for private use;
- Windows 10 Professional is a more advanced version. It contains all the functions of the home version, and also allows you to customize the system in more detail. With some advanced features and advanced security features, this system is ideal for experienced users and small business owners;
- Windows 10 Enterprise - this version is intended for the largest corporations and that says it all. Great emphasis on data protection, communication between computers in a single network and many convenient opportunities for running a large business. For ordinary users, the capabilities of this system will be unnecessary;
- Windows 10 Education is the latest of the “major” versions of the operating system intended for educational institutions. Not too different from the Enterprise version, except that it has a more favorable price and does not contain a number of business solutions;
- Windows 10 Mobile is the only version for mobile phones and tablets. It has been actively developed since its release and is now a very good solution, but it is supported by too few devices.
It turns out that it’s not at all difficult to navigate among all the versions. If you are an experienced user, then the Professional version is your choice. Home will also work, although it is a little stripped down. Well, only Windows 10 Mobile is suitable for installation on mobile devices.
Purchasing a digital license to activate Windows
We have created a flash drive, now we need to think about a digital license (activation key) for the operating system being installed.
I suggest buying it on AliExpress. I myself have been using this key for two years. And the most important thing is the prices, they start from 150 rubles. Personally, I bought it for only 264.50 rubles.
Go to the AliExpress website and type “windows 10 pro key” into the search.
Windows 10 pro key offer on AliExpress
We find a product and buy it.
The most important thing when choosing is to pay attention to customer reviews.
The key comes by email or messages from the seller.
Creating a bootable USB flash drive
Now that you have decided on the version and are sure that your computer will run Windows 10, you should create a bootable USB flash drive. It is common to create a bootable drive in the UltraISO program, so we will look at how to do this using it. You will need:
- the program itself, the free version of which can be downloaded from the official website;
- Windows 10 image in ISO format of the version you choose;
- a blank flash drive with a capacity of 4–8 gigabytes (depending on the size of the image);
- computer with USB support.
Connect the USB flash drive to your computer and run the program, then do the following:
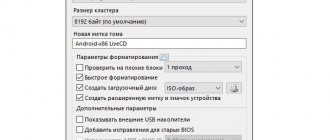
- In the "File" tab, select "Open" and then select your operating system ISO file.
Select the image you want to burn - The image will be loaded into the program and you will see its contents. There is no need to interact with it, because we want to write these files to a flash drive. So select the Bootstrap tab and click on the Burn Hard Disk Image button. It is worth noting here that the localization of the program is far from ideal and the names of certain buttons may differ. However, it is not difficult to guess the meaning.
In the “Bootboot” tab, click on the “Burn hard disk image” button - After this you will need to select your drive. As soon as you do this, the system will warn you that the information on the flash drive will be destroyed. If you have something important there, be sure to save these files to another location, otherwise they will be lost forever. Confirm that you agree to data deletion. The recording process will begin.
Click "Yes" if your flash drive does not have the necessary data - Wait until the image is written to the flash drive. Once it is completed, you will receive a bootable USB flash drive with the operating system ready for installation.
Video: Burning a boot image via Ultra ISO
A few tips to help us figure out whether it is necessary to rearrange the system at all?
- From the very beginning, you need to decide why the computer starts to “slow down”?
- Is it worth upgrading the operating system at all?
- Maybe just set up the computer? Delete all unnecessary files, remove unused programs, and simply clean up your computer, and then Defragment the disks. Perhaps everything is not so bad.
Attention! About defragmentation! If you have an old type of hard drive, PATA (IDE), SATA, SCSI, not solid state at all, then be sure to defragment them. If you have an SSD (Solid State Drives) hard drive, in a word Solid State Drive, as it is commonly called, then it does not need to be defragmented at all, it is even very harmful for it.
Installing Windows 10 in different ways
Regardless of the chosen method, Windows 10 can be installed on any computer, as well as on modern laptops of various models (such as Lenovo, Asus, HP, Acer and others). The installation process itself does not differ depending on the selected device.
Installing Windows 10 from the system
Windows 10, unlike some older versions of Windows, can be installed from within the system itself. This can be done by running the setup.exe executable from the same drive. Do this and the installation will begin.
- After launching the installation program, you will see the initial settings window. Here you can set the keyboard layout, time and currency format, and also select the main language of your future system. Once these settings are set, click Next.
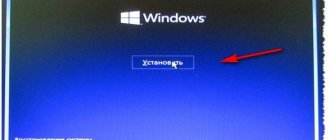
Select your language and layout and click Next - On the screen that appears after this, you will only see the “Install” button in the middle. You need to press it. Another option in the lower left corner allows you to restore the system in case of problems, but at the moment we are not interested in it.
Click the "Install" button in the center of the screen - Next, a menu will appear where you need to enter your product key. If you don't have a Windows license key yet or don't want to enter one, you can skip this step. But in the future you will still have to activate the system.
Enter your key or click "I don't have a product key" - The choice of operating system version does not always appear. Most likely, only one of them will be recorded in your ISO image. However, if this is not the case, select the version of Windows you need and click “Next”.
Select the version of Windows to install and click Next - The license agreement will appear. Study it carefully. In order for the installation to continue, you must check the box next to “I accept the license terms.”
Review the agreement, accept it and click “Next” - Next, it will be necessary to indicate what kind of installation we are going to perform - with a complete formatting of the system or with saving old data. If you select the “Update” item, all data on your computer will be saved, although the programs, of course, will require reinstallation. In the future, you can even return to the old version of Windows if the one you install does not suit you in some way. But it is still recommended to choose another option. A “Custom” installation will completely remove all files from the old operating system. Don't forget to save the necessary data before selecting this item! Otherwise they may be lost.
Select the Windows installation type: “Custom” or “Update” - In the next menu you need to select the disk partition to install. Look at the “Primary” label to find the partitions of your hard drive that can be installed on. Select the partition suitable for installation and click “Next”.
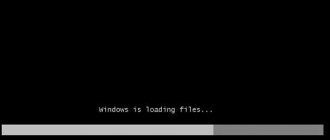
Specify a partition that has enough space to install Windows and click Next - The installation will begin. Nothing more is required from you, just wait.
Wait for Windows installation to finish - The computer will restart several times during installation. Just keep waiting.
The system will reboot several times during installation - Then, the installation will be completed and the initial system settings will begin. First of all, you will be asked to indicate the country where you are located. Select it and click “Next”.
Enter your country and click "Yes" - You will need to confirm the layout. Feel free to click “Yes” if it is indicated correctly.
Make sure the layout is selected correctly and click Yes - If necessary, you can assign more than two layouts to the system. However, the English layout is always present initially. After completing the settings, click “Next” again.
You can skip this point if two layouts are enough for you - The account creation window will open. You can skip this point, but it's better not to ignore it. The account allows you to synchronize some data and settings online. Instead of a password, a simple set of numbers is now used. You can ask anyone.
Log in to your account or create a new one - And right away you will be prompted to use cloud file synchronization. Do as you please.
You can connect your computer to cloud storage from Microsoft - The last stage of the initial settings will be setting permissions for the transfer of various data. Here you can set up many options regarding the transfer of your information for advertising or analytical purposes. Many users prefer to disable these permissions - to do this, simply move the slider of each item to the left.
Adjust the sliders according to your wishes and click “Accept” - The system will accept the settings and install a number of programs available by default. Just wait for this installation to complete.
Wait for the latest settings to be accepted - The Windows 10 installation is complete and your computer is ready to use.
Windows 10 has been successfully installed on your computer
Video: Windows 10 Installation Guide
Formatting a disk before installing Windows
During installation, we selected “Custom installation”, which forces the disk to be formatted. You can format it yourself during installation by selecting the partition and clicking “format” if the basic installation type is selected.
But there are situations in which it is better to format the disk in advance. For example, when your computer is infected with viruses and you don’t want to risk your bootable USB flash drive. Just remember that all files on the hard drive will be destroyed during formatting. The computer will also not turn on after this, since the device requires at least one installed operating system to operate. However, installation via BIOS can still be done.
To format a hard drive, just select it in Explorer and right-click to bring up the context menu. Then select "Format..."
Right-click the section's context menu and select the "Format" button
There are other ways - using third-party programs. You will need them when formatting a disk with modern operating systems, since they will not allow formatting in a simple way. In this case, you will also have to create a bootable drive with this program. Solutions like GParted will help you, but there is no need to describe the process of working with them in detail within the scope of this article. After all, for most users it is enough to format the system right before installing a new one by performing a clean installation of Windows.
Installing Windows 10 via BIOS
The main difference between installing Windows 10 via BIOS is the procedure for starting the boot drive. You are required to go to the BOOT Menu, which will allow you to choose to start the flash drive rather than boot the hard drive. But the key to call this menu differs depending on the computer used:
- When using an Asus laptop (or a computer on which the motherboard of this company is installed), the login is performed by pressing the F9 key when turning on the computer. Although more modern models use the Escape key;
Select your boot drive in the boot menu - For Lenovo laptops, the F12 key works, and some of the models have a special button next to the power button;
Lenovo laptops have a button to call up the boot menu - Acer laptops also open the Boot menu by pressing the F12 key. But there's a catch: by default, the ability to call this menu is disabled. You need to go directly to the BIOS by pressing F2 and enable the ability to call this menu. And only then, after saving the changes and restarting the computer, open this menu by pressing the F12 key;
Acer laptop requires enabling boot menu in BIOS before use - HP laptops call the Boot Menu using the F9 button, although sometimes you need to press escape first. And also when using Windows 10, you will open an intermediate window where you will need to select Windows Boot Manager. In any case, the call button remains unchanged;
- on other devices this menu is called either by these same keys or by pressing F11. Watch for messages on the screen when you turn on the computer; usually a notification appears indicating which key you need to press.
After you launch this menu and select your drive, the installation of Windows 10 will begin. The installation process itself is no different from installing Windows 10 from the system.
Partitioning the disk when installing Windows
If you want to install several operating systems on one computer or simply allocate a separate partition for the operating system, this can be done right during the reinstallation. This is done like this:
- During Windows installation, click on the “Custom” installation type.
Click on “Custom” Windows installation to access the necessary settings - Then select the partition you want to split into two, click "Delete". It is immediately converted to “Unallocated disk space”.
- Select this space and, having specified the volume, press the “Create” key. In this way, you can create one of the disk partitions, leaving space on it, for example, exactly for installing and running Windows.
Select an unallocated area and click "Create" to create a new partition - By pressing the “Create” key, select the rest of the space into the second section. Or divide it into the required amount.
- Format both partitions.
Install Windows 10 using the command line
If you do not want to use programs to create a bootable USB flash drive, you can do this via the command line:
- Open Command Prompt with Administrator rights. This can be done through the “Run” window (Win + R) by entering the cmd command in the window that opens. Another way to open it is to simply search for the application in the Start menu. To run with administrator rights, use the right mouse button and select the appropriate item in the context menu.
The command line can be launched through the Start menu, finding the corresponding application there - Enter the DISKPART command in the window that opens. Confirm the command by pressing Enter.
Enter the DISKPART command at the command prompt and confirm your entry - To view the connected drives, type LIST DISK and also confirm the entry. A list appears with each drive assigned a number. Find your flash drive and remember its number.
Enter the List disk command to list all connected drives - Then you will need to enter many commands. Just enter them one after another, confirming the entry after each: DISKPART # (where instead of # there should be the number of your flash drive); CLEAN; CREATE PARTITION PRIMARY; SELECT PARTITION # (again the number of your flash drive); ACTIVE; FORMAT FS = NTFS QUICK (be sure to wait until this command finishes executing); ASSIGN; EXIT.
Enter a series of commands to prepare the flash drive for loading the image - All that remains is to designate this drive as boot. To do this, in the same command line, enter X: CD BOOT (where X is the letter designation of your virtual drive. Mount the Windows image to find out which letter you need to substitute) and press Enter. Then enter the CD BOOT command again, this time without the letter. Confirm your entry. The last command will be Bootsect.exe /NT60 D: (D should be the letter of your flash drive instead). Confirm your entry.
Enter the last commands to complete the preparation of the flash drive - As soon as the message Bootcode was successfully updated appears, the process will be completed. You can close the command line.
- Now simply drag and drop all Windows 10 files from the image mounted in the virtual drive onto your flash drive. Wait for the recording to finish.
Thus, a bootable USB flash drive is created via the command line. The installation process itself will in no way differ from what was already described earlier.
Video: Installing Windows 10 via the command line
Installing Windows via Media Creation Tool
Any user can also install Windows 10 through the official program from Microsoft - Media Creation Tool.
When downloading, be sure to download the version of the program that matches the bit size of your system. After starting the program, do the following:
- In the first window, indicate that you want to upgrade your computer to Windows 10.
Select "Update this PC now" and click next to begin installation - The files will then begin downloading. Wait until the download completes and click Next.
Wait until the operating system is downloaded from the Internet - The terms of the license agreement appear. The installation will still take place within the program, although the procedure itself is not too different. Review the prompt and accept it to continue with the installation.
Review the license agreement and accept it if you want to continue with the installation - Select your installation type. The “Save nothing” option means completely formatting the hard drive. If you select “Save personal data,” the system and application settings will remain. And with the “Keep personal files” option, nothing will be deleted. Make your decision and click Next.
Choose whether to save files when installing Windows 10 - Check the entered settings and click “Install”. Next, the normal installation of Windows 10 will begin.
If you have selected all the settings correctly, click the “Install” button
Video: Installing Windows 10 via Media Creation Tool
Differences in installing Windows using UEFI BIOS
UEFI is a new, modern type of BIOS. It has a graphical interface and is generally more intuitive for the user. But problems can still arise due to a mismatch between new and old equipment. For example, in the menu for selecting a drive to boot, you should take into account its type - GPT or MBR and, depending on this, select different options. The GPT disk structure is distinguished by its support for gigantic disk volumes - more than two terabytes.
Updated UEFI BIOS is more user-friendly than the previous version
Installing Windows using this version of BIOS is easier than using a regular one.
Video: installing Windows 10 via UEFI BIOS
Selecting a drive to install Windows 10
Should you install Windows 10 on an SSD? This solution has significant advantages:
- the speed of the operating system, and therefore all applications, will be much faster;
- SSD drives do not require defragmentation, which is a long and tedious procedure;
- transferring and loading system files will also occur much faster, as will turning on the computer.
However, there are also disadvantages:
- An SSD drive will last you comparatively less time;
- The SSD will wear unevenly.
It's up to you to decide, but most users still prefer to install the operating system on an SSD drive. The increase in productivity is painfully noticeable. The installation process itself is no different from installing it on a hard drive.
How to find out what operating system is installed on your computer (laptop)?
1) — To find out which system is installed on your computer, you need to go to properties. There are several options to open computer properties:
- Press Windows+Pause Break on your keyboard.
- Open Control Panel, select System and Security , then System . or even simpler.
- Right-click on My Computer and select Properties .
2) - In the drop-down menu, select “ Properties ” (Fig. 1)
Fig.1
3) — In the system information window that opens, we need to find out what Windows operating system we have installed and its bit depth (Fig. 2).
Fig.2
- Among other things, you need to know the bit capacity of your system. Why this is needed, read the article - Maximum amount of RAM in Windows.
- How to find out the bit capacity of the system, read more - here.
Installing Windows 10 Mobile on your phone
To install Windows 10 on mobile devices, use a special application from. You can download it on the official website. This program will notify you about the possibility of installing Windows 10 Mobile on your device, and will also carry out this installation, if possible. You will need about 2 gigabytes of free space to install the Windows 10 upgrade.
The Upgrade Assistant app will almost automatically install Windows on your device.
More details about DVDs
- 1-sided 1-layer (DVD-5) - 4.7 GB.
- 1-sided 2-layer (DVD-9) - 8.5 GB.
- 2-sided 1-layer (DVD-10) - 9.4 GB.
- 2-sided 2-layer (DVD-18) - 17.1 GB.
What is the difference between DVD-R and DVD+R discs? - read here.
We have made our choice, prepared everything and got to the most important thing, namely downloading and burning Windows 10 to our media.
Free upgrade to Windows 10
There is a way to upgrade your Windows 8.1 to Windows 10 for free. This is done through the official Microsoft website. Initially, this opportunity was presented only within one year after the release of Windows 10, but even now a small loophole remains.
- Follow the link https://microsoft.com/ru-ru/accessibility/windows10upgrade.
- The free update is still offered for users with disabilities. No confirmation is required, so this step is entirely up to you. Just click “Update now” at the bottom of the page.
You can upgrade to Windows 10 for free if you have a licensed Windows 8.1 - After this, the update assistant will load and the normal installation of Windows 10 will begin.
This update method has been in effect for a long time and there is no reason to believe that it will no longer work in the future. Just remember that you need licensed Windows 8.1 for such an installation.