No matter how marketers convince us that SSD drives will soon displace HDD drives from the market, the trend in demand for the latter shows the opposite. A hard drive has more storage space and costs several times less than an SSD. This is an excellent solution for storing large data both on a computer and in server storage. Therefore, let's look at how to install a hard drive on a computer with Windows 7 or 10.
How to connect an internal HDD or SATA SSD to a computer
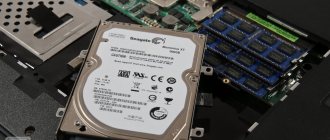
Before connecting the internal drive, you need to determine its form factor and connection interface. Outdated hard drives use the IDE interface, modern ones use SATA2/SATA3. All versions of the SATA interface are backward compatible, unlike IDE. The main form factors are 2.5 and 3.5 inches; you can compare their sizes in the picture in the connection to a laptop section.
If you need to connect an outdated IDE drive to a modern motherboard that does not have the appropriate connectors, you will have to purchase an IDE to SATA adapter. However, using hard drives with the old interface in modern PCs makes no sense. The exception is when you need to transfer data to a newer and faster HDD.
To install the device, turn off the computer (either from the outlet/surge protector, or using the switch on the power supply), and remove the side cover. Install the drive into the hard drive bay and connect the cables to it (don't forget about the power cable). Securely secure the device with screws on both sides - this will extend its life by reducing unwanted vibrations. It is recommended to secure hard drives with at least 4 screws; for SSDs, two are enough, since they have no moving parts. If the form factor of the hard drive or SSD is 2.5-inch, then it is advisable to purchase mounting sleds and install it in them.
Drive bay
The location of the connectors corresponding to the drive interface on the motherboard can be found in the user manual or on the manufacturer’s website.
Connecting an IDE Hard Drive
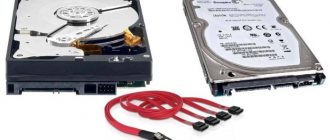
Connecting a SATA HDD/SSD
Screw the hard drive to the system unit
Installing a new hard drive begins by screwing it to the case. This is done using bolts. There are threaded holes in the hard drive case, and grooves in the computer case. It is screwed through them.
Hard drive in the system unit.
Make sure that the installed device will not interfere with ventilation inside the system unit, and that all wires and cables can easily reach it without tension.
Only on the service https://doctorsmm.com/ there are discounts on selling views on Instagram for a limited period of time. Hurry up to have time to purchase a resource with the most convenient speed mode for video or broadcast, and experienced managers will help you understand any issue.
How to connect an internal hard drive or SSD to a laptop
If the laptop requires disassembly to connect the drive, we recommend contacting specialists or using a detailed guide for a specific device model.
Important: It is not possible to install a 3.5-inch HDD into a laptop. Only 2.5-inch drives are supported.
If, to install a hard drive or SSD into your laptop, it is enough to remove the cover by unscrewing a couple of screws or using a latch, then the algorithm is not much different from installing a similar device into a computer - just use the appropriate connectors.
Connecting a 3.5-inch hard drive using an external power adapter
Step 1: Attach the adapter to the hard drive.
Attach the adapter to the hard drive
Step 2. Connect the adapter and the desired port on your computer using a USB cable.
Connect the adapter and the desired port
Step 3. Connect the power cable to the adapter.
Connect the power cable to the adapter
Step 4. Apply power to the adapter by switching the toggle switch to the working position.
We supply power to the adapter by switching the toggle switch to the working position
Step 5. If necessary, install drivers for the connected equipment.
How to connect mSATA or M.2 SSD to a computer
mSATA is an interface for compact SSDs, usually used in laptops. On motherboards for computers, mSATA drives are connected via an adapter to a regular SATA connector, if such a need arises, but the board does not have a corresponding slot.
SSD with M.2 interface is another option for compact solid state drives. They are used in both computers and laptops, and to connect you just need to insert the drive bracket into the connector.
At the moment, there are 3 types of M.2 drives: B, M and B&M. The first 2 types of devices can only be connected to a connector of the same type, and the last one can be connected to any one.
Tip: Before purchasing an M.2 SSD, check the specifications of the drive and motherboard to ensure compatibility. If in doubt, you can consult on specialized forums.
Windows setup
If this is the first HDD, then you need to install the system on it. Use a bootable USB flash drive or installation disk to install Windows. It is recommended to review the installation process in another article.
If you connected an additional drive that does not have the system installed, it must be detected in the system.
Windows 7
To work with a new disk in Windows, you need to give it a letter (volume label) and format it:
- Using the command diskmgmt.msc via line "Run" run "Disk Management".
- Move the scroll bar down and click on the unallocated area (it is the size of your new HDD).
- Right-click and select "Set Volume Label" .
- Select a letter from those suggested and click OK.
- You can immediately format it to the desired file system (for example, NTFS).
- Ready. The disc appears in My Computer and is ready to be burned.
Windows 10
Carry out a similar procedure in the top ten:
- Right click on Start and select "Disk Management".
- Scroll down, selecting the drive with the unallocated area.
- Click "Change drive letter".
- Select the one you like and click OK .
- To format, select the appropriate section.
- After selecting the file system and successful formatting, the HDD drive is ready for use.
How to connect an external HDD
To connect an external drive to your PC, use a compatible USB or USB/mini(micro)USB cable. Wait a few seconds for the device to be detected.
If the HDD is not detected after connecting, one of the most likely reasons is lack of power. In this case, you will need a special USB cable with a splitter. The first plug will be used for data transfer, and the second for power, so two USB slots will be occupied at once. However, there may be other reasons why the computer does not see the hard drive - we will look at them in more detail in the corresponding section.
Connecting a 2.5-inch hard drive using the appropriate adapter
When using a special adapter for 2.5 hard drives, you do not need to remove the slide. As a rule, such adapters do not have external power and receive voltage from the computer’s USB port.
Special adapter for hard drives 2.5
Step 1. Connect the adapter to the hard drive.
Connect the adapter to the hard drive
Step 2: Connect both ends of the USB adapter cable to the ports on your computer.
Important! Two ends of the cable are needed because one of them transmits information, and the other carries power to the adapter.
Problem solving
If Windows does not display the connected internal HDD, go to “Disk Management” through the Control Panel. There may be a drive there without a volume label - right-click and assign a label. If the device is not initialized, also right-click, select the appropriate menu item and act according to the system prompts. After that, click on the disk again and select “Create simple volume”.
Note: Do not confuse the new HDD with other storage devices - if you select the wrong one, you may accidentally delete data
The disk is not in Disk Management, updating the configuration in Device Manager also does not help? Restart your computer and press F2 or DEL while booting until the BIOS opens. Go to the disk section (may be called, for example, Storage Configuration or Drive) and check whether the computer sees the HDD, and whether the necessary connectors are enabled (for example, SATA). This can be done in the section of the same name.
In cases where the external drive is not detected, first check “Disk Management”, then the functionality of the USB slot, cable and the availability of up-to-date drivers. If no problems are found, try using a cable with a splitter. When none of the above helps, there is a high probability that the hard drive itself is faulty - test it on other equipment or contact a service center.
Final stage
Since connecting the hard drive to the computer is not enough, you need to make the final setup directly from Windows. On some computers, this procedure is carried out automatically. To check this, you should open “My Computer”, and then see if a new disk has appeared.
If nothing happens, you need to launch the control panel. Then select “Administration”. Once a new window opens, you will need to select “Computer Management”. In the left column, you need to find the “Disk Management” tab (on some computers “Disk Manager”).
Now it is recommended to perform the following steps sequentially:
- At the bottom of the window, select disk 1 (if more than 2 hard drives are connected, select the disk with the highest number). This will be the new hard drive;
- You must assign a letter to the logical volume. To do this, right-click on the disk and then select “Assign letter”;
- As soon as the disk is assigned a new letter, it must be formatted. The procedure can take a long time, it all depends on the size of the hard drive. When formatting, it is important to select the NTFS file system.
When the formatting process is complete, a new disk will appear in the My Computer root directory. If for some reason you cannot connect the HDD using the built-in manager, it is recommended to use third-party programs.
An excellent tool for working with hard drives is Partition Manager. In addition, such a utility allows you to split the disk into several logical volumes.
Differences between connecting IDE and SATA hard drives
It would seem that the connection procedure is the same, but in fact IDE is slightly different from SATA in that it requires setting the position of the jumper, the so-called jumper.
The motherboard is usually equipped with a pair of connectors for IDE devices, and two devices can be connected to each. Each pair can have one master and one slave, and it is impossible for two to be identical. The hard drive must be in master position if Windows boots from it. The second device in the same connection branch must be a slave.
Jumper (jumper) on the hard drive
If all this is difficult to understand, then simply set the jumper to master if your computer only has one hard drive.
You can find the jumper connection card on the hard drive case itself.
There are no such problems with SATA. Master and slave positions are set via BIOS. When connecting a SATA hard drive, you will need to configure it as bootable if it has an operating system installed.
Similar articles:
- Type of Power Supply Connectors The type of power supply connectors is one of those things that if you don’t plan for it, you will have to...
- Guide to connecting a motherboard Connecting a motherboard is very interesting, albeit individual. After all, different models may have...
- Type of Power Supply Connectors The type of power supply connectors is one of those things that if you don’t plan for it, you will have to...