January 29, 2022 Miscellaneous MacOS
Sometimes you need to test a project on MacOS, for example in Safari. Or you need to make a small application for iOS and test it on a real device.
There are 3 options here. Of course, the best one is a real Mac. The second is Hackintosh and the third is the virtual OS itself.
A virtual system, in my opinion, is the best option, because for one-time tests there is no point in shelling out incredible amounts of money for a Mac. Hackintosh is a different story, but if you have a lot of free time and desire, you can pick it up. Personally, after having a lot of trouble with the installation and ending up with a computer with a slow and buggy OS and a non-working Wi-Fi module, I decided that this was not a good idea.
Preparation
For all the files below, the password for unzipping is: glimake.ru
If any links stop working, please contact me directly so I can update them. The link is valid for 30 days.
We will install the MacOS operating system on the VirtualBox virtual machine. You can download it from the official website or from the following links:
- Windows
- OS X
- Linux
- Solaris
- Solaris 11 11 IPS
We also need an extension pack for VirtualBox.
Since we want to install MacOS, we need its image. You can download the iso image here.
Now that everything is ready, we can begin installing the operating system on the VM.
Setting up the resolution
The last thing we need to do is teach the virtual machine to work with the resolution that we need. To do this we will need the command line again. Shut down the virtual machine, close VirtualBox and launch Command Prompt. Enter:
| 1 2 | cd "C:\Program Files\Oracle\VirtualBox\" VBoxManage setextradata “Name of YourVirtual” VBoxInternal2/EfiGraphicsResolution 1920×1080 |
You can specify any resolution instead of 1920×1080. The meanings are separated by the Latin x. Or you can use the vbox_resolution.cmd script. After this, when booting for the first time, the virtual machine may freeze. If this happens, simply reboot it. That's all. As usual, if you have any questions or difficulties, ask in the comments.
Creating a virtual machine
On the main screen, click on the “Create” button
The virtual machine creation window will open. Now we just follow the instructions.
In the window that opens, set the name of the virtual machine, preferably without spaces or special characters. Specify the VM folder - the place where the VM files will be stored. Type – Mac OS X. Version – Mac OS X (64-bit):
We indicate the amount of RAM that we want to provide to the VM. At least 4GB.
In the next window, select “Create a new virtual hard disk.”
Now select VirtualBox Disk Image. The VM will be stored on disk in this format.
Select “Dynamic virtual disk”:
We indicate the size of the hard drive that we will provide to the MacOS virtual machine. Specify at least 40 GB:
This completes the creation of the Virtual Machine. The next step is to configure the created virtual machine.
Installing MacOS on VirtualBox
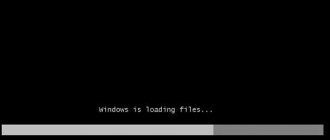
If everything was done correctly, after a while the graphical shell of the installer will launch. There is no point in describing the entire installation process; it is quite simple. I will dwell on the less obvious points. In the third or fourth step, you will receive the message “OS X BaseSystem does not have enough free space to install.” The fact is that our hard drive must first be prepared for installing MacOS. Notice the menu bar at the top. Select “Utilities” -> “Disk Utility”.
In the window that opens, select our disk and click clean:
Enter the name of the partition and run it for cleaning:
After completion, close the utility and select the disk that appears for installation and continue:
What else should you pay attention to? Do not enter your own or create a new AppleID:
Uncheck the boxes for sending diagnostics to Apple:
That's all. Keep in mind that MacOS takes quite a long time to load on VirtaulBox. Therefore, do not be nervous, do not overload the virtual machine, but just wait until the download completes. And also, either change the boot order of the system (put the optical disk after the hard disk) or mount the image so that the MacOS installation does not start every time.
Setting up a Virtual Machine
On the VBox main screen, select our created VM and click on the “Configure” button:
That. we get to the settings page, where we can see all the VM parameters:
Go to the “System” tab, “Motherboard” tab:
Here we uncheck the “Floppy disk” box and make sure that all the boxes in the “additional features” area are checked:
Enable I/O APIC Enable EFI (special OS only) Clock in UTC
In the top menu, go to the “processor” tab. You need to allocate at least 4 processor cores, and set the CPU load limit to 100%. There should also be a checkmark next to “Enable PAE/NX”:
In the left menu, go to the “display” tab.
We allocate 128 MB of video memory to the virtual machine. Disable 3D acceleration. The graphics controller must be on VBoxVGA.
Go to the “media” menu item. Here we need to add our MacOS ISO image to the virtual machine. We will install the system from it in the future.
Click on the plus sign to add a new virtual optical drive and select our downloaded ISO from MacOS:
As a result, our iso file should appear in the list:
Go to the “USB” tab, turn on the USB controller and select USB 3.0.
This completes the setup of the virtual machine. Now we just need to register the configuration files and start the MacOS installation. Let's get started!
Why choose Mountain Lion over the latest Mojave?
Mountain Lion is a system released by Apple in 2012. She is 9102 years old. This system should say that many of the latest programs are no longer supported and their availability is low. If this is for training, then the computer configuration is not very powerful. For example, recently I wanted to systematically learn Maven and become familiar with the Mac system. There's still more to it than just rubbing. Compared to a 6G7G system, Mountain Lion's footprint is really small, only 4G, and takes up little disk space. And can be upgraded to subsequent new systems via system updates.
- Image Mac OS X Mountain Lion (4.04 GB) Extract code: hdkk
- Or from key:h9Rj6Ug8TIYQig9w86wfEqCTN7H_N4vNs9gsxx526rM
- VirtualBox 6.0.0
This is the bulk of this article and the dirtiest, dirtiest place on the internet. I'll focus on setting up the virtual machine. As for the installation process, just follow the installation wizard.
Virtual machine configuration for MacOS
Why is this necessary? - this configuration will allow you to simulate an Ivy Bridge CPU, the microarchitecture of which was found in processors installed on Macs.
Open the folder where VirtualBox is installed to copy the path to the program files.
Open the command line: press Win + R → type “cmd” → press enter or find cmd in the start menu. Next we need to go to the copied directory:
CD
P.S. If VirtualBox is not located on the “C:\” drive, then the command will be as follows:
cd\d
As in the photo above, execute the following commands:
For Intel
CPU emulation:
VBoxManage modifyvm "Glimake_MacOS" --cpuidset 00000001 000106e5 00100800 0098e3fd bfebfbff
Setting the product type "MacBookPro11.3":
VBoxManage setextradata "Glimake_MacOS" "VBoxInternal/Devices/efi/0/Config/DmiSystemProduct" "MacBookPro11.3"
Set the system version:
VBoxManage setextradata "Glimake_MacOS" "VBoxInternal/Devices/efi/0/Config/DmiSystemVersion" "1.0"
Set the name of your “Mac”:
VBoxManage setextradata "Glimake_MacOS" "VBoxInternal/Devices/efi/0/Config/DmiBoardProduct" "Mac-vm-product-name"
Device key:
VBoxManage setextradata "Glimake_MacOS" "VBoxInternal/Devices/smc/0/Config/DeviceKey" "ourhardworkbythesewordsguardedpleasedontsteal(c)AppleComputerInc"
Turning on the system management controller is a subsystem of the Macintosh that is responsible for power, charging, switching sleep and hibernation modes, and more.
VBoxManage setextradata "Glimake_MacOS" "VBoxInternal/Devices/smc/0/Config/GetKeyFromRealSMC" 1
Here we set the resolution of our MacOS system:
VBoxManage setextradata "Glimake_MacOS" VBoxInternal2/EfiHorizontalResolution 1920 VBoxManage setextradata "Glimake_MacOS" VBoxInternal2/EfiVerticalResolution 1080
For AMD
VBoxManage modifyvm “Your Virtual Machine Name” —cpu-profile “Intel Core i7-6700K”
For Linux OS:
The commands are the same. Open a terminal and paste the commands.
Setting resolution and solving problems with video memory.
To set the resolution, run the second script vbox_resolution.cmd from the archive and indicate your monitor resolution, for example 1280x1024. That's it.
After launching High Sierra I saw only 4 MB of video memory. You can check this setting by clicking on the apple icon and About This Mac. To increase the memory to the selected 128 MB, you must install the Guest Tool. To do this, enable VMSVGA in the virtual machine settings.
Next, mount the previously downloaded VM Tool image and click Install VMware Tools. Give the installer five to ten minutes, after which you should receive a "System Expansion" notification. Then select the “Open Security Settings” option.
Click "Security & Privacy" then select "Allow" to complete the installation process.
After ten to twenty minutes, you will receive a notification that the installation is complete. To complete the installation process, click the Restart button for the changes to take effect.
After restarting VirtualBox, you may receive a "System extension is blocked" notification. Open the "Security Settings Menu" to activate the extension. If the integration was successful, you should see 128 MB in the system menu.
After these manipulations, the screen resolution will change again. To fix this, you need to go to the Terminal and enter the following command, where and respectively are the width and height of your monitor:
Sudo /Library/Application\ Support/VMware\ Tools/vmware-resolutionset
If you liked the article, you can thank the author with any amount you consider acceptable:
Still have questions about the article? Ask them now!
Related Posts
iOS app development: first app
A simple application that, when launched within itself, opens a website at a given URL. 1. Create a Single View Application in Xcode. 2. To switch to visual mode, double-click on Main.storyboard. A window with a device opens in front of us. If you don’t see Read more
Xcode launching an application on iPhone
In this article we will look at how to add support for devices with iOS 12 and higher in Xcode 10. We will also connect an iPhone and run your application on it. 1. Setting up support for iOS 12 and higher in Xcode 10 In Xcode 10 Read more
Installing Xcode on a virtual machine with MacOS High Sierra 10.13
Xcode is a programming environment for developing applications for MacOS, iOS, WatchOS and TvOS. Most importantly, this is the only environment where you can test your application on a real device without activating a developer account. In previous articles we talked about how Read more
Installing MacOS High Sierra 10.13 on VMware Workstation Pro
A virtual machine running MacOS runs faster and more stable on VMware Workstation Pro. In addition, there are no problems connecting external devices. I was able to deploy the system much faster and there were no problems with screen resolution, iPhone connection and video memory. Read more
How to clear the cache of sharing posts on social networks
A fairly common problem is when, after adding a link to an external page on social media. the network, its data, including the image, are cached, and with subsequent changes they remain the same. In this article you will learn how to clear the cache of shared external pages of the site Read more
Determine the site's CMS plugin
Wappalyzer is a cross-platform utility that identifies technologies used on websites. It discovers content management systems, e-commerce platforms, web frameworks, server software, analytics tools and more. You can install Weppalyzer as a plugin for Google Chrome and Firefox browsers, and Read more
to "Installing MacOS High Sierra 10.13 on VirtualBox"
- Ilya:
02/10/2020 at 09:36
I managed to install it, but Iphone 5S is not visible in iTunes.
Answer
- Alexander:
07/07/2020 at 18:10
Good time! Thanks for the articles and help! Some difficulties arose, after I wrote date 060710102018 in the terminal, it still says that the image is damaged. Either I'm doing something wrong, or Apple is struggling with hacks like this, or something else, please tell me how to install. Maybe you should find different images on the Internet and try with them.
Answer
- Alexander:
07/07/2020 at 18:16
The most important thing is that when you write the date, it changes it to the one you set, and after you click set and it gives an error, you go and check in the terminal, and there the current date is again.
Answer
- Anton:
07/07/2020 at 19:30
If you downloaded the image from the link in this article, then the image is 100% working. You can also try setting a different date. It must be before the release date. The date must be in the format: mmddHHMMyy where mm is month (01-12), dd is date (01-31), HH is hours (00-23), MM is minutes (00-59), yy is year.
Answer
- Alexander:
07/07/2020 at 20:20
Thanks, I'll try again. Although I’ve already tried 5 times. Now I tried to install Catalina, I found the image, everything is ok, but before choosing a city, it reboots and writes Disk Utility again, but now instead of installing, reinstalling, and if you remove the disk, it displays Shell after the reboot, I’m trying your combination fs1: etc. through Shell. Let's see what happens! Thanks for the answer, and such a quick one! I will try everything until victory. Good luck and health to you and your family!
Answer
- Alexander:
07/07/2020 at 20:49
Tried a lot again? many times, nothing. It says that it’s corrupted, I’ll try to delete what I downloaded and re-download the image, I’m afraid that the result may be the same (I’ve already tried so many images. Another thing is that I installed 10.12, everything is fine, but there’s no update for 10.13 in the store, xcode won’t start for 10.12 you need a higher version... Thanks again for the answers, that’s all for today, tomorrow I’ll start all over again and also storm the Internet!
Answer
- Anton:
07/07/2020 at 22:00
You can try installing on VMware Workstation Pro: It has fewer problems with connecting devices. How to install Xcode 10:
Answer
- Albert:
07/11/2020 at 23:44
Good day!
Dear gurus, we need your help! I install everything according to the instructions, before stage 3 (start the VM and start installing macOS) Shell appears. The installation does not start. I tried to enter fs1: it says that there is no such folder. The mapping reflects fs0: (as I understand it, this is a MacOS image from an .iso file) and blk Due to unstable Internet, I can’t download a >5GB file from Google Drive (it’s interrupted and it’s impossible to download again), so I downloaded the image from a torrent in dmg format and using The converter made the iso format. Through the shell and the ls command, folders and files are shown. What could be the reason for the problem that the installation does not start? Thank you in advance!
Answer
- Albert:
07/12/2020 at 10:16
The question has been removed. The installation was successful. Apparently there were problems with the image.
Answer
- Eugene:
09/15/2020 at 08:12
"Good time! Thanks for the articles and help! Some difficulties arose after I wrote date 060710102018 in the terminal"
In my case, the problem was solved by disabling the network interface.
Answer
- Al:
10/27/2020 at 6:37 pm
...In my case, the problem was solved by disabling the network interface.... I don’t hesitate to ask: - Where-When-How to turn it off. Same problem::: .. the image is damaged... etc.
Answer
- Al:
10.27.2020 at 19:38
I'm withdrawing the question. I found an image of the Catalina-10.15-x64 machine. Imported-launched=without diamonds
Answer
- Dmitriy:
07/31/2021 at 09:29
For those who get stuck on “end randomseed” “C:\Program Files\Oracle\VirtualBox\VBoxManage.exe” modifyvm “MachineName” —cpu-profile “Intel Core i7-6700K”
If “blocking while holding a spinlock” appears, try turning off “System” -> “Processor” -> “Nested VT-x/AMD-V”. Helped me
Answer
- Alexei:
10/12/2021 at 00:47
#Try turning off “System” -> “Processor” -> “Nested VT-x/AMD-V”. Helped me #
Plus in your karma, saved me from going through options and settings, disabling this option also helped me progress
Answer
- Denis:
01/17/2022 at 14:03
TURN OFF the network in VB!!!!…. You can’t set it that way. There’s a problem with setting the time. The author did not indicate in the article. THANKS TO THE AUTHOR.
Answer
- Havison:
01/18/2022 at 16:14
If you can't do it, turn off the internet
Answer
- Ivan:
01/23/2022 at 12:26
Is it possible to upload the disk image to Yandex disk?
Answer
How to increase video memory in VirtualBox
After installing all the configurations, we can view the characteristics of our Mac with the following command:
VBoxManage showvminfo Glimake_MacOS
VRAM Size line indicates the amount of video memory. By default, VBox can install a maximum of 128 MB of memory. But to increase it to 256 MB we write the command:
VBoxManage modifyvm Glimake_MacOS —vram 256
And again we check the installed volume:
VBoxManage showvminfo Glimake_MacOS
Step4 Complete screen resolution adjustment
In Mac VirtualBox, resolution settings are not supported. To enable the virtual machine to adapt to full screen resolution, follow these steps: First, enter your VirtualBox installation directory.
Microsoft Windows [Version 10.0.17763.253] (c) 2022 Microsoft Corporation. All rights reserved. C:\Users\Lenovo>cd D:\Program Files\Oracle\VirtualBox C:\Users\Lenovo>D: D:\Program Files\Oracle\VirtualBox>
Then enter the following code. Note that hereYOUR_VM_NAME Replace with your virtual machine name, for example hereMac OS X 10.8
VBoxManage setextradata "YOUR_VM_NAME" CustomVideoMode1 1366x768x32 VBoxManage setextradata "YOUR_VM_NAME" VBoxInternal2/EfiGraphicsResolution 1366x768
In the first command here, 1366x768x32, To note, the previous one is 1366x768 For my laptop's resolution, 32 For the color depth.
The second team is the same. It can be adjusted according to the actual situation, but usually only the resolution is adjusted, and the color depth is not adjusted. console output: Microsoft Windows [Version 10.0.17763.253] (c) 2022 Microsoft Corporation. All rights reserved. C:\Users\Lenovo>cd D:\Program Files\Oracle\VirtualBox C:\Users\Lenovo>D: D:\Program Files\Oracle\VirtualBox>VBoxManage setextradata "Mac OS X 10.8" CustomVideoMode1 1366x768x32x32 D:\Program Files\Oracle\VirtualBox>VBoxManage setextradata "Mac OS X 10.8" VBoxInternal2/EfiGraphicsResolution 1366×768 D:\Program Files\Oracle\VirtualBox>
Launching MacOS
Now go back to the Virtual Box program and select our installed MacOS system: click on it and click “Run” in the top menu.
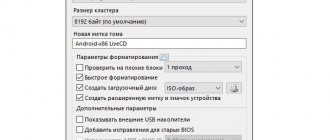
In the next article we will look at installing the operating system itself. Also see the article: “How to install Android in VirtualBox on Windows.”
Before you start
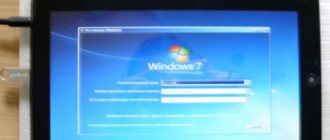
In this article we will tell you how to install a virtual copy of the MacOS 10.12 Sierra operating system using VirtualBox (a virtualization software product), that is, Apple OS will run on top of Windows, or as they say “install Mac os on Windows”. In order for everything to work for you following the instructions below, your computer must meet the minimum requirements.
Read also:
- How to speed up Virtualbox?
- How to install Android on Virtualbox?
Minimum technical requirements for PC
- Processor: 64-bit, Intel Core i3, Core i5, Core i7
- Random access memory (RAM): minimum 8 Gb
- HDD or SSD disk: minimum 30 GB of free space
The CPU-Z utility will help you find out what processor you have and the amount of RAM.
Where to get the MacOS installation image
Tough question because of Apple's licensing policies and all that jazz. If we try to simplify everything, we get two main solutions to this issue.
- Create it yourself if you have access to a working Apple computer. I refer those who want to try it to a good article “How to create a Bootable ISO image of macOS 10.13 High Sierra installer”.
- Find a ready-made image for a virtual machine on torrents.
One way or another, we get a bootable image in ISO format and save it somewhere convenient on the computer.
Installing Mac OS
Once you are sure that the hardware fully complies with the program, download the Mac OS High Sierra installation file to your Windows computer.
1. Download Mac OS;
2. Download and install VirtualBox;
3. Launch VirtualBox and press the New .
Enter the name, type and OS version.