Users ask this question especially often, since there are many reasons for this problem. Below is a sequence of specific actions for a PC owner if a computer running Windows 7 cannot see the microphone.
All recommendations can be successfully applied to solve this problem on other operating systems from . However, today the army of Seven users is still one of the largest. All described actions in other Windows will be similar.
You just need to perform them exactly in the order in which they are given in this guide. This will allow you to troubleshoot the problem as efficiently and quickly as possible, since first instructions are given on how to analyze and eliminate the most common causes of this annoying problem.
Why doesn't the Windows 7 microphone work?
Windows 7 absolutely does not see the microphone for reasons that are most often not related to mechanical failures. It is built into the computer, and it is extremely difficult to damage it without changing the physical parameters of the main device. So, if the laptop was flooded with hot coffee or tea, something heavy was dropped on it or thrown on the floor, and after that the sound stopped working, then the reason is clear. In other cases, there is a high chance that voice recording and audio file playback have stopped due to:
- lack of necessary drivers;
- incorrect settings;
- malfunctions;
- the fact that a specific program is not connected, others work instead;
- The sound-reproducing component has been occupied by a third-party program.
Checking the microphone, adjusting the sound
The last option is something is broken.
Properties panel, volume settings
Error: "Microphone is not available at this time"
The "Device microphone is not currently available" error in Windows 7 is issued if it is not connected or is being used by a third-party program, with a possible settings failure.
Note! In a desktop computer, the microphone comes separately, it needs to be built in, so the absence of sound may mean the physical absence of a device that will have to be inserted and connected on the back panel to correct the situation. In this case, the front panel sockets can be disabled.
To enable it on a laptop:
- Right-click on the volume icon.
- Select “Recording device” (there should be a green checkmark next to the device icon).
- Click on the icon and select “Properties”.
- Go to the “General” tab.
- Select "Use this device".
- Click “Ok”.
Important! If the component is used by another program, you can try to restart the laptop to disable it. If this action does not help, check whether all the necessary drivers are installed, whether a specific microphone is designated as the default device, or whether there are other components that the computer uses for a similar purpose (USB).
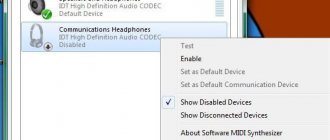
Default device
You can also check if headphones are connected. Perhaps they are the ones that interfere (the front input on different computer models) is intended for headphones. Many headphones have a lavalier microphone that clings to clothing and prevents sound from being lost, but only when you bring the headphone to your ear.
Additional Information
In conclusion, here are a few more points that may be useful in the context of solving problems with the microphone in Windows 11:
- Try using the built-in microphone troubleshooters in Windows 11. In Settings - Sound, under Advanced, under Troubleshoot common audio problems, click Input Devices. This may help in some situations: for example, if the problem is caused by disabled services.
- If all the settings indicate that the microphone should work and it is present in the device manager, try going to the “Recording” tab in Win + R - mmsys.cpl, select the desired microphone and click “Properties”. In the tabs of the window that opens, try disabling (if any) any microphone effects, enabling or disabling (depending on the current state) exclusive access of applications to the microphone in the “Advanced” tab.
- If the microphone only on the front panel of the PC does not work, it makes sense to check its connection (or connect it to the rear panel). Read more: How to connect the front panel of the computer system unit to the motherboard.
- It is rare, but it happens that the microphone does not work due to hardware problems or a faulty cable - I recommend checking its operation on another computer to clarify whether the problem is in the system or the microphone itself.
- It is possible that a new headset with one combined microphone and headphone connector is connected to an old computer or laptop. It should be taken into account here that older sound cards may not support simultaneous operation of a microphone and headphones on the same output.
What to do if the microphone does not work on a laptop with Windows 7
Windows 10 microphone not working - ways to fix the problem
If nothing works, they try to identify the cause of the problem. For this:
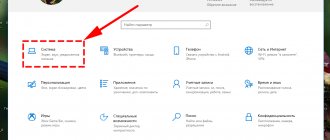
- Open the “Control Panel”.
- Select "Hardware and Sound".
- Click on “Manage audio devices”.
- Select "Show disconnected devices".
Note! In the control panel, you can set up a check for problems that are currently preventing other components, including the microphone, from working properly.
If the computer is busy with another program:
- Open "Device Manager".
- View a list of programs running during a given period of time.
- Disable those that can affect the operation of the microphone, for which they select a program from the list and click “Quit”.
For your information! Internet portals and applications for recording video from a webcam can also negatively affect the use of the laptop's audio recording component. If shutting down programs open on the computer does not help, close all browser windows that are not particularly important.
The sound may work when communicating in the game, but not turn on when using, for example, Skype. In this case:
- Enter “Voice recording” into the search.
- Click on the image of the component and record the sound (this helps to check whether the device is working correctly).
If everything is normal, but nothing still works in a specific program, for example, in Skype:
- Select one by one: “Tools” - “Settings” - “Sound settings”.
- They check whether the required one is selected in the component graph, and whether another one to which the computer does not have access is indicated.
An effective way to restore functionality is to restart the computer. After its implementation:
- Right-click on the speaker icon.
- Select “Recording device” in the field that opens.
- Click on the “Record” column.
Getting an app to access your device
If everything is working correctly, the last action will cause the microphone icon to appear. If the icon is missing, click on any free area and in the pop-up window select “Show disabled devices” and right-click on the microphone. After the “Enable” button appears in the context menu, click on it.
Important! Sound recording and other components responsible for sound are restarted by alternately clicking the “Disable” and “Enable” buttons in the context menu. To further check, try making noise or playing music on the computer. If the ticker moves, the microphone is working correctly.
Troubleshooting
What is the first thing Windows tries to start when it encounters an error? Troubleshooter (or troubleshooter) is a built-in tool for solving problems that arise with the system and its components. With each new update, this tool is improved and increasingly helps users. According to Microsoft representatives, problem-solving tools work using artificial intelligence technologies. This means that every new bug report will teach it and make it better.
So, to find out why the microphone on your headphones or other Windows 10 device is not working, follow these steps:
- Open Windows Settings (Win+i or Start menu)
- Open “Update & Security” settings
- Go to the “Troubleshooting” tab
- Open the “Sound Recording” troubleshooter and follow its instructions
- Once finished, restart your PC
This software tool solves software problems. For example, it naturally will not solve the error when the microphone does not connect to a Windows 10 computer due to a hardware problem.
How to install a driver for a microphone
How to turn on the microphone on an Android phone - why it doesn’t work
If the necessary drivers are not installed on the device, there will be no sound from the speakers built into it. To fix the problem, you need to restore communication between the OS and the computer. To do this, use a special utility.
Usually the driver is already built into the system, but due to the fault of the user or a virus program, it may stop working and even be removed from the laptop. You can check if the required driver is available as follows:
- Open "Control Panel".
- Log in to “System”.
- Select "Device Manager" and "Sound Devices".
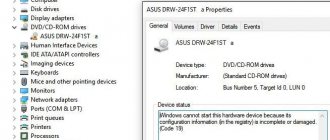
The presence of a yellow exclamation mark in the window that opens indicates the absence of a driver or the need to update a utility that has already been downloaded. You can find what you need on the official website of the company that produced the computer. Using the search, they find the laptop model, indicate the installed OS and note the bit depth. After these steps, a section with drivers for a specific laptop model opens.
Driver Update
Important! Install the utility in semi-automatic mode using the installer program. As soon as all manipulations are completed, the computer is rebooted. A reboot is required for the changes to take effect.
Reinstall your sound card drivers
When the microphone you need is not in the list of connected ones at all, the reasons may be different. Most likely:
- microphone is not connected.
- the device is faulty.
- The problem lies in the sound card drivers.
Return to Device Manager. Remove the sound card from this PC. In the utility text menu, select “Actions”. Click "Update Hardware Configuration" to reinstall the drivers.
In case automatic reinstallation of drivers does not help, download the versions for your laptop or desktop motherboard from the official website of the equipment manufacturer. Install the software.
To find the software you need, enter in the search bar: the full name of the laptop or motherboard model + support.
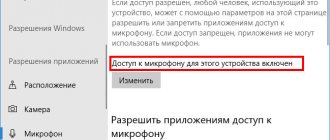
Windows 11 has built-in tools to help you fix hardware problems. Use them. Open Settings, where you need the “Advanced” section of the “Input Devices” item. This method helps in certain cases. In particular, when you disable some services that are necessary for the microphone to work.
Set microphone as default device
If 2-3 microphones are connected to the computer, then before using a specific device, check whether it is selected as the default device. To do this, after opening the control panel and the sound window:
- Select the “Properties” section.
- Open the “General” tab.
- Select the desired one in the “Microphone set” line.
- Go to the lower left corner and set the value to “Use this device” with o.
How to mute the microphone on a Windows 10 laptop
Next, use the device for its intended purpose, the sound should come out.
Note! To save battery power, in some cases the system turns off the microphone. To enable this, check the box next to “Continue operation when switching to battery power.”
If nothing happens, then open the “Sounds” window in the control panel again and in the “Properties” section go to the “Listen” tab. You need to make sure that the microphone does not rely on battery power to operate.
Sound options
The next way to answer the problem of why the microphone does not work in Windows 10 is to check the sound settings. Obviously, if the system detects a device (the corresponding sound is played when connected), then you must first look at the system settings. In Windows 10, there are at least 2 places where you can check your sound settings - Windows Settings and Sound Options (from the classic Control Panel).
Windows Settings
To check whether the microphone is working or not working on a Windows 10 laptop or PC, follow these steps:
- Open Windows Settings (Win+i or Start menu)
- Go to “System” settings
- And open the “Sound” tab
- We need Input parameters responsible for recording devices. In the “Select input device” drop-down menu, make sure that the microphone that you want to work is selected. You can check it right away - with a working microphone - the slider should move in time with the voice or sounds.
The main disadvantage of these settings is that they do not contain all the information that would be useful to solve the problem.
Check microphone volume level in mixer on Windows 7
The microphone volume level is checked in the same place where it is assigned as the default device - in the “Properties” tab. To do this, select the “Levels” section, move the slider towards increasing or decreasing the volume, and try to adjust the level it needs.
You can also change the bit depth and sampling frequency. If, after repeated reboots of the computer, installing new drivers and all the described actions, nothing changes, it is better to show the device to professionals.
If, when trying to talk to a friend via Skype or chatting in a game, your computer displays a microphone error, there is no need to panic. The Windows 7 microphone does not work for many reasons, but in most cases all of them can be resolved in a few minutes without the need to contact a wizard. Most often, the malfunction is a consequence of the lack of the required driver.
Select the correct microphone from the list of connected ones
In Windows 11 Settings, go to the “Sound” subsection of the “System” section. See which microphone is selected from the Input list. If not the one you need, activate the correct one.
The second reason is that the microphone volume slider is shifted to the left to the limit. In this case, audio recording by the microphone is effectively disabled. Set the volume to a comfortable level.
If this did happen
It is possible that there is another reason why the microphone stopped working, which was already mentioned at the very beginning. If it's broken, that's also possible.
The likelihood increases if:
In this case, the microphone (if it comes separately from the PC) or the entire laptop will have to be taken to a service center, where they can provide professional assistance.
Microphone repair can be quick or lengthy (depending on the severity of the damage). The price also varies widely depending on which recording device needs to be repaired and why it broke.
What types of microphones are there?
All microphones for computers are divided into three types:
- Regular analog microphones with minijack
- Microphone built into webcam
- USB microphone
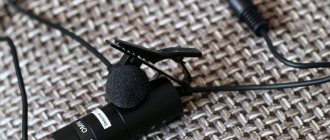
Among the microphones “on a stick” with a 3.5″ mini-jack you can find more or less sensitive models that are suitable for most built-in microphone inputs. Analog microphones are connected to a special jack on the computer; it is on the back and front panels, usually pink. For good audibility, you need a good microphone input in your sound card or laptop. Due to low sensitivity or high self-noise levels, the microphone sound will be quiet.
USB microphones have a built-in microphone amplifier that fits the microphone capsule and provides a comfortable sound level in most cases. Such microphones are also built into webcams, but only if the camera is wireless and has a minijack. For normal sound, I recommend choosing a USB microphone. But if you have a microphone with a minijack, you will need to configure it.
In the previous article, I told you how to set up Skype on your computer. But unfortunately, many users complain that they are hard to hear. Sometimes you just have to yell straight into the microphone to be heard properly. But some people simply don't know that the microphone needs to be configured in the Windows mixer. This usually only applies to analog microphones. Let's look at microphone settings using the example of common Realtek HD and AC'97 compatible codecs. With any other codecs everything is exactly the same, by analogy.
for performance
So, if the user is actively searching for the reason why the microphone stopped working, he will be forced to constantly check it. Standard Windows capabilities (any version) allow you to do this in real time.
You just need to go to the “Recording devices” tab (how to do this was already written in the same article a little earlier), select the appropriate one and find the “Listen” option in the parameters. Place a checkmark next to it. Done - now all sounds received by the microphone will be simultaneously output to the PC speakers.
There you can also find other configurations of the recording device: experiment with microphone gain, noise reduction and everything else.
Line input failure (for externally connected recording devices)
If an externally connected microphone stops working, the problem may not be with it, but with the line input. It’s very easy to check: firstly, try using the “native” recording device of the PC, and secondly, you can connect an external microphone to another device (any other laptop, tablet, smartphone, computer, etc.). If there is a problem with the linear input, well, you will have to take it in for repair.