Usually this situation does not satisfy the user, and he installs a full-fledged and familiar version of Windows. You can cope with the task on your own, eliminating the need to hire third-party computer specialists and avoiding unnecessary costs.
You will learn how to do this as you study the information below. The instructions are relevant for modern versions of Windows. Reinstallation differs from installing from scratch in that in the first case, at the appropriate stage of work, it is strongly recommended to format the hard drive partitions in order to avoid confusion and reduced performance in the future.
System requirements
The Windows 7 operating system is unpretentious and highly optimized. For stable operation, the computer must have the following characteristics:
- processor (32-bit or 64-bit) with a frequency of 1 GHz or more;
- 1 GB of RAM for the 32-bit version or 2 GB of RAM for the 64-bit version;
- 20 GB of free hard disk space;
- Graphics adapter supporting DirectX 9.
Lenovo laptop
Depending on the specific build of the “seven”, the requirements may change. The basic version is considered the easiest, while professional or maximum builds will require significant resources.
Lenovo IdeaPad Z580 laptop: a home machine at the right price
If you're looking to buy a laptop that combines style and entertainment at an affordable price, the Lenovo IdeaPad Z580 is a great choice. Attractive appearance, good ergonomics, durable body, excellent performance - a laptop from Lenovo has all these qualities.
The build quality of the Z580 is also good, and despite some give in the plastic panels (the laptop comes in both aluminum and plastic casings), the chassis of the model is quite durable. The laptop offers bold, glossy lines and is one of the brightest budget laptops on the market.
Lenovo IdeaPad Z580 laptop is one of the brightest budget laptops on the market
Hidden under the attractive appearance of the IdeaPad Z580 are:
- processor: Intel Core i3/i5/i7, 2200–2900 MHz;
- core: Ivy Bridge/Sandy Bridge;
- RAM: 2-8 GB RAM;
- HDD: 320-1000 Gb;
- video HD Graphics 4000 plus GeForce GT 630M–645M.
Lenovo's glossy display is also impressive. With a screen diagonal of 15.6″, the matrix resolution is standard and is 1366×768 pixels. The monitor's brightness is also average, but the contrast reaches an impressive 260:1, which, along with good color reproduction, provides vibrant colors and makes it one of the best displays in its price category.
The laptop, while not lightweight, is 33mm thick and weighs about 2.5kg. Battery life – 5 hours.
Important! Based on real-world gaming tests, this is one of the fastest budget laptops around. If a buyer needs a fast laptop for everyday tasks without breaking the bank, the Lenovo IdeaPad Z580 will not disappoint.
Preparing BIOS settings
How to install Windows 10 from a USB flash drive on an HP laptop
Installing Windows on Lenovo is not much different from similar processes with other devices. Immediately before starting the installation, you must configure the BIOS properly.
BIOS setup
Procedure:
- Turn off the laptop.
- Press the power button.
- As soon as the splash screen with the brand name appears on the screen, you must immediately press the button on the keyboard to access the BIOS. On Lenovo laptops, the F2 button is responsible for this. The F12 key allows you to select a specific boot device.
- Now you need to go to the “Security” section and open the “Secure Boot” tab by pressing the “Enter” button when selecting the appropriate item.
- Opposite the “Secure Boot” position, you need to set the “Disabled” parameter, which means disabling bootloader protection.
- Go to the main BIOS menu and open the “Boot” section.
- Using the arrow keys, you need to move the bootable media of interest to the very top of the list. This will allow you to set the required download priority.
- In the main BIOS menu, open the “UEFI/Legacy Boot” section and activate the “Legacy Only” mode.
- Press the F10 button to save the settings.
BIOS capabilities in Lenovo laptops
Since the main task of BIOS software is to test the laptop, the program itself is displayed on the monitor in the form of a table, divided into a number of additional tabs. They inform the user about the laptop configuration, show the main technical characteristics of this model, make it possible to boot and configure the security system. All these sections are displayed on the screen as “ Information ”, “ Configuration ”, “ Boot ”, “ Security ”, “ Exit ”.
Pay attention to an important detail. When moving into the BIOS, the mouse connected to the laptop stops working, so while in the software menu, navigation is carried out using buttons with pointers. It must be remembered that in all configurations without exception, the changed settings begin to work only after they are saved and the laptop is rebooted.
Remember that BIOS, like any other software, requires regular updates. Do not use dubious sites and blogs to download. All products installed in Lenovo laptops can be downloaded and updated from the manufacturer’s official website. And it is preferable to do this on the same computer where you are going to change the software. The BIOS version can be found by going through the POST procedure by pressing the Pause/Break key.
You already know how to enter the BIOS.
Creating a bootable USB flash drive
How to install Windows without a disk and without a flash drive
Not all users have a boot disk with an operating system. Therefore, they often resort to the procedure of creating a bootable flash drive based on some image that allows them to install the OS.
Creating a bootable USB flash drive
First of all, you need to take care of downloading the appropriate assembly to your computer. It is better to download images from official sources, since there are a lot of low-quality assemblies on the Internet, which are also often embedded with various types of malicious programs. The best option would be an image from the developer’s website.
Next, you will definitely need a special program to create a bootable USB flash drive. The most common applications are UltraISO and Rufus. You can download the software for free on official resources.
Creating bootable media using the UltraISO program as an example:
- In the main window, you need to open the previously downloaded image through the “File” menu.
- Now you should select the “Burn hard disk image” option.
- Select the desired drive from the list provided.
- Set the necessary settings.
- Press the “Record” button. The software will offer to delete all data on the drive. You have to agree.
- Once the program displays a message that the procedure is complete, the drive can be removed and used to reinstall Windows on Lenovo.
Important! When creating a bootable flash drive, the USB-HDD+ mode is selected in any case.
Lenovo S920 smartphone, characteristics of the fast IdeaPhone
Another interesting solution from Lenovo is the Lenovo IdeaPhone S920 smartphone.
- screen: IPS 5.3″, 16 million colors, 1280×720, touch, capacitive, multi-touch;
- Processor: 4-core MTK 6589, 1.2 GHz, PowerVR Series5XT video;
- memory: 1 GB RAM, 4 GB built-in + 32 GB microSDHC, microSD;
- phone type: monoblock, 159 g, 154×77.7×7.9 mm;
- phone charging connector: micro-USB;
- communication type: GSM 900/1800/1900, 3G;
- navigation: GPS, A-GPS;
- interfaces: Wi-Fi, Bluetooth, USB;
- platform: Andro >IdeaPhone S920 boasts two SIM cards, but it is equipped with one radio module, which, for example, does not allow it to download a file on the Internet during a telephone conversation.
The S920's photo quality is very good, but the ideaDesktop doesn't shine with its design. The battery allows the smartphone to work intensively for a day on one charge, which is a very good indicator. The speaker of the phone is high quality and loud.
The Lenovo IdeaPhone S920 isn't an outright bestseller, but it's a good choice for an all-in-one device, highlighted by its good camera, long battery life, and dual-SIM capabilities.
Installation process
To install the system on a laptop, you need to turn it off and connect the bootable media you created to the port. Pre-configuring the BIOS will allow the system to independently determine which disk to boot from. Sometimes you may need to press any button during the startup phase to activate the installer. Information about this will appear on the screen.
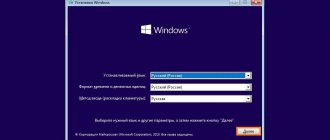
How to install Windows 10 from a flash drive - reinstalling the OS
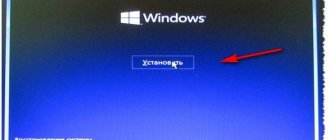
The system will begin to unpack the installation files, after which the main OS window will open in front of the user. Here you will need to select “Full installation”.
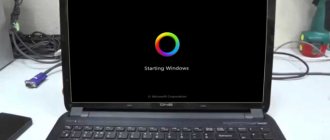
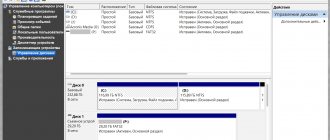
Using the tool built into the installer, you can manage disk partitions. Here you can format the desired partition, delete it, or split an existing disk into new sectors. After completing all the manipulations, you need to select a specific media for the system and start the installation. The process is completely automatic and will not require user intervention until the first setup window for the already installed operating system appears.
Attention! The computer will reboot several times during the OS installation. At this time, you should not try to use it or completely disconnect it from the power supply.
What to do after installation
Immediately after installing the operating system, several main steps follow to prepare the computer for use:
- The time zone is selected, and the date and time parameters are set.
- In the appropriate window, enter the username and password to access the system. If necessary, you do not have to enter the password.
- The system will also prompt you to immediately set up an Internet connection. Here you need to select the appropriate network and enter the access password.
- Security settings are configured separately. The built-in system defender can be activated or turned off completely.
- The final step is to install all the necessary drivers and programs for subsequent use of all the capabilities of the computer.
Completing the OS installation
Possible problems
Problems loading the OS do not arise very often, since reinstalling Windows on a Lenovo Ideapad laptop or any other model is quite simple. However, some complications may still appear.
First of all, you need to make sure that the selected format of the flash drive you are using is correct. Directly when creating the installation drive, you need to select FDD or HDD formatting.
Note! When creating bootable media through the program. It is necessary to carefully study each item and set the correct parameters in accordance with the instructions.
Particular attention should be paid to the boot image. All installation disks from the operating system are divided into boot and recovery disks. The second option cannot be launched from the BIOS. This means that the installation will not be possible.
Having understood how to correctly install Windows 7 from a flash drive on a Lenovo laptop, the user can easily repeat this procedure at any convenient time. Moreover, there will be no costs for using the services of specialists in service centers.
Booting via Boot Menu
To boot Lenovo from a USB drive, you do not need to do so through BIOS Setup. Lenovo laptops have a special “Boot Menu” for this purpose.
To enter the boot menu, you must:
- Turn on the system and immediately press the “F12” button.