Before disabling processes that load your PC's RAM, you need to understand which of them are not related to the OS itself. Disable only the processes of programs that you have installed yourself and that you are sure are not required.
- To launch the task manager, press the [Ctrl] + [Shift] + [Esc] keys simultaneously.
- Go to the Startup tab at the top, here you will find all the programs that start with Windows.
- Select the process you want with your mouse and click the "Disable" button in the lower right corner.
Windows 10: disable autorun
Startup programs
See also: “How to add a file to startup in Windows 10”
Perhaps the most common question is: what programs can be disabled from autoloading? The answer is extremely simple - everything. This will boot the operating system as quickly as possible. And the necessary programs can then be launched manually. But this is a generalized approach that does not always give the best results. Therefore, let's look at this issue in more detail.
Applications that can be disabled
You can safely disable automatic loading of the programs listed below; they do not affect the system in any way:
- Skype
- Google Chrome
- Microsoft Office
- QuickTime
- iTunes Helper
- Evernote Clipper
- Adobe Reader
- Apple Push
- CyberLink YouCam
In addition, you can disable the torrent client, programs for managing scanners, printers, cameras and other peripheral devices that are rarely used.
Apps that are best left on
These programs contribute to the normal operation of the operating system, so it is better not to disable their automatic loading:
- Antivirus programs (Kaspersky, Norton Internet Security, etc.);
- Utilities and applications for wireless devices and touchpads (on laptops);
- Microsoft Services;
- Intel and AMD utilities and programs;
- Cloud storage services (Dropbox, Google Drive, etc.).
How to remove programs from startup on Windows 7
The Windows 7 operating system provides the ability to eliminate programs from startup using the built-in MSConfig command, as well as using the third-party Autoruns program.
Using the command line
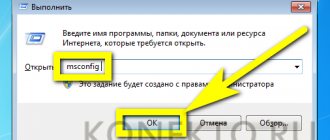
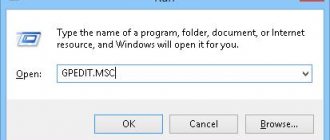
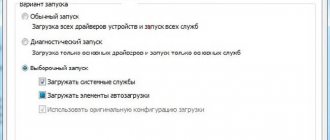
The Windows 7 operating system provides a call to one wonderful utility. Through it, services, several operating system parameters and, of course, startup are managed. In Windows 7, you can directly open this line by selecting "Run" from the menu. You can enter the command in the form of text msconfig and in the search bar, after calling the corresponding Start menu item. You can enter a command into the line by calling it with the Windows key combination and R. This combination leads to the appearance of the “Run” menu, in the line of which you should enter the MSConfig command. Now all you have to do is press “Enter”:
In the “Startup” tab, you can remove any program from Windows 7 startup.
The contents of the tab will appear in table form. The column on the left lists all applications that are in startup, and if the program is active, there is a checkmark next to its name. To exclude an application, you need to uncheck it and be sure to save the changes in the settings by clicking the “OK” button:
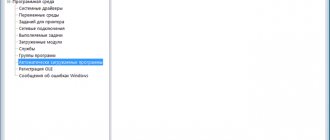
You can approach solving the problem more globally. We are talking about disabling unnecessary services, which are also sometimes used to autoload programs. Without leaving the same “System Configuration” utility, you need to click the “Services” tab to go to it. There, opposite the “Do not display Microsoft services” option, check the box.
A list of programs that are included in startup as services will appear. Some of them can be disabled if necessary. To do this, we do exactly the same as in the case of the “Startup” tab. You need to uncheck the box and save the changes by clicking “OK”:
We use the Autoruns program
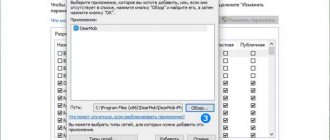
Third-party programs can also remove unnecessary applications from startup. Among the most effective of them is the Autoruns program.
You can download this program and use its simple interface. It really is simple: on the “LogOn” tab you can deactivate most of the programs included in startup. To disable services, the “Services” tab is provided. The principle of operation remains virtually unchanged: you need to uncheck the box next to the unnecessary program or service. In this case, there is no need to save the new configuration - all settings will be applied immediately:
Opening the startup list
In order to disable or enable the automatic downloading of certain applications, you first need to open the corresponding list. This can be done in different ways. We will analyze one of the most popular methods.
- By right-clicking on the Start menu icon, open the context menu (or you can simply press the Win+X key combination), in which we select “Task Manager”.
- In the window that opens, switch to the “Startup” tab, where all the necessary information is presented.
Startup directory
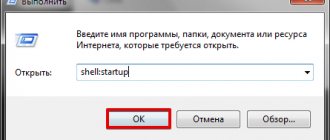
Now I’ll tell you where the startup folder in Windows 10 is located. There are two ways to get there. The first is to follow the path:
Users\ AppData\ Roaming\ Microsoft\ Windows\ Start Menu\ Programs\ Startup
But you may find that the location is hidden (for security reasons). Then you need to activate the display of hidden files and folders in Windows.
The second method is to open the “Run” window using the Win + R keys and enter the command “shell:startup” (without quotes) into the line.
After executing this command, a folder with startup shortcuts will open. Here you can remove unnecessary ones from autorun, but be careful not to make a mistake and clear out “useful” programs. To add it, you need to put a shortcut to the corresponding application in the folder. However, according to user comments, this method does not work for everyone.
Disabling program autorun
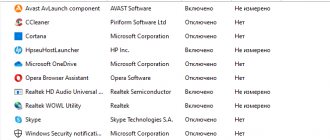
Once in the “Startup” tab of the Task Manager, we see a list of programs in a tabular form, and for each the name, publisher, status and impact of the program on startup are indicated.
The “Status” column indicates whether application startup is enabled or disabled.
Using the value in the “Impact on startup” column, you can evaluate how much a particular program affects the loading speed of the operating system when you turn on the PC.
You can disable the program in one of the ways below:
- Right-click on the selected application. A context menu will open in which we select the “Disable” item.
- Having selected the required program, then click the “Disable” button in the lower right part of the window.
- After all the required settings have been completed, reboot the PC.
Note: If you find a program in startup that you don’t know the purpose of, look for information about it on the Internet to decide for yourself whether you should leave it enabled or not. The “Internet Search” command, which is accessible in the context menu, will help with this.
Complete removal from startup
As an alternative to deactivation, to disable the program's autorun completely, you can completely delete entries in autorun. However, this is generally only useful if the process cannot be disabled in the manner described above.
- First, follow the instructions above and open Task Manager.
- Go to the Processes tab and close the relevant process.
- You can now remove the entry using the free CCleaner cleaning tool.
- Launch CCleaner and navigate to Launch in the Tools section on the left.
- Select the desired startup entry and click the "Delete" button on the right.
CCleaner: remove the program from startup
Using CCleaner
CCleaner , along with the professional one, also has a free version (for home use) . The steps below apply to both versions:
- Let's launch the program.
- Go to the “Tools” tab, in which we select the “Launch” section.
- Here are all the programs that start when Windows starts. After selecting the desired line, the startup control buttons are activated – “Enable/Disable” and “Delete”. When choosing deletion, remember that you cannot cancel this action.
Note: You can download the program on the official website at: www.ccleaner.com.
After installation, the default interface language is English. You can change it to Russian in the “Options” tab – “Settings” section – “Language” parameter.
See also: “How to speed up your computer (laptop) in Windows 10”
How to remove startup in Windows 10 using third-party programs
You can disable startup programs in Windows 10 using third-party software, which you will first need to install on your computer. At the same time, the applications have additional functions that allow you to make changes to other components of the system.
CCleaner
CCleaner is a multifunctional program that is distributed under a paid license, but has a free version with a reduced set of tools. Any one will do to complete the task.
Step by step guide:
- Launch the program and go to the “Service” section.
- Open the “Startup” tab and select the application that you want to deactivate in the list.
- Click on the Delete button.
If necessary, these same steps must be repeated with the remaining utilities from the list.
Autorun Organizer
Autorun Organizer is a highly focused utility for working with Windows 10 autorun. Distributed under a free license.
Instructions for use:
- Launch the application.
- Select the program name in the list.
- Click on the Delete button.
- Repeat the steps with the remaining items in the list.
Autoruns
Autoruns is a multifunctional application for working with the startup list. Supplied free of charge as an archive.
Instructions for use:
- Launch the program, go to the All tab.
- In the list, find the utility whose autorun you want to disable.
- Right-click and select the Delete option.
- Confirm the action in the pop-up dialog box.
What is startup in the Windows operating system?
To defeat the enemy, it is important to understand what he is. Items in the startup list are programs that are activated every time the computer starts. They can be useful, for example, instant messengers or antiviruses, but on the contrary, they can add a lot of hassle and cause harm.
Windows 10 has its own ways to eliminate applications from startup
Programs designed for startup can be deleted or added independently. But most often people are interested in how to remove applications from Windows 10 startup.
Note! If programs that were not completed before turning off the computer are turned on at the beginning of the next startup, then they are not part of the startup list.
Registry
Another place where you can remove or add an application to startup. Some users encountered a problem when the program was not in the “Device Manager” and the “Autorana” folder, but it was constantly launched along with the system. Then you can remove it only through the registry.
- Again, press our favorite keys and R. Write the command below.
- We follow the folder path to the “Run” folder.
HKEY_CURRENT_USER\Software\Microsoft\Windows\CurrentVersion\Run
- Now you will see lines like this. The first line is the name, and the third is the path to the “exe” file to be launched. You can also add additional launch commands there, like in a shortcut. To delete a line, select it and press the “Delete” key.
- To add a line, right-click: “Create” – “String parameter”.
- Enter the name. Next, open the parameter by double-clicking and enter the path to the “exe” file. The easiest way is to copy the parameter from the “Properties” of the shortcut.
Remove everything from autorun
Once again, I repeat that doing this is not entirely recommended, but sometimes it is impossible to disable the malicious program in any other way. Press + R and enter “msconfig”.
On the “General” tab, click “Load startup items” to disable this section. Next, apply the parameters and reboot the computer.
Autorun settings during program installation in Windows
Some programs, directly during the installation process, provide users with the opportunity to make advanced settings, including unchecking the item that allows you to register in the list of automatically launched programs when you turn on Windows.
Therefore, in order to avoid having to manually remove startup, it is extremely important to carefully read all the information during software installation.
Task Manager
Right-click the Windows Start icon in the lower left corner of the screen. Next, a window will appear where you need to select “Task Manager”.
There is also a second way to quickly launch this Windows partition. Find the left “Ctrl” button on the keyboard, “Shift” will be located just above, and “Esc” at the very top - press these three buttons simultaneously.
Go to the “Startup” tab. Let me show you with an example what exactly needs to be disabled or not, so that you understand.
- Adobe Reader and Acrobat – we definitely turn it off, I rarely use this program.
- Amigo - disable.
- AvLaunch – launches the antivirus, leave it.
- CCleaner – runs once a month, so we disable it. Plus, this program periodically scans and slows down the system.
- Everything else is also cut down.
Why do programs autoload at all? In theory, this is only necessary so that the application starts a little faster. And no one is interested in the fact that it clogs the memory. As you can see, many software additionally load the system in the background, which will negatively affect the performance of the computer.
It is recommended to disable everything except the antivirus program and sound card driver. NVIDIA and AMD are a regular panel for the video mode of your card, this is not a driver, so you can safely disable them.
To deactivate, right-click on the selected program and select “Disable”. For the changes to take effect, you need to restart your computer.
There is another way to disable the software - go to “Start” - “Settings”. Click on the "Applications" section.
Next, go to “Startup”. Everything is simple here - we switch the slider to “Off” mode for unnecessary applications.
Task Scheduler
To avoid searching for this service for a long time, simply open the main Start menu and enter the name of the service in the search bar.
To open the menu, click on the first folder “Task Scheduler Library”.
- To add an application to automatic launch, click “Create task”
- In the first tab, enter a name - you can name it whatever you like.
- In the second tab, click on the “Create” button. After that, select “At startup”. Click "OK".
- In the third tab, click “Create” and add the path to the file to be launched (exe).
- At the very end, click “OK”.