- Complete and partial removal of programs - what is the difference?
- Manual removal of programs
- Uninstalling programs using the Windows uninstaller
- Completely uninstalling a program manually
- Complete removal of the program using special utilities
PC users often need to uninstall programs.
Having a large number of applications (especially those that are not used) can lead to reduced disk space. For the same reason, a decrease in computer performance may occur. Removing unused programs can be done in several ways - manually, using a system uninstaller, or third-party utilities specifically designed to perform such tasks.
Complete and partial removal of programs - what is the difference?
Complete and partial removal of programs must be distinguished.
- When a program is partially uninstalled, files generated during operation and/or system settings made by the application being removed remain on the computer’s hard drive. Most often, entries in the system registry remain untouched and automatically turn into garbage, because. they are no longer used by the program.
- Complete (clean) removal of a program is a process that involves not only deleting the main files and folders of the program, but also all traces of its operation, including remaining temporary data and entries in the system registry.
If there is a question about uninstalling the program, it is recommended to choose the second option - complete uninstallation. This operation can be performed either manually or using specialized utilities. Let's consider both methods.
Method 1: Options Menu
Now in Windows 10, almost all system actions are carried out through the Settings menu. The developers have transferred all the necessary options and tools into it so that users can quickly find the required sections and perform the appropriate manipulations. This also applies to deleting programs, and you can open the category where their list is displayed as follows.
- Go to “Start” and click on the gear button there to get to “Settings”.
- In the window that opens, click on the “Applications” line.
- Now you can see the full list of both third-party and standard applications.
- To open detailed information, click on the program line. There will be a “Delete” button, which is responsible for calling the proprietary uninstaller.
We will not touch on the deletion process itself, since this is done by simply following the instructions displayed in the window and almost always this is done using approximately the same algorithm, so let's move on to analyzing the following methods.
Manual removal of programs
When manually uninstalling, you will first need to uninstall the application using one of the standard methods. This can be done either using the program’s uninstaller file or using the Windows system uninstaller.
Everything is quite simple here. You need to go to the folder where the program is installed, and then find and run the uninstallation file. It is usually referred to as "Uninstall.exe" or "Uninst.exe", although other options are possible. Let's say there is such a file in the application installation folder. All that remains is to find it and run it:
1. Open the system drive (usually “Local Disk C:”), then go to “Program Files” and go to the folder bearing the name of the program. This folder may be named after the company that developed the application.
2. In the case of 64-bit Windows operating systems, the “Program Files (x86)” folder will also be present on the system local disk. Go to it if the folder of the application you are uninstalling is missing in “Program Files”.
3. The uninstaller file can be located directly in the root application installation folder or in one of the subfolders.
4. Find the required file and run it, after which the program uninstallation window will appear on the screen - follow the instructions.
5. You can also go to the program installation folder in another way:
- Switch to your desktop.
- Right-click on the shortcut of the program to be removed, then select “File Location”.
6. The program installation folder will be opened in Windows Explorer.
7. Find and run the uninstaller file. If for some reason you cannot find the uninstaller file, proceed to the next section.
What programs cannot be removed from your computer
The main thing in this process is not to get carried away, because you can erase something truly important. There is a list of folders that should not be affected by the complete removal of programs. Some data is responsible for the operation of the entire operating system and overwriting it will lead to the computer not working. You cannot delete anything from the following folders:
- ProgramData – if you don’t know what the folder is responsible for, then you shouldn’t erase anything from it;
- Windows is the main folder of the OS, all components of the system are located here;
- Program Files – installed software, only if you understand what the folder is responsible for can it be erased;
- Users – user data;
- Boot – system boot files.
Uninstalling programs using the Windows uninstaller
Everything is a little simpler here:
1. Press the “Win + R” keys on your keyboard.
2. In the “Run” window that opens, enter the command “control” (without quotes) and click “OK”.
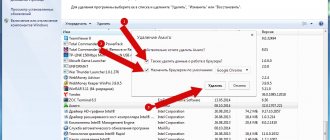
3. The “Control Panel” window will appear on the screen. Find the "Programs" item and open it.
4. Next, click on the “Programs and Features” item.
5. A list with all programs installed on the computer will be displayed on the screen. Find the name of the application you want to remove, right-click on it and select “Uninstall.”
6. The last action will launch the application uninstaller file, wherever it is located. Next, follow the onscreen instructions.
Thus, a standard uninstallation of the application was performed. Now all that remains is to clear the system of traces of his presence on the computer.
What to do if the program is not uninstalled
Sometimes users may encounter a situation where a file or folder that cannot be deleted appears on their PC. In this case, you will need special applications that remove the ban. Utilities for unlocking files LockHunter or Unlocker are considered popular. These options help you remove the lock from the desired element, which gives you the message “The file cannot be deleted.” Instructions on how to remove an uninstallable program:
- Download, install Unlocker, it will immediately appear in the OS context menu so that you don’t have to look for it.
- Right-click on the document that voluntarily does not want to go into the trash.
- In the window that appears, click on “Delete” and click “Ok”.
LockHunter works on the same principle. When you install it, when you right-click on any document, there will be a new line in the menu “What is locking this file?”. When you activate the item, a note will appear in which the path to the document and the processes that prevent it from being erased will be written. To get rid of a document, you just need to click on the “Delete it!” option.
Completely uninstalling a program manually
First of all, go to the “Program Files” or “Program Files (x86)” folder. Often, during a standard deletion, folders that belonged to the deleted application remain in these directories. If there are any, just remove them as usual. A Windows Administrator account is required to perform this and most subsequent operations.
Next, we will deal with deleting files and folders generated by the program, and at the same time manually cleaning the system registry, because these processes are in some way interconnected.
1. First you need to launch the system registry editor. Press "Win + R" and then type "regedit" into the Run window. Click "OK" to launch the editor.
2. The Windows Registry Editor stores various system parameters and any applications that have been launched at least once on this computer. Our task is to find and delete records that belonged to the remote program.
3. While in the Registry Editor, press the key combination “CTRL + F” or at the top of the window open the “Edit” tab, and then select “Find”. A small “Search” window will open.
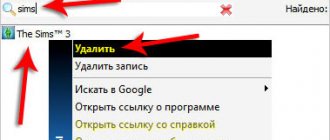
4. In the “Find” field, you need to enter the name of the remote program, and then click on the “Find Next” button. For example, we will search for records related to the Opera Neon program.
5. The search process may take some time. As soon as the editor detects a section, parameter or knowledge of a parameter in which the “Opera Neon” entry is present, the corresponding element in the registry tree will be automatically highlighted. In our case, the program detected a string parameter whose name and/or value contains the searched phrase “Opera Neon”.
6. Right-click on the detected parameter, select “Delete” and click “OK” to confirm the action.
7. In most cases, the same program owns several entries in the Windows registry. After the parameter has been deleted, press the “F3” button. The editor will search for the next entry belonging to the program being deleted. Delete the found entries until there are none left.
Pay attention to the left side of the Registry Editor window. Its sections are listed here. Quite often there is only one parameter in one section. In this case, you can delete this entire section (if it contains a parameter that belongs to the program being deleted). In our case, the registry found a string parameter located in the “965c7a6_0” section.
To delete a section, right-click on it and select “Delete”.
Clear the entire registry of unnecessary entries, after which the removal of the program can be considered completed cleanly.
How to remove an unnecessary program from your computer
Various options have been described above on how to get rid of unused applications. You yourself can choose any of the methods to remove unnecessary programs from your computer. The uninstallation option via the Start button is the simplest, but there are also more advanced utilities that open up more options for experienced users. You can not only remove unnecessary programs from your computer, but also work with the registry. Keep in mind that you can only perform these actions if you understand what you are doing. Otherwise, there is a risk of erasing the necessary documents.
Free Uninstall tool
This is a lightweight, simple utility that is distributed freely on the Internet. The Uninstall tool can be used without purchasing a license. During installation, in addition to the main folder, hidden ones appear in other places on the PC, and registry entries are added. Removing them manually becomes difficult because the search does not always find them by name. The utility in question will help you in this matter; it detects all the “tails” that were created during installation. You need to do the following:
- Install the software.
- The application will launch and the “Uninstaller” menu will open in front of you in the first window.
- Select the unnecessary application from the list in the window.
- Information about the file will appear, it is possible to force it to be deleted.
How to remove a program using CCleaner
This is a powerful tool for working with the registry, all installed applications, and games. Cleaning your computer with CCleaner can be done automatically or manually. The utility is capable of collecting data from the entire PC and offering to erase specific files. Externally, the main program window is similar to a standard Windows tool. To get rid of unwanted documents, you must do the following:
- Install and open the application.
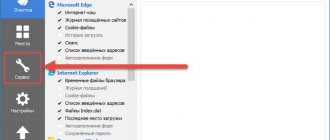
- Select the "Service" tab.
- The first item in the menu will be “Delete”; you need to select the required line in the list.
- Click on the “Uninstall” button, the software itself will perform all the necessary actions and guide the user through the necessary steps.
- Please note that you need to click on the button indicated above, and not on “Delete”. This feature erases data from the registry, not the application itself.
- Then go to the “Registry” window and start scanning.
- Clear all unnecessary entries, which Ccleaner finds.
Revo uninstaller
A powerful utility that simplifies the process of erasing data. With its help, you can solve all the problems that may arise in this process. Revo uninstaller programs are removed like this:
- Launch the software, find in the main menu the icon of the document you want to erase. Right-click on the line and select “Delete”.
- First, a preliminary analysis will take place, then the uninstaller will be launched.
- The uninstallation wizard will guide you through several steps, follow the necessary steps by selecting the desired uninstallation options.
- There might be some “tails” left, so go to the “Advanced” section and run a scan.
- The report must include all registry entries after the deletion took place.
- Click on “Select All” and then again on “Delete”. You don’t have to worry about the performance of Windows; only unnecessary data is removed from the registry.
- Do the same in the “Remaining files...” section.
- How to take folic acid when planning pregnancy for women and men
- Regenerating ointment with antibiotic and silver for rapid wound healing
- Salad with green peas: recipes with photos
Uninstalling programs via Windows PowerShell - method 7
Similar to the command line, you can remove an unnecessary program using the Windows PowerShell system tool. Pre-installed Windows 10 applications are removed using other commands.
You need to do the following:
- Run Windows PowerShell as an administrator.
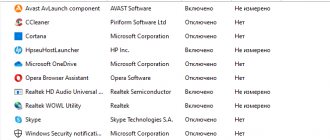
- In the Administrator: Windows PowerShell window, run the command to display a list of installed programs:
Get-WmiObject Win32_Product | ft name,version,vendor,packagename
- To remove the program, run the command:
(Get-WmiObject Win32_Product -Filter "Name = 'XXX'").Uninstall()
In this command: "XXX" is the name of the program in the "name" column. Replace "XXX" with the name of the program you want to remove.
Why Windows 10 blocks installation of programs
Microsoft's software installation block was created in response to numerous complaints related to previous versions of Windows. Millions of users remember SMS ransomware in Windows XP, masqueraders as the explorer.exe system process in Windows Vista and Windows 7, keyloggers and other nasty things that lead to freezing or blocking of the Control Panel and Task Manager.
The Windows Store, where you can purchase paid and download free applications that have been comprehensively tested by Microsoft (as the AppStore service does for the iPhone or MacBook), was then created to separate users who do not yet know everything about Internet security and cybercrime. from threats to their computer systems. So, after downloading the popular uTorrent downloader, you will find that Windows 10 will refuse to install it. The same applies to MediaGet, Download Master and other applications that clog up the disk with semi-legal advertising, fakes and pornographic materials.
Windows 10 refuses to install uTorrent because the author or developer could not be verified
Ways to disable protection against unverified programs
This protection can and should be disabled when you are confident in the security of the program.
It is based on the UAC component, which monitors accounts and digital signatures of installed programs. Anonymization (removing signatures, certificates and licenses from a program) is often a criminal offense. Fortunately, protection can be temporarily disabled from Windows settings itself without resorting to dangerous actions.
Changing the Account Control Level
Do the following:
- Follow the path: “Start” - “Control Panel” - “User Accounts” - “Change User Account Control Settings.”
Click "Change User Account Control Settings" to change the controls
- Move the control level control to the down position. Close the window by clicking "OK".
Move the control level control to the down position
Launching application installation from the Command Line
If you still cannot start the installation of the program you like, use the “Command Line”:
- Launch the Command Prompt application with administrator rights.
It is recommended to always run Command Prompt with administrator rights
- Enter the command “cd C:\Users\home-user\Downloads”, where “home-user” is the Windows username in this example.
- Launch your installer by entering, for example, utorrent.exe, where uTorrent is your program that conflicts with Windows 10 security.
Most likely, your problem will be solved.
Method 2: Control Panel
The next option is to use the Control Panel menu, which is familiar to all those users who started getting acquainted with the Windows operating systems even before the release of the latest version. There is a “Programs and Features” section, through which software was previously removed. Now the developers still have not removed it, which means that anyone can open it and start deleting it.
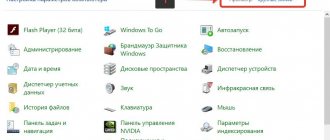
- Open “Start”, write the name of the “Control Panel” application there and launch it by clicking on the appropriate result from the list of matches.
- Here, find the “Programs and Features” section and click on the inscription to get into it.
- All that remains is to study the list of software, after which you can safely remove unnecessary components by double-clicking on the corresponding line.
The next three methods of today’s material will involve launching the “Programs and Features” menu. As for the “Applications” section, which can be accessed through Settings, at the current time Method 1 is the only way to open it.