TrustedInstaller.exe is a genuine application developed by Microsoft Incorporation. The service is often mistaken as a virus or malware because it uses a lot of disk and CPU resources. This process causes a sharp decline in the overall performance of the computer and also leads to several common errors.
TrustedInstaller.exe is an important service and part of the Windows Module Installer. It is designed to check for operating system updates. It allows you to install, change, and remove Windows updates and add-ons. The executable file is located in the C:\Window\servicing\ subfolder. If you disable the TrustedInstaller.exe process , installing/uninstalling Windows updates on your computer may fail.
Note: Because some viruses and malware masquerade as the TrustedInstaller.exe process, it is highly recommended that you carefully check the TrustedInstaller.exe service to ensure that it does not pose a threat to your computer.
TrustedInstaller - what is this service and how to disable it
With the release of the innovative Windows 7 operating system back in 2009, many users, accustomed to reign supreme in their personal and mobile computers, were unpleasantly surprised by a strict controller who periodically slapped hands for attempts to delete system folders and files, and appeared in the task manager until then. an unprecedented TrustedInstaller process, reliably protected from attacks by the system itself. So, what is this “beast” and what difficulties does it cause?
What is the reason for the high memory usage of Trustedinstaller.exe?
Are you wondering why Trustedinstaller.exe is using so much memory on your computer? While scanning for updates on your PC, this program works with the integrated Windows Update Service.
It checks for new updates. When updating, the trusted installer process uses a lot of resources on your CPU. This results in high memory usage.
This is normal because new updates are checked even after the update scan is completed. This helps ensure that your computer is up to date for all downloads as new updates become available.
What is the Windows Modules Installer Worker process and what is it responsible for?
By and large, when working with the Windows 10 software platform, quite often a situation may arise when the Windows Modules Installer Worker loads both software and hardware platforms. This process, which is responsible for updating Windows, is launched by the TrustedInstaller service. As for the properties of the Windows Modules Installer Worker process, its executable file is TiWorker.exe. It is impossible to delete it; the software platform will not allow this. Moreover, if you try to uninstall using a third-party application, you will inevitably encounter problems with Windows.
Situation 1
So, the user noticed that this particular procedure actually overloads the PC. That is, the task arises: Trustedinstaller - how to disable it?
This file process directly relates to such a procedure as automatic OS update.
If it is this that creates the problem, then there is an opportunity to deactivate it:
- Right-click on the “Start” icon.
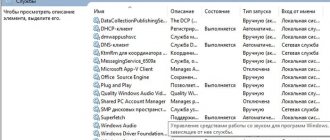
- Go to “services” through “control panel” and “administration”.
- In the list shown, find the center responsible for the Windows update procedure. The option for him is to stop.
- Slowly close the window and search for another line in it - background intelligent service. Do the same.
Save changes. After this, you need to simultaneously press three buttons on the keyboard: “Esc”, “Ctrl” and “Shift”. Activate the “Services” tab and finally stop the operation of this file-process.
Trustedinstaller process loads Windows 7 computer
Trustedinstaller is a subsystem of the Windows 7 updater, which is responsible for automatically searching for and downloading updates. Therefore, if there is a process of downloading and installing system patches, the activity of this process is justified and you just need to wait until everything is installed. In cases where there are no updates, Trustedinstaller activity is atypical and means there are problems that can be solved in several ways.
Method 1: Install update KB3172605
In one of the updates released in the summer of 2016, Microsoft developers made a mistake that led to the constant activity of the process in question. Fortunately, the fix was quickly released, so you can solve the problem by installing it.
- Follow the link above. After the page loads, scroll down to the block called “Method 2”. Below the paragraph with the text there is a table in which there are links to download the patch - the top two lines are responsible for Windows 7: the top one for the x86 version, and below it for the x64. To start downloading, click on the appropriate link.
Method 2: Clear the update cache
Also, the cause of problems may be an underloaded update that interferes with the normal installation process, causing the procedure to freeze, thereby loading the processor. The way out of the situation is to clear the update cache, which can be done using a third-party application, for example, CCleaner.
Method 3: Eliminate the virus threat
Often, unusual activity of the process in question indicates that the system is infected with virus software. If you suspect infection, it is better to thoroughly check your computer using one of the reliable methods.
Method 4: Disable automatic updates
In cases where installing the update from Method 1 did not help. and there is nothing similar to a virus in the system, you can try disabling OS update tools, thus stopping the problematic process.
Attention! Disabling updates reduces the security of your computer!
Conclusion
We've looked at the reasons why the Trustedinstaller process may be hogging the CPU on a Windows 7 computer, and we've also suggested ways to resolve the issue.
As you can see, none of the proposed methods require special knowledge or skills from the user. We are glad that we were able to help you solve the problem.
In addition to this article, there are 12,369 more instructions on the site. Add the Lumpics.ru website to your bookmarks (CTRL+D) and we will definitely be useful to you.
Thank the author and share the article on social networks.
Describe what didn't work for you. Our specialists will try to answer as quickly as possible.
Collection of notes for developers.
Categories
Archives
Improvement / modernization / correction of sites on OpenCart
On my new computer there is Windows 7 x64, and recently it started to slow down terribly, looking into the task manager, the unusual activity of the svchost.exe process was visible - this process was loading up memory and the processor, after a minute and a half the trustedinstaller.exe process appears, which also starts load the processor by 25%. The processes svchost.exe and trustedinstaller.exe begin to load the processor by 25-50% and load 1.5-2.5 GB of memory, because of this my computer began to slow down terribly.
After a bit of GOOGLE, it became clear that the issue was most likely an update issue; for many, svchost.exe loads the Windows 7 RAM while searching for updates, so I decided to simply disable the automatic search for updates.
- Go to the “ Control Panel ”, then find the “ Windows Update ” item, then “ Settings Don’t check for updates option and uncheck the “ Receive recommended updates in the same way... ” and “ Allow all users to install... ", click OK
- Next, we disable the update service - go to the “ Control Panel ”, then go to “ Administration ” then “ Services ”, in the services we search alphabetically for “ Update Center ” and go there. Select “Startup type: disabled ” and stop. Click the “ Apply ” button and voila!
With these actions we disabled updates and Windows stopped tormenting my computer with wild background downloads. CPU usage in rest mode 0-1% is quite normal!
Good luck! If there are other solutions to this problem, please leave a comment and we’ll discuss it together!
If trustedinstaller does not allow you to delete a folder
Many people have noticed that in the Windows directory on drive C there is no possibility of changing, deleting, or generally doing anything with folders and files.
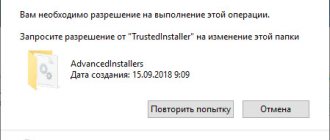
When trying to contact
for such documents, for example, to change the name, the system will issue the following message.
Let's consider what to do in this case, if you still need to edit such folders and files.
How to delete a folder occupied by trustedinstaller
Did a dialog box appear when you tried to delete a system folder?
You will need to become an owner
requiring folder deletion. To do this, regardless of the OS version used (7, 8, 10), you will need to do the following.
Right-click to open the context menu
, in which we are interested in the
Properties
.
Go to the Security
, and then
Advanced
.
Near the item Owner
(in other OS versions there may be a separate tab for this) Trustedinstaller has a button
Change
, click on it.
Go to the Additional
.
Where in Search we find the Administrators
.
In all dialog boxes that open, click OK
and
Apply
to confirm, the following message appears.
That is, you become the full owner of this folder or file.
But that's not all, on the Security
select
the Administrators group
you just added as the owner.
Here click Change
and give her
full access
, after which we agree to the warning that appears.
OK everywhere
- now you can easily delete the required folder.
However, we strongly recommend
that you perform removal only if you are completely confident in your actions, so as not to damage any very important system objects. Full responsibility now lies with the user himself - it is necessary to understand and be aware of his every action.
Setting permission on an element
You will need to do the same steps as described above to allow editing
a separate file in the Windows directory on drive C.
Purpose
This service was introduced as a virtual observer that has priorities over a human user, even with administrator status. Its direct task is to ensure that data important for the stable functioning of Windows cannot be damaged, deleted, or changed by user negligence or a malicious virus attack.
Based on WRP (Windows Resource Protection) technology, it “gently” hints that the great men of Microsoft know better what is best for mere mortals and strongly do not recommend disabling it, which means...
TrustedInstaller: what is this service and how to manage it
When working with system files, users may encounter a situation where TrustedInstaller does not allow deleting or editing files. Why such restrictions are needed by the system and how to obtain permission to manage components, read our material.
Why is this service needed?
Starting with Windows 7, Microsoft operating systems have learned to additionally protect themselves from viruses and the not always reasonable actions of their administrators. This process is carried out with the help of a special rights owner - TrustedInstaller. It is usually found near important system folders and files, and is created to prevent third-party programs and individuals from interfering with the operation of the computer. But if you, as a user, still need to make changes to file properties or delete something, and you have access to the computer’s administrator account, then you can overwrite the rights to yourself.
TrustedInstaller, as a protection service even from its own administrators, was not created by chance - after all, most often it is they who thoughtlessly introduce problems into the operation of the system. Therefore, before you change the rights to edit components, think about the consequences. If you are confident in the correctness of your actions, and the system displays a message that you need to “request permission from TrustedInstaller to change,” then follow our tips and you will receive full editing rights.
How to disable and enable TrustedInstaller for Windows 7
To disable the TrustedInstaller service:
- Hover your cursor over the folder or file you want to edit or delete and open the object's properties via the right mouse navigation menu. Next, on the “Security” tab, click on the “Advanced” button.
- A new dialog box will open where we must open the “Owner” tab and press the “Edit” key.
- Another window will pop up in front of you for additional security options. Here we have to select the administrator account. If you need to change control rights not for one file, but for an entire folder with files, then do not forget to check the box next to the phrase “replacing owners of subcontainers and objects.” In this case, the changes will affect all files in the folder.
- By clicking on the “Ok” button, close the last two dialog boxes and remain on the “Security” tab in the “Properties...” window. In the "Groups or Users" section, single-click the "Administrators..." line and click the "Edit" button.
- A new window will open where you will need to place permission marks for all lines.
- Apply all changes and close the dialog boxes with the "OK" button. You now have permission to change or delete system files.
But for system security, immediately after making changes, you need to return the rights of the owner of TrustedInstaller. For this:
- Open “Properties” - “Security” - “Advanced” - “Owner” - “Edit” again.
- In a new window, open the menu of the “Other users and groups” button and in the field for entering names of selected objects, write “NT SERVICETrustedInstaller” and apply the changes by closing the window with the “OK” button.
- In the previous window, also select the TrustedInstaller rights owner and check the box to apply properties to all child objects.
- After this, close all windows by clicking on the “OK” button - the security system will now again protect your files from unauthorized deletions.
Permissions to edit and delete files and folders
To be able to manage the contents of the system at will and delete a folder protected by Trustedinstaller, you will need to obtain individual permission from the computer. For this:
- Go to shortcut properties.
- Select the “Security” tab.
- Click "Advanced".
Your name (PC administrator name) must be in the permissions list. If you haven’t found it, click “Add” and add yourself to this list. In some cases, you will need to click “Change” to select the administrator icon before doing this, in others, this action will not be required. Next, in the window that opens, you need to select “Select a subject.” Here again, try to find the user to set full access rights for him and agree with the actions (Figure 4).
Figure 4. Setting full user rights
Go back to the Advanced Security Settings window and select Replace all child object permission entries with those inherited from this object. Again, agree with the actions taken and enjoy the result. We also recommend using the Revo Uninstaller application to remove various files from your computer.
After completing these steps, you will be able to delete and change the contents of the system, as well as rename them at will, without receiving annoying messages about closed access. If this still does not help, then go to properties and uncheck the box next to “Read Only”.
General information and characteristics about trustedinstaller
Basically, the entire load of this “process” on the PC occurs at the time of installing any updates, but most often no problems arise in working with the computer itself during these “operations”. Problems for the user in working with a personal computer may arise, and most likely will arise, if your system is fully loaded. Let's consider the reasons why these “problems” can and most often occur:
- Perhaps some kind of failure occurred during the installation of updates necessary for normal operation of the PC;
- It is likely that due to an unstable Internet (low download speed or constant signal failures), the installer was downloaded to your PC incorrectly;
- If you have downloaded a pirated version of Windows, then it is quite possible that the tool, which is responsible for updating your computer’s operating system automatically, for some reason fails during its operation;
- The same failures can also occur due to problems with the system registry of your personal computer. The reason for these “problems,” most often, is that all kinds of “garbage” accumulates in this registry, which over time can “result” in failures in the normal functioning of various processes on your PC;
- There is also an option that a virus located on your personal computer “pretends” to be this process or the launch of this process, thereby disrupting the correct operation of the system. To resolve this “situation”, you will have to install special software on your PC that fights viruses. You will also need to do a “cleaning” of your computer.
But there are some good tips that can help you deal with this recurring reboot problem:
- You can just wait a while, because, most likely, the process, performing complex and large work with downloading and installing updates, has simply frozen. Sometimes, in cases where the processor is doing too much work, it may freeze for an hour or a certain number of hours, but then the problem will resolve itself, without your intervention;
- You can also simply restart your computer. There is a possibility that the process simply, for some reason, cannot complete the installation of the necessary updates, so you will need to restart the PC. But if trustedinstaller.exe does not want to start working, that is, it is frozen, as they say, “tightly”, you will need to restart the computer or turn off the ongoing process through “Services”.
Best practices for resolving TrustedInstaller issues
A clean and tidy computer is the key requirement for avoiding problems with TrustedInstaller. This means running a scan for malware, cleaning your hard drive using 1cleanmgr and 2sfc /scannow, 3uninstalling programs that you no longer need, checking for Autostart programs (using 4msconfig) and enabling Windows' 5Automatic Update. Always remember to perform periodic backups, or at least to set restore points.
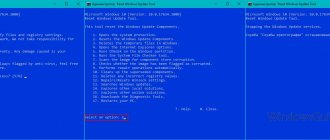
Should you experience an actual problem, try to recall the last thing you did, or the last thing you installed before the problem appeared for the first time. Use the 6resmon command to identify the processes that are causing your problem. Even for serious problems, rather than reinstalling Windows, you are better off repairing of your installation or, for Windows 8 and later versions, executing the 7DISM.exe /Online /Cleanup-image /Restorehealth command. This allows you to repair the operating system without losing data.
To help you analyze the TrustedInstaller.exe process on your computer, the following programs have proven to be helpful: ASecurity Task Manager displays all running Windows tasks, including embedded hidden processes, such as keyboard and browser monitoring or Autostart entries. A unique security risk rating indicates the likelihood of the process being potential spyware, malware or a Trojan. detects and removes sleeping spyware, adware, Trojans, keyloggers, malware and trackers from your hard drive.
Partial way to disable - change the owner
In most cases, I recommend using this method. With its help, you can disable only the notification from Trustedinstaller for specific files, while other data remains protected. Fundamentally, the process of changing ownership is no different in Windows 10 and 7. Therefore, I will consider it using a dozen examples.
Detailed instructions:
- Right-click on the object and open properties.
- Move to the security section and click the “Advanced” button.
- In the “Owner” line, select “Change”.
- Click “Advanced” again.
- Click on the “Search” button, select the current user in the list that appears, most often it is “User” and click “OK”.
- Click "Ok".
- Select the item to change the owner of subcontainers and click “Ok”. This option is present only when changing the owner of a folder; individual objects do not have it.
- Now click “Change”.
- Select a user from the list, set full access by checking the required boxes and click “Ok”.
- Click “Ok” again.
You can also use programs like TakeOwnershipEx, which allow you to change ownership in a few clicks.
We’ve figured out how to disable Trustedinstaller when editing files and directories, now let’s touch on one more point.
Other solutions
There are several other methods that may be useful to you if all else fails.
- You can completely remove trustedinstaller.exe from Windows. To do this, open the task manager (combination “Ctrl+Shift+Esc”), go to the “Processes” or “Details” tab, find the application you need, right-click on it and select the “File location” option "
Remember the path to it, it is displayed in the top line, usually it is “C:Windowsservicing”. Then boot into safe mode or from LiveCD, go to the specified path, select and delete the required object. It can be removed from Windows 7 in a similar way. - Check the system for errors. To do this, right-click on the local Windows drive and go to “Properties”. Go to the “Service” section and click on the “Check” button.
Check the boxes below and start the verification process. Most likely you will need to add a scan to the schedule; to do this, click on the appropriate button and restart your computer. After which the scanning will begin automatically. Following this, run the command sfc /scannow in the command prompt. - Disk cleaning and correcting incorrect registry entries. For these purposes, I recommend using CCleaner or Reg Organizer.