Windows 10 differs in many aspects from previous Microsoft operating systems, including the location of system files, as well as the presence and access to special features and functionality of the OS. The Update Center has also undergone certain changes, which will be discussed below. However, setting up Windows 10 System Update itself has not become more complicated, but on the contrary, it has become simpler and more convenient.
Windows 10 Update
- a program with which the operating system is updated to more current versions, and also downloads updates for related programs. Without it, the operating system on your computer will quickly lose its relevance and will not have many additional features that appear over time.
How to set up Update Center
The automatic operating system update process is configurable and can be disabled in several ways. The methods below allow you to quickly do this without the need to install additional utilities.
Using the built-in Services program
Using the Registry Editor
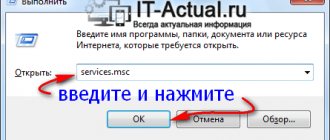
- Open the Registry Editor using the Win + R key combination.
- Type regedit command
- There, go to the “ Auto Update
” folder, located along the path “
Hkey_Local_Machine
” → “
Software
” → “
Microsoft
” → “
Windows
” → “
CurrentVersion
” → “
WindowsUpdate
”. - In the menu that appears, double-click on the “ AUOption
” item. After that, set it to 1. This means that Update Center will stop checking for new versions of Windows programs. If you want to enable updates again, just change the value to 0.
It is possible that such a parameter will not exist, then you need to write it down yourself. Just right-click on a section of the field and select to create a separate parameter with the DWORD type. Name it the same as indicated here.
In the Advanced Options menu
Go to the Update Center menu according to the guide above. Select Advanced Options
" and go to the "
Notify about reboot
" window.
There, select “ Delay updates
”.
It is worth saying that with this method of disabling, updates will still be installed.
You can enable automatic updates from here.
Executing the script
A universal tool for solving update problems for both Windows 10 and Windows 8.1 and 7. Solves 8 out of 10 problems related to the update center. There are 2 options for using the script:
Download the script from the Microsoft forum
Go to Microsoft's Technet download page or download the archive from the direct link. Unpack the archive and run the ResetWUEng script as Administrator.
The first page warns about possible consequences (the script can not only reset the CO), to agree, press the “ Y” . There will be 17 actions to choose from, but we only need one, under the number 2. Press 2 and the Enter key. The running processes will be displayed on the screen and upon completion a window with 17 options will appear. Select 17 to reboot and press Enter.
Note : Some antiviruses may complain about this script, but by opening it with Notepad, you can make sure that there is nothing suspicious in its contents.
Creating a script yourself
Making a script to reset Windows Update is quite simple; first we need to open Notepad (notepad.exe) and copy this text there:
Then save this file. When saving, specify File type: All files , and in the title indicate “title” . bat (for example, wu.bat), so that this file is executable and the script can be reproduced.
After saving, open the file as Administrator and wait until the procedure is completed, then restart the computer.
We hope that this instruction was useful to you and helped you resolve the Windows Update issue.
Recommended publications
All users have experienced that downloading or unpacking large updates takes too long. Sometimes, without waiting for the end, the device...
February 13 is Windows 10 Update Tuesday. All current versions of Windows 10 received cumulative updates that fixed bugs and…
When updating the Windows 10 operating system, error 0x80070013 may occur. The error is accompanied by the description: “There were some problems installing the update...
Add a comment Cancel reply
This site uses Akismet to reduce spam. Find out how your comment data is processed.
Source
Possible problems
Sometimes it may happen that a previously working update center stops functioning for unknown reasons. Below are the most common problems with this program and solutions if suddenly the update service does not work.
Solving problems using the Troubleshooting Manager in Windows 10
Modern Windows operating systems have a built-in way to deal with application failures and problems. You can also use it to deal with problems with Update Center not working.
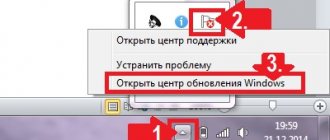
- Go to the Start
. - In the search bar, write “ Troubleshooting
”. - Double-click on the icon that appears. A window will open with the “ System and Security
” menu.
There, at the very bottom, click on the “ Troubleshooting
” item. - In the menu that appears, click “ Advanced
”, check the box “
Accept fixes automatically
” and confirm running as administrator. - After that, click Next and wait. After some time, the repair process will be completed and the Update Center
will resume operation.
Error "Service Registration is Missing or Corrupt"
This problem occurs if a proxy server is registered on your computer without permission to update. There are two ways out of this situation: do not use a proxy for updates, or set the permission in the system itself.
Restarting Update in Windows 10
In the operation of this program, situations sometimes arise when the error is not corrected by the Troubleshooting Center, as well as by other methods.
Thus, the most effective method of solving the problem is to reset the Update Center system and restore it to default.
To do this you need to do the following:
Upon completion of this procedure, the Update Center will be reinstalled along with all related services. This way, the system will stop crashing and start updating.
In general, this is all that can be said about Update Center in Windows 10. Its work, of course, is somewhat different from what it was before, however, it still performs the same functions as before the new OS from Microsoft. In addition, in the tenth version of Windows it is located in a different place, which changes the procedure for setting it up and debugging it.
The intricacies of working with Windows 10
Now the Pro edition user is left without a choice, since it is now possible to postpone the inclusion of the update only for a while. In other words, now the new system installs everything automatically.
There are some points that allow you to somewhat block this process. Read how to install Windows 10 update manually. There are several ways for Windows to manage the update center:
1) Through the section called “additional parameters”.
You can configure the update process in Windows 10 anniversary update using the section called “advanced settings”. This method will prevent the computer from restarting automatically, but you will not be able to block updates with this method.
Sequencing:
- We open the application with the name “settings” and there we go to the update topic and the security topic, and only then to the Windows 10 anniversary update center itself.
- Let's move on to "advanced options".
- Now here we select “notify...”. This way you can protect Windows 10 anniversary update from automatic reboot immediately after downloading and after current updates are installed.
- Next, you just need to enable the option called “When updating Windows, provide updates...t.”
- Then you should activate the option called “defer updates”. Once you have enabled this option, updates will no longer be able to install or download for approximately several days or even months. The only exceptions here will be those updates that are responsible for its safe operation from the system.
- All that remains is to select the link “choose how and when to receive ...” and then immediately switch the special switch for “update from several places” to its “off” state. This action will definitely help in saving Internet traffic, since this function is done according to the principles of P2P technology or according to the principle of torrent clients.
2) By disabling its automatic loading from the drivers of such devices.
The new system also allows us not to start automatically downloading it and also installing drivers. See how to enable this:
- Using the combination, we quickly open the Execute dialog.
How to open a dialogue follow the video.
- Now in the window we enter this special command rundll32 newdev.dll,DeviceInternetSettingUi and now before your eyes is the “installation parameters...” window.
- Now in this window we select “no, provide the option to choose” and only after that we proceed to the choice “never install drivers from the Center ...”.
- We fix current changes through saving.
After such a connected action, the system will not install or search for drivers from the computer, and will only access the Update Center system if a specific driver is not found on the hard drive.
3) Using Show or hide updates, a special tool to hide updates.
After running the tool, you can free the system from unwanted updates. Here is the sequence of actions that will be useful for this:
- Download a tool for this called Show or hide updates.
Video on how to download Show or hide updates.
- Now we launch the program and then click next to start scanning.
- Now you can click “Hide updates”.
- Another screen will open in front of you, and now you can select here through the list the updates that you plan to hide, and after your selection in the list, you will easily succeed. After making the wrong choice, you can always return everything to its place and simply uncheck the options required for updating. It’s just that instead of clicking “Hide updates”, you will then need to select the “Show hidden updates” option.
4) As a limit, we will now set up a connection to the Wi-Fi connection.
Another way helps in Windows 10 to install and download updates strictly not automatically, but under some control of the user himself. For this condition, we simply set up the Internet for this connection as a metered one.
Here's what the user needs to do to do this:
- Let’s first open “Settings” and then open “Network and Internet”.
- Then we open the name “additional parameters” and here it is worth switching the special slider to the “set as metered connection” mode and simply put it in the “on” position.
And this will be enough to prevent our “ten” from carrying out endless automatic downloads whenever it wants. As long as your Internet connection is listed as limited, she will not have the right to do this.
Watch the video on how to make a wired Internet connection metered.
5) Setting up the registry or group policy.
You can move from the simplest methods to more advanced ones. Even though Microsoft was able to remove all management features by downloading updates, the settings through the Registry Editor remained working as before. You can enable either notifications about current downloads, or automatic downloads and also notifications about installation, and there is also a chance to enable the installation of everything strictly according to schedule. You should also know that since changes occurred in the update center itself, the registry policy settings do not immediately take effect. You will see this and note that the changes do not occur immediately and even after rebooting the device.
After all, you need to click the “check for updates” button through the update center.
After this, the system will almost immediately begin to accept current changes. Only then will you be able to notice the changes after you open the advanced options and see that the new settings have been applied successfully. Here's how to enable updates the easy way.
Video about how to work with the registry.
There are currently three different issues that Windows 10 users are facing when installing updates. Firstly, there is an error downloading the update or the download process is frozen. Secondly, there are problems during the installation of the update, and finally, the system crashes with BSOD after a reboot. Below are several possible troubleshooting solutions.
Fixing Windows 10 update download problem
If the cumulative update does not download, try the following steps:
If a cumulative update freezes during download or the installation fails, something has gone wrong with the update files. After the folder containing the update files is cleared, Windows Update will try to download the update components again. Go to the following location:
C:\Windows\SoftwareDistribution\Download
Delete all files/folders, but do not delete the Download folder itself. Select all files and folders using CTRL + A and press Delete key to delete. Restart your computer and run the update process again.
If the cumulative update freezes during download, try the following solution:
- Enter Services
- Scroll to the Delivery Optimization
. - Right-click on the service and select Properties.
- Change the “Startup Type” to “Manual”.
- Restart your computer.
- If Windows 10 update still gets stuck, change the startup type to Automatic (Delayed Start).
Stop the Windows Update service
If stopping the Delivery Optimization service does not solve the problem, also try stopping the Windows Update service. If your Windows 10 update is stuck at the “Initializing...” stage, try the following solution:
- Click on the Start menu icon.
- Enter Services
and launch the desktop application of the same name. - Scroll to Windows Update
. - Right-click on the service and select Stop.
- Restart your computer.
- Check for new updates.
- The update should proceed as normal.
Windows Update reset script
Completely reset the Windows Update client settings. It has been tested on Windows 7, 8, 10 and Server 2012 R2. The script will configure services and registry keys related to Windows Update, restoring the default settings. It will also clean up files related to Windows Update.
Fixing Windows 10 update installation problem
In some cases, you may encounter a problem while installing the update. If the update installation is stuck at some point, try the next solution.
If your computer is frozen at the stage, then follow the instructions below.
- While holding the power button, turn off the machine.
- Restart your computer and boot into Safe Mode.
- Sign in to your account (if required).
- Make sure all virus scanners are disabled before continuing.
- In the Start menu, type Recovery
and select the corresponding desktop application. - Click Run System Restore
. - Select an earlier restore point, and then click Next.
- Follow the instructions to begin system recovery.
- Wait while your computer completes the system restore process.
- Regardless of whether the restore is successful or fails, you will most likely get rid of the error stuck at the moment “Preparing to set up Windows. Don't turn off your computer."
- Sign in to your account if required.
- Disable virus scanners before continuing.
- Start the Windows update process.
- The update should now install without problems.
Some users may encounter a stop error that causes a Blue Screen of Death (BSOD) to be displayed during a system reboot.
If you encounter a BSOD crash when upgrading Windows 10, check out this article:
Other Windows 10 update problems
After installing Windows 10 updates, you may encounter some problems such as internet connection errors.
To resolve these issues, you need to run the following commands in the Command Prompt (cmd.exe). In the search box on the taskbar, type Command Prompt
, press and hold (or right-click) Command Prompt and select Run as Administrator. After opening the command line, enter the following commands one by one:
netsh winsock reset catalog
netsh int ipv4 reset reset.log
If you still encounter the “No Internet Connection” issue, please update your computer's IP address. To do this, open a command prompt (Win + R, enter cmd.exe
and press Enter) and enter the following command:
ipconfig /renew
Disabling Windows 10 updates and drivers
Sometimes you may need to disable the installation of Windows 10 updates on your computer. Windows 10 Pro users can defer updates for a certain period of time, but Windows 10 Home users do not have this option.
Microsoft has provided a separate "Show or Hide Updates" tool to disable cumulative updates or even drivers.
DISM commands to check for problems with Windows 10
You can use the official DISM commands to restore a Windows image to fix any problem with your updates. Before you start, it's a good idea to take a full system backup or create a system restore point in case something goes wrong.
Using the CheckHealth option in DISM
Team /CheckHealth
DISM allows you to detect potential corruption. This command is used only to find damage, but does not perform any repair operations.
Command line
, right-click on the link that appears and select "Run as Administrator" because running DISM requires device administrator rights.
DISM /Online /Cleanup-Image /CheckHealth
Using
Option in DISM
Command / ScanHealth
DISM allows you to scan your Windows image for any damage. Unlike /CheckHealth, the /ScanHealth check can take up to 10 minutes.
To run this command follow these steps:
1. Search for Start menu Command Prompt
2. In the Command Prompt, type the following command and press Enter:
DISM /Online /Cleanup-Image /ScanHealth
Using
Option in DISM
Command /RestoreHealth
DISM allows you to automatically repair damaged Windows images. Unlike /ScanHealth, the /RestoreHealth scan can take up to 10 minutes.
To run this command follow these steps:
1. Search for Start menu Command Prompt
, right-click on the link that appears and select “Run as administrator.”
2. In the Command Prompt, type the following command and press Enter:
DISM /Online /Cleanup-Image /RestoreHealth
Note: When running /RestoreHealth or /ScanHealth, you may notice the procedure hangs between 20% and 40% - this is completely normal behavior.
Found a typo? Press Ctrl + Enter
Update Center is a built-in Windows 10 service that is responsible for installing system updates and drivers for third-party devices. If it stops working, the computer will not receive any updates or drivers. You can fix it manually without reinstalling the system, or even download updates from another source.
Video on the topic
In Windows 10, unfortunately, the Update Service Center is significantly different from previous modifications of Microsoft operating systems. It has additional features, but does not have the usual functions that the service had in Windows 7 and 8.1.
Often, users in the new “Ten”, even after a painstaking search, cannot find the location of the updated upgrade center in Windows 10. In particular, Windows Update is now almost devoid of the ability to customize its settings and cannot be launched from its usual place in the Control Panel. Basically, only owners of the Professional modification of the OS can make adjustments.
Users of other versions are forced to wait for unexpected Windows 10 updates, risking losing the results of their unsaved work during unplanned computer reboots. It is strange that Microsoft specialists do not realize that people often use computers with their system to perform important and urgent work, and not just for entertainment purposes.
Conclusion
The classic Update Center in the new version of the OS is missing in the control panel. It's located in the Settings app. You can restore the standard utility only in earlier builds of Windows 10. If you encounter problems downloading packages for updating your PC, reset all Update Center settings.
Windows Update is the main tool for ensuring the security of the operating system. Essentially, this is the link between the user and Microsoft Corporation. It is very important to always keep the OS up to date, otherwise there is a possibility of losing personal data and damaging computer files.
Setup procedure
From the previous section of the article it has already become known how the user can configure the system restart time on his PC. But this is clearly not enough for comfortable use of the computer. It is immediately necessary to upset users of the new OS and announce the fact that there is almost a complete lack of freedom in changing the parameters of the upgrade service in Windows 10, since the included center here works completely automatically. By default, the running service installs all application and driver upgrades, and making adjustments to its functions is practically impossible for the system.
However, there are small options for settings in the “Advanced Settings” tab, where you can set some rules for installing update packages. You can tell the system to notify the user in advance of the need to restart the computer.
If you set this parameter, the PC owner will always have time to save the files he is working with before rebooting the system.
If the user needs to update only Windows 10 itself, and not touch other Microsoft applications installed on the PC, then you need to uncheck the box shown in the figure below:
If you need to temporarily postpone the procedure for installing upgrades, then in the professional version of the OS you just need to uncheck the corresponding line in the menu.
How to set it up
Setting the reboot date and time is not all that many users would like. That is, at least a little more freedom in choice. However, Windows 10 practically does not provide it. The tiny functionality that is in the “Advanced Settings” section will allow you to at least slightly customize the Update Center for yourself.
First of all, we will need to set exactly how the packages will be installed. If you do not need automatic device reboots, you will need to set the “Notify when reboot is scheduled” option. This setting will at least give you the opportunity to save everything you need.
The Update Center allows you to specify that the version will update only itself with new files, without affecting other programs. This is convenient if for some reason you do not need an update for other Microsoft products. If so, you need to uncheck the corresponding box. This setting will leave the system the ability to install updates only for itself, and not for the applications included in it. Any Offices and other programs will no longer change.
And finally, setting up automatic updates in the new Windows 10. The only thing that is available to the user even of the Professional version of the system is to postpone the installation of the update. Essentially, this is the same refusal to auto-update.
Important! If you decide to postpone all updates while the Update Center is being configured, then do not forget to periodically update manually. Windows 10 is still a crude system, which often receives the necessary patches. And it would be better to install them.
But if you click on the link “How and when to receive updates”, you will be able to configure how to download updates - from the official Microsoft server or from other computers running Windows 10. It’s up to you to decide whether you are ready to wait until it unloads main server or endure the risk of catching a virus from someone else’s device.
(Visited 12,334 times, 1 visits today)
Windows 10 Update is a special tool that is built into all versions of Windows 10, thanks to which the OS is updated automatically.
The Windows 10 operating system has a tool that is responsible for the timely downloading and installation of all updates from the company’s official servers. It's called Update Center and by default it works in the background. However, not all users require this capability. Therefore, they can disable it and no longer receive the corresponding files until the CO is turned back on. By the way, this is how it is possible to free up a certain amount of resources for other system needs.
But do not confuse CO with. The second is a special directory, which we have already talked about in more detail earlier.
Emerging problems and errors in the service
Sometimes packages don't download at all. For such cases, there is a choice of a method for downloading upgrades, for example, through a peer-to-peer network. This is very convenient for local networks, because after downloading updates to only one computer, they will quickly spread to all other PCs. In the parameters window, you need to set the corresponding parameter toggle switch to the “Enabled” position, and check the box “PC on the local network and PC on the Internet”.
If errors occur in the operation of the PC, you need to uninstall updates that caused functional failures through the “Additional” section. parameters”, where in the log click on the corresponding link, as shown in the figure below:
After this action, we must pay tribute to the Tens developers, the OS immediately begins to update itself.
The tenth version of Windows, according to its creators, is revolutionary in every way. This may be true, but the changes in the interface and the location of some components are certainly quite noticeable. Thus, many users in their usual location cannot find the “Update Center” in Windows 10. Let’s take a brief look at where this service is located, how to work with it and troubleshoot problems that arise. Naturally, it will not be possible to describe all the errors and methods for correcting them, but the most basic ones will be touched upon.
Features of the service
Next, you need to save the resulting file called “winupdate”, at the end of which there will be “reg”, and only then open it. As a result, the Update Center service will appear in the Control Panel. Attention! This method does not work in the latest versions of Windows 10 .
In order not to do the above translated work manually, download the ready-made file from the link.
Windows 10 OS: Where is Update Center?
Many users, accustomed to the interface of older systems, did not appreciate the innovations in the arrangement of some system control elements. Indeed, now there is not one “Control Panel”, but two. The main option is the settings section, which is called up through the main Start menu. And it’s completely impossible to get to the standard “Control Panel” (it also exists in its classic form) without special knowledge. But that’s where the update service used to be located.
But you can call the standard panel with the control command in the “Run” menu, which is used both in all earlier versions of the system and in Windows 10. “Update Center” (where this component is located will be discussed a little later) is not among the sections, and this is for many users baffles.
In fact, this service has been moved to a new panel. To get to it, you need to call the “Settings” section, and then find the update and security menu. The first section (line at the top left) is the desired “Update Center”. There are quite a lot of settings here. For example, you can change the frequency of receiving updates, configure update methods, change privacy settings, etc.
How to restore service: before you start...
As always, a few words in prologue to the actions:
- don’t try to cram in what you can’t fit in; If the build/version of Windows does not provide this service initially, the consequences may be unpredictable. At a minimum, it (the service) simply won’t work.
- if you are not sure that the service has been deleted, it is better to check both the disk and the system again with repair utilities, as well as anti-virus utilities of all stripes.
- the list contains system services; To restore the services of specific programs, you will have to reinstall the program. Also, depending on the configuration of the computer and its components, the installer may install additional services - I did not include them in the list either.
- Remember that some services have strict dependencies on other services; Before reinstalling, check whether the “sister” services are running.
Cannot be updated via Update Center. What to do?
But, as in other systems, this service is not immune to errors and failures. If Windows 10 does not update via Update Center, this may be due to communication settings or incorrect operation of the service itself. But, and this is the saddest thing, some important updates that are installed into the system automatically (when the update mode is enabled without notifying the user) can also cause failures. They then have to be removed.
First, you can try to manually search for updates. If the components of the service itself are in order, the packages will be found, after which they just need to be installed. But this is the simplest case.
Removing the SoftwareDistibution folder
Solves 5 out of 10 problems with updates. SoftwareDistibution – the folder where downloaded updates, the Update Center cache and its logs are stored. Deleting this folder solves installation errors, but not downloading updates.
The folder is located at C:\Windows\SoftwareDistribution
Before you can remove it, you must stop the Windows Update service or run the following command in Command Prompt as Administrator:
Troubleshooting Guidelines
The situation looks worse when the components responsible for searching for and installing updates are damaged. And incorrect installation of some important packages leads to failures.
If Windows 10 Update Center does not work, in this situation it is best to go to view recently installed update packages, sort them by date and remove them one by one, checking the service. Once the faulty package is found, you should do a manual search and then install all the packages, eliminating the one that is problematic from the list.
If failures occur due to incorrect operation of the Update Center components, there can be quite a few reasons (incorrect proxy settings, lack of files required for operation, impact on the update process of third-party services and programs, not counting viruses, and much more).
In the simplest case, troubleshooting Windows 10 Update boils down to restarting the service and renaming the SoftwareDistribution directory located in the system root directory. This is done through the command line (cmd in the “Run” console or the corresponding line in the right-click menu on the start button), but only with administrator rights. To do this, use two commands: net stop WuAuServ and net WuAuServ start with renaming the specified folder to SoftwareDistribution.old. After a restart, the system itself will create a new directory.
In other cases, you need to look for a solution based on the situation (the description of the failure can be found by the error code). But for the laziest, Microsoft offers its own automated utilities - Microsoft Fix It! and Microsoft Easy Fix. In some cases, the DLL Suite program is useful, which allows you to install missing or damaged libraries into the system. In general, you first need to assess the nature of the failure, and only then make a decision on how to fix the problem as effectively as possible.
Clearing the update cache manually
It happens that the troubleshooting utility does not cope with the task of clearing the cache, and it has to be done manually. This is done as follows.
1. Deactivate the Internet connection.
The best way to do this is programmatically through the network icon in the taskbar.
2. Call the command line with administrator privileges (via the Win → X menu or the Start context menu).
3. One by one, enter and execute the chain of commands using Enter:
- net stop wuauserv - reset the Windows Update service - if it is impossible to stop the service, repeat the command after restarting the computer;
- net stop bits - disable the background transfer service.
4. Without closing the command line window, go to the “Windows” directory and delete the “SoftwareDistribution” folder from it.
5. Return to the command line and execute the commands: net start bits and net start wuauserv.
6. Connect to the Internet and check whether the detected updates are downloaded through the Update Center.
Instead of a total
Here’s a brief summary of what the “Update Center” is in Windows 10. Where this component is located is already clear. As for possible errors or malfunctions, it is quite difficult to describe all situations and cases, since you cannot foresee everything, and describing each specific problem and methods for eliminating it will take a lot of time. Only the most common failures are considered. If something doesn't work, use automatic utilities. At least one, but will give some tangible result.
Thanks to the fact that Update in Windows 10 has been radically changed, it is now becoming very difficult to find it, since many users are not well acquainted with the new design of the operating system. So where is Windows 10 Update?
In addition to the difficult location, it is worth mentioning that the user will have to face the same difficulty when the process touches. And only users who have the “Professional” version can add new parameters related to innovations.
Other people, in turn, who do not have this particular version, will have to wait until the update arrives to them. Now let's find out where the parameter settings are stored.
Shutdown
Disabling the application is done in standard utilities - Services and the local group policy editor. Here you can turn it back on. For information on how to disable it in other ways, see the article “Disable automatic installation of updates in Windows 10.”
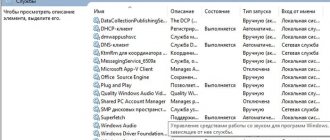
In services
- Press Win+R → enter the command: services.msc .
- Windows Update service → RMB → Properties → Stop.
- Select in the “Startup type” field → Disabled → Ok.
In the Local Group Policy Editor
Important! This method is only available on Windows 10 Pro and Enterprise versions.
- Press Win+R → enter the command: gpedit.ms c .
- Computer Configuration → Administrative Templates → Windows Components → Windows Update.
- In the right part of the window, select “Automatic update settings” → RMB → Edit → set to “Disabled” → confirm changes.
Good to know! After making changes, go to settings and check for updates for your computer. Changes do not always take effect immediately.
- How to disable Windows 10 update - change Update settings
The video shows the shutdown process clearly.
Finding a Center
First, let's learn how to find our control center, so where is it located? System Settings tab
.
You can find these options in the Start
.
Having entered it, enter the word Parameters
, and now you have found out where these parameters are stored. For more detailed information, we recommend viewing these images:
After we have entered them, we find the Update and Recovery
. By entering this menu, we can immediately see what innovations are already available for our device. You will also be faced with a window where you are offered to restart it at some time of the day or right now.
This reboot is necessary to ensure that the reinstallation of parameters occurs without errors and the boot files are not damaged. Even a switched off computer can abruptly start restarting, it depends on the timer that is set in the settings, usually it is set at 3:30 a.m. It’s not very nice to find your device rebooting at night before installation, is it?
We recommend that you reboot immediately, if possible, so that it, along with the reinstallation, does not take you by surprise. Also, if you do not find notifications about upcoming innovations and a reboot timer in the menu, there will most likely be a button called Check for Updates
, by clicking it, wait a while and find out what options are already available to you. Now you know where the update settings are, let's move on.
Where to find it
The new Windows Update in Windows 10 is now located in System Settings. You can find them if you go to the “Start” menu, where it will say “Settings”. You need to click on it.
A new window will appear, from which we only need “Update and Security”. By clicking on this section, we find ourselves in the coveted Center.
We are immediately shown which updates are already available for Windows 10. Below is the setting for when to reboot the device. This is necessary for the update to install correctly. You can select the time when the device is idle (the system by default suggests 3:30 a.m. of the next day), or you can set this parameter yourself. Or you can reboot right now so that an unexpected reboot does not take you by surprise.
The list of downloaded packages can be viewed in more detail in the Center window - “Information” is available next to each one. It will indicate what kind of file it is, what program it is needed for, and so on. If you click on the “Restart required” link, a pop-up window with the following content will appear:
- The name of the update and its code.
- Race date.
- Description of what it is needed for.
- Recommendation to install as quickly as possible and a warning about a possible reboot.
Settings
Let's move on to adjusting the Center, the fact is that the Windows 10 operating system gives very little freedom to users, almost no choice. The only thing highlighted to users in this case is the More Options
.
Only thanks to them you will be able to at least slightly adjust this process to suit yourself, but where are they located and how to disable them? That's right, the files may be located in additional debug files. Let's start with the fact that in that menu you will be offered how the installation will proceed, automatically or with a reboot notification.
Of course, the checkbox will be for automatic updating, change it to a button associated with the notification. Now that you have these settings, you do not need to constantly save information on your PC, which is due to not knowing the exact update date. Now, knowing when the update will occur, you can already prepare for it, let's move on.
And finally, the most important thing, in the version of Windows Professional, in that menu there will be a function called Postpone Update, but we remind you that such, one might say, services are provided only by the tenth Windows, unfortunately, users of the tenth version who do not have the Pro function on their PCs do not will be able to postpone and disable updates; if you want to reinstall Windows to a more convenient version, on our website you can find an article on reinstalling it.
How to restore a Windows 7 service?
How to restore a Windows 7 service?
Using the information and suggested files in the article, you can try to restore a Windows 7 service that was damaged as a result of a system failure. The above method may be useful if the service was deleted by mistake or disappeared from the system due to errors on the hard drive.
Hello everyone, today I will summarize the many days of collecting and finalizing the list of services that may be lost as a result of incorrect user actions or failure. Considering the fact that Windows services are nothing more than a set of registry settings, I offer you ready-made reg files for download. Let me remind you that all Windows 7 services, without exception, are located in the following registry section
HKEY_LOCAL_MACHINE\SYSTEM\CurrentControlSet\services
So from the list below you can download the one you need and try to resume it by re-recording/registering it in the registry.
Deferring or disabling parameters
With it, as you already understand, you can endlessly postpone upcoming new products until you are ready to update your device. Now you know how to disable updates and where the settings for disabling them can be located. Now you not only know where Windows 10 Update is, but you also know how to configure it.
Self-configuration of auto-updates is a drop in the ocean compared to many other processes that you will encounter when using this system. This is where our website will help you; here you can find a huge number of other articles relating to all versions of operating systems.
Update Center is a built-in Windows 10 service that is responsible for installing system updates and drivers for third-party devices. If it stops working, the computer will not receive any updates or drivers. You can fix it manually without reinstalling the system, or even download updates from another source.
The importance of Windows updates
Windows Update is a Microsoft operating system tool that is responsible for managing and monitoring updates for the system and its components. To do this, it will give priority to important updates or security updates, later it will carry out those that serve to make improvements or fixes that Windows may contain and finally takes care of minor and optional updates that will only be carried out if we Let's launch them.
Therefore, if the Windows Update button disappears, we will not be able to access updates, which allows the system to remain vulnerable to possible viruses and spyware. In the same way, we could not solve possible bugs or system errors that require revision and updating of the software.
To avoid possible problems with our computer, we are going to show you how we can solve the Windpows update button missing problem and also access system updates even if they are not available.
Why does Update Center stop working?
There are times when Update Center stops working:
- does not download updates;
- downloads updates with errors, incompletely, incorrectly;
- stops starting;
- freezes;
- produces errors with various codes.
This can happen for two reasons:
- a virus got onto your computer and damaged some system files, including Update Center;
- the user's actions led to this result.
It is also worth understanding that the reason for unsuccessful installation of updates may be not only in the Update Center, but also in other components. For example:
- in damaged system files;
- in third-party devices connected to the computer;
- in a third-party antivirus that blocks the installation of updates by mistake.
Downloading updates using a third-party utility
Users of the forum.ru-board.com forum created a portable program called Windows Update Minitool, which uses the Update Center to function, but is superior to it in functionality.
- Download the utility, unpack the downloaded archive and run the program.
- Click “Update” to receive information about current updates.
- installation of selected updates;
- copying links to cab files to the buffer for later downloading updates via a browser or download manager.
In this way, you can update Windows 10 when the Update Center is not working, the computer does not have access to the Internet, or is using wireless Internet with limited traffic.
Solving possible problems
There are ways to manually launch Update Center or restore its files. Before you start fixing the Update Center, make sure that the problem is not an unstable Internet connection. Interruptions in downloading updates and the appearance of errors may be caused by connection problems.
“Update Center” has disappeared or does not open, the update does not start
If any problems arise with the Update Center, you need to check whether the corresponding service is running. If it is deactivated, then Update Center will not be able to perform any actions. The service is sometimes disabled on purpose, but it can also end on its own. To enable the service:
Before manually trying to fix the problem, trust Easy Fix - this is an official program from Microsoft. Previously, the Fix It program collection was used to automatically fix errors, but its support has now been discontinued, and the current collection is Easy Fix. On the official Microsoft website you can find a complete list of mini-programs, each of which is aimed at correcting errors in a specific system process.
- Find Easy Fix on the official Microsoft website.
- In the list of solutions, click "Fix Windows Update errors." Click "Fix Windows Update errors"
- In the first step, select Windows 10.
Select your OS - Windows 10 - Start downloading the wu170509.diagcab file by clicking on the “Windows Update Troubleshooter” link.
Download the wu170509 utility by clicking on the link “Windows Update Troubleshooter” - Run the program with administrator rights, in the first step select “Windows Update” and click “Next”. Select Windows Update and click Next
- Wait while the program finishes searching for the problem, this may take several minutes. Upon completion of the work, information about the result will be displayed. And if problems with the Update Center have been identified and corrected, you will see it.
Scan the update center using Easy Fix
Alternative options for receiving updates
You may not want to fix Windows Update if you find out that there is another way to get Windows 10 updates. There are a couple of alternative options:
- third-party official and unofficial programs;
- manual download of update files.
All of the methods described below allow you to perform an update without losing user data. The process is identical to a regular update through the standard Windows 10 tool.
Third party official programs
There are two programs from Microsoft, both are located on the corporation's official website. Look for them on the page with a tool for upgrading to Windows 10 from previous versions of the Windows operating system.
Third party unofficial programs
There are several non-Microsoft programs that allow you to update your system and selectively download updates. For example, you can use Windows Update Minitool. The program has Russian language and a clear interface.
Downloading offline updates for Windows 10 using the official method
Microsoft has provided the ability to download, and for users who do not have the Internet, its traffic is limited or the Update Center does not function properly, as in this case. Here you will need the Windows Update Minitool utility.
2. If this is done using IE, follow the link “Internet Explorer” (let’s look at its example), otherwise click “Microsoft Download Center”.
3. Enter the update code that needs to be downloaded for offline installation and click “Add”.
The system will automatically detect the bitness of your OS, and if the file does not contain information about the bitness, it is intended for x86.
4. Click on the “View cart” button.
5. Once you have completed adding the required files, click “Upload”.
How to restore a Windows 7 service. The services themselves.
The list is compiled by the name of the service, as it appears, for example, in the Task Manager. If you know its description, use the search on the browser page Ctrl + F.
- AeLookupSvc – Application Compatibility Information
- ALG – Application Layer Gateway Service
- AppIDSvc – Application Identity
- Appinfo – Application information
- AppMgmt – Application Management
- AudioEndpointBuilder – Windows Audio Endpoint Builder
- AudioSrv – Windows Audio
- AxInstSV – ActiveX Installer (AxInstSV)
- BDESVC – BitLocker Drive Encryption Service
- BFE – Basic Filtration Service
- BITS – Background Intelligent Transfer Service
- Browser – Computer browser
- bthserv – Bluetooth support service
- CertPropSvc – certificate propagation
- COMSysApp – COM+ system application
- CryptSvc – Cryptography Services
- CscService - Offline Files
- DcomLaunch – DCOM server process launcher
- defragsvc – Disk defragmentation
- Dhcp – DHCP client
- Dnscache – DNS client
- dot3svc – Wired setup
- DPS – Diagnostic Policy Service
- EapHost – Extensible Authentication Protocol
- EFS – Encrypting File System
- ehRecvr – Windows Media Server Receiver Service
- ehSched – Windows Media Server Scheduler Service
- EventLog – Windows Event Log
- EventSystem – COM+ event system
- Fax – Fax
- fdPHost – Discovery provider host
- FDResPub – Publish function discovery resources
- FontCache – Windows Font Cache Service
- FontCache3.0.0.0 – Windows Presentattion Foundation 3.0.0.0 font cache
- gpsvc – Group Policy Client
- hidserv – access to HID devices
- hkmsvc – Certificate and health key management
- HomeGroupListener – Home group listener
- HomeGroupProvider – Home group provider
- idsvc – Windows CardSpace
- IKEEXT – IPsec key modules for Internet key exchange…
- IPBusEnum – PnP-X IP Bus Enumerator
- iphlpsvc – IP Ancillary Service
- KeyIso – CNG Key Isolation
- KtmRm – KtmRm for distribution transaction coordinator
- LanmanServer – Server
- LanmanWorkstation – Workstation
- lltdsvc – Link layer topologist
- lmhosts – NetBios support module over TCP/IP
- Mcx2Svc – Media Center Set Top Box Service
- MMCSS - Multimedia Class Scheduler
- MpsSvc – Windows Firewall
- MSDTC – Distributed Transaction Coordinator
- MSiSCSI – Microsoft iSCSI Initiator Service
- msserver – Windows Installer
- napagent – Network Access Protection Agent
- Netlogon – Network login
- Netman - Network Connections
- netprofm – Network List Service
- NetTcpPortSharing – Net.Tcp port sharing service
- NlaSvc – Network information service
- nsi – Network Saving Interface Service
- p2pimsvc – Network Participant Identity Manager
- p2psvc – Grouping of network participants
- PcaSvc – Program Compatibility Assistant Service
- PeerDistSvc – BranchCache
- pla – Performance Logs and Alerts
- PlugPlay – Plug and Play
- PNRPAutoReg – PNRP Computer Name Publishing Service
- PNRPsvc – PNRP Protocol
- PolicyAgent – IPsec Policy Agent
- Power - Power
- ProfSvc – User Profile Service
- ProtectedStorage – Protected storage
- QWAVE – Quality Windows Audio Video Expierence
- RasAuto – Automatic remote access connection manager
- RasMan – Remote Access Connection Manager
- RemoteAccess – Routing and remote access
- RemoteRegistry – Remote registry
- RpcEptMapper – RPC endpoint mapper
- RpcLocator – Remote procedure call (RPC) locator
- RpcSs – Remote Procedure Call (RPC)
- SamSs – Security Account Manager
- SCardSvr – Smart card
- Schedule – Task Scheduler
- SCPolicySvc - Smart Card Removal Policy
- SDRSVC – Windows Backup
- seclogon – Secondary login
- SENS – System Event Notification Service
- SensrSvc – Adaptive Brightness Control
- SessionEnv – Setting up a remote desktop server
- SharedAccess – Internet Connection Sharing (ICS)
- ShellHWDetection – Shell hardware detection
- SNMPTRAP – SNMP Trap
- Spooler – Print Manager
- sppsvc – Software protection
- sppuinotify – SPP Notification Service
- SSDPSRV – SSDP Discovery
- SstpSvc – SSTP Service
- StiSvc – Windows Image Upload Service (WIA)
- swprv – Software Shadow Copy Provider (Microsoft)
- SysMain – Superfetch
- TabletInputService – Tablet PC input service
- TapiSrv – Telephony
- TermService – Remote Desktop Services
- Themes – Themes
- THREADORDER – Thread ordering server
- TrkWks – Client for tracking changed connections
- TrustedInstaller – Windows Module Installer
- UI0Detect – Interactive Service Detection
- UmRdpService – Remote Desktop Services user mode port forwarder
- upnphost – Universal PNP device node
- UxSms – Desktop Window Manager Session Manager
- VaultSvc – Credential Manager
- vds – Virtual disk
- VSS - Volume Shadow Copy
- W32Time – Windows Time Service
- WinDefend – Windows Defender
- WinHttpAutoProxySvc – WinHTTP Web Proxy Automatic Discovery Service
- Winmgmt – Windows Management Instrumentation
- WinRM – Windows Remote Management Service (WS-Managment)
- Wlansvc – WLAN AutoConfig Service
- wmiApSrv – WMI Performance Adapter
- WMPNetworkSvc – Windows Media Player Network Sharing Service
- WPCSvc – Parental Controls
- WPDBusEnum – Portable Device Enumerator Service
- wscsvc – Security Center
- WSearch – Windows Search
- wuauserv – Windows Update
- wudfsvc – Windows Driver Foundation – User Mode Driver Framework
- WwanSvc – WWAN Auto Configuration
Reset Windows Update Settings Using PowerShell
You can use the PSWindowsUpdate PowerShell module to reset the Windows Update agent and service.
Install the module on your computer from the PSGallery script gallery:
Install-Module -Name PSWindowsUpdate
Allow PowerShell scripts to run:
Set-ExecutionPolicy –ExecutionPolicy RemoteSigned -force
Run the command:
Reset-WUComponents –verbose
The Reset-WUComponents command performs the same actions as the bat script described just below.
VERBOSE: Background Intelligent Transfer Service (BITS) VERBOSE: Windows Update (wuauserv) VERBOSE: Application Identity (appidsvc) VERBOSE: Cryptographic Services (cryptsvc) Step 2: Delete the qmgr*.dat files Step 3: Backup software distribution folders VERBOSE: Renaming Software Distribution folder to C:\Windows\SoftwareDistribution.bak VERBOSE: Renaming CatRoot folder to C:\Windows\System32\Catroot2.bak Step 4: Remove old Windows Update logs VERBOSE: Deleting the C:\Windows\WindowsUpdate.log files. Step 5: Reset Windows Update services VERBOSE: Reset BITS service VERBOSE: Reset Windows Update service Step 6: Reregister dll's VERBOSE: regsvr32.exe / s atl.dll VERBOSE: regsvr32.exe / s urlmon.dll VERBOSE: regsvr32.exe / s mshtml.dll VERBOSE: regsvr32.exe / s shdocvw.dll VERBOSE: regsvr32.exe / s browseui.dll VERBOSE: regsvr32.exe / s jscript.dll VERBOSE: regsvr32.exe / s vbscript.dll VERBOSE: regsvr32.exe / s scrrun.dll VERBOSE: regsvr32.exe / s msxml.dll VERBOSE: regsvr32.exe / s msxml3.dll VERBOSE: regsvr32.exe / s msxml6.dll VERBOSE: regsvr32.exe / s actxprxy.dll VERBOSE: regsvr32.exe / s softpub.dll VERBOSE: regsvr32.exe / s wintrust.dll VERBOSE: regsvr32.exe / s dssenh.dll VERBOSE: regsvr32.exe / s rsaenh.dll VERBOSE: regsvr32.exe / s gpkcsp.dll VERBOSE: regsvr32.exe / s sccbase.dll VERBOSE: regsvr32.exe / s slbcsp.dll VERBOSE: regsvr32.exe / s cryptdlg.dll VERBOSE: regsvr32.exe / s oleaut32.dll VERBOSE: regsvr32.exe / s ole32.dll VERBOSE: regsvr32.exe / s shell32.dll VERBOSE: regsvr32.exe / s initpki.dll VERBOSE: regsvr32.exe / s wuapi.dll VERBOSE: regsvr32.exe / s wuaueng.dll VERBOSE: regsvr32.exe / s wuaueng1.dll VERBOSE: regsvr32.exe / s wucltui.dll VERBOSE: regsvr32.exe / s wups.dll VERBOSE: regsvr32.exe / s wups2.dll VERBOSE: regsvr32.exe / s wuweb.dll VERBOSE: regsvr32.exe / s qmgr.dll VERBOSE: regsvr32.exe / s qmgrprxy.dll VERBOSE: regsvr32.exe / s wucltux.dll VERBOSE: regsvr32.exe / s muweb.dll VERBOSE: regsvr32.exe / s wuwebv.dll Step 7: Reset WinSock VERBOSE: netsh winsock reset Step 8: Reset Proxy VERBOSE: netsh winhttp reset proxy Step 9: Start Windows Update services VERBOSE: Cryptographic Services (cryptsvc) VERBOSE: Application Identity (appidsvc) VERBOSE: Windows Update (wuauserv) VERBOSE: Background Intelligent Transfer Service (BITS) Step 10: Start Windows Update services VERBOSE: wuauclt /resetauthorization /detectnow
Run a scan for updates from Control Panel or search for available updates using the PowerShell command:
Get-WUList