Hi all! And today we will look at another question, how to put a password on a folder in Windows 10. Here, a difficulty may immediately arise in the fact that this operating system does not have a built-in tool that can encrypt data. But you shouldn’t despair, as I’ve found several cool ways that can reliably hide and protect your data. I wrote all the possible options in the article, if you have any additions, or you found another working option, you can describe it in the comments.
Method 1: Via WinRAR
You can also set a password for a folder in Windows 10 through WinRAR, which is installed on almost all computers.
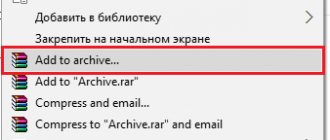
- Select any folder or files on your computer, right-click and from the drop-down list click on the “Add to archive” button.
- Make sure that the default archive format is “RAR”. In principle, there is no need to change other settings. Click on the “Set password” button.
- Enter the password twice. If you are entering a very complex key with symbols, numbers and letters, then if I were you, I would select the “Display password as I type” checkbox so that you can enter all the symbols as clearly as possible. Why do you need the “Encrypt file names” checkbox? If you don’t check it and try to open the archive, then in addition to entering the password, the contents of the archive with file names will be displayed. If you want to hide this information, then you should select this item.
- Now if you try to open the archive, you will see a password entry window. As you can see, I checked the “Encrypt file names” checkbox and therefore the contents of the archive are not displayed.
Is it possible to password-protect a folder on a computer?
If you have never encountered the question of how to password-protect a folder on your desktop, then you should understand that this can generally be done in several ways. The computer may store personal correspondence, confidential important information, or age-restricted films. Because of this, there is a need to install protection and limit the ability to open some directories. You can even block access to the operating system as a whole - create a password (put a password) when logging into Windows.
Method 2: 7-Zip
The principle is the same as with Win-RAR, only we use a different archiver. Right-click on the folder with the files, select 7-Zip and “Add to archive” from the list.
In the “Encryption” block, enter the key twice. If you want to hide the contents of the archive, then check the “Encrypt file names” checkbox. Click on the “OK” button.
Method 3: Using a script without installing third-party programs
This is one of the most popular methods on the Internet, but it has a significant disadvantage. The downside is that the file can be easily hidden for the average user. But if a person is familiar with this method, then the password can be easily cracked. On the other hand, not everyone knows about it, and in a section with a large number of files and folders, no one will even guess that there is a hidden folder there. And now a few words about the script and what it does.
The script creates a "Locker" folder in which you can place the data you want to hide. Next, it hides the folder. To make it appear again, you need to run the script and enter the correct password.
- To encrypt or password-protect data, create a text document in the section where the folder you want to hide is located.
- Open a text document for editing and paste the script there. Click here to see the script. By the way, you can just download it and use it.
- We save the file and find the word “Your-Pass” in it - you need to change this value to the password that you will use.
- As an experiment, I simply entered the key: 1234. But you can use a normal key.
- Now in the upper left corner click “File” and select “Save As”.
- You need to add the format at the end instead of “txt”:
.bat
- Click “Save”.
- Click on the file that will be created and you will see the “Locker” folder appear. Now drag the folder or files into it that you want to hide from prying eyes.
- You can go to this folder and check that the files are there.
- Run the same BAT file again, and you will see something like this. Press the letter Y on the keyboard and then click Enter.
- After this, the Locker folder will disappear. For it to appear again, you need to click on our script again and enter the password.
And now the problem with this method. If someone knows about it, then they can open the BAT file in Notepad by right-clicking on it and selecting the “Edit” button from the list. Then it will simply find the line with the password entered and it will be guessed. But I repeat that the person must be familiar with it, and generally know that you are hiding something in this folder, so the method has a place. Most importantly, delete the original text document. You can also rename the script file to something inconspicuous or hide it. Alternatively, you can archive it with a password in WinRar.
What to do if you forgot the password for a folder
Situations often occur when a user forgets the password for a folder and does not know how to open it.
Unfortunately, there is no simple and accessible solution to the problem (or maybe even fortunately, because if there was one, any attacker could easily pick apart the protection and get acquainted with the information hidden from him).
Even if you remove the password setting program, you still won’t be able to get into the directory, since most of these applications not only put passwords on directories, but also encrypt their contents.
However, in special cases, sometimes something can be done.
For example, if you have protected a WinRAR archive with a password, sometimes the “Advanced Archive Password Recovery” program will solve the problem.
It allows you to crack passwords using brute force methods, and the process can be speeded up by setting the possible length and symbols used (numbers, letters, signs) in the parameters.
This may be useful for those who have only partially forgotten the password and entered it incorrectly.
Note! An extremely imprudent decision would be to trust people on the Internet who promise to show you how to open a password-protected folder or offer special hacking software.
In most cases, the user himself installs various types of spyware into the system, which then plays into the hands of attackers by transmitting data about his activity (for example, entering authorization data on websites).
Method 4: Through virtual storage and BitLocker
BitLocker is a built-in feature in Windows that allows you to encrypt data in storage. This is exactly what we will use. Typically this function is used to encrypt entire partitions of a physical disk, but we will create a virtual partition and encrypt the data there. First, let's create this section.
- On the keyboard, find and click on the and R buttons. In the window, enter the command:
diskmgmt.msc
- Select any physical media, click Actions, and select Create Virtual Hard Disk.
- Click on the “Browse” button and enter the name of the section, as well as the path where it will be located. You can also choose either fixed size or dynamic. For fixed, you need to enter the required value in MB in the “Virtual hard disk size” field.
- Scroll down a little and you'll see a new drive. Click on the left block and begin its initialization.
- Just click "OK".
- Now right-click on the right block and create a volume.
- There is nothing complicated further, we just scroll through all the items, leaving everything with the default values.
- Now in Explorer, click on our drive and select “Enable BitLocker”
NOTE! If this item is not present, it means your version of Windows does not support encryption.
- Select the top checkbox and enter the key twice.
- In the next step, you need to select the item where exactly you will store the recovery key. It’s better to select “Save to your Microsoft account.”
- In another step, select “New encryption mode”.
- At the last step, simply click on the “Start encryption” button.
- Now right-click on the disk and select “Eject” so that it is not visible.
- In order to start working with it, you just need to double-click on it in the place where you originally created it.
- It will start showing up in File Explorer.
- If you click on it, you will be asked to enter a password.
Steganography
And finally, an unusual method of masking a file, very similar to the case with an image, only the “container” for the file will be an audio file. This is made possible thanks to the DeepSound application. Just like the above method, you need a file with an audio extension (.mp3; .wav; .cda) and the folder itself. It is not necessary to archive it.
- In the toolbar, select open carriers files.
- Specify the path to the audio file. For example C:/sound.mp3 .
- After the file appears in the upper area of the window, click Add secret files.
- Select the path to the folder you want to hide, similar to above.
- When the file appears in the lower field, click on Encode secret files.
- A window will open in which you select the option to save the file.
- Select Encode secret files again.
- A temporary .tmp file will be created on your desktop and can be deleted.
Opening the contents of the audio container occurs in the reverse order, only instead of Encode secret files you will need to click the Extract secret files button. The program is intuitive to use and supported by all versions of Windows. However, the inability to open the “container” without using the program becomes a significant drawback.
Now that you are familiar with these easy camouflage methods, your secrets will always be hidden from prying eyes.
Method 6: Hide the folder
This method does not set a password, but hides the folder from view, so that if a stranger does not know what is in the folder, he will not be able to find it. Right-click on the desired folder and select “Properties”. Next, on the “General” tab at the bottom, select the “Hidden” checkbox.
Once you click on the Apply button, the folder will disappear.
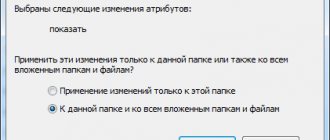
To see it again, you need to select “View” from the top of the window. After that, find the item “Hide items” and check the box - the folder will appear again. Just don’t forget to uncheck this box later.
Turning the archive into part of the picture
This method allows you to hide a file behind an image, merging them into a single whole.
You will need:
- Picture and archive file. It looks like image.jpg and archive.rar respectively.
- Place both files on the HDD partition so that they have the same path. Example: C:
- Open the command line using the Win+R .
- Specify section: From: .
- Enter the command copy /b image.jpg+archive.rar image2.jpg .
- The file image2.jpg - a picture with a hidden archive.
Double clicking on it will open the picture. To open the archive you will need:
- Right-click and select Open with... from the drop-down menu.
- Then select any available archiver. In our case, Winrar.exe or 7z.exe.
- You can also simply change the file extension from .jpg to .rar.
It is worth saying that when added to photo hosting sites, only the image is loaded in order to save traffic. But there are also those in which an attempt to download an archive may be successful. However, when you open a link with your photo, only the image will be loaded.