Good day everyone! Today, perhaps the most popular model from D-Link – D-Link DIR-300, or in common parlance “three hundred”, comes to us for review and configuration. Where and how they are used, and after their active use in Rostelecom, such a model has visited every third family in Russia. So let’s see what kind of beast this is, and let’s figure out its proper configuration step by step.
Approximate plan of action: we will connect, set up a network, the Internet, distribute Wi-Fi and change passwords everywhere for security. That's all, let's get started.
Connection
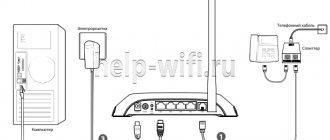
Before moving on to the settings, everything needs to be connected correctly. Pay attention to the back panel of the router:
What is important to do here in order to successfully connect our D-Link DIR-300 router:
- Install the router in a convenient place so that Wi-Fi reaches approximately all rooms, so that there is enough distance to the provider’s wire so that you can connect a computer or laptop via wire.
- Connect the power, make sure that at least one of the indicators is on - this means the router is turned on and you can continue to work.
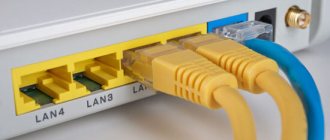
- We connect the wire of your Internet provider from the entrance to the INTERNET - no other place will do, only this port is suitable for an external cable.
- Connect your computer or laptop via wire to any LAN port (there are 4 of them) from which you will perform the setup.
Note! There is also a button in the RESET recess here - don’t do anything with it, but perhaps it will be useful to us later. To reset the settings to factory settings, you need to press this button and hold for about 10 seconds.
All! We're not doing anything else here for now. At the same time, you can look at the front panel - there the corresponding indicators will light up during connection:
From left to right:
- Power is connected – lights up when you turn on your router to the network. Indication that everything is fine with nutrition.
- INTERNET – when you connect the provider’s cable, changes will begin here. If it turns green in the end, everything is fine. Fast blinking on any indicator means data is being transferred, this is normal, don’t be alarmed.
- Wi-Fi – if turned on, it lights up.
- 1-2-3-4 – connected devices via wire. If you turn on your computer or laptop, the required indicator will light up here. Make sure it lights up. Poor connection is one of the possible problems when connecting to the control panel.
For reference. Over the years, many versions of the router have been released, differing in their hardware, firmware and slightly external changes. Although outwardly this DIR-300 router was basically the same old working “three hundred”. Released revisions - NRU B1, B2, B3 (the very first models), NRU B5, B6 (slightly newer), NRU B7 (small external changes), A/C1 (latest modifications). Perhaps something has already been released and newer. You can see your version on the sticker under the router. But all the settings below are suitable for any revision.
Addition . Models DIR-300 and D-Link D-300 are one and the same, no matter how they are confused. TP-Link does not have a model with this number.
How to configure a D-Link DIR 300 router?
Once in the “Settings” of the router, the owner must first of all, if necessary, switch the interface language to Russian by selecting the appropriate option in the drop-down list at the top right of the main window.
Now you should proceed to the “Quick Setup” of the D-Link DIR-300 router - as a rule, it is more than enough for comfortable work with a wireless network, and you can go through a few steps as quickly as connecting Wi-Fi on a laptop.
Quick setup
To easily and simply configure the router, the user must:
- Click on the “Quick Setup” button at the bottom of the main page.
- Go to the “Network” section.
- If this has not been done before, connect the network cable and click on the “Next” button.
- Select the type of Internet connection on the new page - you can find it out from the contract concluded with the provider, or by calling the company’s office.
- At the request of the D-Link DIR-300 settings program, enter the name of the connection, your login and password on the next page.
- By switching to the “Detailed” mode, the user will be able to set additional connection parameters: network card address, connection timeout, etc.
- Now all that remains is to click on the “Apply” button and wait for the connection to be checked.
- And, once again on the main page, click on the Wi-Fi button.
- Here, the owner of the D-Link DIR-300 router must choose in which mode the router will operate: as a main access point, a repeater, or only for distributing a wired signal. By default, it is recommended to select the first option.
- Then set the name of the wireless network - the user can come up with it himself, and this is much easier than finding out the Wi-Fi password if it is forgotten.
- And choose a data encryption method. “Open network” means that anyone can connect to the D-Link DIR-300 router without entering a password or other conditions.
- A “secure network,” accordingly, involves connecting new devices using an access code.
- You can set it right there - in the text field.
- By clicking on the “Apply” button, the user will save the new wireless network settings.
- At this point, the “Quick Setup” of the D-Link DIR-300 router is almost complete. All you have to do is click “OK”, close the settings window and, disconnecting the router from the short cable, install it in any convenient place.
Important: in the “IP-TV” section, the owner of the router will be able to determine which of the LAN connectors he plans to use to connect a digital set-top box.
Advanced settings
To make using the newly created Wi-Fi network even more convenient, the happy owner of a D-Link DIR-300 router can:
- Switch to "Advanced Settings".
- In the “Network” section, click on the WAN link.
- And if necessary, delete existing connections or add new types of connections - you can switch between them here by selecting “Default Gateway”.
- Using the LAN link — set the IP and network mask for outgoing cable connections.
- And enable or disable the DHCP server - in most cases there is no need for it, and this option can be safely “Disable”.
- In the “Basic Settings” section of the Wi-FI section.
- Enable or temporarily stop the distribution of a wireless signal, as well as make Wi-Fi hidden - then you can find the signal of the D-Link DIR-300 router by entering the network name manually.
- Here you can set or adjust the name of the network.
- Select the number of transmission channels in the drop-down list - it is recommended to leave the Auto option or set the value within 7–11.
- And the type of signal - it’s better, as you might guess, to use the mode with the maximum set of options.
- At the bottom of the page, the user will be able to indicate how many devices (from laptops to smartphones and tablets) can be simultaneously connected to the router.
- In the "Security Settings" section of the Wi-Fi section.
- You should set or change the wireless signal encryption method.
- And set or adjust the password.
- In the "IP filters" of the "Firewall".
- Set filtering by IP addresses by deleting current rules or using the corresponding button to add new ones.
- Enter them, select the signal processing method and click on the “Apply” button.
- By clicking on the “Administrator Password” link in the “System” section of the D-Link DIR-300 router.
- The owner can easily change the password for accessing the “Settings” of the router; unfortunately, the name cannot be changed.
- And to save the changes made to a file or reset the D-Link DIR-300 parameters to factory settings, you should use the “Configuration” link located in the same section.
- When resetting, you will need to confirm your desire - the user will be given a little more than one and a half minutes to think.
- That's all - calling up the list of actions at the top next to the interface menu after completing the settings, the user must select “Save and reboot”, wait a few seconds until the D-Link DIR-300 router starts working in the new mode, and with a calm heart start browsing the Internet -pages.
Presets - Windows
If you are sure that everything is fine in your system, feel free to skip this section.
To eliminate all possible problems from the previous settings, I propose to delve a little into the system and make sure that the network settings are obtained automatically. At the setup stage, this is important, because there is a possibility that you either won’t connect to the router or won’t get internet. So it’s better to initially check that everything is set to automatic, and after the basic setup, do whatever you want with your network.
The following steps are suitable for all modern operating systems - Windows 7, Windows 8, Windows 10. The differences between them are minimal; any errors in the text can be corrected by eye. If suddenly something difficult arises, we either look for settings for our system on our website, or simply ask a question in the comments. The screenshots below are taken from the “seven”.
For reference. You can set up the router without a computer - via a phone or tablet, connecting via Wi- Fi. But computer setup is the simplest.
Step 1: Network and Sharing Center
We look for the network connection icon near the clock, right-click on it and select our Control Center:
Step 2: Change adapter settings
Step 3: Adapter Properties
On this page you may have several adapters - for example, wired and wireless. Select the one through which you are connected to the router, right-click on it and activate Properties.
Step 4. Settings – automatic
And then you just need to click to get to the settings we need:
- Internet Protocol version 4 (TCP/IP).
- Properties.
- In both columns, if you have something set, select automatic receipt of settings.
- Don't forget to click OK to save everything.
Now your computer will receive settings from the router itself - and this will allow you to connect, and the Internet will flow correctly without unnecessary dancing with tambourines.
Login to settings
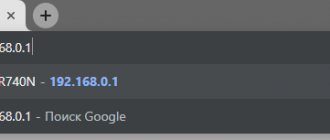
Let's get started with the actual setup. Before setting up the D-Link Dir-300 router, you need to go to its control panel:
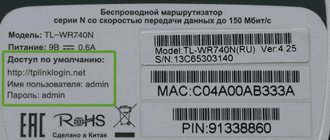
- Try going to the following IP addresses – 192.168.0.1 (sometimes 192.168.1.1)
- Login – admin
- Password – admin
Usually, within the same device, the connection addresses are the same. But on this popular model both options are found. So try both, and where it opens, enter. Here is an example of connecting to the panel via one address:
But on another device there is a sticker on the bottom (here on any router you can see the connection data):
After successful entry, you will be taken to the settings. But if suddenly something doesn’t work out, write your situation in the comments. Common causes of this problem:
- No connection.
- The router is turned off.
- Network settings curves - you need an automatic, you can reboot just in case.
- Someone used the router before you and changed the connection settings - you can reset them to factory settings (the instructions were in the section above).
Comments (4)
Den
05/28/2013 at 02:57
If you have configured everything correctly, without mixing up the password or connection type, it will turn green and the Internet will become available………….I’ve done everything, configured it…but there is still NO connection. D-Link DIR-300 1.0.20. Beeline provider.Answer
Alexei
07/20/2015 at 13:22
Colleagues! Is it possible to configure DIR 300 with a bridge? Thank you
Answer
admin
09/16/2015 at 12:14
Yes, it seems there is such a regime there.
Answer
Sergey
11/16/2016 at 15:18
Tell me, maybe you have encountered the following problem: the WiFi indicator is green, does not blink, and other devices do not see the network, after a while you turn it on and off several times, move the antenna, it appears, and works until you turn off the power, when you turn it on again no network, everything was fine. model Dir-300 B5. At the same time, everything works fine on the computer.
Answer
Internet connection
Now we are trying to connect to the Internet on our D-Link. My main advice is... There are a lot of Internet providers in our big world, and you can’t adapt to everyone:
If there is a problem with the setup at the stage of connecting to the Internet, feel free to call your Internet provider and clarify the necessary settings.
You will have to do this once and for many years, so there is nothing to worry about. Maybe your provider has some specific technologies, and this happens. But usually everything connects successfully even if you do it yourself.
Network - Connection - WAN
We follow this path and end up here:
On the last page, the main thing is to select your connection type - PPPoE or IPoE. Here, look at your agreement with the provider - it usually indicates the type of connection, login, and password. The figure shows a connection via IPoE - you don’t need to enter anything additional here, but if you need to enter a login and password, select PPPoE and the corresponding fields will appear.
Enter everything as here, save - the Internet works.
IPTV
In older router firmware, setting up TV, if it was offered by the provider, did not cause problems. However, for unknown reasons, the function was removed in new versions.
The setup will be carried out using the example of the Rostelecom provider.
On the “WAN” page (section “Network”) you need to create a new connection.
All settings are the same as those that were configured when connecting to the provider, including the “Keep Alive” checkbox, but there are a few differences.
Connection type "Static IP", MTU - 1492.
The IP section is filled in as in the picture:
Be sure to check the “Enable IGMP” checkbox. Then enable IGMP version 2 in the Advanced tab of the Miscellaneous section.
Wi-Fi setup
The most important thing in setting up Wi-Fi is that everything works and you have your own password. We do this:
Wi- Fi – General settings
Here, make sure that the “Enable wireless connection” checkbox is enabled. Or you can simply look at the front panel of the router and make sure that the wireless network indicator is on or blinking.
Wi- Fi – Basic Settings
Here look at the SSID - the name of your network. This is how you will see it when searching for networks, and this is how all your neighbors will see it. Also make sure that the mode is set to B/G/N mixed - this will ensure a complete combination of standards between all possible devices and your router, so that there are no problems.
Wi- Fi - Security Settings
Here you set the basic security settings for your home wireless network. Don't ignore this point! Be sure to set your password.
What is important:
- Network authentication - WPA-PSK/WPA2-PSK mixed - this is the only way, no unsecured networks, no WEP that breaks once or twice.
- The PSK encryption key is your password, which will be requested when any device connects to your Wi-Fi. It doesn't have to be simple, but write it down somewhere right away. You can watch it again here, but it’s easier to enter it from a piece of paper.
Reset settings to original state
If you can’t enter the settings, most likely someone previously configured the device and changed the protection settings. In this case, as in many others, for example, if a new, malfunctioning firmware was installed, resetting the settings will help. It is also called a rollback, which is easy to do without going into the device settings.
For this purpose, the design of the dir model provides a physical “Reset” button. To avoid unexpected failures, it should be pressed and held for 15 seconds.
Note! Excessive force when pressing the Reset key will not give the desired result. On the contrary, it can cause physical damage, since the button is soldered directly to the board.
After the manipulation is carried out, all data about user settings, including passwords and network addresses, will be destroyed. Therefore, in order to avoid the painful selection of values for all parameters, it is advisable to save the configuration in a settings file on the computer.
Router password
We have the Internet, we have secured Wi-Fi from our neighbors, now is the time to protect any router - because now any device from the outside can connect to it, enter admin-admin and, for example, replace all your sites with their own with evil intentions. That's why:
System - Administrator Password
And change the password here to a new complex one. Nothing complicated)
Changing the password for the web interface
You can change the administrator password that you created when you first entered the router settings in the “System” section, on a special page. However, before you install another one, you need to pay attention to the messages on the page. Depending on the firmware version, it is possible that you can only change two passwords at once - for the web interface and Wi-Fi. Set general.
In this case, network protection will have to be configured again.
Other interface
As I wrote above, the D 300 had many manufacturing options, and there were many different interfaces. The whole essence described above will fit any model - and even any other router, because the process is the same everywhere. Below I’ll just show you what other interface variations there are.
Home page and access to advanced settings:
Our WAN network (where you need to add a new setting with the connection type and provider login-password):
And here are the settings for PPPoE. As a reminder, you only need to enter the Connection Type itself, as well as your login and password:
The internals of Wi-Fi look approximately the same, so I’m only showing the entry point to all the necessary settings:
Interesting advanced settings
Attention! The above points are usually enough to connect to the Internet and distribute it via Wi-Fi. I do not recommend using the complex settings of the D-Link DIR-300 for “hobbyists”.
I’ll just briefly touch on what else this model can do. Professionals will simply understand what we are talking about and organize their task without any problems. So for a mention.
- Routing. Allows you to create any routes. That's why it is a Router (router), and not just a modem. The model, although old, allows you to solve problems at home.
- VLAN – allows us to divide our networks into virtual spaces. This content filter will help to apply and separate IP television from the general traffic flow.
- Firewall, NAT and port forwarding are all present. I am attaching a video on forwarding below:
- Repeater (repeater, amplifier, repeater). If you already have some kind of network, then this router can be connected to it and simply duplicate it to expand the coverage area. This is done in the “Wi-Fi – Client” settings. Here we check the box to switch to and broadcast mode, select the desired network and everything works.
- The device is perfectly stitched. If you have an old model, go to the official website, look at the firmware for your revision and simply update the software. But for me, if there are no problems, it’s easier to leave the official firmware the same, and it only makes sense to update for professionals directly to some third-party OpenWRT.
Firmware update
If setting the factory settings did not give a positive result, the next step to restore the router to full functionality is to update the firmware. The device comes with the original version from the factory. On the official website (via search) you can find the latest firmware version and download it. The file has bin permission and is located on the website in the Firmware directory. Next, follow the steps of the following instructions:
- log into the router’s web interface (more details about this are described in the next section);
- go to the “System” -> “Software Update” section;
- click the “Select” button and then specify the path to the file on your computer;
- Click "Update".
The process will take a few minutes. After completion, an automatic reboot will occur. New firmware is usually more efficient because it eliminates microcode flaws. You can roll back to the previous version using the same method by downloading the necessary software from the website and installing it through this menu.