By default, the Telnet client is disabled in Microsoft Windows operating systems, which ordinary users are unlikely to notice. The very ability to enable it on desktop systems is present. And since this is an extremely useful tool that can be used to test TCP connections to external hosts on a specified port, let’s figure out how to activate this functionality. For those who read the article to the end, I will show you a couple of interesting options for using the telnet command, which many are not aware of.
Why do you need a telnet client?
Great when you are trying to troubleshoot network connection issues, for example we have a web server that needs to handle HTTP requests on port 80. By using telnet to connect to a web server on port 80, we can test connectivity even when we cannot load a web page using the browser.
It is possible that the connection is fine, but the problem is with the web server, or that the web server is stopped and, for example, the port is not listening at all. With telnet we can better understand what's going on.
Telnet commands:
c — close — close the current connection d — display — display the operation parameters. Available options: - WILL AUTH (NTLM authentication) - WONT AUTH - WILL TERM TYPE - WONT TERM TYPE - LOCALECHO off - LOCALECHO on o - open hostname [Port] - connect to the site (default, Port = 23) q - quit — exit telnet set — set set parameters (“set?” to display a list of them). Available options: - bsasdel character will be sent as a character - crlf carriage return mode; causes CR & LF characters to be sent - delasbs the character will be sent as a character - escape x where x is the character to switch to and from telnet terminal mode - localecho enable local echo. - logfile x where x is the current client's login file - logging performing a login - mode x where x is the console or stream - ntlm enable NTLM authentication. — term x where x — ansi, vt100, vt52, or vtnt sen — send — send lines to the server st — status — display information about the current state u — unset — reset parameters (“unset?” to display a list of them) Available parameters: - bsasdel character will be sent as a character - crlf carriage return mode; causes characters to be sent CR & LFbsasdel the character will be sent as a character - crlf line feed mode; causes the CR character to be sent - delasbs the character will be sent as a character - the escape character to switch to and from telnet terminal mode is not specified - localecho disables local echo - logging disables login execution - ntlm disables NTLM authentication. ?/h — help display help
Telnet client activation
First, we need to enable the telnet client. If you do not enable it, you will get a result similar to the one below when you try to use it:
C:\Users\MikroTik>telnet google.com 80 "telnet" is not an internal or external command, executable program or batch file.
You can enable the client either from the command line or using the GUI.
Enabling the telnet client using the command line
Run the command below in a command prompt as an administrator. Otherwise, you will receive the following system message:
dism /online /Enable-Feature /FeatureName:TelnetClient
That's all, after a few seconds the telnet client should be ready to work.
Enabling the telnet client using the GUI
Right-click on the Start button and select Programs and Features.
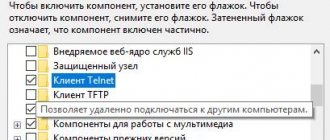
Select Turn Windows features on or off from the left menu.
The Windows Components window will open, scroll down and select Telnet Client.
Click "OK" and the progress of the telnet client installation will be displayed on the screen. Wait until the changes are applied and close the window.
How to enable and start using the program?
To begin, open a command prompt. Don't forget that the Telnet network protocol is now launched via the command line. To perform the action, simply press the “Win” key and enter the “Cmd” command in the “Run” field. Next, type the phrase “Telnet” and press “Enter”. If everything was done correctly, the command line should disappear, and instead the Telnet line will start, which should look something like this - “Microsoft Telnet”.
The next step is connecting to the server. How to enable Telnet Windows 10?
At the command prompt without errors, enter the command:
open serveraddress [port]
Upon successful completion of the operation, a window will open asking for your username and password. After successfully connecting and using the service, all that remains to be done is to properly end the session: open the command line, write the word “quit” in it and press “Enter”.
The client is launched and available for use absolutely free. Almost all available commands for using this network protocol can be downloaded on the Internet (close, display, set, st and others).
Turning the command line into a web browser
Returning to the beginning of the article, let’s check if we can connect via HTTP to the google.com web server on port 80:
A blank screen will appear, you must enter the request “GET /”, which is equivalent to requesting the root web page. We will receive the following response from the Google web server:
Now that you have enabled the telnet component on your system, you can use this command to connect to network devices using various protocols.
What is telnet?
The telnet protocol, based on TCP, allows simple text commands to be sent to a remote server to manually control processes and enable communication between them. Despite the general transition to SSH, the utility continues to be widely used.
General telnet syntax:
$ telnet options host port
Host means a remote computer (domain or IP address), port means the port through which the connection is made. The list of options is as follows:
- -4 – manually enable support for the IPv4 standard;
- -6 – the same for IPv6;
- -8 – use 8-bit encoding like Unicode;
- -E – disable support for escape sequences;
- -a – automatic connection under login from the USER environment variable;
- -b – use local socket;
- -d – activate debugging mode;
- -p – enable rlogin emulation;
- -l – specifying the authorization user.
The options listed are for connecting to a remote server. But this is just the beginning; what follows is entering commands to control processes. Here you can enable two different modes:
- line by line - first the entire line is entered into the terminal on the local computer and only then the entire line is sent to the server;
- character-by-character – sending is carried out character-by-character, in this case any input errors are critical, because even Backspace is transmitted as a certain combination of characters.
Sending an email from the command line using telnet
For example, when we can send a letter via the SMTP protocol from the command line. To do this, enter the command
telnet smtp.mailserver.com 25
If the port is open, we will receive an invitation from the server to send commands. We are interested in checking the sending of letters. Be careful when entering the following commands in sequence. Since typos will lead to errors, and commands for deleting incorrect characters do not work.
- helo your_host_name
- mail from
- rcpt to (if mail relay is not configured, be careful when using a domain other than what is supported on this mail server)
- data
- subject: subject of the letter
- content of the letter
- . (a period on a new line means the end of entering a message)
- quit (exit the communication session)
Thus, we used telnet to test the operation of HTTP and SMTP network services. Also don't forget to use a tool to troubleshoot TCP connections.
Previous Post Network Troubleshooting in 7 Steps
Next entry MikroTik router - initial setup
What is Telnet and how to use it on Windows 10
As was clear from the introduction, Telnet is a network protocol. It is used to connect the user's computer to another PC over the network.
Enabling the Telnet protocol on Windows 10
In other words, a Telnet client for Windows 10 is a PC that uses the Telnet protocol to connect to another server.
Why Telnet is considered obsolete
Nowadays, many PC users refuse to use the Telnet protocol, because it is unsafe, and any information from the server can be stolen by attackers after performing simple steps.
The SSH client is more popular and secure, and was developed later than 1969. The network protocols under consideration have a number of differences:
- Encryption of information. To improve security, SSH encrypts all data before it is sent, while Telnet simply sends plain text.
- SSH uses an authentication key. At the same time, the developers of the Telnet protocol never used authentication and thereby undermined their authority.
- SHH is easier to use than Telnet.
Note! Despite the differences presented above, both protocols are designed to achieve the same goal and are completely worthwhile.
How to install telnet
Now let’s make several training connections to understand how the utility works in practice. But first you need to install it on your computer (using Ubuntu as an example). To do this, use the command:
$ sudo apt install telnet
Once the procedure is completed, you can begin launching and using it.
Checking server availability
The first and most important command is to check the availability of the server to which you are connecting. It allows you to confirm the connection has been established. It looks like this:
telnet 192.168.1.243
In fact, this is an analogue of PING, so it is entered only when using telnet to make sure that the server accepts commands before initiating other processes.
Checking port availability
The same applies to the port check mode on the remote server. This is done with the commands:
$telnet localhost 123 $telnet localhost 22
The first line in the example above returns the response that no one is responding to the connection. The second one initiates a response that a connection via the SSH protocol is available.
Debugging
The debug mode is in demand in situations where it is important for the user to see the details of the utility's operation (in the console window). To do this, the launch command is entered with the -d prefix:
$ sudo telnet -d localhost 22
Telnet console
There are situations when it is necessary to send commands to the telnet utility running on the server, and not on the user’s local computer. In this case, you need to open the console, for which a special character is used. The default is "^[".
To enter it, just press the key combination. The telnet prompt will then be displayed on the screen. First, it is recommended to look at the current list of available commands; it is displayed after entering the command. Also at this stage it is possible to view the connection status:
telnet>status
If you wish, you can try other commands available for input in the current session.
Site testing
A common use case for telnet is to connect to a specific site through the console. Pages are not displayed in the usual “beautiful” form, but as a list of information that is transferred from or to the server. Example command:
$ telnet test-site.ru 80
Once connected, simply enter the /GET , and the web server will return the page and headers that would be sent to the browser during a normal connection.
Connecting to a remote server
The rejection of telnet is often associated with the fact that the transmitted commands are easy to “overhear” from the outside. In this case, there are risks of unauthorized connection. But it is entirely acceptable to try this mode as a study of materiel. Example command:
$ telnet localhost 23
The default port is 23, so it’s easy to “simplify” the command and remove the number. The connection will still be made according to the same principle. After the request, all you have to do is enter your login and access password, and then begin managing the remote computer.
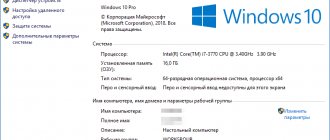
How to run Telnet in Windows:
Press the Win+R key combination to open the Run window:
In the “Open” line, enter the command cmd and click on “OK”. So we will launch the Windows command line. Then enter the telnet and press the Enter key. The Windows 10 telnet client is running and you can use it.
By default, the Telnet client is disabled in Microsoft Windows operating systems, which ordinary users are unlikely to notice. The very ability to enable it on desktop systems is present. And since this is an extremely useful tool that can be used to test TCP connections to external hosts on a specified port, let’s figure out how to activate this functionality. For those who read the article to the end, I will show you a couple of interesting options for using the telnet command, which many are not aware of.
April 2022 Update:
Now we recommend using this tool for your error. Additionally, this tool fixes common computer errors, protects you from file loss, malware, hardware failures, and optimizes your computer for maximum performance. You can quickly fix problems with your PC and prevent other programs from appearing with this software:
- Step 1: Download PC Repair & Optimizer Tool (Windows 10, 8, 7, XP, Vista - Microsoft Gold Certified).
- Step 2: Click “ Start Scan ” to find Windows registry issues that may be causing problems with your PC.
- Step 3: Click " Fix All " to fix all problems.
Network protocol and text interface
TELNET is a communication tool that establishes a transport connection between terminal devices, clients, that is, your computer and someone else’s machine, a server that supports this connection standard. This is not a special program, but just a network protocol, but the word TELNET (terminal network) also refers to various utilities that also use this protocol. Today Telnet is present almost everywhere, all operating systems, one way or another, use it, including Windows.
TELNET implements a text interface, which differs from the graphical interface familiar to the average user in that all commands must be entered manually.
What does all this give us?
Previously, this service was one of the few ways to connect to the network, but over time it has lost its relevance. Today there are much more convenient programs that do all the work for the user, and do not force him to memorize various commands in order to perform the simplest actions. However, some things can still be done using Telnet.
Network connections