Author of the article
Yulia Dyakova
System administrator with software engineer skills.
It’s not for nothing that the manufacturers of the Kinetic Giga line of routers call them an Internet center. These routers combine a lot of useful functions at a very reasonable price. Let's review this model and talk about ways to configure Zyxel Keenetic Giga routers.
Indicators and connectors
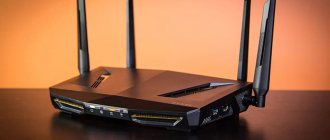
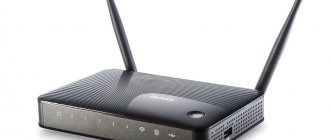
The body of the Keenetic Giga router is made of thick plastic in white and gray tones. There are 9 green indicators on the top panel. The LAN indicators may glow orange to indicate that you are connected at a maximum connection speed of 1 Gbps.
Indicator values from left to right:
- nutrition;
- 4 LAN indicators showing the connection between the router and the computer;
- 1 WAN indicator showing the router’s connection to the provider’s network;
- Wi-Fi;
- globe-shaped indicator displaying the connection status;
- USB.
The back panel of the router has the following connectors and buttons:
- 2 connectors for detachable antennas;
- Wi-Fi on/off button;
- WPS button;
- factory reset button;
- 4 LAN ports;
- 1 WAN port;
- power socket;
- router on/off button.
There are 2 USB ports and control buttons on the side panel.
Connection
The connection algorithm directly depends on the method of use:
- router for a dedicated Ethernet line;
- router for ADSL line (ADSL modem required);
- connection to the mobile Internet via a USB modem.
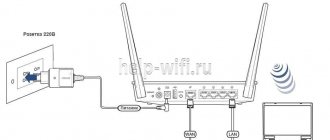
Router for leased Ethernet line
In this case, the router must be connected to the mains and then to the computer. The connection is made using an 8-wire network cable included in the delivery package. One end of the cable is inserted into the PC network card, the second into one of the 4 LAN connectors. The provider's Ethernet cable is connected during the router setup process.
Router for ADSL line
The Kinetic Giga router connects to the ADSL modem according to the instructions:
- Connect one of the LAN ports of the ADSL modem to the WAN connector of the Internet center.
- Connect the router to your computer using one of the 4 LAN ports of the first and the network card of the second.
It is recommended to reconfigure the ADSL modem to bridge mode.
Connecting to mobile Internet via USB modem
When choosing this connection method, it is important to consider the location of the USB modem. It is best to place it near a window, away from objects that cause interference.
Connection algorithm:
- connect the 3G/4G modem to one of the USB connectors of the Internet center;
- connect it to your computer for further configuration.
Conclusion
When releasing a new model, the Taiwanese manufacturer Zyxel tried not only to give the product a new name, expanding the model range, but to make significant changes to the hardware and software. By using the latest components, Zyxel has achieved a significant increase in the performance of Keenetic Giga II, which especially pleased fans of downloading information from file-sharing sites.
External antennas in combination with a powerful amplification module provided high-quality wireless communication anywhere in the consumer’s living space. The addition of Giga (gigabit per second) in the name is fully justified.
pros
Users include the increased performance of Keenetic Giga II as a positive feature due to increased write and read speeds over the channel of external drives connected to any USB connector. If its predecessors had 4-5 MB/s, this model’s speed is limited to 15 MB/s. This allows you to “download” HD movies in no more than half an hour, using the BitTorrent client built into the software. The Intelliqos smart consumer traffic distribution function has been implemented.
The ability to use a mobile 3G/4G modem from any operator allows you to use Keenetic Giga II not only in urban environments, but also in country houses where the cable network is not developed. DLNA support gives you the chance to view and listen to video and audio content, as well as information from a connected external USB drive.
Minuses
Keenetic Giga-2 has few negative ratings. Those who only access the internet via a dial-up line will not have to take advantage of the speed benefits due to the limited speed of the provider. It can be noted that there is only one Wi-Fi band (2.4 GHz), which in urban environments requires searching for the optimal channel and its bandwidth to ensure a minimum of interference. The remaining “cons” are related to the personal preferences and habits of users (color, shape of the case, and so on).
Login to router settings
You can configure the Keenetic Giga router either automatically or manually. In the first case, you need to launch NetFriend from disk, and in the second, you need to launch the web configurator.
Instructions for automatic login:
- insert the supplied disc into the PC drive and wait for the program to start;
- in the menu that appears, select “Quick setup Zyxel NetFriend”.
If the program does not open automatically, run Autorun.exe.
Instructions for manually entering settings:
- open a browser, where in the address bar enter the device’s IP address – 192.168.1.1;
- Enter the administrator account information, by default it is admin and 1234.
Changing the Administrator password
Another important point is the password for logging into Keenetic Giga. If suddenly you did not change it right away, you should definitely do this at the end of the configuration process. Open the section “Management” -> “Users”:
Find the “Administrator Account” group of parameters and enter a new passphrase in the “Password” field. Click on the “Save” button.
Note: If you need to give someone on your home network access to the Kinetic Giga web interface, you can create a separate user account with limited rights for these purposes.
Automatic setup
The NetFriend program, used to configure the Keenetic Giga router in automatic mode, is not available on already configured devices. Therefore, it is recommended to reset it to factory settings first. In addition, it is only used when connecting via a dedicated Ethernet line.
Automatic setup is intuitive. Just follow the instructions that appear on the monitor screen.
Step-by-step instructions for setting up:
Click "Connect to the Internet" in the main menu of the program.
- Fill in the connection parameters by selecting the country, locality, provider and services. If your provider is not in the drop-down list, check the “my provider is not in the list” box and click “Next”.
- Enter the account information issued by your provider. When filling out the fields, take into account the case of the identification data. If there is the slightest error, Internet access will be denied, which the program will certainly report.
- Set up your wireless network by selecting “Set up a Wi-Fi wireless network.” The process of scanning the frequencies by the program takes some time.
- If you agree to use the program's recommended settings, click Next. Otherwise, change them.
After completing the wireless network setup process, NetFriend will automatically save your account information to a text file on your PC desktop.
To connect a TV, in some cases it is necessary to assign a separate LAN port that will connect the router to the set-top box. Port reassignment is carried out in the “Connecting IP-TV” item. After completing the settings, the set-top box needs to be rebooted.
Description
In this compact device, the manufacturer managed to combine simplicity, good performance and wide functionality.
However, the cost differs only slightly from the previous model.
Therefore, it is not surprising that this WiFi router has become very popular among users. Gigabit ports are responsible for a fast and reliable connection to the network. Their standard number will suit most owners of small apartments for creating a home network of several computers.
The built-in amount of RAM is 256 Mb and allows it to function for a long time without failures or freezes, and the internal flash memory (16 Mb) is quite sufficient for software and its regular updates.
If it is necessary to cover a larger area with a wireless signal, it is possible to easily replace both antennas with elements with a higher gain. But even the power of the bundled translators is enough for a comfortable connection to Wi-Fi in a two- or three-room standard apartment.
Manual setting
The web configurator consists of a main menu and a system monitor. The first one contains all the settings, and the second one displays summary information about the system.
Since the router has several operating modes, setup begins with its selection. By default, the operating mode over a dedicated Ethernet line is activated. All further actions are carried out in the “Internet” section of the main menu.
Before setting up, you need to find out from your provider what network parameters it uses: Internet access protocol, MAC and IP address, DNS server and default gateway.
Instructions:
- Open the “Connection” subsection, where you need to fill in the fields with the provider’s data.
- Go to the “Authorization” subsection, select the access protocol and, if necessary, fill in the remaining fields.
This completes the Internet setup. If you have entered your user account information correctly, Internet access will be open.
The VPN is configured in the same way.
Setup instructions:
- In the IP settings settings of the “Connection” subsection, select “Automatic”.
- In the “Obtain DNS server addresses automatically” check the box.
- If there is a hard binding of the MAC address, in the “Use MAC address” field, select “Take from computer”. Otherwise, don't change anything about it.
- Go to the “Authorization” subsection, where in the “Internet Access Protocol” field select “L2TP”.
- Fill out the “Server Address”, “Username” and “Password” fields, and check the “Obtain an IP address automatically” box.
Save the changes by clicking the "Apply" button.
Installing new firmware
It is recommended to download the software using the official Zixel resource, where all current software modifications are available for any model of the Kinetic version.
Having saved the distribution kit in the PC memory, then in the device settings menu you need to perform the following steps:
- Open the “System” tab;
- Then go to the “Files” tab;
- Show the program the location of the downloaded firmware;
- Click “Replace”;
- Wait until the process completes and the device automatically restarts.
Setting up via mobile application
The Zyxel Keenetic Giga router has its own application for configuration and management. It's called "My.Keenetic" and is available on both Google Play and the AppStore.
After installing the application, follow the instructions:
- Launch the application and connect to the router via Wi-Fi network.
- Set the administrator password and click “Save.”
- Open the Internet tab, indicated by the globe icon.
- Run the NetFriend Auto Configuration Wizard and follow the application prompts.
- Connect your provider's cable and answer a few questions.
- If the provider has provided account details, answer “Yes”, otherwise click “No”.
- Select a method for setting the IP address. Manual configuration is selected when using a static IP address. Otherwise, click the “Automatic” button.
- If your provider uses a MAC address, click Yes. In the next window, enter it. If not, after selecting the appropriate button, click “Done”.
- Wait until the Internet connection check is completed. If everything is configured correctly, the following message will appear on the phone screen: “The Internet is configured.” If the program detects problems with Internet access, contact your provider's technical support.
Reviews
The majority of reviews are positive. Among them there are not only Zyxel adherents, but also users who recently made a purchase. Here are some of them:
- “Amazing technical support compared to other manufacturers. They can even configure it themselves when connecting remote access. The Russian-language interface and the manual from the butt help with everything.”
- “I turned it on, “talked” with the “Quick Setup Wizard” and forgot for a year, until the light was turned off. You can even overpay for such a device.”
- “Wi-Fi” breaks through two 30 cm concrete walls. No freezes. I don’t regret my choice of Zuhel Kinetics.
Podgornov Ilya Vladimirovich All articles on our site are audited by a technical consultant. If you have any questions, you can always ask them on his page.
Wi-Fi connection and settings
To create a wireless network in the web configurator, follow the instructions:
- In the “Wi-Fi Network” section, select the “Connection” subsection, in which specify parameters such as network name, standard and signal strength. Don't forget to activate the network by checking the "Enable wireless access point" box.
- Select the “Security” subsection. Fill out the required fields by specifying the authentication standard, security type, and network password. It must consist of a set of Latin letters and numbers.
Don't forget to click the "Apply" button to save the selected settings.
Repeater mode
The Zixel Kinetic Giga router can operate in wireless bridge mode. To do this, you need to connect it to the main router via a Wi-Fi network.
Instructions:
- Open the device's web configurator.
- Select the “Home Network” section, “Network Organization” subsection, where change the device’s IP address from 192.168.1.1 to another in the same network. For example, you can use the IP address 192.168.1.2.
- Go to the web configurator at the new IP address, open the “System” section, where select the “Operation Mode” subsection.
- Activate the “Wi-Fi Wireless Bridge” mode by checking the corresponding window and disable the DHCP server.
- In the “Wi-Fi Client” section, select the “Browse Networks” subsection. In the list that opens, find the wireless network of the main router, highlight it and click the “Connect” button.
Software Update
Every user probably knows about the need for timely software updates. Outdated software can not only start to malfunction, but also often does not support the latest features added to the device by the manufacturer. To maintain stable operation of the router, it is necessary to regularly update its firmware, which serves as its kind of “operating system”.
Let's start this process:
- connect the router to the computer using a cable;
- go to its interface, select the “System” and “Firmware” section, where the current version of the firmware installed on the device is indicated;
- go to the official website;
- here we find “Product Classifier”, then “Network Equipment”;
- in the “Routers” section we find our model – Keenetic GIGA 2;
- go to its page and go to the “Support” tab, click on the “Firmware” link;
- at the top of the list that appears is the number of the latest firmware version; if a newer version is available than the one installed, download it;
- indicate the directory where the file will be stored and wait for it to download;
- after downloading is complete, unpack the archive;
- return to the control panel and click the “Browse” button;
- indicate the path to the downloaded and unzipped file;
- we launch the firmware and wait for the process to complete, after which the system will reboot.
Important! While updating the firmware, do not turn off the power or remove cables from the device - this may not only stop the update process, but also lead to serious malfunctions of the equipment.
Reset
You can return the device to factory settings either physically or via software. In the first case, you will need to press and hold the “Reset” button for 10-12 seconds
It is important not to release it until the power indicator starts blinking rapidly. At the same time, you cannot hold it pressed for more than 30 seconds, otherwise the emergency recovery mode will start.
Reset instructions in the web configurator:
- Go to the “System” section, “Configuration” subsection.
- In the window that opens, click the “Reset” button and confirm your actions by clicking the corresponding button.
Since configuration files may have different formats that are incompatible with each other, it is recommended to save the old configuration of the Internet center before updating the firmware.
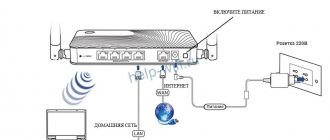
How to connect the Keenetic Internet center?
Connect the power adapter. Connect the Internet (a cable with an RJ-45 connector that was laid into your home by your Internet provider) to Ethernet port 0 (aka WAN, or Internet). On Keenetic routers it is highlighted in blue. If your Internet is connected via an ADSL modem or an optical terminal, then you connect the network cable from the modem/terminal to the Keenetic Internet center in the same way.
Plug the power adapter into a power outlet.
Next we need to connect a device to the router from which we can configure it. It is advisable to use a PC or laptop. If these devices are not available, you can connect and configure from your phone or tablet. The computer can be connected to the router using a network cable (patch cord). It is included with the router. We connect to any LAN port.
If you have a PC with a Wi-Fi adapter, a laptop, a phone, etc., then they can be connected to the Keenetic router via Wi-Fi. The router distributes the Wi-Fi network immediately after turning on the power (pay attention to the indicators). The factory name of the Wi-Fi network and the password for connecting can be found at the bottom of the router.
On the device that you want to connect to the router, you need to turn on Wi-Fi, select the network in the list (with the name indicated on the router), enter the password and connect. If you are connecting a mobile device, try turning on the camera and pointing it at the QR code. This way you can connect without manually entering a password.
Please note: if after turning on the router the devices do not see its network, it has a different name, the password does not match, etc., then the router may have already been configured. So that the old settings do not interfere, and you can configure your Keenetic according to the instructions, you need to reset the settings. To do this, use something sharp to press the Reset button (which is in the photo below) and hold it pressed for 10-12 seconds.
After connecting to the router, you may not have access to the Internet. This is because the router has not yet been configured. You can access the web interface of the Internet center without access to the Internet.