In this instruction, we will configure the TP-Link TL-WR740N router. This is a very popular router that is in great demand due to its low price and quality. Many of my friends have the TP-Link TL-WR740N installed, which does its job perfectly. And it was created exclusively for home use. And then, if you have a lot of devices at home, and the house itself is large, then the TL-WR740N may not be able to do its job. This is normal, because this is a budget router.
But, even despite its low price, it looks just great. Beautiful design, matte case, it is possible to hang the router on the wall, all these are undoubtedly advantages. Of course, I would also like to see a power on/off button and a separate button to turn off Wi-Fi, but unfortunately they are not there. The only problem is when when connecting a large number of devices, in online games, when downloading torrents, the Internet may disappear. And the router will have to be rebooted often. I wrote about it here. But this is quite normal for a budget model.
This model has been produced for a very long time, there are already 6 hardware versions, which means that it has already been modified and updated (in terms of hardware) six times. This router has received many awards and won many competitions. A truly popular model.
Now I will show you how to configure the TP-Link TL-WR740N. This will be complete instructions for setting up the Internet, Wi-Fi network, and setting a password for the wireless network. Well, let's look at the process of connecting the router. It doesn’t matter whether you have a new router just from the store, or you’ve already used it, the instructions will work for you. However, these instructions are also suitable for Tp-Link TL-WR741ND.
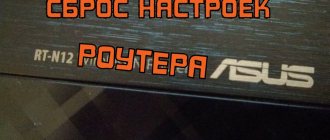
If you have already tried to configure the router, then it would be a good idea to reset the TP-Link TL-WR740N settings . To do this, turn on the power and press the WPS/RESET , which is located on the back of the router, for 10 seconds.
You can look at the indicators, they should all light up. After this you can release the button.
Indicators and connectors
There are 9 indicators on the information panel. Values from left to right:
- nutrition;
- connection status;
- Wi-Fi;
- 4 LAN port indicators;
- communication with the provider;
- QSS.
The router's connectors and buttons are standardly located on the rear panel:
- reset – reset to factory settings;
- nutrition;
- turning on/off the device;
- 4 LAN ports;
- 1 WAN port;
- QSS;
- antenna.
Connection
Install the router in a permanent place and follow the algorithm below:
- Connect the power adapter first to the router and then to the electrical outlet.
- Turn on the power.
- Insert the ISP cable into the WAN connector. When connecting the router as a repeater for a DSL modem, insert the LAN cable coming from it into the WAN connector.
- Connect the router to your computer or laptop. Use the included network cable for this. Insert one end into the LAN port of the router, and the other into the network card connector.
If you plan to set up your router over a wireless network, ignore step 4. Instead, connect to the Wi-Fi network and log in to it. The network name and password for access are indicated on the information sticker located on the bottom of the device.
Model overview
WR740N is a high-speed router based on 802.11n technology. It is compatible with all gadgets that support IEEE 802.11b/g connection standards. A distinctive feature of the model (if we take into account operating standards) is the increased data transfer speed and increased Wi-Fi coverage range. All this will be needed for comfortable viewing of streaming video, IP telephony and online games. Overall, the TP-Link WR740N is a high-speed router at a budget price.
The device looks standard for devices from this company. The router has a stylish plastic case with rounded edges. The front part is slightly tapered, and the indicator panel (black stripe) goes well with the overall white color of the device.
At the bottom of the router there are anti-slip feet that provide stability during installation. There are also special ears - for those who prefer to place the network device in a vertical plane, that is, on the wall. There are also ventilation holes on the bottom, so the router must be installed in such a way as to ensure air circulation.
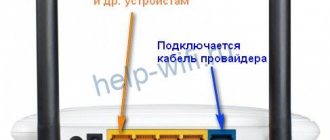
All ports are located on the back of the case - it is to them that wires from other network devices are connected:
- The WAN connector, intended for connecting an Internet provider cable or modem, is highlighted in blue.
- LAN - 4 yellow ports through which a computer, TV set-top box, media center and other devices are connected.
- Nearby is the POWER connector - the power cord is inserted into it.
- The ON/OFF button is located right there - it allows you to turn the router on and off.
- There is also a RESET button used to reset the equipment settings.
- The QSS button (another name for WPS) is a technology that allows you to connect to a router without entering a security combination).
Indicators
On the front of the case there is an elongated black screen - here there are indicators that make it easy to assess the operating status of the router and what devices are connected to it. Each indicator has several lighting scenarios. To learn how to read them, see the table below.
In short:
- PWR (Power) - if it lights up, it means the device is receiving power.
- SYS - lack of indication indicates a system failure.
- WLAN - operation of a Wi-Fi wireless network.
- LAN (there are 4 of them, just like ports) - if the indicator is on, it means a device is connected to the connector. Flashing indicates data exchange.
- WAN is an Internet connection indicator that works similarly to LAN. If it lights up orange, it means there is no Internet or it is not configured.
- QSS (WPS) - shows whether another device is connected to the router using this technology.
Login to router settings
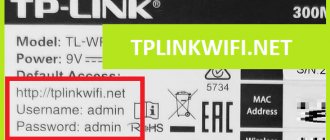
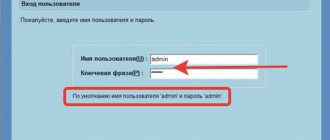
To enter the settings of the TP-Link TL-WR740N, open your browser and type the symbolic or numeric address 192.168.0.1 in the address bar. Both are listed on the information sticker on the bottom of the device. When you log into the web configurator, the router will ask for a login and password for authorization.
The default combination is admin admin. If you can’t log in, then you need to check the TCP/IP protocol settings on your PC.
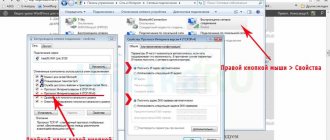
Algorithm of actions for Windows 10:
- In the lower right corner (tray) click on the Internet icon. Next, select “Network and Internet settings”.
- In the “Status” section, select “Configure adapter parameters”
- Select the active connection, right-click on it and open properties.
- Select IP version 4 and open properties.
- We set the IP and DNS to be obtained automatically. Save the settings.
Comments (11)
Dmitriy
12/28/2014 at 11:43 pm
Thank you very much for your help. Helped a lot.Answer
Lily
23.11.2015 at 19:33
And it helped me, thank you!)
Answer
Sergey
23.11.2015 at 20:29
The antenna with the GS E501 unit is connected via 2 coaxial cables. GS E501 with TV – 1 via HDMI cable GS E501 with routerTP-LinkWR-740N ver.4.27 via UTP cable to the WAN connector in GS C591 adapter included with TV – 2 via HDMI cable
Answer
Kirill Sevastopol
07/16/2016 at 11:16
Thank you Briefly and clearly.
Answer
Alexander
03.10.2016 at 23:00
Thank you. Your article helped me out. When I went to the “website” of the router, I simply clicked “Quick setup” - and really quickly configured the router. The problem was solved when I cloned the MAC address, otherwise I didn’t want to connect to the Internet. Thank you, God bless you.
Answer
Alexei
02/09/2017 at 18:42
I did everything as written (PPPoE), clicked save, and I have a permanent connection, what should I do?
Answer
Setting up the router
03/14/2017 at 11:19
Is PPPoE (high speed connection) broken on your computer? Have you tried refreshing the page in your browser where it shows “connection”?
Answer
Elena
01/24/2018 at 10:35
The wan connector does not work, how can I make another of the 4 connectors the main one.
Answer
Setting up the router
01/27/2018 at 18:30
This is not possible everywhere. It’s definitely not possible on TP-Link on native firmware.
Answer
Irina
01/30/2018 at 16:20
I did everything as described, the state is connected to tplinkwifi.net. And then a window from Rostelecom appeared. There was a failure when connecting to the Internet. I checked the login and password and rebooted the equipment. But in the end it doesn't connect.
Answer
Setting up the router
01.02.2018 at 13:13
and where did this window come out? on a computer (not in a browser window)? I just wrote that there is no need to try to start the same connection (Rostelecom) on the computer after you have configured the connection on the router.
Answer
Automatic setup
To configure the router automatically, use the included CD.
Step by step guide:
- Insert the disc into the drive and wait until the installation wizard starts.
- Left-click on the name of the model being configured, and select “Quick Setup Wizard”.
- Select the installation language and click the "Start" button.
- Complete the installation by following the installation wizard prompts.
The setup is complete, check your Internet connection.
If you do not have a disk drive, you can configure the TP-Link TL WR740N router yourself in the device’s web configurator.
Step-by-step instruction:
- Enter your router settings.
- In the menu on the right, select “Quick Setup” and click “Next”.
- If you don't know what technology your provider uses, select "Auto-detect" and click "Next." Some versions do not have this item; they ask you to indicate the country, region and select a provider.
- Wait for the auto-detection process to complete and fill in the required fields.
- The next step is to configure the wireless mode. Enter the network name and password.
- Once the setup process is complete, check if there is internet.
The type of connection and the necessary settings must be in the agreement with the provider.
If you know what type of connection your ISP uses, you can configure your router manually.
Additional features
Completing the steps described above is usually enough to provide access to the Internet and distribute it to devices on the network. Therefore, many users finish configuring the router here. However, there are a number of interesting functions that are becoming increasingly popular. Let's take a closer look at them.
Access Control
The TP-link TR-WR740n device allows you to very flexibly regulate access to the wireless network and the Internet, which allows you to make the network it controls more secure. The following options are available to the user:
- Restricting access to settings. The network administrator can make it so that only a specific computer will be allowed to enter the router settings page. This function is located in the “Security” section of the “Local Management” subsection. You need to check the box to allow access only to certain nodes on the network and add the MAC address of the device from which you entered the settings page by clicking on the corresponding button.
In this way, you can designate several devices from which you will be allowed to configure the router. Their MAC addresses must be entered into the list manually. - Remote control. In some cases, the administrator may need to be able to configure the router while outside the network he controls. For this purpose, the WR740n model has a remote control function. You can configure it in the subsection of the same name in the “Security” section.
It is enough to simply indicate the Internet address from which entry will be allowed. The port number can be changed for security purposes. - MAC address filtering. The TL-WR740n router has the ability to selectively allow or deny access to W-Fi based on the device’s MAC address. To configure this function, you must enter the subsection of the same name in the “Wireless Mode” section of the router’s web interface. By enabling filtering mode, you can block or allow individual devices or a group of devices to access the network via Wi-Fi. The mechanism for creating a list of such devices is intuitive.
If the network is small, and the administrator is worried about its possible hacking, it is enough to compile a list of MAC addresses and add them to the allowed category in order to completely block the possibility of accessing the network from an unauthorized device, even if the attacker somehow finds out the Wi-Fi password .
The TL-WR740n has other network access control capabilities, but they are less interesting for the average user.
Dynamic DNS
Customers who need to access computers on their network from the Internet may benefit from the Dynamic DNS feature. A separate section in the TP-Link TL-WR740n web configurator is dedicated to its settings. To activate it, you must first register your domain name with your DDNS service provider. Then take the following steps:
- Find your DDNS service provider in the drop-down list and enter the registration data received from it in the appropriate fields.
- Enable dynamic DNS by checking the corresponding checkbox.
- Check your connection by clicking the “Login” and “Logout” buttons.
- If the connection was successful, save the created configuration.
After this, the user will be able to access computers on his network from the outside using the registered domain name.
Parental control
Parental controls are a feature highly sought after by parents who want to control their child's access to the Internet. To configure it on the TL-WR740n you need to take the following steps:
- Enter the parental control section of the router's web interface.
- Enable the parental control function and designate your computer as the controlling one by copying its MAC address. If you plan to assign another computer as control, enter its MAC address manually.
- Add MAC addresses of controlled computers.
- Configure the list of allowed resources and save changes.
If desired, the action of the created rule can be configured more flexibly by setting up a schedule in the “Access Control” section.
Those wishing to use the parental control function should keep in mind that in the TL-WR740n it operates in a very unique way. Enabling the function divides all devices on the network into one controlling device, which has full access to the network, and managed devices, which have limited access according to the created rules. If the device is not classified into any of these two categories, it will be impossible to access the Internet from it. If this state of affairs does not suit the user, it is better to use third-party software to implement parental controls.
IPTV
The ability to watch digital television via the Internet is attracting more and more users. Therefore, almost all modern routers provide IPTV support. The TL-WR740n is no exception to this rule. Setting up this feature is very easy. The sequence of actions is as follows:
- In the “Network” section, go to the “IPTV” subsection.
- Set the “Mode” field to “Bridge”.
- In the added field, indicate the connector to which the set-top box will be connected. For IPTV, only LAN4 or LAN3 and LAN4 are allowed.
If you cannot configure the IPTV function or such a section is completely missing on the router settings page, you should update the firmware.
These are the main features of the TP-Link TL-WR740n router. As can be seen from the review, despite the budget price, this device provides the user with a fairly wide range of options for accessing the Internet and protecting their data.
We are glad that we were able to help you solve the problem. In addition to this article, there are 12,719 more instructions on the site. Add the Lumpics.ru website to your bookmarks (CTRL+D) and we will definitely be useful to you. Thank the author and share the article on social networks.
Describe what didn't work for you. Our specialists will try to answer as quickly as possible.
Manual setting
Instructions using PPPoE (Rostelecom) as an example:
- Enter your router settings.
- In the menu on the left, expand the “Network” branch, select “WAN”.
- On the right side of the window, select “WAN connection type.”
- Fill in the required fields. For a PPPoE connection, this is the login and password, which is specified twice. If your provider has assigned you a static IP address, activate the corresponding window by placing a dot next to it.
Fill in the fields that appear: IP address, Subnet mask, Gateway and DNS. - Save the settings and try to access the Internet.
The TL-WR741ND model is configured in a similar way.
Configuring PPtP (VPN) while automatically obtaining a local IP address (DHCP)
- type : select L2TP/Russia L2TP
- Username: your login according to the contract
- Password and password confirmation: your password according to the agreement
- We put an end to Dynamic IP
- IP address/Server name - server address or name (specified in the contract)
- MTU Scaling - Change the value to 1450 or less
- WAN connection mode - Connect automatically
- After entering the above settings, click Save . The Internet is configured.
Setting up via mobile application
If your provider does not require you to specify an IP address to connect, you can configure the TP-Link TL WR740N router through the mobile application. To do this, you must first install TP-link Tether on your smartphone or tablet. It is available for devices running Android and iOS OS.
Setup instructions:
- Launch the application and create an account following the on-screen prompts. Connect to the router's network.
- Select the router and log in to the settings by entering your username and password. By default, both parameters are the same - admin.
- Call up the menu and select “Internet Connection”.
- In the field at the top, select the connection type, fill in the required fields, and click “Save.”
If the connection type and authorization data are specified correctly, the router will start distributing the Internet. If there are errors, the network will appear, but without Internet access.
TP-LINK Tether phone application
I advise you to immediately install this application from Google Play or the App Store. It allows:
- Quickly set up the device.
- Changing the Wi-Fi password.
- Shutting down the freeloading neighbor.
- Monitor all connected devices.
- Setting up parental controls to prevent slow-witted people from surfing dangerous sites.
To use it, just download it to your smartphone:
- Android
- iOS
After installation, simply go to the application and follow the instructions to set up the Internet and Wi-Fi.
Wi-Fi connection and settings
To configure the wireless network of the TP-Link TL WR740N router, go to its settings, select “Wireless mode” and then step by step:
- Sub-item “Wireless mode settings”.
- Enter the desired network name and check the boxes as in the screenshot.
- Save the settings.
- Go to the next sub-item and set up Wi-Fi protection following the instructions in the picture.
After saving the password, you will need to reconnect to the wireless network.
Setting up IPTV
To configure IPTV, launch and log in to the device’s web configurator and follow the visual instructions:
- Expand the “Network” branch, select the “IPTV” section.
- IGMP Proxy must be enabled. Set the bridge mode and select the port to connect the set-top box.
- Don't forget to save your settings.
If your ISP uses VLAN ID, follow these instructions:
- In the IPTV section, select Tag VLAN mode.
- Fill in the fields provided by the provider.
- Select the port for the set-top box.
- Save your settings.
Change Password
The default password can be changed in the router's web configurator.
Instructions:
- Expand the “System Tools” section.
- Select "Password".
- Please provide a valid username and password.
- Enter your new login, password and confirmation.
Don't forget your new password, without it you won't be able to access the web configurator.
How to change and reset your password
The default password on many routers is “admin”; it is recommended to change it immediately for security reasons. To do this, being in the main menu of the router, click “System Tools”, go to “Password” and set a new combination.
It happens that users forget the password or buy a used router where it has already been changed, and the new owner was not informed about this. In this situation, use the “Reset router settings to factory settings” option.
This is easy to do: press the “WPS/RESET” button on the back of the case for 10 seconds. It is recessed inside, which prevents accidental pressing, so use something thin (a toothpick or a straightened paper clip). If everything is done correctly, SYS will begin to flash slowly and then quickly on the indicator panel. Then release the button and wait for the hardware to boot. Along with the password, the router parameters will be reset, so you will have to configure it again.
Repeater mode
Configuring the device in repeater mode begins by specifying a static channel for the wireless network on the main router. On TP Link routers this is done as follows:
- Enter your router settings.
- From the menu on the left, select Wireless Mode.
- In the window on the right, in the “Channel” field, select a number.
- Save the settings and close the web configurator.
Now you need to configure the second router in repeater mode.
Step-by-step instruction:
- Enter the settings and select “Network”, sub-item “LAN”.
- In the window on the right, change the IP address. To properly configure the router in repeater mode, both devices must be on the same subnet. If the main IP address is set to 192.168.1.1 or 192.168.0.1, then on the second one write the same, but one more digit - 192.168.1.2 or 192.168.0.2, respectively.
- Next, select “Wireless Mode” in the menu on the left, and enter the channel number on the right, the same as on the main router.
- Check the “Enable WDS” box, then click the “Search” button.
- In the list that appears, find the network whose signal you want to strengthen and click on “Connection”.
- Select the key type, specify the password for the wireless network you are creating and save the settings.
- Reboot the router and go to the settings again at the specified address.
- Select Status from the menu on the left.
- In the window on the right, check the line “WDS Status”. If it says “Installed” next to it, then the router has already connected to the main router and can distribute the Internet.
- Set up network protection by step-by-step following the steps shown in the picture.
The router is configured in repeater mode.
Firmware update
You can download the current router firmware on the official website.
To flash TP-Link TL WR740N, follow the instructions:
- In system tools, select “Firmware Update”.
- Select the file by clicking on the button, specify the path to the firmware file.
- Select it and click "Open".
- Click Update.