Windows operating systems
29.07.20192671
A user of Microsoft products who knows how to quickly and effortlessly launch Windows 7 in safe mode probably notices from time to time that a computer or laptop has begun to work slower, or, in other words, slow down. One possible reason for this behavior is that the physical random access memory, or RAM, is full. Let's try to figure out how to unload the RAM without harming the functionality of the PC.
Task Manager
It’s worth warning right away: the amount of RAM occupied by programs and background system processes is constantly changing. Moreover, measures that are effective in one case may be useless in another - it all depends on the specifics of the applications used. Thus, any cleaning of the RAM of a computer running Windows 7 or another OS is only a temporary measure.
If the problem of lack of RAM has become constant, instead of trying to clear the existing volume, it would be more useful to think about purchasing a new die. In addition, it makes sense to diagnose the current state of RAM - timely measures will help avoid serious system errors leading to a “blue screen” and the need to study the Memory Dump report.
Is your Windows computer running normally, but does your RAM fill up sporadically? Great! This means you can start cleaning without worrying about the general condition of the computer. The easiest way to clean up RAM and slightly improve computer performance on Windows 7 is to end unnecessary processes using the Task Manager:
- By right-clicking on any free space in the “Taskbar”, you need to select “Launch Task Manager” from the context menu.
- On the “Programs” tab, select currently unused items that are wasting RAM, and click on the “End” button - interrupting the operation of most applications in this way is easier than making a bootable Windows 7 USB flash drive.
- Repeat the same manipulations for the remaining unclaimed programs.
- If the application automatically restarts and again takes up RAM on the computer, you need to act differently: go to the “Processes” tab in the “Task Manager”, find the one you need and use the “End Process” button.
- Then confirm your choice.
- In addition, you can clear RAM by suspending some unused system services - of course, the user should first find out what exactly he is stopping. By going to the “Services” tab and selecting the unwanted one, you need to right-click on the title and select the “Stop service” option from the menu.
- Next, two possible scenarios for the development of events are possible. If the process is successfully stopped, you can start it again at any time by selecting the appropriate command in the same context menu.
- If the service is critical to the operation of Windows 7, it simply cannot be stopped, which means the user should move on to the next cleaning item.
The user will find a little more options for managing operating memory on a computer running Windows 7 on the “Performance” tab:
- By clicking on the Resource Monitor button, it will open a list of all running processes.
- For any of them (or several at once, by checking the checkboxes on the left), you can choose not only a complete stop, but also a temporary stop—essentially, a freeze—as a measure to clear the RAM.
- Now the computer owner just has to confirm the action and check how much better the operating system has become.
Important: to “wake up” a suspended process, just select the “Resume” option in the context menu; A completely closed application will have to be launched again.
Cleaning autostart
Many programs are added to Windows autorun during installation and begin working in the background when the computer starts. They are often the reason for a sharp drop in computer performance, loading RAM with unnecessary processes. To start optimization and determine which of them are in startup, do the following:
- go to the “Start” menu, then “All Programs”;
- find the “Startup” folder and view its contents;
- We leave only the essentials in it; the rest can be removed, freeing the RAM from unnecessary load.
There is another way to get to the cleaning menu:
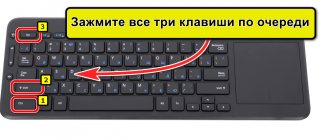
- press the combination “+R” on the keyboard;
- in the “Run” window that appears, enter “msconfig” and then click “OK”;
- The startup optimizer will start.
The previously described CCleaner will also help you check and configure startup:
- launch the utility and go to the “Service” tab;
- here we select “Startup” and study the programs that start when Windows starts;
- we clean all unnecessary elements, freeing up RAM.
Particular attention should be paid to all kinds of updaters designed to download updates from the Internet.
Such software, running in the background, takes up some of the RAM resources and may remain invisible to the user.
This completes the cleaning. It should be remembered that files clogging the RAM appear on the PC literally every minute of its operation. For this reason, it is highly recommended to carry out preventive RAM cleanings without waiting for a drop in system performance.
A user of Microsoft products who knows how to quickly and effortlessly launch Windows 7 in safe mode probably notices from time to time that a computer or laptop has begun to work slower, or, in other words, slow down. One possible reason for this behavior is that the physical random access memory, or RAM, is full. Let's try to figure out how to unload the RAM without harming the functionality of the PC.
Computer management
So, you can clean up the RAM on your computer by stopping unused applications as quickly as you can figure out how to restore the Windows 7 bootloader. Services are another matter: as has already been shown, not all of them are closed using the “Task Manager”; Moreover, some are not shown in the list at all.
To ensure that any service that is hogging RAM is stopped, the user must:
- Open "Control Panel", and then go to the "System and Security" section.
- Select the “Administration” subsection.
- Double-click the left mouse button to launch the Computer Management utility.
- Expand the Services and Applications menu.
- Go to “Services”.
- And, having found an unnecessary process that is cluttering up the RAM, select the “Stop” option for it.
- After a few seconds the service will be terminated; in the same menu you can disable its autorun - almost with the same ease as finding out why Windows 7 is not updated.
Tip: sometimes, in order to clear the computer’s RAM, it is enough to simply “Restart” the service without shutting it down.
Let's sum it up
The most well-known way to clear RAM on a Windows 7 computer is to call the Task Manager and manually end unnecessary processes. Other options are stopping system services and restarting Explorer. Finally, the user can create his own simple RAM cleaning script or use any effective application from third-party developers, such as Mem Reduct.
Thank the author and share the article on social networks.
RAM is the most important component of any computer or laptop. To a greater extent, it determines the speed of the device and, accordingly, the more RAM is installed on the computer, the better and easier it will work. You can increase the performance of your computer by increasing the physical amount of memory, but in Windows 7 the same result can be achieved in slightly different ways, for example, by cleaning it.
Restarting Explorer
A particular example of a program that consumes a lot of RAM is Windows 7 Explorer. A user who views a lot of photo or video materials during a session will inevitably experience a slowdown in the computer due to the constant formation of new image thumbnails. The easiest way out of the situation is to clear the data loaded into RAM by stopping and restarting the explorer.exe process - “Explorer”.
The computer owner will need:
- Open the Start menu and expand the All Programs list.
- In the “Standard” folder, right-click on the “Command Prompt” utility.
- And run it as administrator.
- Enter and apply the tskill explorer .
- Immediately after this, the Explorer window should disappear for a moment or two, and then appear again. If this does not happen, a Windows 7 user who has just managed to clear the computer’s RAM should open the “Task Manager” by simultaneously pressing the Ctrl + Alt + Del keys and select the “Run” option from the “File” menu.
- And finally, launch Windows 7 Explorer manually by entering the command explorer.exe and clicking OK.
Important: another way to restart Explorer, and at the same time completely clear the RAM, is to simply restart the computer.
What is RAM, physical and video memory
All operations with information are carried out by the computer's central processor, and it does this only with that contained in the random access memory. A lot of different information is loaded here, including intermediate results of various calculations and current data. Literally all operations that a computer performs involve accessing RAM and its subsequent use. Thus, we can draw a simple conclusion - everything you do on the computer, one way or another, can consume RAM resources. This makes it clear why computers with little RAM perform much worse than other devices with more resources.
In addition to random access memory, there are several other types of memory, these are physical and video memory.
If you look at the system indicators that display the amount of RAM, you will probably be surprised, because it will show a slightly smaller amount than you installed. The system automatically reserves a certain amount of RAM for the operation of the central processor. As a rule, this volume is not very large, but it is mandatory for the functioning of the “brain” of a personal computer. This part is called the physical memory of the device.
Each video adapter has its own memory. In essence, this is the same RAM, only installed on a separate computer component, which performs the function of transmitting images to the monitor. Unlike traditional RAM strips, each of which the PC owner can independently replace (add, remove some, or replace them), video memory is non-removable. As a result, you can increase the amount of such memory only by replacing the old video adapter with a new one or purchasing an additional video card.
Cleaning using a custom script
A Windows 7 user who regularly needs to clear RAM can automate the process by creating a small and completely safe executable script for the OS - in the future it can be run directly from the desktop or from any other folder. This is done simply:
- The user opens the Start menu and enters the query “Show hidden files and folders” in the search bar, and then selects the top result in the list of found results.
- On the “View” tab of the new window, uncheck the “Hide extensions...” checkbox and click successively on the “Apply” and “OK” buttons.
- Creates a text file on the desktop with any name - it can always be changed.
- Opens the document and enters, without unnecessary paragraphs, the text:
MsgBox "Cleanup request",0,"Window title" FreeMem=Space(250000000) MsgBox "Cleanup report",0,"Window title"
Important: spaces, as well as the case of letters in the first and third lines, do not matter - as do the names of queries and reports; the main thing is to follow the general syntax. But you will have to calculate the numerical value in the second line yourself: to do this, you need to find out how much RAM is on the computer, and multiply the nominal amount by 1024, and then by another 100,000. So, if the machine has 8 gigabytes of RAM, you need to put it in brackets substitute: (8 × 1096 × 100000), that is, 819200000.
- Saves changes to a file.
- And changes the TXT extension to VBS.
- Confirming the adjustments made.
- Great! Now all that remains is to run the resulting script and clear the RAM by clicking on the “OK” button.
- The process will take a few seconds. Upon completion, the script will display a report about successful cleaning; By clicking “OK” again, the user will close the script window.
We use third-party applications
There is no doubt that certain applications will unload RAM faster and better than the user. But the most effective results are achieved in cases where all the above settings are applied and applications are enabled.
We will look at several of the most effective and popular programs for cleaning your computer's RAM from unnecessary junk. They are completely free and easy to use.
KCleaner
Not to be confused with CCleaner. This is a powerful application for quickly cleaning RAM. It does not affect system services at all, and this is its main advantage. The program works quickly and accurately in any situation.
1. Launch the program using a shortcut on the desktop.
2. If you need regular cleaning, then in the main program window click on the “Clean” button. The process will start automatically. Upon completion, the application will display a corresponding message.
3. However, it is best to use the “Clean&Restart” button. It runs a deep clean, during which the computer restarts.
It is recommended to perform this procedure once a month. KCleaner is one of those programs that should be on every user's computer. It helps maintain normal computer operation in any conditions.
Mz RAM Booster
Another excellent utility for working with RAM. It not only knows how to clean RAM, but also has a rich toolkit for optimizing it. The program interface is intuitive. Although there is no adequate Russian language.
You can download the utility completely free of charge from the official website of the developer. The installation process is standard. Even beginners will not have any questions. And to clear RAM using this program you need to do the following.
1. Launch the utility using the appropriate icon.
2. In the main program window, just click one “Smart Optimize” button. The process of cleaning and optimizing memory will begin. When it completes, the program will display a message. In English.
3. The program also has a processor optimization option. To start this task, just click on the “CPU Boost” button.
Mz RAM Booster can also optimize the OS and constantly monitor the status of the RAM and processor. A very useful program that every user should definitely have on hand.
Wise Memory Optimizer
A small utility with wide capabilities. It is designed exclusively for working with RAM and can perform its full optimization. The program is completely free, has a pleasant interface and is entirely in Russian.
You can download the utility completely free of charge on the developer’s website. By the way, it uses open source code, which is also good. Installing the utility is very simple. And it's even easier to use. To optimize, you need to do the following.
1. Launch the program using a shortcut on the desktop.
2. In the main window, click just one button called “Optimization”.
The process will start and end automatically. Wise Memory Optimizer is one of the smallest RAM optimizers. The installed application weighs only a few megabytes.
Mem Reduct
A small utility for monitoring RAM consumption and quickly cleaning it. Mem Reduct is extremely simple to use - right-click to call up its menu from the system tray and select the “Clear memory” option. The utility will immediately unload non-critical processes from memory.
Additionally, the program supports automatic cleaning of RAM when a certain level of its load is reached or according to a timer, cleaning of a specific area, and settings for appearance and behavior are available. After unloading the memory, the utility shows the result in megabytes. Free, effective and in Russian.
Terminating running applications
Each running application takes up some memory. Large amounts of RAM are required if the user opens many programs at the same time. Shutting down running non-essential processes allows the system to concentrate on completing the primary task. This helps improve gaming performance.
The problem can be solved if you close the browser, turn off the audio player and animated wallpaper. Graphic editors or modeling utilities take up a lot of RAM, so when working on weak hardware, it is recommended to temporarily abandon non-essential programs.
Closing background processes and services
Background processes are used to launch the necessary services and maintain the functioning of applications, but the average user does not find some of the components useful during work. You can reduce RAM consumption by killing unnecessary processes. Algorithm of actions:
- Launch "Task Manager".
- Go to the “Processes” tab, sort the list by RAM usage.
- Select unnecessary programs and click End process.
As a result of performing the actions, the load on the RAM will be significantly reduced, which will increase the performance of the computer.
Cleaning startup
Autoloading applications significantly reduces the performance of the device during startup. To avoid this, you need to clear the corresponding section:
- Click “Start”, select “All Programs”.
- In the list, find and open the “Startup” section.
- Determine the application that needs to be removed from automatic launch, right-click on the icon, select “Delete”.
Important! The program will not be removed from the device, but will simply be excluded from startup.
This method is not always effective; sometimes it is better to use the Command Line function:
- Press Win + R at the same time, enter msconfig in the command field and click OK.
- Go to the "Startup" section.
- In the list, uncheck the boxes next to unused components and click Apply.
Attention! It is not recommended to exclude programs whose purpose is unknown from startup. This may damage the system.
Such manipulations must be repeated periodically, because the system gets clogged regularly.
Special programs
Finally, you can clear your computer's RAM using third-party applications:
- CleanMem;
- Mz Ram Booster;
- Mem Reduct and others.
Mem Reduct as an example the process of clearing RAM looks like this:
- The user downloads, installs and runs the program, opens the “File” menu.
- And goes to “Settings”.
- For greater efficiency in freeing up RAM, check all available checkboxes on the “Memory Cleaning” tab.
- After confirming your consent, wait an extra minute.
- If desired, set a rule for automatically clearing RAM: when a certain volume is filled (indicated as a percentage, it is recommended not to lower the bar below 70–80%).
- Or at regular intervals.
- Here, a Windows 7 user can set a key combination for quick cleaning.
- Return to the main window and click on the “Clear memory” button.
- Confirm your intention.
- Once the cleaning is complete, the user will see a pop-up window with a report in the lower right corner of the screen.
- Immediately after Mem Reduct starts running, an application icon will appear next to the system clock, showing how much RAM is currently occupied. You can also clear RAM from here: just right-click on the icon.
- And select the appropriate option in the context menu.
Tip: if you need to clear the RAM under Windows 7 regularly, it makes sense to set the “Start at system boot” option for the program.
Diagnostics of RAM in Windows 10/7
mdsched.exe in the search or press the windows + R button combination and enter.
In the next window, select the mode that is currently suitable. (The tool also offers the option to schedule a test on the next reboot if you are unable to close your applications and restart immediately).
As soon as the computer restarts, it will start in the Windows Memory Diagnostics environment, and the tests will immediately begin running in Standard mode . In this mode, the tool will run all the checks available in the main mode, in addition to LRAND, Stride6 (with cache), CHCKR3, WMATS+ and WINVC. You can also select scanning parameters by pressing the F1 .
After pressing F1 , a test selection will appear: basic, normal, wide. Below you can enable the cache and number of passes. In the expanded “Wide” test mode, more tools will be available, which will allow you to thoroughly diagnose RAM for performance. Disabling the “cache” will allow direct access to RAM, which will improve the quality of diagnostics. Once you have configured the settings for the scan, press F10 and it will start checking your RAM.
Checking test results
While you can see the status during the scanning process, once the test is completed, your computer will restart automatically and you will need to use Event Viewer to see the test results to see if you have a bad RAM module.
- Press Win+R and type eventvwr.exe to open Event Viewer.
- Expand the Windows Logs and right-click System , select Find the
- MemoryDiagnostics-Results in the Find search box .
In the event viewer, double-click the MemoryDiagnostics-Results and view the result, if there are no errors, then you can not blame the RAM of your laptop or computer.
What to do if there are errors when diagnosing RAM?
- Your best bet is to replace the RAM stick.
- You can try cleaning the contacts from dust on the bar and in the connector.
- Try inserting one strip into different slots to identify the problem in the module or slot itself.
Method 4: Quick Method: Closing Unneeded Programs to Increase RAM
- Open Task Manager by pressing Ctrl+Alt+Del.
- Go to the Processes section, find the programs that are taking up the most memory and degrading the CPU.
By doing this, you will instantly fix the problem of high CPU usage, and you will be able to start your computer quickly.
Find out effective ways to fix the problem when loading the processor in the article - “Svchost is loading the processor.”
Did you like the article? Save so you don't lose!
Method 2. Complete removal of cache files
Stellar BitRaser for File is a highly efficient and reliable program that can be used to completely remove content on Windows 7. It quickly clears the memory cache and erases system traces and files. With this utility, you can clean up your entire disk, remove traces of online activity, remove applications, etc. However, BitRaser will not harm your system in any way or delete data without any additional effort. To clear the cache follow these steps:
Step 1: Download Stellar BitRaser for File on your Windows 7 computer and launch it.
Step 2: To clear cache memory or any other system data, click “System Traces”.
Step 3: A detailed list of various system traces will open. To clear the cache memory, make the appropriate selection and click the Erase Now button.
Step 4: This process may take some time to complete as BitRaser will remove all selected content from your system.
Step 5. Click the “Yes” button and restart Windows 7. For the process to complete successfully, you should not skip this important step.
If desired, the same steps can be performed in several approaches. Even if the data is deleted the first time, then with several (ideally three) executions you will receive an additional guarantee.
By following the above-mentioned methods, you will get rid of cache in Windows 7 without any problem.
What should you do first if your PC loses performance?
Of course, first of all, you need to diagnose the system. Moreover, everything necessary for this is provided in advance by Microsoft developers. Well, it's time to move on to the practical part of our story.
- Right-click on the taskbar (the lowest area of the screen).
- From the drop-down list, select “Manager...”.
- Once in the work area of the service window of the same name, use the “Performance” tab.
Disable hibernation if you don't need it
Windows 10 saves a bulk of data to your hard drive before each shutdown to preserve the current session. When you start your computer again, the hibernation cache allows you to continue where work left off in the past. Although this is a very convenient feature, it is not useful to everyone and storing information in the hiberfil.sys file requires many gigabytes of space. If your computer is running low on memory, deleting the hibernation cache will free up space for more significant files.
How to disable hibernation cache:
- Open Command Prompt, be sure to use Administrator mode.
- Type the command “powercfg /hibernate off” and press Enter.
- Ready! The hibernation cache has stopped working and will no longer store files.
If your computer is running on network power and you are not using sleep mode, then:
- Open the Settings app.
- Go to the "System" section.
- In the side menu, click "Power and sleep."
- Under the Sleep Mode heading, select Never from the drop-down lists and save your changes.
- Open the Run utility (Windows key + R).
- Enter the command “powercfg -h off”.
- Click "OK" to save the settings.
After completing the above, hibernation mode will be disabled and the hiberfil.sys file will be deleted.
Remove offline maps, unnecessary languages and components
Check if you have installed offline maps (city or country) for Windows Maps, extra language packs (interface or system languages) and additional components (Windows Media Player, Windows Hello facial recognition, additional fonts, remote administration tools) on your computer , mathematical symbol recognizer, etc.). Feel free to remove unused items and other things that you may even be seeing for the first time.
How to delete offline maps: “Settings” → “Applications” → “Offline maps” → Delete all maps.”
How to remove localization packs: “Settings” → “Time and language” → “Language” → “Preferred languages” → “Delete”.
How to remove additional components: “Settings” → “Applications” → Apps and features” → “Apps and features” → “Additional components” → “Uninstall”.
Disable unnecessary services
Services in Windows generally work independently of you - you don't even notice them. But at the same time they take up their share of RAM. If you don't use Bluetooth on your laptop, you can simply disable the corresponding service. Or turn off all video card driver update services and install them manually.
To do this, use the same msconfig utility. Go to the Services tab and uncheck all services that are not needed. Be careful: you can disable a Windows system service, so before disabling it, Google what a particular service is for and whether it can be disabled. To be sure, you can simply check the “Do not display Microsoft services” checkbox.