03/22/2016 windows | programs
Several times remontka.pro readers asked about how to create an image of a bootable flash drive, make an ISO image from it for subsequent recording on another flash drive or disk. This instruction is about creating such images, not only in ISO format, but also in other formats, which represent a complete copy of the USB drive (including the empty space on it).
First of all, I want to draw your attention to the fact that you can create an image of a bootable flash drive and there are many tools for this, but usually this is not an ISO image. The reason for this is that ISO image files are images of CDs (but not any other drives) on which data is written in a certain way (although an ISO image can be written to a flash drive). So there is no "USB to ISO" type program or easy way to create an ISO image from any bootable USB flash drive and in most cases it creates an IMG, IMA or BIN image. However, there is an option to create a bootable ISO image from a bootable USB flash drive, and it will be described first below.
Flash drive image using UltraISO
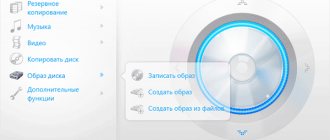
UltraISO is a very popular program in our latitudes for working with disk images, creating and burning them. Among other things, using UltraISO you can make an image of a flash drive, and there are two ways to do this. In the first method, we will create an ISO image from a bootable USB flash drive.
- In UltraISO with a connected flash drive, drag the entire USB drive onto the window with a list of files (empty immediately after launch).
- Confirm copying all files.
- In the program menu, open the “Boot” item and click “Extract boot data from floppy disk / hard drive” and save the boot file to your computer.
- Then, in the same menu section, select “Load Download File” and download the previously extracted download file.
- Using the “File” - “Save As” menu, save the finished ISO image of the bootable USB flash drive.
The second method, by which you can create a full image of a USB flash drive, but in ima format, which is a byte-by-byte copy of the entire drive (i.e., the image of even an empty 16 GB flash drive will occupy all of these 16 GB) is somewhat simpler.
In the “Self-loading” menu, select “Create a hard disk image” and follow the instructions (you just need to select the flash drive from which the image is taken and indicate the location where it will be saved). In the future, to burn the flash drive image created in this way, use the “Burn hard disk image” item in UltraISO. See Creating a bootable USB flash drive using UltraISO.
Why do you need a flash drive image?
A flash drive image is needed for various purposes. Basically, this is installing or restoring an operating system, diagnosing a computer without loading an OS, launching special programs without installing them, creating a backup copy, transferring a system from one disk to another, or creating a copy of a disk partition.
Creating an image is not the usual, familiar to everyone, copying files using the mouse and keyboard. If the disk is partitioned or bootable, then this copying will not work, mainly due to the byte-by-byte copying that occurs during image creation. The special program that is required for this, in addition to the entire contents of the disk, will copy the master boot record (MBR) and all unused space.
Creating a full flash drive image using the USB Image Tool
The first, easiest way to create an image of a flash drive (not only bootable, but any other) is to use the free USB Image Tool program.
After launching the program, on the left side you will see a list of connected USB drives. Above it there is a switch: “Device Mode” and “Partition Mode”. The second point makes sense to use only when your drive has several partitions and you need to create an image of one of them.
After selecting the flash drive, just click the “Backup” button and indicate where to save the image in IMG format. Upon completion, you will receive a complete copy of your flash drive in this format. In the future, in order to write this image to a flash drive, you can use the same program: click “Restore” and indicate from which image it should be restored.
Note: this method is suitable if you need to make an image of some flash drive you have in order to someday restore the same flash drive to its previous state. It may not be possible to write an image to another drive, even of exactly the same size, i.e. it's a kind of backup.
You can download the USB Image Tool from the official website https://www.alexpage.de/usb-image-tool/download/
Copy the image to another new USB drive.
Now what we're going to do is transfer this image that we just created to another USB drive. The first thing we need is a USB flash drive with a capacity corresponding to the original device. We cannot install the image on a disk with a different capacity than the one we used to create that image .
Then we run the commented program again. When it opens on the screen, in this case we have selected the option “Burn image to USB drive”.
We click the Browse button again to find and select the image file previously saved on the PC. Once we have found an image stored on the disk, we select it and click the "Burn" button at the bottom to begin. We must keep in mind that the ImageUSB program will erase everything stored in the target USB memory and replace its contents. with image data . Additionally, we can repeat the same process with any number of USB storage devices as long as they are the same size.
Creating a flash drive image in PassMark ImageUSB
Another simple free program that does not require installation on your computer and allows you to easily create a full image of a USB drive (in .bin format) and, if necessary, write it back to a flash drive - imageUSB by PassMark Software.
To create a flash drive image in the program, follow these steps:
- Select the desired drive.
- Select Create image from USB drive
- Select a location to save the flash drive image
- Click the Create button.
In the future, to write the previously created image to a flash drive, use the Write image to USB drive item. Moreover, for writing images to a flash drive, the program supports not only the .bin format, but also regular ISO images.
You can download imageUSB from the official page https://www.osforensics.com/tools/write-usb-images.html
Method 4: ImgBurn
ImageBurn is a simple tool that allows you to create ISO images of disks and bootable USB drives.
- Select the option “Create image file from files/folders”.
- Click on the “Browse for a folder” button, select the flash drive.
- Go to the "Advanced" section and open the "Bootable Disk" tab. In the “Extract Boot Image” column, select the flash drive, click on the save icon and specify any convenient location. The program will extract the boot record.
- Activate the “Make Image Bootable” function, specify the path to the file created in the previous paragraph in the “Boot Image” line. Click on the button to start the process of creating a boot image from a flash drive.
If ImgBurn offers to use the created boot record, you must agree - the 4th step will be performed automatically.
We are glad that we were able to help you solve the problem. In addition to this article, there are 12,719 more instructions on the site. Add the Lumpics.ru website to your bookmarks (CTRL+D) and we will definitely be useful to you. Thank the author and share the article on social networks.
Describe what didn't work for you. Our specialists will try to answer as quickly as possible.
How to install office from an ISO image?
Installing Office from ISO
- Right-click on the downloaded ISO file - open with - explorer.
- A virtual disk with Office installation files will appear on your computer.
- Start the installation using the Setup file.
- Download the DTOOLS program. ...
- A virtual disk with Office installation files will appear on your computer.
15 Apr
2022 Interesting materials:
How to make purple using gouache? How to make Fluffy Slime without glue and sodium tetraborate? How to do fluorography for free in a clinic? How to get fluorography done under compulsory medical insurance in Moscow? How to make foil? How to make a chat background in VK? How to make a background for a product photo? How to make a background for a presentation in PowerPoint 2003? How to make a background from a picture in Corel Draw? How to make a background in Skype on a tablet?
On Linux
On this operating system we will use commands in the terminal, but first the flash drive must again be connected to the PC. Open Terminal and enter the command
sudo fdisk -l
it will allow you to browse all file systems. Your drive will be labeled /dev/sdb and its capacity will be shown next to it. The name of your drive needs to be remembered or written down; it will be needed for the next step. To record the image, use the dd command, the result will look like this:
sudo dd if=/dev/sdb of=~/raspbian_backup.img
the if parameter will indicate the path to the source file, that is, you will need to enter the name that you remembered at the previous stage. The of parameter is the result of the recording; here you need to enter the desired file name and extension. You should be careful here, since incorrectly entered parameters can completely and irrevocably destroy the data on your flash drive. Recording data will take some time, and you will not see any progress bar; the end of the running process will be indicated to you by the message “ Copied ”. Before restoring data on the card, we check whether all partitions are disabled; to do this, use the command
sudo mount | grep sdb sudo mount | grep sdb
where sdb is the name of your drive. If the output is empty, everything is fine, if not, use the sudo umount command where you need to enter all the highlighted partitions. For example
sudo umount /dev/sdb1 /dev/sdb2 /dev/sdb3 /dev/sdb4
And now, the actual restoration. To do this, we use the same dd command, but now we enter the data in a different order:
sudo dd if=~/raspbian_backup.img of=/dev/sdb
where if is the name of the clone saved on your PC, and of is the name of the drive. There is no recording progress, so we wait for confirmation of the completion of the process, after which we remove the memory card. Another process also available to Linux users is shrinking a cloned image. As we noted above, the size of the clone will be equal in volume to the size of your SD card, so if you have a large drive, it will not be a bad idea to reduce its copy. To reduce we will use the PiShrink script. To download its latest version, use the command
wget https://raw.githubusercontent.com/Drewsif/PiShrink/master/pishrink.sh
After that make it executable using the command
chmod +x pishrink.sh
Now let’s move on to the compression itself, to do this we run the script and indicate the name of the image that needs to be compressed in the following format
sudo ./pishrink.sh ./raspbian_backup.img
where “raspbian_backup.img” is the name of the image.
After this, you can burn the image using the method described above.
Cloning a card and copying files: what's the difference?
There is a significant difference between simply copying the contents of a flash drive and creating a complete clone of it. If you select files, use the keyboard shortcut “Ctrl + C” and transfer them to your hard drive or memory card using “Ctrl + V”, the checksums will be different, and this will greatly affect the performance of programs and the amount of memory occupied.
This feature is due to the fact that flash drives use their own file system layout and memory partitions. To take this into account, you should use special software that allows you to fully clone a flash drive.