Author of the article
Maxim aka WisH
Higher education with a degree in Information Systems. Experience as a system administrator - 5 years.
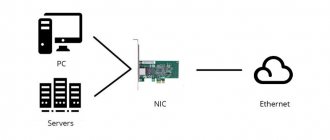
Almost all devices that have complex control boards are now connected to the Internet. Gradually, technology will come to the “smart home” standard, in which you can remotely adjust the temperature, brew coffee, turn on sockets and do everything else.
This is only possible by connecting all devices to the Internet. As soon as one of them falls out of connection, its functions become unavailable. This often happens even with computers. If you run troubleshooting, the computer will display the message: “The network adapter does not have valid IP settings,” and will not offer solutions. I’ll tell you how to solve this problem on a computer or laptop.
Why does the error occur?
There are several reasons for this error to appear. In the simplest case, your computer has received an invalid IP address and therefore cannot access the Internet. This is a failure on the part of the provider or router.
Also, connection problems arise if the network card cannot accept the necessary settings, or they were set manually and failed. In this case, the ethernet card is not able to transmit data over the network.
The same problems arise with a wireless network. The reasons are the same, only here it’s worth blaming the router or network card. Such network problems are typical for any version of the operating system.
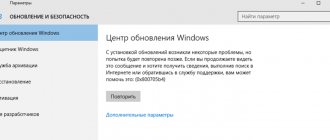
The error text is the same in Windows 10 and in Windows 7. The operating system does not offer any solution options. You need diagnostics, but you have to act on your own. The check will indicate the problem area and can correct some other errors.
Some more tips
- Sometimes the problem is caused by third-party software, for example Bonjour. Check the list of installed applications and remove it if you find it;
- Stop your antivirus software for a while. Was that the point? So uninstall the security software!
- Open Device Manager, remove the Ethernet adapter, update the configuration (there is a special button at the top for this). The device will begin reinstalling, which may resolve the error.
I really hope that at least one of the methods helped you resolve the “network adapter does not have valid IP settings” problem in Windows 10.
Sincerely, Victor!
Rebooting devices
In most cases, failures occur in the software. This is possible when the device is used for a long time or when there is a heavy load on it. Small problems gradually accumulate and turn into a serious mistake. If your computer or router has accumulated minor problems due to which something has turned off, then a reboot will help. Restart your computer via the Start menu – “Shutdown” – “Restart”.
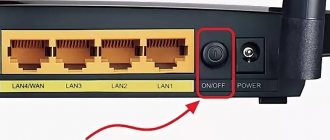
On your router, try to find the shutdown or reset button.
If that doesn’t work, you can unplug the power supply cable and wait 30 seconds. Also, if you go to the menu and go to the system item, you can find the reboot option there. Each brand of router has it hidden in its own section. Read more in the article on how to reboot your router.
IP update
After rebooting both devices, it is worth updating the IP settings. This will help if they are transferred normally, but for some reason the computer does not want to install them. Usually they fail due to problems with the DHCP server, which is the router. Although the provider itself transmits addresses if the cable is plugged directly into the computer.
To update the settings, open Start, type “cmd” in the bottom line, right-click on “Command Prompt” and select “Run as administrator” from the menu.
After this, a console will open in which all commands are executed. One by one, enter:
- ipconfig /release
- ipconfig /renew
This will help you obtain new network settings from your router or ISP. If you installed them manually, then there is little point in executing the commands. With their help, parameters that are requested from a remote source will be updated.
Removing a local network
If you want to delete a local network, then the step-by-step instructions below will help you in this matter:
- First, open the operating system properties window. This can be done either by right-clicking on the “This PC” shortcut and selecting the corresponding menu, or by using the “Win+Pause” key combination; on a laptop, you need to add the “Fn” key to the combination. Right-click on the “This PC” shortcut, then open “Properties”
- Select “Advanced system settings”, and then “Environment variables...”. Select “Advanced system settings” Click on the “Environment Variables” option
- At the bottom of the second block, which is responsible for system variables, there will be a “Create” button - click it. In the “System Variables” block, click on the “Create” button
- Set the variable name “DEVMGR_SHOW_NONPRESENT_DEVICES” and specify its value “1”, then confirm the changes by clicking the “OK” button. Once the variable is created, hidden devices will be shown in Device Manager. Set the name “DEVMGR_SHOW_NONPRESENT_DEVICES”, write the value “1”, click “OK”
- Go to Device Manager. To do this, press “Win + R”, enter “devmgmt.msc” and click “OK”. Press “Win+R”, enter “devmgmt.msc” and click “OK”
- Click on View and enable the option to show hidden devices. Click on “View” and activate the option to show hidden devices
- After this, local networks will be displayed in the network adapters. You can disable them or delete them through the context menu - it is called by clicking the right mouse button. In the “Network adapters” section, right-click on the local network, then left-click on the “Delete” option
Setting up a network is not that difficult, it’s just that the process requires perseverance and does not tolerate mistakes (in particular, entering an incorrect IP address). Therefore, be careful when setting up, and then you are unlikely to encounter problems.
Video - How to Connect Computers via LAN Cable (Local Area Network) Windows 10
HomeWindows 10Configuring a network adapter in Windows 10—>
A wireless network adapter is a device that connects a PC to a wireless network. Many computers are equipped with a wireless network adapter. In order to find out about the presence of this element on your PC, you need to:
- Click “Start” and select “Device Manager” (after entering it in the search bar);
- open “Network adapters”;
- Find the required network adapter.
There are various methods to disable and enable the network adapter in Windows 10, which we will describe below.
Resetting network settings
If none of the previous points helped, all that remains is to completely reset the network settings on your computer or laptop. If the router is configured automatically, then everything will configure itself. If you configure it manually, you will need to re-enter all the data, so it’s better to clarify in advance or remember which parameters you configured and how.
Via Windows Settings
Here we will describe only the method that is suitable for tens. For other systems it will be easier to use the command line. To get started, click on Start, then on the gear on the left side and select “Settings”. You can also simply press the Win+I key combination and the desired window will open. Here, select "Network and Internet".
On the left side of the window that opens, click on the “Status” section. Now on the right side, go to the very bottom. The “Network reset” option will appear here.
A new window will open. There is only one button “Reset Now”. Click on it. Please note that your computer will restart, so close and save any important documents.
After this, receive new settings automatically or enter the parameters manually.
Via command line
Everything here is the same for any version of operating systems. Go to Start and launch Command Prompt there with administrator rights.
Now enter the following commands, after each of them press enter:
- netsh int ip reset
- netsh int tcp reset
- netsh winsock reset
- ipconfig /flushdns
- route –f
Then you need to restart your computer. Using these commands, you can completely reset tcp/ip settings, clear settings in Windows, reset the DNS cache and completely clear the routing table. In fact, according to its network parameters, you will see a new operating system, as if you had not used it or configured anything.
Enabling NIC through BIOS
By default, the card should already be enabled on the computer. If Windows reports that the Internet is not working, you can try re-enabling it in the BIOS.
- Turn off the computer and turn it on, quickly pressing a certain button (F1, F2, etc.).
- Once the BIOS boots, use the arrow keys on your keyboard to navigate through the available options.
- Find the section “Integrated Peripherals”, “Onboard Devices” or “On-Chip PCI Devices” (may also be called differently, depending on the type and year of BIOS).
- Select "Integrated LAN", "Onboard Ethernet" or similar option.
- Enable it by setting the value to "Enabled".
- Press F10 - a dialog box will appear asking if you need to save the settings and exit the BIOS (Y key to agree). You can also do this manually by going to the appropriate section.
- Confirm action. This will restart your PC.
Windows will now automatically detect the driver and the internet should work fine.
Checking tcp ip and dns parameters, resetting cache
If none of the methods help, all that remains is to do manual configuration. First, press the Win+r key combination and enter the command “ncpa.cpl”.
A window with network connections will open. The number of icons will vary depending on how many network or wireless cards you have, as well as connections to different providers. For work, select the active adapter, because that is what is being used now, and the settings should affect it. Find one, right-click on it and select Properties.
In the small window that opens, find “IP version 4 (TCP/IPv4)”. Double-click on it or select the line and click on “Properties”. In the same window, you can uncheck “IP version 6 (TCP/IPv6)”, because this parameter is not useful for a home router.
Here enter the IP address of the router. If you don't know what to write, look in the settings. Typically its address is 192.168.1.1. Enter it in the line with the gateway address, and set, for example, 192.168.1.150 as the main address of the computer. The main thing is that only the last digit differs from the router address. Specify 8.8.8.8 and 8.8.4.4 as DNS. These are Google DNS addresses and they are definitely working.
No Internet
Step 1: Check the connectivity of other devices.
First, you need to determine if your PC is the only device that doesn't have internet access. Take your phone, tablet or laptop, connect to Wi-Fi, and check how it works.
If your PC is the only device that does not connect, then most likely this is due to incorrect configuration of its Internet parameters. However, if each device has the same problem, the fault lies with the network hardware.
First, do a quick check. To do this, disconnect the Ethernet cable connecting your modem to the router and use it to connect your computer directly to the modem. If a connection to the network is established, then the problem lies in the router.
Step 2: Reboot your PC.
This step is not necessary if the communication problem affects all devices. Restarting your PC is one of the first steps to troubleshoot various problems. It helps to quickly eliminate temporary failures.
We assume that in most cases you are using a wireless connection. However, if you are connecting to your router using an Ethernet cable, try a different cable to make sure it works.
Step 3. Reboot the modem and router.
Due to the fact that most network failures are related to the modem or router, it is advisable to reboot them one by one. However, they do not need to be rebooted through the user interface, as is done with a PC. Simply unplug the power plug and wait approximately 15 seconds or a minute, depending on the brand of the device.
Next, start by connecting the modem and allow it to boot completely before connecting the router. Wait for them to start functioning. If you are not getting activity from some of the indicator lights on one of your devices, then your hardware may be faulty.
Keep in mind that a reboot and a factory reset are two different things. Use a reset as a last resort, it will cancel all settings.
Step 4: Launch the Network Troubleshooting Tool.
Although Windows 10's built-in diagnostic tool is generally bad at fixing problems, it's worth a try before moving on.
To access the Network Troubleshooter, go to System Settings, then select the Network and Internet section and launch the Network Troubleshooter.
Step 5: Check your IP address settings.
One of the key steps you may need to take next is making sure your computer is configured correctly. In most home networks, under normal conditions, the router issues an address to devices when they connect. If your PC's IP address settings are incorrect, it may result in you being unable to access the Internet.
Right-click the network icon in the system tray and select “Open Network and Internet Settings.” Select “Adapter Settings” and then click on the connection you are using.
Next, click the “Properties” button. Find the “IP Version 4 (TCP/IPv4)” protocol in the list and double-click it. Make sure that the IP address and DNS server address are set to be retrieved automatically.
Step 6: Execute certain commands in the Command Prompt.
The Windows 10 operating system supports several network commands for the Command Prompt. Try some of them. Below are the most useful commands for managing and troubleshooting your home network.
To reset some of the files that the OS stores for access, use these two commands:
If that doesn't work, try releasing and getting a new IP address:
Next, try updating your DNS server settings:
It won't hurt to restart your PC at this point. If nothing works, move on.
Step 7: Disable security software.
A very strange but likely scenario is that the PC has security software installed that blocks access to the Internet. This, for example, can happen as it did with the free Avast antivirus 2 years ago.
Try temporarily disabling your installed third-party antivirus tool. Check to see if the connection has returned.
Step 8: Update wireless drivers.
In normal cases, there is no need to update drivers to their latest or test versions. This often creates problems until they are tested on a large number of user devices. But since you still have problems, you should check for driver updates.
It is better to do this using an application from the manufacturer. Launch it and check for wireless driver updates.
Step 9: Reset network settings.
At this point, if you have completed all the steps listed and the “no internet” problem is still present, you can reset your network settings. Go to “Settings” – “Network and Internet” – “Status”. Click on the “Network reset” link at the bottom of the screen. This will completely remove all network adapters and return the settings to their default state. After this, you will have to configure everything in a new way.
If, even after completing all the steps suggested above, you still do not have Internet access, we recommend that you contact your provider’s technical support department for help. Reset the modem and router to factory settings only as a last resort and provided that you have all the data for the next correct configuration. Thank you for your attention!
Computers have firmly entered our lives, and access to the Internet today is already an urgent necessity for many. Modern hardware and operating systems are becoming more and more intelligent, and the user is less and less likely to need to do anything to configure. However, occasionally such a need arises. Today we will tell you how to solve the problem if your computer reports that you are connected to a network without access to the Internet, and next to the connections icon you see a yellow triangle with an exclamation mark.
Setting up an antivirus
If the setting does not help, you should check your antivirus. Now some programs, even free ones, immediately have a built-in traffic analyzer to prevent attacks. A firewall is built into any of these antiviruses. It is difficult to imagine how exactly such an error is caused; perhaps the antivirus is blocking the flow of data from the router or provider, but then manual configuration should help. It is best to completely remove the antivirus and then restart the computer. If this doesn't help, then it's unlikely to be the problem. People often complain about Avast antivirus, so let's look at how to solve the problem.
In the upper right corner, click on the “Menu” button. A list of all items will appear, click on the “Settings” button. Go to the “General” tab, click on “Troubleshooting” and here click on “Restore default settings”.
Go back to the list of adapters and open the properties of the active connection. Look here in the list for the item that contains the name of your antivirus in the title and uncheck it. This will remove the influence of the antivirus on the connection.
Enable sharing
The local network has been created, but in order to use programs and files from one computer that are stored on another machine, you must also set up shared access for them. Setting up a Windows 10 network
This essentially ends there. Let's create a shared folder with documents:
- Right-click on the folder and open properties.
- Go to the “ Access
” tab, click on the “
Advanced settings
” button.
Put o. Click on the “Permissions” button.
Set permissions. If you want to be able to only open a directory from another computer and view its contents, then in the “Allow” column. To provide full access, check the appropriate box. Save the configuration by clicking "OK".
Then you need to return to the folder properties and go to the Security
" Here you should click the “ Change”
».
The Group Permissions window appears
" Below the " Groups or Users"
» click «
Add
».
Enter your name "All
"(quotes are not needed), click " OK
».
Set the same permissions that you did earlier when setting up access.
After allowing sharing, it is recommended to restart your computer to configure the Windows 10 network
completed correctly. Network” section will appear in Explorer
", which will display the computers between which the connection has been established.
Inside the directory under the name of the other computer, you will find folders that are configured for sharing.
Inside the folder will be the same documents that are stored on another computer. If you have given full access to the settings, you can easily edit them from another machine.
Reinstalling the driver
It happens that after updates a different network adapter driver is installed. This is common with wireless cards because they are driver sensitive.
Standard drivers are also suitable for Ethernet cards, unless you have some rare type. To make it easier to find drivers, you can use the DriverHub program, which scans your computer and installs the necessary drivers itself. you can follow the link.
For manual installation, go to the website of the manufacturer of your motherboard (if the network card is built-in), network card or laptop and download drivers for your version of the operating system from there. Install them and restart your computer. If it helps, you should always keep them with you, or better yet, block driver updates for the system.
If all else fails
There are a few more things to check:
- Check for the Bonjour utility. If you have installed any software from Apple (iTunes, iCloud, QuickTime), then most likely you have Bonjour in the list of installed programs. Often it is this that interferes with the operation of the network card.
- Press win+r and enter msconfig. In the first window, select "Diagnostic Boot". This will disable all unnecessary services.
- Go to Start, find System Restore there, roll it back to the moment when the Internet was working.
- Try to remember what you installed or removed before the connection was lost. Put everything back the way it was.
If all else fails, then all that remains is to contact official Microsoft support or reinstall the system to start with a clean image.