The built-in disk management tool of Windows 7/10 is significantly inferior in terms of functionality to third-party partition managers, but for simple resizing of volumes this tool is quite suitable. It allows you to reduce the size of the partition using the “Shrink Volume” option or increase it through the “Extend Volume” option. Here, however, the user may encounter a number of limitations.
Thus, increasing a partition through standard Windows equipment is allowed only at the expense of unallocated space, which must be located in the “correct” place. Otherwise, the user will find that the “Extend Volume” button is not active in the context menu of the partition he has selected, which means that the operation will not be possible. There are several other reasons that prevent volume expansion. We'll talk about them below.
File system not supported
It will not be possible to enlarge a partition using the built-in utility diskmgmt.msc even if it is formatted in a file system other than NTFS. The standard utility will not allow you to expand disks in FAT32 or exFAT format. If you want to expand a FAT partition, either convert it to NTFS, or use third-party disk managers that allow you to bypass these restrictions.
Unallocated area configuration
As already mentioned, you can increase the size of a partition using Windows only by attaching unallocated space to it, but, firstly, it must be located to the right of the partition being expanded, and secondly, it must be adjacent to its border. Otherwise, you will not be able to expand the volume in Windows 7/10. For example, if you want to increase the size of the system partition C, you will have to completely delete the user partition D. Not shrink, but rather delete, because when compressed, the resulting free area will be to the right of the compressed partition, that is, without adjoining the border of partition C. Here Why can't you expand the volume of drive C by shrinking drive D?
If you want to get additional space on the user partition at the expense of the system partition, you won’t be able to do this either, since the unallocated space will visually appear to the left of drive D and will only be available for expanding drive C.
Location of volumes on different physical disks
The “Extend volume” button in Windows 7/10 will not be active even when the partition being expanded and the free unallocated area are located on different physical disks. In this situation, you can only combine volumes by creating a software RAID array or disk pool.
- Windows 10 Disk Management – how to open and use it correctly?
Exceptions to the rules
Above, we looked at the main reasons why the “Extend volume” option is not active in Windows 7/10. There are, however, interesting exceptions to this set of rules and requirements that you should be aware of. For example, if the volume is logical (such volumes are marked in bright blue in diskmgmt.msc), then to expand it you can use unallocated space that is not directly adjacent to the boundaries.
Dynamic disks, marked in olive color, also have their own characteristics of volume expansion. You can expand any volumes on dynamic disks, including using space on another physical disk. The result of such an expansion will be the creation of a composite volume - a single logical space under one letter.
- 16shared
- 0Facebook
- 16Twitter
- 0VKontakte
- 0Odnoklassniki
How to open hard drive management
Like most Windows Settings windows, Disk Management has many doors and can be accessed in many different ways. The simplest ones: right-click on the start menu and find the required item there (not available on all versions) or type in “Create and format partitions” in the search.
In Windows 10, “Hard Disk Management” is called “Create and format hard disk partitions,” but in the window signature the name remains the same, and “Disk Space Management” is a completely different window with limited functionality.
This is the easiest way to manage disks
If for some reason this method does not suit you, here is the path to disk management, which has not changed since XP:
- Right-click on Start and open Control Panel.
If it is not there, you can find it through the search. Right-click on the Start button and open Control Panel - Open the "System and Security" category when categorized.
Open the "System and Security" category when categorized - Scroll down and click “Create and format hard disk partitions”, under the “Administration” group.
Scroll down and click “Create and format hard drive partitions”
You cannot access control via the command line. There is only a separate set of commands for disk management as a fallback alternative, but this is quite complex and pointless.
If it doesn't open
If the system does not allow you to manage disks, the issue is a limitation of user rights, since for this you need to have administrator rights. Most likely, the root cause of the problem is a virus on your computer and after following the instructions, be sure to scan everything and everyone with an antivirus.
- Expanding a disk partition in Windows 10
Before proceeding with the method described below, try disabling your antivirus and try again.
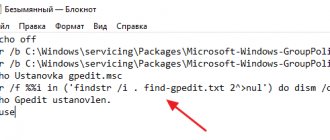
- Search the Start menu and find and open “regedit”.
Search in the Start menu, find and open "regedit" - On the left side of the window, go to the path “HKEY_LOCAL_MACHINE/SYSTEM/CurrentControlSet/Control” and click once on the “Windows” folder contained there.
Go to the path “HKEY_LOCAL_MACHINE/SYSTEM/CurrentControlSet/Control” and single-click on the “Windows” folder contained there - On the right side of the window, open the “CSDVersion” option.
On the right side of the window, open the “CSDVersion” option - Set the parameter to zero and confirm the changes.
Set the parameter to zero and confirm the changes
The reason for the error and how to solve it
The first thing to note is that the disabled “Extend volume” option is not a bug at all. The fact is that Windows 10 does not know how to allocate space on drives if they are formatted in any file system other than NTFS. Also, the option under consideration may not be available if there is no free, unallocated space on the hard drive. Therefore, eliminating the problem depends on the cause of its occurrence.
Method 1: Formatting the drive to NTFS
Many users often share the same drive between Windows and one of the Linux operating systems. These systems use fundamentally different markings, which is why the phenomenon in question may arise. The solution to the problem is to format the partition in NTFS.
Attention! Formatting will remove all information on the selected partition, so be sure to copy all important files from it before proceeding with the procedure below!
- Open Search and start typing the word computer . The results should show the This PC app - open it.
In the list of partitions in the “This PC” window, find the one you need, select it, right-click (hereinafter RMB) and use the “Format” item.
The system disk format utility will launch. In the File System drop-down list, be sure to select NTFS if it is not selected by default. You can leave the remaining options as they are, and then click on the “Start” button.
Method 2: Delete or shrink the partition
The peculiarity of the “Extend Volume” option is that it works exclusively on unallocated space. You can get it in two ways: by deleting the partition or compressing it.
Important! Deleting a partition will result in the loss of all information recorded in it!
- Make a backup copy of the files that are stored in the partition intended for deletion, and go to the Disk Management utility. In it, select the desired volume and right-click on it, and then use the “Delete Volume” option.
A warning will appear indicating that all information on the partition being deleted will be lost. If there is a backup copy, click “Yes” and continue following the instructions, but if there is no backup file, cancel the procedure, copy the necessary data to another medium, and repeat the steps from steps 1-2.
- The partition will be deleted, and an area named “Unallocated Space” will appear in its position, and it will be possible to use the volume expansion on it.
An alternative to this action would be to shrink the partition - this means that the system will defragment some files and use the unused space on it.
- In the Disk Management utility, right-click on the desired volume and select Shrink Volume. If the option is not available, this means that the file system on this partition is not NTFS, and you will need to use Method 1 from this article before continuing.
The partition will start checking for free space - it may take some time if the disk has a large capacity.
The Volume Compression snap-in will open. The line “Space available for compression” indicates the volume that will be obtained as a result of compression of the space. The value in the “Compressible space size” line should not exceed the available volume. Enter the desired number and click “Compress”.
Conclusion
As you can see, the reason why the “Extend volume” option is inactive is not due to some kind of failure or error, but simply to the operating system’s operating features.
Thank the author and share the article on social networks.
Disk space management
So-called disks are correctly called partitions or volumes (you only have 1 disk, most likely), but given that even Windows calls them disks, this is not important.
To make one volume larger, you must first make another volume smaller. You can't just grab a spot out of nowhere and you have to find a donor first. It is worth saying that in Windows 10 there is no function for merging volumes. If you want to merge, you will have to use the standard methods described below and copying information from disk to disk.
There is one very important non-obvious rule that imposes a strong limitation on disk management, and before you start wasting space, you need to consider the most popular mistake.
Why is "Extend Volume" inactive?
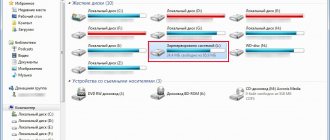
Pay special attention to the order of the volumes in the lower half of the window.
Note the order of the volumes in the lower half of the window
In our case, the order is: C, J, D. After we pinch off a piece of space from one of the disks, it will appear behind the donor volume. For example, if we take a piece from drive J, the order will be: C, J, Free space, D. Free space can only be filled into adjacent partitions. That is: return to the donor volume (J) or expand the next disk (D). We cannot expand drive C, since there is an obstacle in the way in the form of drive J.
Free space can only be filled into adjacent partitions
To expand the C drive, you need to completely remove J and make it a remote space. But if this doesn’t seem enough and you want to expand to include drive D, you’ll have to delete it too.
Expansion of the first volume is possible only with the help of an individual multi-pass or specialized programs.
For example, in this case, to expand drive C at the expense of D, you can do the following multi-step:
- Creating a new volume using drive D.
- Moves all files from drives J and D to a new volume.
- Removing the J drive and expanding the C drive using the freed up space.
- Removing drive D and expanding drive C using the freed up space.
- We call the new volume disk D.
- We move from C to D as much space as needed.
- We create drive J at the expense of C and move old files from drive D to it.
It all depends on the order of the disks, their volume and the availability of free space, so the multi-pass is individual.
- How to partition a hard drive in Windows 10: 3 ways
If the disk with the system is not the first, then expanding the ones in front of it is impossible, since the disk with the system cannot be removed.
Compression
- Right-click on the partition you are interested in and select “Shrink Volume...”.
Right-click on the partition you are interested in and select “Shrink Volume...” - Set the donor space size and click Shrink.
Set the size of the donor space and click "Shrink" - Free space will appear behind the donor volume.
Free space will appear behind the donor volume
If you cannot compress the volume, you must either moderate your appetite or delete part of the contents of the volume.
Removal
- Right-click on the volume and select "Delete Volume...".
Right-click on the volume and select "Delete Volume..." - All its contents will then be deleted.
All its contents will then be deleted. - The freed space will appear in the place of the deleted volume.
The freed space will appear in the place of the deleted volume
Extension
The system disk expands just like all the others. But due to the error described above about the impossibility of expanding the volume, this is not easy to do. Before expanding your disk, be sure to read the first part of this chapter, which covers the most common disk management error.
- Right-click on the volume and select "Extend Volume".
Right-click on the volume and select "Extend Volume" - Select the size of the allocated space and confirm the expansion.
Select the size of the allocated space and confirm the expansion
Creation
Windows 10 does not recognize the difference between a local disk and a simple volume. In principle, there is no difference between them. The distinction between volumes and local disks was used on older operating systems and was purely a conditional limitation. By creating a simple volume, you create a full-fledged local disk.
- Right-click on the unallocated space and select Create Simple Volume.
Right-click on the unallocated space and select "Create Simple Volume" - Select the size of the allocated space.
You will not be able to use non-adjacent free space. Select the size of the allocated space. You will not be able to use non-adjacent free space - Select a letter for the new volume.
Select a letter for the new volume - It is better to leave all settings as default.
It is better to leave all settings as default - A new volume will appear in place of the used space.
A new volume will appear in place of the used space
Video: Disk Management in Windows 10
Free up space on Windows 10
The newest version of "windows", unlike the old ones, can itself free up space on the system partition. So, if the unallocated space on the disk is 0 MB, the system will issue a warning and offer a deep cleaning of unnecessary files.
Unlike the "seven", on Win10 you no longer need to think about how to increase the size of the C drive, because after installation and deployment the system takes up to 8 GB on the 32-bit version and 12 GB on the 64-bit version. Naturally, after installing updates, disk space gradually disappears, but not as quickly and aggressively as on Win7. In addition, automatic cleaning effectively removes old versions of the OS and simply unnecessary temporary files.
If you are interested in the question of how to increase space on the C drive under the Windows 10 operating system, then in this version you can expand the volume in a similar way to older OSes. In the system search menu, enter “panel”, the system will find “Control Panel”, then the algorithm is similar to that described above.
You can manually find space on drive C by following the path: “Start” - “Settings” - “System” - “Storage” - “Disk C” - “Temporary files”. Here you can delete the Temporary Files folder, as well as the Trash and Downloads.
Defragmentation
The entire contents of the hard drive are divided into many small fragments, and when new information is entered, these fragments are located taking into account their best position for sequential reading, one might say side by side. However, when they change, new information is recorded and existing information is moved, a well-ordered structure gradually tends to become more chaotic. Moreover, bad sectors appear, where the reading process is greatly hindered. The process of optimizing this entire structure is called defragmentation and is recommended for periodic execution at least once every six months.
Checking the disk for errors is also included in the optimization process.
Defragmentation is intended exclusively for HDDs. For SSDs, it is not only dangerous, but also harmful. If you don't know what you have:
- HDD - The computer turns on for 10 seconds or longer, and the hard drive looks like a box with a round part.
- SSD - Windows starts in less than 7 seconds, and the drive looks like an electrical contraption, just like the other components.
- Right-click one of the drives in Explorer and select Properties.
Right-click one of the drives in Explorer and select Properties - In the “Service” tab, click “Optimize”.
Click "Optimize" - Select one of the drives and click Optimize.
Then repeat with the rest. Select one of the drives and click "Optimize"
Cleaning drive C
In addition to simply cleaning the desktop and deleting unused programs, it is worth getting rid of files that are actually called junk. Windows 10 has a very specific place for collecting junk and junk files - this is the Temp folder. Everything in it can be deleted without any regrets and the slightest risk of harming the system.
Cleaning the C drive through its properties in Explorer is less complete and does not affect some temporary files.
- Go to settings.
Go to settings - Open the "Privacy" section.
Open the "Privacy" section - In the General tab, disable Ad ID and Start Tracking.
Disable Ad ID and Start Tracking - Go to the Speech, Handwriting, and Text tab and turn off speech services if they are active.
Disable voice services if they are active - In the “Feedback and Diagnostics” tab, select the main method of data collection, disable the only switch and disable the generation of reviews.
Select your primary data collection method, turn off the only switch, and disable generating reviews - In the Background Applications tab, turn off the main switch.
Turn off the main switch
Programs
As mentioned above, standard Windows tools for managing hard drive space are very limited in capabilities. If you are faced with an insurmountable problem or are simply too lazy to bother with moving space multiple times, you can always use the help of a special program that will do all the dirty and mental work for you in just a couple of buttons.
- Acronis Disk Director. The most powerful and most revered disk space management program.
It has the most complete list of features, but not the simplest interface. If you spend a couple of minutes mastering it, your problems with editing volumes will disappear forever. The most powerful and most revered disk space management program - PartitionGuru. Allows you not only to manage free space, but also to recover long-deleted files from the depths of your computer.
The program's interface is similar to the standard Windows utility, so you won't have any problems mastering it, and if you leave it on your computer, you'll no longer have problems with accidentally erased documents. A distinctive feature of the program is the ability to recover long-deleted files
Proper distribution of disk space is a simple and very far-sighted action, and timely defragmentation is the key to order on your computer. You should only change the size of volumes or their number after carefully considering your future plans for using the computer and distributing priorities between heavy games and programs. The main thing is to always leave at least 10 GB of free space on each volume, especially on the system one, and do not forget about defragmentation.
28.12.2018
The partition extension function in the Disk Management console is not active, or why does Extend Volume not work?
In this article we will look at the question of how to find out the reason for the volume expansion button being disabled in the Windows Disk Management console. Why is the Extend volume not active (gray button), and what can be done to correct the situation? About the problems in order. And right away: often they are not. The inability to expand the volume indicates that the ground is unprepared for this - after all, this “mistake” often awaits those who want to work with portable devices. Unfortunately, Windows itself does not give the user any hint of this, even in the more or less suitable help. It is clear that it is much more comfortable to work with third-party programs, such as AOMEI Partition Assistant. With its help, you can avoid all the mistakes described below. However, sometimes such programs refuse to work with disks for the same reasons.