Users of smartphones based on the Android operating system who don’t mind delving into the settings of their gadget have repeatedly asked themselves the question – Wipe data/factory reset, what is it?
This is a function that allows you to reset the settings to factory settings, simultaneously clearing all information.
In this case, the data is deleted both from the memory card and the global internal memory of the phone.
After using this function, only the system folder and other system partitions that are responsible for the proper operation of the smartphone remain untouched.
The remaining information and applications are completely erased without the possibility of returning them in any way.
Contents:
Why is this function needed?
There can be many reasons to use this feature. Users often encounter memory limitation problems.
An SD card always has its limit, and the phone's built-in memory can usually hold even less information.
However, despite all the warnings, we fill up the phone, filling it with music, videos and photos, which ultimately leads to unpleasant consequences:
- loading the smartphone is very slow;
- the gadget freezes even with the simplest manipulations;
- applications stop working correctly.
In this case, it becomes difficult, if not completely impossible, to use, so many, when faced with this problem for the first time, rush to the service center, wanting to fix everything as quickly as possible.
Important! Equipment repair and inspection services are not free and you will have to spend money on something that you can easily do at home yourself.
Viruses can also be one of the reasons. By downloading applications, games and information from unverified sites, the user risks his gadget.
Sometimes the built-in anti-virus program successfully copes with a virus introduced into the system, but their reliability is not always at the highest level.
An effective way to get rid of the problem is to use a system reset. Along with personal files, the deletion of which, unfortunately, cannot be avoided, the virus will also be destroyed.
You can use it for a number of other reasons:
- If you have recently updated the firmware of your smartphone, removing the built-in, original system, replacing it with a custom one, or simply upgrading to a higher version.
- When selling your phone to another person, without wanting them to have access to your personal information.
- In case of constant failures in the operation of Android, for which you cannot find an explanation.
A reset to factory settings, of course, can be done without an urgent reason, if desired, simply saying goodbye to old and boring applications that you don’t have time to delve into.
How to find Hard reset on your phone
There are several ways to use the Reset function on Android:
- Through the regular menu. It is the easiest way to do a hard factory reset; moreover, the process will take a minimum of time and does not require special knowledge and skills.
- Using service codes. In most cases, they are universal and are suitable with equal success for both Samsung and HTC, LG, Sony and other manufacturers of smartphones and tablets.
- By pressing hot keys in a certain combination. Suitable for devices of any brands.
- Using a computer (suitable for hard reset only by advanced users).
Before the procedure, it is recommended that you read the instructions for each method: it will help you understand how best to return to the factory settings of a gadget on the Android platform and avoid fatal errors, which could cause the entire system to stop working completely.
Peculiarities
In English, wipe is translated as cleaning, wiping, and if you see it in the gadget settings, always remember that this is formatting and hardly anything else. There are two types:
Full wipe - selecting this action will completely clear and format both built-in and removable memory.
Partial wipe - helps to delete individual sections and folders, performing a cleaning operation so that this does not lead to malfunctions and failures in the future.
On Android there are three ways to use it:
- through the options menu;
- using Recovery;
- thanks to a special reset button, if available.
The first and third methods are considered to be the simplest, because they do not take even a few minutes. As for the second, it takes longer, but is reliable.
Why do you need to perform a factory reset?
A factory reset clears Android data and apps and can be done for a variety of reasons:
- If Android does not work correctly or critical errors occur frequently
- After obtaining Root Android rights
- After the firmware (transition from original firmware to custom firmware, OS update)
- In order not to delete personal data (when reselling the device)
In the Android ecosystem, resetting settings is usually called wipe , [wipe] from the English word wipe, wipe. For many, a more familiar word in this case will be formatting or format.
So remember, Wipe Android is a reset, formatting, hard reset!
Types of wipe on Android
Wipe on Android can be divided into full and partial:
- Full Wipe (full wipe) - completely deletes all data on Android.
- Partial Wipe - deletes data only on the selected partition.
How to do it on Android?
Following the first method, turn on the smartphone and find the “Settings” section in the menu (most often the gear-shaped icon) and click on it.
Android menu
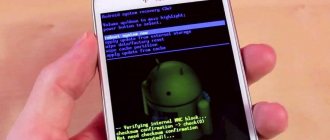
Next, almost at the very bottom we see the “Recovery” item and go to it. Then you should find “Reset to factory settings” and use it. To continue, click “Clear all”.
Please note: The system will definitely issue a warning that your files will be permanently deleted. We just agree and continue.
The manipulations carried out will lead to the fact that your gadget will go out for a while, and when it lights up again, a robot will appear with a scale showing what stage the formatting is currently at.
Once it's completed, the device will reboot, but it will do so very slowly, so don't be alarmed that you've broken something or only made the situation worse.
The second method using recovery is longer and requires attention from the performer. Follow the instructions and you will succeed:
- Completely turn off your smartphone or tablet.
- We hold down the volume control on its side panel and without releasing it, press the power button.
- Either the company logo or the menu for work should immediately appear, and only after that do we release the buttons.
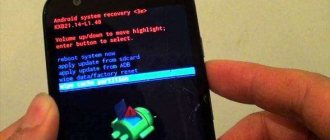
The course of further actions depends entirely on whether this feature is standard. If you see a list of commands on a black screen, then CWM is installed on the gadget.
This means you should use the volume up and down keys to scroll through.
With their help, we reach the section of the desired section and use the button to turn the smartphone on and off to select the correct item. Next, we confirm our choice.
Recovery menu
If TWRP is built into the gadget, the manipulations will be slightly different. After entering recovery, a grid of partitions will open, from which we select the one we need.
TWRP menu
The selected section will open and you will need to drag the curved arrow to the right, after which the formatting process will start.
Reset
To boot your smartphone after this, go to the reboot section and tap on the system key.
The gadget will start and you can start working on it again, eliminating any freezes, viral pop-up advertisements and system failures.
« Previous entry
More information about wipe on Android
This information is for those who want to know more about wipe.
About the subtleties of performing Wipe on Android
Many people are faced with the question of when to perform wipe? Before the firmware or after? It’s better to do this before installing the firmware , since many firmwares may have a built-in automatic reboot function after installing the firmware!
If the firmware contains files that are uploaded to the data section, then it’s worth checking how the system behaves; if it boots, it’s good; if not, then run wipe data.
About the subtleties of performing Wipe on Android 2
Based on personal observations, I noticed the following feature: in the popular custom firmware CyanogenMod (LinageOS) there is a script that performs a backup during the installation of the firmware and restores the data after it is completed. Because of this script, errors can sometimes arise and migrate from firmware to firmware.
Therefore, if you use LinageOS firmware or you know that the updater-script contains a script that backups system files, then it is better to make a format system before updating the firmware.
That's all, stay with the Android +1 !
Formatting a smartphone via PC
There is an option to reset Android to factory settings, which involves installing an additional utility on a PC and using the command line.
This Android formatting option is more complex than formatting through recovery, and is mainly intended for experienced users.
Most of the time will be spent installing the ADB utility itself. After downloading the archive with the application to your computer, you will need to unpack it and make sure that there is an executable file named adb in the “platform-tools” folder. If there is no file in this folder, you need to launch the SDK Manager, which is located in the “Android-sdk-windows” folder and download Android SDK Tools and Android SDK Platform-tools to your computer.
After installing Android Debug Bridge, you can begin deleting all data on your phone. To do this we do the following:
- Launch the command line using the cmd command.
- We connect the phone to the computer (first enable the “USB Debugging” option on the gadget in the “For Developers” section). To make sure that the phone is connected to the PC, you should use the “adb devices” command.
- Go to the ADB directory by entering the “cd” command. To do this, you need to put a space after “cd” and indicate the path to the directory.
- Enter the command “adb reboot recovery” in the command line (without quotes) and wait until the phone starts in recovery mode.
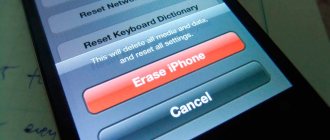
- Using the physical buttons on the phone, first select the “wipe data/factory reset” option, and then “Reboot system now”.
Using this utility is important when the device is blocked or faulty (for example, the sensor does not work).
Reset from settings
A reset using this method is done if the device starts and works normally, since it is done from the settings.
Open “Settings”, look for “Personal data” (on different versions of Android this item may be called “Backup and reset” and “Accounts”). We go to where you will need to click “Reset data to Reset devices”, after “Delete everything”).
How to reset settings on Android via Recovery
This option is recommended for those who cannot turn on the phone because the system freezes, or if it is impossible to enter a lock password or pattern. The procedure using Recovery is performed as follows:
- We activate Recovery by simultaneously pressing two keys – volume down and power off. On some gadgets, other combinations may be used: power on + “home” + volume up (for Samsung); power + volume; volume up and down buttons at once.
- When the menu opens, navigate through it using the volume keys.
- Select “Wipe data” or “Clear flash”, then “Yes” or “Yes, delete all user data”.
- When the process is completed, select the OS reboot option – “Reboot system now”.
Some smartphones come with individual instructions describing how to back up or restore settings on Android, and the menu options may vary slightly.
What is Android Hard Reset?
With careful use of the device, the Android operating system can live for quite a long time without failures and system problems, which can arise for several reasons.
- Frequent installation of applications from unknown sources that begin to harm the OS and system files.
- Cluttering of the mobile device’s memory with temporary files, cache and other garbage that remains after using applications, browsers and games.
- Having received superadmin rights (root rights), the user unknowingly deletes data that is important for Android.
- OS components are blocked or removed by a virus. A very common virus is one that blocks the phone and demands that money be transferred to an account, threatening that otherwise criminal liability will follow. Don't be scared, this is pure scam.
But whatever the reason, Android Hard Reset will help solve the problem. This is a special feature of the mobile device that resets all data to factory settings. As a result, the user has a completely clean gadget, just like immediately after purchase.
How to clear all data on your phone remotely
There is an Android formatting option that does not require “direct” contact with the phone - using a Google account.
In order to do a complete reset on Android in this way, you can use absolutely any device that has access to the Internet.
To be able to delete all information from your phone in the future, you need to configure your device correctly. To do this, do the following:
- go to the “Security” section, which is located in the device settings;
- click on “Device Administrators”;
- check the box next to the “Find device” option;
- enable mobile Internet and the “Transfer location data” option on your phone.
In addition to the above conditions, the Android device should not be turned off.
Note: in addition to formatting the device memory through the account, the user can remove the lock from the screen if he has forgotten the password, and, if lost, “see” the location of the phone on the map.
To perform a full factory reset on your phone using Google, you need to do the following:
- Open a browser on your device and go to google.com.
- In the right corner, click “Login”.
There is another way to reset to factory settings - using a secret code.
This method does not always help and is not suitable for all smartphones, so it is used less and less in practice.
In order to reset Android using a secret code, you need to enter the combination *#*#7378423#*#* or *2767*3855# in the dialing menu.
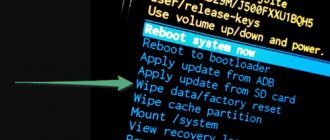
You can format Android in this way if your phone is locked. To do this, select “Emergency call” on the locked screen and enter one of the combinations.
«>
Without preparation you can't go anywhere
Before you do a Hard Reset Android, some preparations are required in order to save important data (phone book, accounts, passwords, etc.). This is done in different ways:
- synchronize with your Google account via mobile Internet or Wi-Fi;
- we connect to the PC via USB, after which we save all the data on the device using a special program (it can be either from the manufacturer or from unofficial developers);
- You can also save contacts from the phone book by importing them to a memory card.
In addition to the internal data of the mobile device, it is advisable to copy files from the memory card to the computer. The fact is that Android Hard Reset erases not only all personal data, but also information about the location of files on the SD card. Therefore, on a full memory card inserted into the gadget after the reset, the new file system will be displayed on top of the old one (the files on the flash drive will physically remain, but will not be displayed).
Now that all important information is saved, you can do an Android Hard Reset. It is done in three ways:
- Programmatically, i.e. from the system settings.
- In Recovery mode.
- Using a PC.
What you need to do before formatting
Formatting internal memory on Android does not take much time (5-10 minutes). Saving personal data takes much more time from users, because after a hard reboot, contacts, photos, videos, and programs (except pre-installed ones) will be deleted on the phone.
Accounts entered on the smartphone will also be lost. Therefore, it is advisable to remember or write down logins and passwords for them before formatting.
Attention: it is important to remember the registration data from your Google account, because after formatting (when you turn on the device for the first time), the user will need to be authorized.
You can save information in any of the following ways: use backup programs, a cloud storage service, or transfer photos, documents and videos “manually” to your computer through Explorer.
Instructions: How to reset settings via computer?
Step 1
Go to the Android developers website and download the Android System Development Kit. Right-click on the ZIP archive and select "Extract All". Click the Browse button and select the C:Program Files directory.
Step 2
Go to the folder where the files were extracted and press "F2" to rename it. Give the folder a simple name, such as "AndroidADT".
Step 3
Right-click on "My Computer" and select "Properties". Click on the "Advanced System Settings" option and in the "Advanced" window, click on the "Environment Variables" button.
Step 4
In the System Variables window, select the Path option and click the Edit button. When the window for editing system variables opens, scroll to the very end and write the path to the archive that you unpacked earlier (“;C:Program FilesAndroidADTsdkplatform-tools”) (without quotes). Make sure you add a semicolon at the beginning of the path. Click "OK" to save your changes.
Step 5
Hover over the top right corner of the screen and click the Search button. Type “cmd” in the search field and click on the program icon in the search results to launch a command prompt window.
Step 6
Turn on your smartphone and connect it to the computer's USB port. Write "adb shell" and press "Enter". When ADB connects to the mobile device, write “--wipe_data” and press “Enter”. Your phone will reboot into recovery mode and automatically reset to factory settings.
Now you know how to reset settings via a computer.
Dear reader! If suddenly the method described in the article did not help you, please help others - write how you dealt with the problem or ask a question. By the way, the answer to your question may already be in the comments.
Backup
There are several simple ways to make a backup before restoring factory settings on Android:
- Using your Google account.
- Via PC and using ADB tools.
- Using custom Racovery.
- Through the DataSync program.
The best option is backup through an account, since full synchronization occurs in it, as a result of which the user gets easy access to backup copies. How it's done:
- Go to “Personal” and “Accounts”.
- After selecting your account, check all the boxes.
- We return to the previous step again, click on “backup” and “reset”, select data archiving and automatic recovery. We perform a full check of the work account and go to the synchronization menu, where we click on “Synchronize”.
- Login to your account. Click on reset to roll back to the previous version.
This option is only suitable for those who remember all the account information (username and password). You will need it later after a rollback and reboot of the system, otherwise you will not be able to use the device.
As a result of synchronization and creation of a backup copy in Google, after turning on the device will automatically download all data from the “account”.
To perform the operation via ADB RUN, you will need a PC and a cord from your smartphone, which must be inserted into the USB connector. The process consists of several stages:
- We activate USB debugging on the smartphone.
- Launch the ADB RUN program.
- If the driver has not been installed previously, install it.
- In the program, select “Backup”, then “ADB Backup”.
- Find the backup menu in your device and click on it.
After completing the procedure, you only need to perform two steps to restore:
- In the program, click on “ADB Restore”.
- On your smartphone, select “Data Recovery”.
If a custom “Recovery” is installed in the OS, a complete copy of the firmware is performed, rather than creating a backup copy. What needs to be done:
- Log in to Recovery, click on “Backup and restore”.
- Select “Backup” to copy, then “Restore” to restore.
Another copying option is to use the DataSync application. It is suitable for users who only need to transfer data from other applications. If you need to create backup copies of them, you won't be able to do this using DataSync.
Performing Hard Reset from Fastboot mode
To reset all data on Android, there is a Fastboot utility; it can be downloaded from the developer’s official website. To install this program correctly, you must do the following:
- After installing Fastboot, unzip it to the root of drive “C”, then download the Java Development Kit, install the package, agreeing to the licensing terms.
- Go to the “Android SDK” folder, open it and find the “Android” file, run it.
- Install the package by selecting “Accept license”.
Users of LG, Nexus, Huawei, HTC and Motorola brands will have to pre-unlock the program:
- By selecting the “Fastboot oem unlock” command, if the device is LG, Huawei or HTC.
- For other device manufacturers, activation is only possible by obtaining a code on the official website.
To put your equipment into Fastboot mode, you can use any of the following methods:
- Turn off the mobile phone, then press two keys: the power button and volume down.
- We connect the device to the PC, enter the ADB command in the address bar, running as administrator, and press Enter. When the firmware is loaded, you need to do a hard reset using the commands “./fastboot erase userdata” or “./fastboot-w”. After the reset, reboot the smartphone with the “fastboot reboot” command.
other methods
There are several other rollback methods:
- Through Google's Find My Device service. Suitable for users who have lost their gadget and want to remotely delete personal information.
- Via TWRP service. It allows you to clean individual partitions rather than the entire OS.
- Using a number key combination.
In the latter case, you must enter the codes
- *#*#7378423#*#8
- *#*#7780#*#*
- *2767*3855#
- press call key
After this, the device will perform the operation and reboot. Sometimes the reboot occurs immediately after entering the final character, which is normal.
All the options presented above are the easiest to use for users without specific skills. If other problems appear after the rollback, it is recommended to contact a professional service, otherwise, with independent intervention, the likelihood of complicating the situation increases.
Resetting your smartphone to factory settings via “Settings”
The easiest way, which does not require the owner of the gadget to install additional software and connect to a computer, is to format it directly on the “problem” smartphone.
To do this you need to take the following simple steps:
- open “Settings” on the device;
- go to the “Restore and reset” section;
- click on the item “Reset settings”;
- click “Reset phone settings”;
- confirm the action by clicking “Erase everything”.
If your phone has a security lock installed, you will be asked to authenticate before resetting.
You can clear the gadget's memory in this way only if you have access to the settings. If the phone is locked, the screen is damaged, or for some other reason it is impossible to get into “Settings,” then you can use Recovery.