Good time! As I have repeatedly noted, every user of devices from the Cupertino company must have an Apple ID account. Yes, what should there be - I simply must! However, sometimes various errors occur during registration that prevent the creation of this identifier. What to do? Don’t register anything and use the device “as is,” thereby depriving yourself of the pleasure of using the gadget to its fullest?
The correct answer is no, no and no again. Problems must be dealt with, and today’s article is dedicated to why an Apple ID may not be created and, most importantly, what to do in this case. Are you ready? Let's go, well! :)
Create an account using iPhone
You can create Apple company accounts directly from your iPhone. To do this, there are two options: go through standard registration, in which you need to provide information from your bank cards to make payments, or create an Apple ID without a credit card. Up-to-date payment information will be required if you purchase any software from the AppStore. If you do not plan to make purchases and do not want to do it accidentally, for example, by mistake. We recommend using the second, more sophisticated method.
The standard procedure is carried out as follows: you need to open the iTunes Store, App Store tab and find the “Create a new Apple ID” item there.
If you want to register an Apple ID without payment cards and for free, proceed as follows:
- Go to the App Store.
- Select a game or application that is offered for free.
- Download and wait for it to install on your iPhone.
- The next step is to log into an existing account or create a completely new one. When prompted, select “create a new ID.”
After this, the steps are similar in both options:
- If you do not want to link a card, for one reason or another, it is better to set Russia as the country, even if you live in another country - this will give you a wider selection of applications, programs and other things.
- After this, you need to carefully read and accept the standard user agreement.
- Then personal information is entered. When specifying your existing email address and password, be careful - for security reasons, the password must consist of at least eight characters and have letters in both cases.
- When indicating your age, please note that you cannot indicate less than 13 years of age, and if you indicate less than 18, access to the content will be limited.
- It is best to save the answers you enter to security questions in a text file or write them down on paper and hide them. This is done so that, if necessary, you can quickly and safely restore access to your account.
- If you register using the first method, you will then need to enter payment information.
- The procedure is completed.
After this, you need to go to the mailbox that was used to create the account. You should receive a letter from technical support confirming the creation of your Apple ID. For the first apple id registration to go quickly and correctly, just click on the highlighted link in the text of the letter.
Part 1: Why iPhone Freezes When Updating iCloud Settings
These are the common causes of iCloud settings update error on iPhone. You can read and check if you have made the same mistake before.
1. Press Sleep/Wake button unknowingly during iOS system update.
2. Your iPhone is running out of storage space.
3. Apple server is too busy or down due to high traffic.
4. Your iPhone is low on battery. Consequently, your iPhone may suffer from black screen death or freeze for 10 minutes.
5. Unstable Internet connection.
iTunes to the rescue
Alternatively, you can create an account for an iPhone or iPad using the official iTunes program. In this situation, you will be able to choose whether to provide information about your cards or not. Before you change your ID, you need to go to the menu and find the iTunes Store item there. If you want to learn how to create an Apple ID without payment data, as in the first case, you need to download any free application and go to this menu using it.
After this, the steps are standard in both cases:
- The system will offer to log in to a newly created, existing account or create a new one.
- Having chosen the option to create a new one, enter your data. As stated earlier, they must be factual for you to verify their authenticity.
- After this, you will have to answer security questions (it is better to write down the answers) and enter your card details or refuse this if you want to create an Apple ID without a credit card.
- After completing registration, be sure to go to your mailbox and immediately confirm creation in the mail using the highlighted link in the body of the letter.
If the letter is from those. support does not arrive for a long time, check your spam folders and filtered letters by other categories - often letters arrive there by mistake.
Instructions
If the message “There was an error connecting to the Apple ID server” appears on a loaded device, you should pay attention to the state of the branded services themselves. In some cases, difficulties arise in their functioning. Be sure to set the time and date correctly. When automatic detection is not possible, we specify these parameters manually.
Your device must have the latest version of iOS. Test versions of the platform can also cause such a failure. In the case of using beta versions, the owner of the device takes on additional risks, since he is using not fully finished software. Errors in this case can occur quite often.
You also need to check your Internet connection. Sometimes the connection may stop working and still show a good signal. To fix the problem, you can sign out of your Apple ID. To do this, go to “Settings” and select iTunes. Open the App Store and use “Exit”.
Next, we reboot our device. After that, use your own ID to log into your account again. As the most radical remedy, you can use complete data deletion. You must first create a copy in iTunes or on your personal computer.
Jailbreak can also cause such problems. If the previous methods turned out to be ineffective, stop using it. This can only be done correctly by restoring the iPhone.
In rare cases, a similar failure is possible when working with iTunes. To fix it, check your computer's connection to the Internet. Firewall and antivirus programs may deny access to various Apple servers.
We disable protection for a while. Install the latest version of iTunes. If an Apple ID was used on a personal computer, we “unlink” it from the application.
To do this, launch iTunes - in the upper left corner, click on “Store”. Select “Deauthorize computer”. Next, reboot the PC. Let's try to log in again. The attempt will probably be successful. We discussed the main options.
When trying to create an Apple ID for your iPhone or iPad, or when trying to purchase any digital product in iTunes, the user may receive the error message “For assistance, contact iTunes support: www.apple.com/support/itunes/ www". Trying to start obtaining the ID first leads to a similar result, forcing the user to guess about the reasons for the specified problem. In this article, I will tell you what this error is, what causes it, and how to fix the “Please contact iTunes Support for help” error on your PCs.
This is what the mentioned message looks like:
This problem is of an international nature, and is observed among many Yabloko members around the globe (the English version of the message – “for assistance contact iTunes support...” occurs no less regularly).
According to indirect data, the occurrence of this error in most cases is associated with IP filters, which are installed on unreliable IP addresses of individual users (for example, incorrect registration with incorrect data was previously carried out using IP data, there were problems with a payment card, and so on) .
Also, the cause of this error is a standard failure on Apple servers, which also happens sometimes.
What mistakes can be made?
To find out how to register an ID on an iPhone correctly, how to change the ID on the device, you need to know what mistakes to avoid. Most often, the following difficulties arise in the process:
- You don't want to make purchases on the App Store. To avoid even accidentally purchasing any paid content without providing bank card details.
- It is best to indicate your real age, but only if it is over 13, or better yet, over 18 years old. If you set the age to 12 years or less, the system simply will not allow you to create your own Apple ID. And if you indicate an age of less than 18, you will not have access to all content.
- If you managed to get an email address with an @iCloud.com or @me.com address, you will have to create a new email account to register an account for your iPhone. These addresses are not suitable for creating accounts.
- If the name you entered contains invalid characters, please note that there are no Russian letters in the email address, and that there are no extra symbols, dots, numbers, etc. in the first and last name.
- The password must be complex. If the password is too simple, the system will not allow you to complete the process completely. Numbers, large and small letters, symbols - the more of them in the password, the better.
- An obstacle to creating an ID on an iPhone can be a server failure. In this case, it is best to wait and continue after half an hour - an hour, when the servers are working properly.
In general, registering a new Apple ID does not take much time. Even an inexperienced user can carry out this operation if he follows the instructions.
We'll tell you how to set up and manage your Apple ID in the next article, stay tuned.
You already understand that creating an account for an iPhone is no more difficult than creating an e-mail. You need to understand the essence of the process and then mechanically fill in the necessary fields. Registration does not take a lot of time, so in 20 minutes you will be able to use your smartphone as the rightful owner of a smart device capable of many amazing things.
Your Google Account
What should you do if you entered the wrong age on your account and it was blocked?
There are age restrictions when creating an account, these vary from country to country. The minimum age for regular accounts is 13 years in most countries around the world. This means that if you specify a lower age, the account will not be created or will be blocked. If, as a result of any actions, an incorrect date was specified in the settings and the account was blocked, then do not worry, and you can try to correct the situation. About this described in these articles: • “Age restrictions in Google Accounts”https://support.google.com/accounts/answer/1350409?hl=ru&ref_topic=7189311• “Frequently asked questions about age restrictions on using a Google account” (solution to the problem )https://support.google.com/accounts/answer/1333913?hl=ruIt is worth remembering that any nickname instead of a real name, and other fictitious information can limit the process of restoring access. For example, you indicated fictitious information, and then you try to restore access using real information, but all the data differs quite significantly from each other. Thus, the system will not be able to identify the correct information as the main one, and may limit the return of login to the account.
What is an Apple ID?
However, let's start in order and understand the concepts - what is an Apple ID and why registering this identifier is so necessary.
Apple ID is a personal account unique for each iOS user, allowing access to all giants, including the App Store, iCloud, iMessage, FaceTime, etc.
Of course, it is possible to exist without an Apple ID, but in this case it is a very correct word to exist - to live to the fullest, as they say, the iPhone will not be able to live without a personal account. Look for yourself, without an Apple ID it is impossible to even download applications from the App Store, that is, you will only have access to “native” pre-installed programs, the range of which is difficult to call wide and comprehensive. Apple doesn’t even pre-install the most popular social networks - so without an ID, you’ll have to view the latest photos on Instagram exclusively through the browser.
As for other Apple services, you can also suffer serious losses here. Don't have an Apple ID? This means you can't send messages via iMessage or make calls via FaceTime for free. You also cannot access iCloud cloud storage, activate the “Find iPhone” option, and so on and so forth. In short, wherever you go, an Apple ID is required everywhere.
Status
So, the device reports “There was an error connecting to the Apple ID server.” Let's look at how to eliminate it step by step. Because of this, the only phone functions you can use are calls. Apple services become unavailable. For example, you cannot use the App Store.
Additionally, if your device displays the message: “There was an error connecting to the Apple ID server,” iCloud will also fail to activate. There are several options to resolve this problem.
How to create an Apple ID on iPhone?
However, there is no need to worry, because creating an Apple ID takes very little time. Many, however, are scared that when registering an ID, they are required to provide bank card information, which is logical, because they need to buy applications for something. However, there are many users who are afraid to enter card details and the lack of opportunity to buy a program or content does not bother them. Just for such users, we have great news - entering payment information is not necessary at all, and in our guide we will tell you how to “skip” this step.
Well, let's figure out how to register an Apple ID. It is worth noting that there are two ways to complete this procedure - registration can be done directly from the iPhone, or you can use an “intermediary” - the iTunes program. We will provide instructions for both the first and second methods, but note that there will be practically no differences in them. That is, the choice of one or a new method for creating an Apple ID account will be determined only by the fact which device is more convenient for you to work with - if it’s easier to use the i-device directly, then read the first instructions, but if it’s “closer” to a PC and iTunes, then the second .
Registering an Apple ID from an iOS device
So, first of all, since in our opinion it’s easier, we’ll tell you how to create an Apple ID from an iPhone. It doesn’t matter whether you have a brand new iPhone 7 or another model, the instructions will be the same:
- Go to the App Store, select the “Top Charts” section, then “Free” and click “Download” next to any free program.
- A window will appear asking you to enter your Apple ID data or create a new one. We select, of course, the second option and in the next window we indicate the region and accept the terms of the privacy policy.
- Now you will see a “form” for registering a new account; all you need to do is fill it out correctly.
- First of all, we indicate the REAL mailing address to which you have access. Why is this so important? Because it is to this address that a link will be sent to confirm your account registration, and if you cannot access it, you will not be able to complete the registration.
- Next, specify the password, taking into account security requirements.
We set up verification questions and answers that will help you out if you forget your account password and need to reset it. Important point! Keep the questions and answers as simple as possible so you don't forget them. - We also recommend that you fill in the “Backup E-mail” field; it will come to the rescue when resetting your password if the answers to the security questions are forgotten.
- Well, now let’s move on to the most interesting part - filling out the “Payment Information” section.
If you do not want to attach bank card information, select “No”, otherwise indicate the type of card, for example, “MasterCard” and its parameters. If you don't see the "No" option, it means you didn't start creating your account by trying to install a free app. Reset the questionnaire and start over, strictly following this guide. - There is very little left to do - fill in some personal information - first name, last name, address, date of birth. All fields must be filled in Latin characters!
- All! Click next, wait until the entered data is verified and go to the mailbox specified in the fourth step of this instruction. There will be a letter from Apple in your mailbox with a confirmation link - click on it and you're done! Apple ID is active.
Once your account is activated, the application you selected in step 1 of the instructions will begin to download.
Registering an Apple ID account
You can register an Apple ID account in three ways: using an Apple device (phone, tablet or player), through the iTunes program and, of course, through the website.
Method 1: Create an Apple ID through the website
So, you want to create an Apple ID through your browser.
- Go to the account creation page and fill out the fields. Here you will need to enter your existing email address, create and enter a strong password twice (it must necessarily consist of letters of different case and symbols), indicate your first name, last name, date of birth, and also come up with three reliable security questions that will protect your account.
- Next, you will need to specify the characters from the picture, and then click on the “Continue” button.
- To continue, you will need to provide a verification code, which will be sent in an email to the specified mailbox.
It should be noted that the code's expiration date is limited to three hours. After this time, if you do not have time to confirm your registration, you will need to complete a new code request. - Actually, this completes the account registration process. Your account page will load on your screen, where, if necessary, you can make adjustments: change your password, set up two-step authentication, add a payment method, and more.
Please note that test questions must be designed in such a way that you will know the answers both in 5 and 10 years. This will be useful in case you need to regain access to your account or make major changes, such as changing your password.
Method 2: Create an Apple ID through iTunes
Any user who interacts with Apple products knows about the iTunes program, which is an effective tool for interacting your gadgets with your computer. But besides this, it is also an excellent media player.
Naturally, an account can be created using this program. Previously, our website has already covered in detail the issue of registering an account through this program, so we will not dwell on it.
Connection to App Store failed
Resolving the “App Store connection failed” error
10.08.2017
A common problem for owners of Apple devices is often an error when connecting to services of the same name, be it the App Store, iTunes Store or iBooks Store.
The messages displayed on the screen may vary, but, as a rule, the causes of all these errors are similar. Examples of messages:
- "Unable to connect to iTunes Store"
- "Can't connect to the iTunes Store. An unknown error has occurred"
- "The iTunes Store request failed. The iTunes Store is temporarily unavailable. Please try again later"
- "iTunes was unable to connect to the iTunes Store. Make sure your network connection is active and try again."
- "The iTunes Store request failed. This network connection cannot be established. An error occurred in the iTunes Store. Please try again later"
General solutions
First of all, regardless of the problematic device, you must complete the following points.
Method 1: Checking your Internet connection
The most common reason is a lack of connection between the device and Apple servers. First of all, make sure that the device is connected to the Internet.
Open any website in your browser. If there is no connection, in case of connecting to the Internet via Wi-Fi, restart your routing device (router, switch, etc.). Check its settings: the router software should not block access to Apple servers and ports. If you use a public network (in public places, educational institutions, offices, etc.) and do not have access to configure the router, contact your network administrator. If the settings are fine, but there is still no Internet connection, contact your provider.
Method 2: Checking the status of Apple services
Sometimes the connection error is caused by a problem not on your end, but on Apple's side. To exclude this option, check the status of the company's services in your country using the link.
Method 3: Checking the set date and time
Incorrect date and time on the device can cause a large number of errors, especially related to connecting to remote servers. You need to make sure these parameters are correct for your time zone.
- On an iPhone, iPad or iPod, in the settings menu, find the “General” section, and then select “Date and Time”.
- On a Windows PC, set the time to the standard time setting for your operating system.
For example, in Windows 10, first click on the date and time displayed in the lower right corner (on the taskbar), then on the inscription “Date and time settings”. In the settings window that appears, click on the “Change” button. - On a Mac computer, go to the System Preferences menu, then go to Date and Time.
- On the AppleTV player, the actions are similar to mobile devices: go to the “General” item in the “Settings” menu, then “Date and Time”.
Manually enter the required values.
Method 4: Login again
Sometimes, to solve a problem with access to Apple services, you just need to log out and log back into your account.
- Go to the settings menu and click on “App Store. iTunes Store".
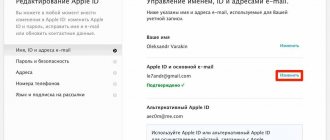
- Click on the “Apple ID” line with your ID.
- Log out of your account by clicking the "Log Out" button.
- Re-enter your username and password in the appropriate fields and click the “Login” button.
If, after logging out of your account, it turns out that you cannot remember your password, use the recovery service by clicking on the corresponding text.
Additional Solutions
If all of the above steps do not have an effect, please follow the additional instructions below (based on your device type).
Mobile devices (iPhone/iPad/iPod)
If you use a cellular connection to access the Internet, you need to check the following:
It is also worth noting that when using cellular communications there may be problems with loading heavy objects. For this purpose, it is better to use a Wi-Fi connection.
Computer (Mac)
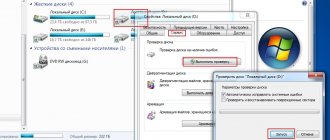
Check your standard firewall settings. Although by default it is set to automatically pass all connections from Apple programs, there are cases of accidental or deliberate changes to the settings. Resetting the cache of approved certificates can help resolve this issue.
- Go to Finder by clicking on your desktop.
- Click on the go button on the top panel of the window and click on the “Go to folder” item.
- In the field that appears, type the path: /var/db/crls/ and click “Go”.
- Locate the crlcache.db and ocspcache.db files and then delete them.
- Restart your Mac.
Computer (Windows)
First of all, make sure whether there are third-party programs on your computer that control network traffic (firewalls, antiviruses, etc.). They, along with the standard Windows Firewall tool, can block connections to Apple servers. Disable all software that controls network connections (and also turn off the proxy connection if used) and check if the problem is resolved. If the answer is yes, you need to make changes to the settings of these programs, adding permission to connect to the App Store, iTunes, etc. services, or leave them turned off.
If all the manipulations specified in these instructions did not help solve your problem with accessing the iTunes/App Store, you need to contact the official Apple support service.
Tell your friends on social networks
compdude.ru
How to register an Apple ID without linking a bank card
The user does not always want or can indicate his credit card during registration, however, if, for example, you decide to register from your device, then the screenshot above shows that it is impossible to refuse to indicate the payment method. Fortunately, there are secrets that will still allow you to create an account without a credit card.
Method 1: registration through the website
In the opinion of the author of this article, this is the simplest and most optimal way to register without a bank card.
- Register your account as described in the first method.
- When you sign in, for example, on your Apple gadget, the system will report that this account has not yet been used by the iTunes Store. Click on the “View” button.
- A window will appear on the screen to fill in the information, where you will need to indicate your country and then proceed further.
- Accept Apple's fundamentals.
- You will then be asked to indicate your payment method. As you can see, there is a “No” item here, which needs to be checked. Below, fill in other personal information that includes your name, address (optional), and mobile phone number.
- When you proceed further, the system will notify you that your account registration has been successfully completed.
Method 2: Register via iTunes
Registration can easily be done through the iTunes program installed on your computer, and, if necessary, you can avoid linking a bank card.
This process has also already been discussed in detail on our website in the same article on registration through iTunes (look at the second part of the article).
How to change age on YouTube
Unfortunately, the mobile version of YouTube does not yet have a function that allows you to change age, so in this article we will only look at how to do this through the full version of the site on a computer. In addition, we will also tell you what to do if your account was blocked due to an incorrect date of birth.
Since a YouTube profile is also a Google account, the settings are not changed entirely on the YouTube website. To change your date of birth you need:
- Go to the YouTube website, click on your profile icon and go to “Settings”.
Here, in the “General Information” section, find the “Account Settings” item and open it.
You will now be taken to your Google profile page. In the Privacy section, go to Personal Information.
Find “Date of Birth” and click on the arrow on the right.
- Guide to registering an Apple ID account without linking to a credit card
Next to your date of birth, click on the pencil icon to proceed to editing.
Update your information and don't forget to save it.
Your age will change immediately, after which you just need to go to YouTube and continue watching the video.