If you came to this article, then you had to face a problem when the laptop does not turn on and a black screen appears. This is the most common problem associated with laptop hardware, or, to be more precise, with hardware settings.
We thank the laptop repair service FIXIT.BY (Minsk, Belarus) for their help in preparing this material.
Below we will look at how to reset hardware settings. This method helps when the hardware settings are lost, but it will not help if your laptop was flooded with water.
In the article “The laptop does not turn on, reasons and solutions,” we looked at the physical problems associated with the appearance of a black screen.
You perform all actions at your own peril and risk; if you are not sure about something, it is better to contact the service center. Typically, the cost of repairing a laptop differs significantly from the cost of repairing computers.
How to reset your hardware
To perform a hard reset, you must follow these steps:
- Disconnect the laptop from the network or other power source. This includes disconnecting the laptop from the charger, as well as removing the battery.
- You need to press and hold the power button for about 20 seconds
- After that, insert the battery and connect the laptop to power.
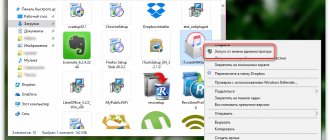
- Turn on the laptop and select the normal Windows boot using the arrow keys on the keyboard.
Why is this necessary? Everything is very simple. The laptop stores residual charge on capacitors to save settings. When you turn on the laptop without a power source, this charge disappears and all settings are lost.
If these steps did not give any result, proceed to the next step.
Ways to check your computer for problems.
Is your computer working properly and you don’t have the problems we mentioned above? Do not rush to rejoice, because often the computer is full of system errors that have not yet manifested themselves. In order to make sure for yourself that the computer is working without problems, you need to check for errors.
There are several ways:
- Check your computer without the help of third-party software. Go to “my computer”, then right-click on the hard drive, select “service” and check the disk for errors. This check allows you to detect most errors and eliminate them. However, this is by no means a panacea, since some errors may still be present in the system.
- Scan your computer using Iobit Download the program and run the scan, after which you will be given a list of problems that your computer has encountered. The program will automatically correct errors and your computer will work noticeably better.
- Antivirus check. If the cause of errors on your computer is viruses, then the first two methods will lead to nothing. Scan your computer with a high-quality antivirus and delete infected files.
For technical aspects of fault diagnosis, watch the video:
Checking the health of the laptop screen
Checking the functionality of the laptop screen can help solve the problem with “Laptop won’t turn on and black screen appears.”
This method is recommended to be used if, when you press the power button, the laptop shows signs of life, i.e. indicators of power, railway operation, etc. I start blinking, the cooler starts making noise.
In this case, it is recommended to connect an external monitor and restart the laptop. If the laptop turns on and the OS loads, then there is a problem with the screen and you cannot do without a service center.
Computer turns off while playing
It happens that we launch a game and the laptop turns off, or instead of our favorite shooter we see a black screen in front of us. What to do and what are the reasons for the breakdown?
- The most common reason is excessive load on the power supply. Very often “heavy games” are to blame for this. If you are sure that the problem is not in the game, but in the power supply itself, then you need to replace it with a better one.
- Processor problem. When we launch a demanding game, the load on the processor increases many times over, and a black screen may appear. Accordingly, if the temperature sensors detect an excess of temperature on the computer, then the protection mode is triggered and your computer simply turns off. Most likely, your cooling system is outdated. The best option is to replace the processor cooler.
Resetting BIOS Settings
If the problem “the laptop does not turn on and a black screen appears” appeared after changing the BIOS settings, then you just need to reset and roll back to factory settings. This action is performed in several steps.
You can read more about the information “how to enter the BIOS on Windows 10” or “How to enter the BIOS on Windows 7” in our articles.
- When you turn on the laptop, press the F10 or F1 key for 10 seconds to enter the BIOS.
- Then you need to press f9 or select the option "Load Setup Defaults"
and enter to return to factory settings. - Press the f10 key and enter - this action saves the settings and restarts the laptop.
If these steps don't help, see the next step.
Diagnosis and elimination of software errors
It’s worth starting diagnostics by looking for software errors, since they are most often to blame for the problem why the laptop won’t turn on.
Boot in Safe Mode
If you can't start Windows, you should try Safe Mode first.
In Safe Mode, you can undo all recent changes, such as adding/removing programs or restoring/deleting one of your Windows accounts. These recent changes may be the reason why your laptop won't boot normally.
In Windows, you must press the F8 key when starting the system. Then select safe mode. If you are offered a recovery option while running in Safe Mode, you should run it.
If for some reason, when you press F8, the selection of safe mode does not appear, then you need to restart the system 3-4 times, then the next time you start, the “Automatic Recovery” menu will appear. You need to click “advanced options”, then “Troubleshooting”, then select “Boot options”.
Using a recovery disk
If error messages appear when starting the system, and the problem does not seem to be caused by faulty hardware or installed programs, then you should consider using a recovery disk.
If your laptop has an optical drive and has a Windows recovery DVD, use that. Otherwise, you can download (from another computer running the same system) the recovery image and burn it to a CD or copy it to a USB drive.
This will return the device to its factory state, that is, it will reinstall all the software that was on the laptop by default when it was purchased.
Advice! It is advisable to create and store a recovery disk in advance to resolve unexpected critical problems.
Problems with BIOS
You can try resetting the BIOS settings to factory settings if the laptop does not turn on. Some programs, including malware, can disrupt the correct operation of the BIOS.
There are 2 ways to reset the settings, both of them are simple.
- 1 way. After the laptop has been started, you need to press the F9, F11 key (depending on the model), find the “Load BIOS Defaults” item, save the changes and restart the system.
- Method 2. To do this, you need to disconnect the CMOS battery from the motherboard for a few minutes. It is easy to recognize: it is a large round flat battery, similar to the one used in watches. In laptops it is less than in desktop computers.
Also, a dead battery can be the reason why your laptop won't boot. In this case, when the system starts, an error message and the message “Press F1 to Continue” will appear.” In this case, you will have to replace the CMOS battery with a new one.
Graphics driver problems
A black screen at startup does not always mean a video card problem. If any errors appear in the driver, the image simply stops playing.
To resolve this issue, you must start Windows in Safe Mode. To do this, when starting the system, press the F8 button, then select “Start in Safe Mode”
After the system starts on the standard developer driver, it is worth checking whether the graphics driver is actually working incorrectly. To do this, you need to go to the “device manager”, find the “video adapter” item, and see if the current and working driver is installed.
If this is the problem, you first need to remove the current driver, then you need to download the current version of the required driver from the video card manufacturer’s website and install it.
Problems with the OS bootloader
A number of internal system errors or regular incorrect shutdown of the OS can create an error that prevents the laptop from turning on. At startup, a message appears about “corrupt MBR or GPT entry” in one of the hard drive partitions.
In order to fix this error, there are 2 ways.
1. Use a recovery disk
2. Reinstall Windows
For the first method, you must have a bootable external device (this can be a disk or flash drive). The principle of operation is as follows: first you need to launch the BIOS, then select a USB drive or disk as the first connected element, save the changes and exit. After the restart, a menu will appear, select “System Restore” in it. This process will restore the laptop to factory settings.
The second method is more radical; you will have to use it if the recovery disk did not help.
Reinstalling Windows
It's worth reinstalling Windows if you couldn't solve the software error in any other way. There are 2 methods.
Method No. 1: If you manage to start the system in safe mode, then you need to:
1. Using the Run command, write: ms-settings:recovery.
2. Select the item “Return the computer to its original state.”
3. Click the “Start” button.
The reset program then offers two options:
- Save files: the program will only affect system files, everything else will not be deleted. Then the system reinstallation process will begin.
- Delete All: Performs a complete removal of the disk, all files will be deleted permanently. It will be impossible to return them. This is the safest solution, but it is worth keeping in mind that this is a fairly long process (depending on the size of the disk).
Method #2: Using Windows Installer
This method installs a completely new version of Windows. All files of the current system installation will be stored for 30 days in the C:\Windows.old folder.
Here is a simple algorithm of actions:
- First, you need to create a Windows installation USB drive.
- Boot your computer to the Windows installation USB drive in BIOS to access the Windows 10 installer.
- Select regional and language options.
- Click the “Install Now” button.
- The Windows 10 product key entry screen will appear: you need to enter a license key, or select the “I don’t have a product key” option. A laptop that has Windows 10 installed will not have this screen. The device has a Windows 10 OEM license thanks to the SLP key registered in the motherboard's UEFI firmware, which is automatically read by the Windows installer.
- Select the desired version of Windows
- Accept the terms of the license agreement.
- Select the media on which you want to install the system.
After completing these operations, the installation process of the new OS will begin.
Why you can’t do without the help of a specialist
Only an experienced specialist will be able to perform high-quality laptop repairs and replace spare parts without damaging the expensive electronic hardware. Independent troubleshooting in most cases provokes the final loss of functionality of the device or failure of its main components.
Professional repairs, carried out in strict accordance with the manufacturer’s recommendations, will be the key to long-term and uninterrupted operation of your equipment. Trust the Service specialists, and today your laptop will be in full working order. A warranty card is issued to confirm the quality of the repair. Leave applications online on the website or by phone 8(495) 213-33-33
.
Checking RAM
The reason why the laptop does not boot but the fan is running may be due to a RAM failure. For example:
- one of the bars came off due to shaking of the device;
- due to periodic switching on after returning from the cold, condensation and oxides formed inside the RAM connectors;
- the contact group of one of the memory lines is oxidized.
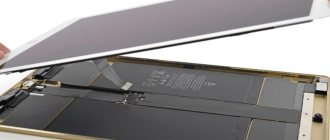
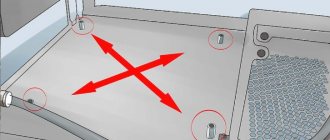
To check the status of the RAM, you will have to remove the protective cover at the bottom of the laptop.
Important! This should only be done if the product warranty has expired. One of the screws securing the cover is covered with a seal. It comes off when you try to unscrew it, which automatically voids the warranty.
Before use, the laptop must be unplugged and the battery removed. After removing the cover (it can pry up at the edges and go up or move towards the edge of the case), access to the RAM strips is gained. To remove them, you need to remove the side latches. After this, the bar is raised 45 degrees and pulled out.
It is necessary to check the cleanliness of the connector, as well as the condition of the contact pads on the memory line. If there are traces of oxides or contaminants, they are removed with alcohol, followed by thorough wiping with a regular school pencil eraser. A strip whose contact foil has been rubbed through must be replaced.
Installation of the ruler is done in the reverse order. The strip is tightly inserted into the connector (its protrusion and the notch on the line of the memory contact group must coincide) at an angle of 45 degrees until it stops. After this, the RAM bar is slightly lowered. You need to make sure that the latches are in their regular places, in the recesses on the side panels of the bar.
Power button malfunction
If the laptop does not turn on the first time or at all, it is likely that the power button has ceased to perform its functions. Fortunately, new parts are sold on the market and a new component can be selected. Some will choose to use a donor. Unlike a chip, there is no need to flash firmware. The difficulty with a used part may only lie in the quality of the components.
Action plan:
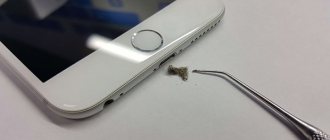
- Removing the keyboard.
- Release the cover.
- Dismantling the old part.
- Installing a button.
- Assembly.
When looking at an Acer laptop, it is not necessary to remove the keyboard. It is enough to pry the bar at the top. To do this, use some sharp object. Since we are talking about plastic, you have to be careful with the clamps. If we look at early Acer models, they use two mounts on the sides. The lid lifts up to the silk.
Newbie mistakes:
- Damage to plastic;
- Sudden movement with the tool;
- Lifting the lid from the top.
For many Lenovo, Acer, Asus models, the panel is detached from the keyboard side. If you stick a screwdriver into the screen, the likelihood of breaking the fastening and deforming the panel increases. After this, it is impossible to restore the element. When using a laptop, part of the board will always be visible. This not only looks terrible, but also shortens the life of the equipment. Dust will fly through the hole onto the internal modules.
When the cover is removed, the Power indicator is visible. It is located at the top and a wire extends from the node. It is very small, so it will not be possible to move the lid a long distance.
Action plan:
- Inspection of the mounting location.
- Checking the integrity of the loop.
- Evaluation of fastenings.
When the cable burns out, dark spots appear on the cable. Also, burns are often visible directly on the board.
Input devices can be disconnected using the following tools:
- Tweezers;
- Screwdriver Set;
- Soldering iron.
If we consider an HP laptop, its cable will not have to be completely unsoldered; a soldering iron is not required. On the one hand, it is practical and it is possible to quickly replace the part. Fastening occurs due to a narrow clamp. On the other hand, contacts are generally considered unreliable.
Important fact! Soldered cables last much longer. The level of insulation is higher.
Further plan of action:
- Releasing the board from the input device.
- Contact testing.
- Removing the power button.
The board is disconnected through the largest contact, most often it is white. Contacts are tested using a tester or multimeter. Experts recommend checking elements in pairs. The device is switched to “resistance” mode. A shorted circuit indicates that the board can no longer be used.
Solution to the problem:
- Using a similar board;
- Buying a new conductor.
Once the board is removed, you can inspect the power button socket. A large amount of dust accumulates on the laptop, and it does not go unnoticed. Despite the modest size of the indicator, there may be a large tuft of hair underneath it, which interferes with the operation of the button. The solution is obvious - remove all garbage.
Newbie mistakes:
- The integrity of the loop is not checked;
- Installing a button with a short wire.
The contacts on the boards may be in good working order, but the cable produces errors. Possible causes include mechanical impact and increased temperature. To solve the problem, cleaning is done.
Required tools:
- Scalpel;
- Glue.
To carry out the procedure, a complete disassembly and inspection of the element is performed. The cable most often breaks near the power button.
Action plan:
- Detaching a part.
- Incision.
- Removing the seal.
To remove the insulation, a previously prepared scalpel is used. The cut off part of the cable is not thrown away; it will still be useful. Glue is required to disconnect the contacts. For this purpose, the sealant is brought to the contact. Glue is applied to the surface in a small amount. If the end of the part is not cleaned, the new part will not take root.
Why don't the indicators light up?
An HP laptop differs from Lenovo or Acer and it is difficult to indicate clear reasons for the breakdown. The technique has individual characteristics and it is worth starting from this. If we consider, for example, a Lenovo laptop, the LED does not light up due to the battery being disconnected.
Important fact! When the battery indicator is on, a special tool is used for the test in the workshop. The tester is installed on the AC and then the voltage that is supplied to the LEDs is determined.
When the laptop does not want to turn on, it is better to check the button. Particular attention should be paid to contact.
Possible problems:
- Burnout;
- Oxidation;
- Disruption.
The main cause of contact failure is exposure to moisture. For example, equipment can be filled with tea or juice. It was dried and everything worked fine, but over time the contacts became unusable due to this tea.
Windows shows screen of death after loading
Blue Screen of Death (BSoD) is a serious problem among all kinds of laptop problems. It pops up while the operating system is loading and appears as a lot of error messages on a blue background, after which the laptop completely turns off or begins to reboot. In fact, the true reason: why BSoD appears is difficult to determine on your own, without specialized knowledge. Therefore, in this case, it is recommended to contact a specialist.
If this is not possible, then it is recommended to try reinstalling the operating system on the laptop. This will do a complete reset of system errors. After reinstalling the OS, the blue screen of death should disappear; if this does not happen, then the problem is a breakdown of some component of the filling.
For those who have never reinstalled Windows, it is recommended that you contact a service center without experimenting.
HP laptop overheating
A typical reason that causes freezing and other difficulties in the operation of laptops from this manufacturer is overheating. Most models of this brand are susceptible to it. As a rule, under normal operating conditions, difficulties associated with increased heating do not appear immediately. An increase in the temperature of the hardware components of the case during Hewlett-Packard operation increasingly occurs as the ventilation system becomes dirty. This is due to the fact that dust and small particles settle on radiators, grilles and fan blades inside the case.
The more modern the laptop, the more powerful its components, and the more they heat up during operation. Therefore, for new Hewlett-Packard models, maintaining the health of the ventilation system is more important than for older ones. To ensure that the device operates without freezes and random reboots of Windows, do not violate the recommended operating conditions and regularly clean the ventilation. Within the warranty period, it is better to entrust this operation to specialists from an authorized service center, and after it ends, you can clean the device from dust yourself.
Some Hewlett-Packard laptop models overheat due to poor implementation of the cooling system. Instead of thermal paste, such devices use gaskets made of thermally conductive material. Their efficiency is much lower, so even with good ventilation it is not always possible to remove sufficient heat from parts that heat up. In this case, replacing standard silicone and foil gaskets with high-quality thermal paste will help fix the problem.
To check the current temperature, you can use the BIOS setup program, which runs immediately after turning on the device, before loading the operating system. More convenient tools that allow you to find out how hot your HP laptop is are special utilities for Windows:
- Speccy;
- AIDA64;
- CPUID HWMonitor;
- SpeedFan;
- HWiNFO.
Important tip! To keep your Hewlett-Packard laptop from heating up less and causing the system to freeze, use it only on a flat, smooth surface. This is especially important for models with vents at the bottom of the chassis, as using them on an uneven surface will reduce the flow of air to cool components.
In such programs, the critical temperature of the processor, video card and other parts is usually indicated in a different color (usually red). You can find out the maximum permissible heating in the laptop specifications. It is recommended to take measurements after performing complex tasks that significantly load the computer, causing the parts to heat up. For example, launch a browser with a large number of “heavy” tabs, open a graphics editor and any modern game. At the same time, go to any program from the list above and for 15-20 minutes observe the temperature to which the parts of your device heat up.
To keep your laptop from heating up and freezing less, use a cooling pad. They come in two types: passive and active. Cooling is provided due to improved heat transfer. A passive stand is typically made from a material with a high thermal conductivity and is perforated to improve the performance of the Hewlett-Packard's built-in ventilation. The active cooling pad is equipped with coolers to externally cool the bottom panel, which heats up the most. Fans are usually powered via a USB connector. Such devices are more expensive, but they are much more effective.
Eating problems
Power problems are the most common reasons why a laptop won't boot. Often the device does not start due to a failed power supply, bad contacts in the connectors, broken or bent wires. In this case, the owner of the laptop needs to first of all understand at what stage the failure itself occurs. For example, in many laptop models the power supply is equipped with a special LED indicator. If it does not light up, then the problem lies in this node. In this case, you won’t be able to start the laptop yourself; it’s better to immediately turn to professionals. Sometimes power issues can be resolved by removing the laptop battery or replacing the cable.
The laptop keeps rebooting or shutting down
Another abnormal reaction of a laptop computer is constantly rebooting or suddenly shutting down. Finding out what the reason is is not difficult. It is necessary to determine whether the device is overheating. For this purpose, special AIDA 64 software is used, which will determine the temperature of each component of the laptop computer hardware. It is also possible to determine its overheating tactilely; a thermometer is not needed here.
So, the laptop is overheating, but what caused the heating? In most cases, this is dust on the inside of the device (cooling system, motherboard, video card, central processor, etc.). As a result, the smart CPU of the laptop computer performs an emergency shutdown or reboot.
To avoid such a turn of events, it is strongly recommended to use the laptop only on a hard surface and avoid using it on the floor, beds, sofas, carpets and other dusty places.
You should also pay attention to the charge indicators on the laptop or on the taskbar. The lack of connection to the network is not immediately noticeable, but it is quite close to the real reason for the complete shutdown of the device.
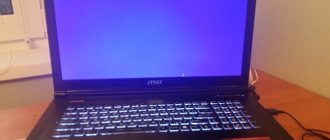
Is the display working?
It's funny, but sometimes the computer works, makes noise, shows basic signs of life, but the display does not display anything and even blinks when turned on. Obviously, you had a power failure, your video card burned out, or the matrix crashed. These options are very difficult to solve on your own, although you can try connecting a second monitor via VGA or HDMI connectors in order to get the final picture of the world.
If after connecting a picture appears, you need to
change the matrix , and if not, then most likely the video card. It’s even better to buy a new laptop, since replacing a video card will cost a little less than a new laptop.
Battery breakdown
If the laptop does not start, no indicator lights up, and the fans are not making noise, you should check the battery condition. To do this, it is disconnected. The laptop is connected to a 220V network with a charger. If the system unit operates in this mode, it means that an internal breakdown of the battery has occurred. It is enough to replace it to resume normal operation.
Cyclic reboot immediately after switching on
What it looks like: after pressing the power button, the cooler starts spinning. After a few seconds it stops and spins up again, continuing the cycle of starts and stops indefinitely as long as power is supplied.
In more than 90% of cases, the culprit is the BIOS, in less than 10% it is the RAM. The problem is solved by flashing the first one on the programmer or replacing the memory.