In recent years, the popularity of purchasing smartphones online has been growing. Thanks to the services of international trading platforms, the user receives high-quality goods in a short time. At the same time, any user may encounter the problem of purchasing a device that is not certified for the CIS market, that is, with an interface in English, Chinese, and even Hebrew. In this case, Russian may simply be disabled, or even completely absent. Don’t despair, because you can simply change the language using standard settings, or add it by installing a special application.
How to Russify Android 4.2 and higher
Complete Russification of the entire Android operating system version 4.2.x and higher is associated with some difficulties, but there are no difficulties that a true Android system enthusiast cannot overcome, right?
To begin with, let's say that on Google Play there is a program Set Locale & Language, which allows you to set the system language, even if it is not in the firmware. The developers claim that it can localize even Android versions 4.2.x and older.
However, many users complain that the Set Locale & Language program does not always work stably, and localization settings may disappear after restarting the application. Only one recommendation can help here: try, try, and hope that you are lucky and your device is localized reliably.
But if the previous method turned out to be useless for you, now we will teach you another method on how to translate the system language of your phone or tablet into Russian. This method was originally invented for HTC smartphones, but for other phones or tablets it also works great in many cases.
To Russify new versions of the Android OS, we will need to download the adb program and install it on our computer. In addition, in this case it is also necessary to install the More Locale 2 application, which was already discussed above. Also install drivers for your smartphone or tablet on your PC. To Russify your Android device, follow the instructions below:
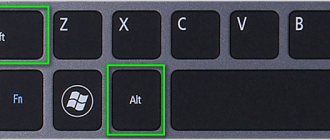
1. Enable the “USB debugging” mode on your device (Program menu -> “Settings” -> “Developer options” -> “USB debugging”). If the “Developer options” item is not available in the menu on your device, you need to find the “About phone” item in the “Settings” menu and click on the name of the device model or firmware version ten times in a row. "Developer options" will appear in the settings menu;
2. The ADB program must be unpacked on the computer to the root of the C: drive (the path to the executable file should be: C:\adb\adb.exe);
3. Connect your Android device to your computer;
4. Launch the command line application on your PC by running cmd.exe;
5. Enter the command cd c:\adb to go to the folder
C:\adb\;
6. To search for your smartphone, enter the command adb devices;
7.The program should display your device ID below under the line “
List of devices attached
";
8. Enter
the command
adb shell pm grant jp.co.c_lis.ccl.morelocale android.permission.CHANGE_CONFIGURATION
9. Make sure that
the response
lo program appears in the window
cale android.permission.CHANGE_CONFIGURATION;
10. If we made an error in the command syntax, the system will display a message with help from the pm command. In this case, you need to carefully repeat the command again.
11. Disconnect your Android device from your computer and launch MoreLocale 2.
12. Repeat the sequence of actions for Russifying the firmware using MoreLocale 2, indicated in the previous section.
If your phone or tablet is not found by the ADB program, and next to its identifier you see the word “offline”, this means that your version of ADB is outdated for this model. Download the Android SDK and install it on your computer. In the /platform-tools/ folder you will find the latest version of ADB.
Please note that this localization method (like the method for Adroid before 4.2.x) works at the software level, and not at the operating system level. Therefore, if you do this, your localization will be lost, and to get the Russian language after resetting the settings, you will have to do everything all over again
As you can see, it’s not always easy to localize new mobile devices with the latest Android firmware
The only good news is that even little-known Chinese mobile phone developers are already paying attention to the market of Russian-speaking users, and phone or tablet models that do not have Russian localization are becoming less and less common. For most modern devices, it is usually possible to find, if not official, then at least custom (custom) firmware, in which the Russian language will be built-in
We hope your new mobile phone on Android OS will be exactly like this!
Now we will figure out how to Russify Android, since using a device that for some reason does not have a Russian version of the operating system is not always convenient.
↑ The process of Russifying your device
- First, go to "Settings
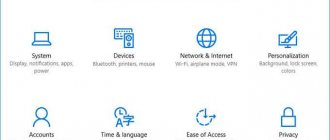
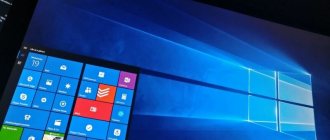
" If your mobile device contains Chinese characters, you should look at how the icon directly looks on the screen, which is similar to the image of a gear.In the latest versions of the OS, it can be found in the menu, and at the same time in the panel that is responsible for user notifications.
- Go to subsection "Language&Input
" As a rule, next to its name there is a simple picture of a globe. - Then you should select "Language
" located at the top of the screen. - After this, the user will be offered a list of languages that are built into the “operating system” of the smartphone. It is clear that here you should choose Russian or any other language suitable for you.
It can be noted that the Google corporation includes many different languages in its own operating system. Technically, the phone manufacturer can eliminate them. In particular, to reduce the amount of operating system memory.
Google Play does not have many programs for Russification. MoreLocale 2 is considered quite common
.
The program is free and compatible with a large number of gadgets.
Download MoreLocale 2 from Google Play
- First you need to install this application. After this, you need to do the following.
- Next, activate the “ For Developers
” settings.
If your smartphone has an English version of the OS, then you need to go to “ Settings
”. - Then you need to select “ About Phone
”. - Build Number
approximately seven to ten times . This will enable developer permissions. - By pressing the “Back” key, you should go to the subsection “Developer Options
». - Here you activate the checkbox next to “USB Debugging
"—as a result, USB debugging mode is enabled. - Here the user will need an archive that has an ADB file
. You need to upload it directly to the C disk root of your own computer. - After this, you should connect the phone to the computer using a USB cable. Then the command line is launched. To do this, go to the menu ( Start
→
Run
→
cmd
).
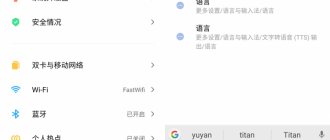
In the Windows 10 version, press Win+X
and enter in the “adb” field by clicking the mouse button on the left on what is displayed on the screen. - Next, enter into the command line: cd c:ADB. Then you need to press Enter.
- After entering "adb devices
", you should also click on "
Enter
" As a result, the user will have access to the code name of the smartphone connected to the computer. If suddenly the system is unable to identify the phone, then something went wrong, perhaps a low-quality cable is used.Note:
We enter all commands manually, copy-paste does not work!
- Next you need to enter the following commands:
- cd c:\adb
adb devices
(should highlight your device as a set of letters and numbers and opposite the word device) - adb shell
- pm list packages morelocale
- pm grant jp.co.c_lis.ccl.morelocale
- android.permission.CHANGE_CONFIGURATION
- After this, you need to disconnect the phone from the computer and launch the MoreLocale 2 application.
- Having found Russian in the list of languages, you need to click on it.
The system will automatically be localized. At this point, user actions can be considered complete.
Features of the arrangement of graphemes
At first glance, it seems that this Chinese computer keyboard has a random arrangement of graphemes. But in fact, he is characterized by a certain calculation. All keys are divided into 5 zones in accordance with the number of basic features. Each key in a certain zone has its own number, which is located from the center to the edge. The capital character of each key is one of the 25 most frequently used hieroglyphs.
To write a capital hieroglyph, you must press the corresponding key 4 times. If it contains 4 graphemes, 3 specific keys are pressed in turn, and the fourth is designated as the last one.
Then the process becomes even more complicated, since there are hieroglyphs that consist of 2 or 3 graphemes. This causes confusion due to the presence of several graphemes with the same key combination. To distinguish them, the developers who invented the Chinese virtual keyboard introduced a special two-digit code. Its first digit is the serial number of the last line of the hieroglyph, and the second is the group of the hieroglyph.
The described method is not perfect and has many disadvantages. One and the most important of them is complexity. But, despite this, when using it, you can increase the number of hieroglyphs entered per minute to 160. To do this, you need to press the keys more than 500 times.
How to open Factory Mode
The Factory Mode menu can be forced. It also becomes active if there are any problems with the smartphone. If you want to call it yourself: you need to use the mechanical power, “Home” and volume keys. You can find exact information about the key combination on the smartphone manufacturer's website. Typically this is:
- Press the power and volume down keys (10-15 seconds).
- Press and hold the Home and Volume Up keys (10-15 seconds).
- Press these three buttons at the same time.
This will give you access to various Factory Mode features. There can be from 3 to 12 depending on the manufacturer and Android version. The choice of one or another item is confirmed by the power key of the smartphone, and navigation between items occurs using the volume buttons. The most common Factory Mode features are:
- Full Test: complete testing of the device with all components.
- Signaling Test: GSM signal module test.
- Essential Test: Allows you to perform a basic scan of your device.
- Item Test: random testing.
- GPS: geolocation functionality check.
Depending on which item is selected, Factory Mode will provide diagnostic information about the smartphone, allow you to perform some actions on the operating system, or help calibrate basic parameters. For example, the Reboot function often allows you to unfreeze your phone or restore failed functions. It also allows you to exit the factory mode.
Before running Factory Mode and performing diagnostic tests, the user must ensure that the battery has sufficient charge, as sudden power failure can cause serious damage. It is recommended to use this mode and keep the gadget on charge at the same time.
Factory Mode is more informational and allows you to eliminate some malfunctions in the operation of the operating system or the device itself. For more serious interventions, there is a Recovery Mode, which we talked about in.
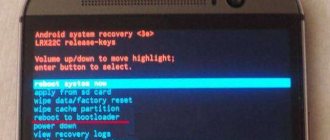
You bought a Chinese smartphone, and suddenly there was a need to go into Recovery
. Well, there’s nothing to do - turn off the smartphone, press Vol (-) + Power, and it will boot into recovery mode. And imagine your surprise when Recovery opens in Chinese. They did not expect? And they told you 10 years ago, learn Chinese! Didn't you listen? But in vain. Well, oh well, I don’t know Chinese either, maybe just a few words, so let’s think about how to get out of the situation. There is a very simple option, which I will write about below.
Installing new firmware
Firmware is the software shell of a device. The user can independently replace the firmware with any one he likes, including the one with the Russian language.
This process may differ depending on the device model, OS version and manufacturer, but in general there are several main points that will help you successfully reflash your phone. The instructions consist of the following steps:
- Find on the Internet already Russified firmware specifically for your model.
- Download it to the memory card on your phone. The file must be in a ZIP archive. Make sure that the file name contains only Latin letters and numbers.
- Install a special system recovery application, such as ClockWorkMod.
- If necessary, use this program to back up your data. Select the “backup” menu in the application, and then confirm your choice. After that, click “Reboot system now”.
- Put your device into recovery mode after finding out online how to do this for your model.
- Select "Wipe". Erase the old operating system.
- Then, from the main menu, select the firmware from the ZIP file. The item may have the name “Flash ZIP from SD” or similar.
- Specify the previously downloaded firmware onto the memory card.
- Follow the instructions. Wait for the process to complete.
- If everything went without errors, select the “Reboot System” item.
After these steps, the phone should have Russian language. How to set it up is indicated in the very first paragraph. Before flashing, make sure your phone is 100% charged.
Do not think that the problem of Russification is present only in Chinese gadgets. Yes, there are devices even without English, but the Celestial Empire is not to blame here. The blame lies with the traders who try to save money at any cost. There are a lot of products released specifically for the Asian market (half the world lives there), and there are gadgets with European certification. So, from the shelf the phone/tablet was completely Russified, but after the update, everything became in some European language. Let's figure out how to Russify Android.
Russification of apk files in Android
From this article you will learn how to Russify apk files in Android. Let's consider all the subtleties and nuances of this process.
Theoretical information about apk translation After decompiling the software, go to the RES directory. Here are files whose names contain the word values. There are also various other attachments. The purpose of these folders is to localize programs for different language versions. To implement Russification of apk files in Android, you need to create a directory called values-ru. In this case, the case of letters is of decisive importance. The folder must be created in the res directory. Go to values. Here, find the strings.xml file. It needs to be transferred to values-ru along with the arrays.xml document (if it is present).
A set of tools for Russifying apk files on an Android phone
1. Translation method using Notepad++ After downloading and installing the application, make the correct settings. In particular, set the correct encoding and format. 2. Using aiLocalizer Download the software and install it. 3. Using the Translator APK utility. Download the archive with the program for Android and unpack the files.
Implementation of method 1
As described above, you create a values-ru folder and transfer 2 xml files there. Open the strings.xml document using Notepad and manually perform the translation. I think you have already guessed that you need to translate expressions that are located before the tag. When you have completed this work, do the same with the arrays.xml file. Upon completion of Russification, compile the software and its signature. This solution is not optimal because it is quite labor-intensive and time-consuming. Therefore, let's consider other methods.
Performing translation with aiLocalizer
Upon completion of the decompilation procedure, launch the pre-installed software. Find the application you want to translate using the Browse button. Perform data localization. Mark the required fragments, and then apply the Auto Translate command to them. Correct any remaining inaccuracies and save the project. Be aware of the need to make changes to the arrays.xml document. Compile the program and sign it.
Application of TranslatorAPK
This software automatically compiles and decompiles apk, so there is no need to use third-party applications.
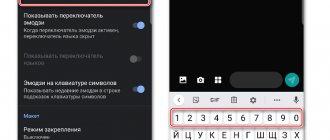
Russification of the keyboard
Step 1.
Download the
Google Keyboard
.
Step 2.
Now go to “
Settings
” and visit the “
Language and input
” item.
Step 3.
Here, click on the “
Google Keyboard
” option.
Step 4.
Click on the “
Languages
” item.
Step 5.
Check the languages you need.
Or activate the “ System language
” item if Android is already Russified.
That's it, the Russification of the keyboard is complete! Of course, in exactly the same way you can enable the Russian language on any other virtual keyboard, if it supports it (some of them only have a Latin layout).
Android devices, according to statistics, occupy 85% of the global smartphone and tablet market. Increasingly, people are buying equipment abroad, and therefore, when using the devices, a problem arises due to the lack of Russian language in the menu. It happens that the seller buys “gray” devices and does not adapt them properly, so the Russian language disappears somewhere after the first update. In this guide, we will show you how to Russify Android so that no problems arise in the future.
Methods for Russifying devices on the Android operating system using special programs
You picked up a tablet, and the menu is in a language foreign to you. First of all, you should check if Russian is in the settings. Find the settings icon, go to the language and keyboard selection tab and there view the list of preinstalled languages. Perhaps the Russian language is hidden here. It is much easier to navigate when the menu is at least in English or another European language. If we received a package from a Chinese store, we will be guided by the icons. Settings usually have a gear sign, and the list of languages is indicated by the letter A with three dots. If there is no Russian among the installed languages, Russification of Android is inevitable.
How to enable Russian language on your phone
The popular Android OS these days is the base operating system for hundreds of thousands of devices used in every corner of the planet. That is why Google initially builds several dozen languages into it, including Russian.
During the first launch, a notification should appear on the smartphone screen prompting you to select a language. If this does not happen, it means that someone has already turned on the device (or maybe used it). Don’t give in to worry, because you can change the interface and set Russian as the system language on most devices easily and quickly, in just a couple of clicks.
To make it easier to get to the necessary parameters in the menu of a phone with an interface in a foreign language (Chinese, English), we offer a detailed guide with visual screenshots.
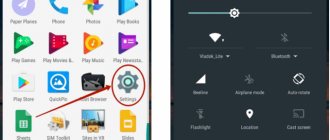
- Open the “Settings” section. The gear shortcut can be accessed from the application menu or quick access panel.
- Find the “Language & Input” item and click on it.
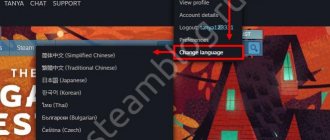
- In the tab that opens, select the line “Language”. Usually it is at the very beginning of the list.
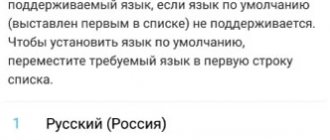
- Next, a list of languages installed by the company will open. Slowly scroll through it, find “Russian” and set it as system by tapping on the line.
Today, many manufacturers create their own shells for their smartphone models. At the same time, the interface changes significantly, which makes it difficult to find language settings. This problem concerns firmware in Chinese. In this case, users (with the exception of those who have specifically studied the language or are familiar with the hieroglyph system of the Celestial Empire) go through all the settings items and find the ones they need at random.
How to enable Factory Mode
Factory Mode can not be found in every smartphone. Some manufacturers have abandoned it for the simple reason that device testing is carried out using proprietary utilities or special key combinations.
If your device has Factory Mode, most often it starts:
By pressing the Power key and the volume up key of the switched off device:
When you press the Power key and the Volume Down key while the device is turned off:
When you press the Power key and the volume up and down keys while the device is turned off:
In this case, you can launch Recovery Mode or another menu, be careful.
What are factory settings for?
Data-lazy-type=”image” data-src=”https://androidkak.ru/wp-content/uploads/2017/06/14536662284_ef80d3e919_n1-300×225.jpg” alt=”selection menu” width=”300 ″ height=”225″ srcset=”« data-srcset=”https://androidkak.ru/wp-content/uploads/2017/06/14536662284_ef80d3e919_n1-300×225…jpg 320w” sizes=”(max-width: 300px) 100vw, 300px">
Factory Mode allows you to check the functionality of the speakers, buttons and screen backlight. You can also use it to clear cache files, reset the operating system to its original settings, calibrate the device, clear the memory card, etc. The mode does not support the Russian language. It is not recommended to experiment with its features as it may result in losing important files on your phone.
Each company that produces mobile devices equips the stock operating system with additional functions, as a result of which Android can differ noticeably on different smartphone models. These changes also apply to Factory Mode, but in most cases it contains standard items:
- Essential Test (checking the basic functions of the device);
- Item Test (custom check that allows you to select specific items);
- Full Test (full test that covers all phone functions);
- Signaling Test (SIM card testing);
- GPS (map detection service testing);
- Reboot (device restart).
After completing a test of any phone system, Test Pass or Test Fail should appear. If the test was successful, the user will see the message: Test Pass. Otherwise, we can assume that the check has revealed faults.
Using the MoreLocale 2 cracker
There are not as many localizers on Google Play as we would like. One of them is MoreLocale 2
. The application is free and compatible with a huge number of devices. In fact, it contains all those language packs that are present in the Android operating system by default, before the influence of the Chinese manufacturer on it.
First you need to install this program. After this, do the following:
Step 1.
Activate the
settings section "For Developers"
.
Our recent article already wrote about how to do this. In the case of the English version of the operating system, you first need to go to “ Settings
”.
Step 3.
Here, tap about 7-10 times on the “
Build Number
” item.
This will enable developer permissions, which will be indicated by the “ You are now a developer
” pop-up notification.
Step 4.
Press the
Back
.
Proceed to the newly appeared “ Developer Options
” section.
Step 5.
Here you need to activate the checkbox next to the “
USB Debugging
” item, thereby enabling USB debugging mode...
Step 6.
Now you will need the archive with the ADB executive file.
Download
and extract it to the root of the C drive of your computer.
Step 7
Connect your device to your computer using a USB cable.
Next, launch the command prompt. To do this, open the “ Start
” menu and enter “
adb
” (without quotes) into the search field, left-clicking on the result that appears.
Step 8
Type the following at the command prompt:
cd c:ADB
.
Press Enter
.
Step 9
Type the command “
adb devices
”, then press
Enter
. This will show you the code name of the device connected to your computer. If the system cannot detect the smartphone, then something went wrong - it is quite possible that you are using a low-quality cable.
Step 10
Enter the following commands in order:
- pm list packages morelocale
- pm grant jp.c.c_lis.ccl.morelocale android.permission.CHANGE_CONFIGURATION
Please note: the command line does not support the copy function. In this regard, you will have to enter all the text manually
Step 11
Disconnect your smartphone from your computer and open the
MoreLocale 2
.
Step 12
Find “
Russian
” in the list of languages. Click on this item.
The system will be automatically localized. Your actions are now complete!
How to Russify Android using an application
It’s good if the language pack remains untouched, you can get to the necessary parameters, albeit gradually. More difficulties arise if the Russian language is not on the list at all, because the manufacturer decided to ignore it. But even in this case, it’s not difficult to deal with the problem; you just need to tinker a little with additional software.
There are not many localization programs on Google Play, but among the available ones you can find a decent program. Today it is "MoreLocale 2"
The utility is free and compatible with a huge number of mobile devices. It contains all the locales proposed by Google for the Android operating system by default.
When you first start the program, you must immediately obtain developer rights. To do this, you will have to perform several steps sequentially.
- Go to the “Settings” menu, and then to the “About” section.
- In the tab that opens, find the “Build Number” item. The firmware version installed on this smartphone is indicated here.
- You need to quickly tap this line 7-10 times until the message “You are now a developer” appears on the screen.
- Now you should go back by tapping on the corresponding key. A new option “Developer Options” will appear in the list.
- Having opened this menu, find and activate the “USB (Android) Debugging” option in the proposed list by switching the slider to the “ON” position (move to the right).
- Now on a PC running Windows OS you will need to download the archive and the executive ADB file and unpack it into a folder of the same name located in the root directory of drive C.
- Connect your smartphone to your computer and go to the desired directory by running the command: “cd c:\adb”.
- To make sure that the PC system recognizes the mobile device, enter “adb devices” into the command line and press the “Enter” key.
- After the code name of the device is displayed on the command line, you will need to enter the following combination: “pm list packages morelokale”, and then another one: “pm grant jp.co.c _lis.cci. morelokale android.permission.CANGE_CONFIGURATION."
- Next, you will need to disconnect the smartphone from the PC and run the “MoreLocale 2” utility.
- In the list of languages, find the line “Russian” and click on it.
Russification of the interface will be completed, and the package will be automatically localized.
Location, location and location again
Apps are never shy about asking your permission to get your location data, and they always find ways to use that data, whether it's autofilling a "select your city" window, or weather data, and even as a way to promote a "local suggestions" screen. .
Many apps allow you to connect with strangers nearby, which doesn't scare anyone here at all. The same idea was tried in the US with apps like Highlight and Skout, but they never became as popular as they did here. This may be due to different cultural characteristics, or due to different degrees of population density and level of urbanization. However, it is a widely used and widely implemented feature here.
Separate category of applications
Momo is an application created specifically for such purposes. It already has over 60 million monthly active users and the project has already announced an IPO.
With its help, you can not only meet people who are nearby, but also find nearby events, seminars, games and much more. Weiju and Bilin are its closest competitors in this category.
Built-in features into everyday apps
Despite the popularity of this particular category of apps, what's more noteworthy here is that every regular, more practical app also includes these features.
WeChat and QQ, two of the most popular messaging apps, have a People Near You feature that gives you a simple list of who's near you, and sometimes even lets you see the photos those people have posted in their news feeds.
Of course, this implies your agreement that you will appear on the lists of people nearby and will be available for communication for a couple of hours only if you look at your list.
Weibo, unlike Twitter, allows you to see posts made near you, but also popular accounts and groups. And most music, video and TV apps show what users nearby are watching or listening to.
I would like the Baidu Maps app to update in real time and provide quarterly population density data based on users' location data.
It seems to me that if popular American applications were to add such features, even if they were implemented very carefully and with all sorts of restrictions, it would still become the source of horror stories on the evening news broadcasts, and would be harshly criticized in the blogospheres from one group or another users.
Software Hard Reset
Click to enlarge
Hardware Reset
Click to enlarge
Just turn it on by pressing the power button, and then, depending on the specific model, simultaneously press the Power, Vol- and Home buttons or only the first two. You need to hold them for a long time until the system menu appears on the screen. It will be in English. But there is no need to be afraid. Use the volume rocker to scroll down to the item “Wipe data/Factory Reset" and select it, and then enjoy the process of recycling accumulated useless data that interferes with the normal operation of your phone or tablet.
Click to enlarge
how to do Hard Reset in Chinese
item for hard reset of Chinese phone
Click to enlarge
Hard Reset via computer
adb reboot recovery
Chinese smartphones are very popular in our country. This is facilitated by the low cost of the devices, as well as decent characteristics.
However, no Android smartphone is immune from errors and various problems. If you decide to do a factory reset (hard reset) on a Chinese smartphone, but you don’t understand Chinese characters, we’ll tell you what to do and where to click. Thanks to screenshots, you can do a hard reset on a Chinese smartphone in a matter of seconds.
In this guide we will cover the following:
- How to do a hard reset on a Chinese Samsung Galaxy.
- How to do a hard reset on a Chinese HTC Desire.
- How to do a hard reset on a Chinese Lenovo.
- How to do a hard reset on a Chinese Android smartphone.
ADB Interface and good old MoreLocale2
- First you need to install the ADBInterface program on your computer, unpack it to the root of drive C and connect your phone via USB. The computer will recognize the phone and automatically install the necessary drivers
- Next, you need to disable the “USBDebugging” item, which is located in the “DeveloperOptions” section of the phone settings. On some models this section is hidden (to unlock, you need to go to the “AboutPhone” item and click on the firmware or phone version several times in a row)
- Connect the phone to the computer again (select charging mode)
- Using the key combination “Win + R”, the “Run” item will open. In the window that opens, enter the command “cmd”, after which the command line will open
- In this command line, enter the value “cd c:adb” and then “adb devices”
- Next, write the command “adb shell pm grant jp.co.c_lis.ccl.morelocale android.permission.CHANGE_CONFIGURATION” (the entry locale android.permission.CHANGE_CONFIGURATION should appear in the program window)
- Disconnect the phone from the computer, go to the MoreLocale2 program and repeat the same sequence of actions as in the instructions described above
Installing a Russian keyboard
In order to install a Russian keyboard, you must first download the corresponding application on Google Play.
- Download the Google Keyboard application.
- Go to “Settings” - “Language and input”. Select “Google Keyboard” from the list.
- In the “Language” menu, use the switches to mark the required languages.
Recently, tablets and phones based on Android OS have become popular. Many people purchase devices abroad, after which they soon face a number of questions. The main problem, as a rule, is the language of the tablet or phone, namely the transition to Russian. Without it, it is difficult to configure the device correctly. Where to start and how to Russify Android
?
Working with mobile device settings
When starting to resolve the issue, you need to check what languages the device supports. To do this, there are settings that you need to get into. Going to the tablet or phone menu, we find the “Settings” icon, these are the settings. Looking through all the menu lines, select “Language and Keyboard”, here is the entire list of device and keyboard languages. If Russian is present, then we simply select it. This is the most basic option, since it does not require unnecessary actions, everything is in order and the device is ready for use. But how to Russify an Android tablet or phone if the gadget does not initially have Russian language? To do this, you need to use the Play Market application, where you can find a lot. After logging onto the Internet and going to the desired program, type “ ” into the search bar. Download, install and put it into operation. Several different windows will appear, you should select “Custom Locale”. Here you need to enter “Russian”, and in the second line, “Country”, set your country of residence and confirm the actions with the “Set” button. After this, the device based on Android OS is completely Russified.
Possible problems and questions
Despite the simplicity of the Russification procedure for smartphones, many beginners encounter certain difficulties at various stages of installing the Russian language. In this regard, they have a desire to consult with someone. Below are answers to the most common questions.
Vyacheslav
For several years he worked in mobile phone stores of two large operators. I understand tariffs well and see all the pitfalls. I love gadgets, especially Android ones.
Ask a Question
Question to the expert
What should I do if in the “MoreLocale 2” program the language I need is not in the list?
Really. Owners of some smartphones, mainly Samsung, face a similar problem. The desired localization should be specified via Custom Locale, or added to the list of existing ones using the program menu settings.
If I don't like the GBoard keyboard, what is an alternative option?
The following popular utilities are available for download in the Play Market: SwiftKey Keyboard – has a quick input function and hints; Fleksy is one of the best programs for speed typing; Chrooma Keyboard – adapts to the color of the application you are using.
Are there other applications that can Russify the Android OS besides “MoreLocale 2”?
There are several utilities created by various . The application adds Russian language to AndrOpen Office, and also contains a number of templates and reference materials. But “MoreLocale 2” remains the best.
What is ADB?
ADB is a console application for PC that allows you to manage mobile devices based on Android OS. Using this tool, you can debug Android devices, including emulators. Installed with Android SDK.
When buying a phone via the Internet, you need to be prepared for the fact that the device will have to be Russified. There is no need to be afraid of this, since you can install the Russian language on any Android smartphone by performing simple manipulations in the settings or in the downloaded application. If you cannot cope with the problem yourself (due to a lack of knowledge in modern technologies), you can always contact the service center specialists.
4.3/5 — (20 votes)
Changing the interface language on a Huawei tablet
Unfortunately, sometimes on a Huawei tablet computer, instead of the Russian language, all functions and menus are displayed in a foreign language that is incomprehensible to users. In most cases, this happens due to an accidental click in the language selection in the settings. Or if the tablet was brought from another country, for example, from China. It's good if there are more words in English. In this case, you can look for translation on the Internet or find an English-speaking friend. But how to change the language on the tablet if all the words, for example, are Chinese? Of course, you can copy hieroglyphs and paste them into an online translator, but you can also navigate using icon pictures.
In order to change the interface language on the tablet, you must do the following:
- Go to settings.
- Select the item where the icon with the letter “A” is displayed, press this key. There are 3 dots under the button.
- In the menu that appears, you need to select the first line. This will activate the list of languages.
- Scrolling down the list, you need to select Russian (or the one you need).
- Confirm your choice by clicking on the desired language.
After this procedure, the entire interface will be displayed in the language selected by the user. Share link:
How to add Russian language to an Android phone or tablet
How to add Russian language to an Android phone or tablet . The main convenience of controlling any smartphone lies in the clear and concise arrangement of all elements and menu items. But what if the language settings of the gadget are different from the “great and mighty” one, and to navigate through the menu sub-items, complete Russification of the device is required? Are all the inscriptions displayed in English, or, even worse, in Chinese? No problem! In this instruction we will talk about how to add the Russian language to an Android smartphone from the system menu and third-party localizers, as well as how to add a Russian keyboard layout.
Installing Russian language from the Android menu
In order to set Russian as the system language, on most smartphones you just need to follow a few simple steps. We have attached several screenshots of the same menu items in English and Chinese. They are the ones who will help you get to the right place in the settings.
1. Open Settings and find Language & Input.
2. Select Language from the menu that opens.
3. In the proposed list, find “Russian” and, tapping on it once, install it as the system one.
If the Russian language is not in the list, you will need to download the localization language from the Google Play app store.
Installing a cracker
1. To install the Russian language on a smartphone whose list of language settings does not include it, download the MoreLocale 2 utility from the Google Play application store.
2. After installing the MoreLocate 2 application, obtain developer access rights. To do this, open the Settings menu - About.
3. In the menu that opens, find the Build Number item, which indicates the firmware version installed on your device.
4. Continue tapping until “You are now a developer” appears. Press the Back key. An additional menu item will appear in the list of settings - Developer options.
5. Open this item and in the list, find USB (Android) Debugging and set the corresponding slider to the On position.
6. Download the archive with the ADB executive file () and unzip the ADB folder to the root of drive C.
You can get the latest version of ADB. Download the Android SDK Tools Only archive, unpack it, launch SDK Manager; when the list of distributions loads, click “Deselect All”, put a single checkmark in front of Android SDK Platform Tools (almost at the very top of the list), click “Install 1 Package”, read the license agreement, agree, wait for the download to finish (a message may appear that it was not possible to stop ADB; you need to forcefully terminate adb.exe through the task manager). We see in the folder where SDK Manager was unpacked, a new folder “platform-tools”, and there is ADB.
7. Connect your smartphone to a computer running the Windows operating system. Launch the command line and to go to the directory with the application you just downloaded, enter the command: cd c:\adb .
To make sure that the smartphone is detected by the system, enter the following command at the command line: adb devices and press the Enter key.
If the device is recognized, its code name will be displayed on the command line.
8. Enter the following command: pm list packages morelocale , followed by another one: pm grant jp.co.c_lis.ccl.morelocale android.permission.CHANGE_CONFIGURATION . The final command line screen should look like this:
Disconnect your smartphone from your computer and open the MoreLocale 2 application.
9. “Russian” will appear in the list of languages. Select it.
The system will automatically switch to Russian localization. Russification is over.
Installing a Russian keyboard
To install a Russian keyboard, just download the appropriate keyboard from the Google Play app store.
1. Download the Google Keyboard app.
2. Go to Settings - Language & Input and select Google Keyboard.
3. Go to the “Language” menu and select the required input languages with the corresponding radio buttons.
This completes the installation of the Russian keyboard.
DOWNLOAD:
| [File size - 1.43 Mb] | 2015-11-08 12:45 |
Russification of Android 4.2 and newer versions
Since the Jelly Bean operating system (Android 4.2) and later versions of this OS implement configuration change protection, simply installing programs is not enough. You will have to work a little with a special console application called ADB, which is installed on a personal computer and helps debug tablets and communicators.
Among other things, this method is suitable for Russifying Android 4 3. First, install a program called MoreLocale 2 on your device. It has already been said how to find it.
After this, install the ADB program on your computer, which can be downloaded from the Internet. In addition, you need to install the drivers for your own mobile device. They are best found on the developer's official website. After downloading, ADB must be unpacked onto the main drive, for example C. When installing drivers, everything is simpler: all parameters there, as a rule, can be left “by default”.
After this, on your phone you need to go to the “Menu” item, then to the “Settings” section, “For Developers”, and finally, “USB Debugging”. Since we are talking about a device that can display an English interface at this stage, we note that you need to find the USB debugging item. Check the box next to it.
If there is no “For Developers” section (this happens with “Android 4.2.2”, as well as newer versions), go to “Menu”, “Settings”, then go to the “About device” item (or “About phone” "), click on "Build number" about 10 times. As a result, a message about opening the “For Developers” section should appear. Next you need to enable USB debugging. After that, connect your phone to your personal computer.
Using the Android Menu
It should be noted that Google standardly supplements its operating systems with support for several languages, which are the most popular. The list also includes Russian. Some manufacturers are getting rid of certain languages, which allows them to reduce the cost of permanent and RAM memory. However, in practice, many manufacturers no longer touch language packs.
In addition, after purchasing the gadget and when starting the mobile device, the system should automatically prompt you to select the desired language. Often this function works on all models running Android. If such a menu does not appear, it means that the device has already been launched by someone before. This is not a problem, since you can select the desired language very easily using standard options. To do this, you need to use simple instructions:
- Go to the “Settings” menu of your smartphone, and if the language is unclear or there are hieroglyphs, then you need to click on the gear. It can be located not only in the phone menu, but also on the notification panel, which should be moved from top to bottom.
- Go to the “Language & Input” section. Often it is located under the globe icon.
- Tap on the “Language” line, which will be the very first of the entire list.
- The entire list of available languages that are available in the Android system will be offered and you need to scroll through to find Russian.
At this stage the change process is complete. If the list does not contain the desired option, it means that the manufacturer has made some adjustments. In this case, you need to use other means to install the Russian language.
Undefined icons
Chinese apps deliberately use a user interface element that can be described by the phrase “vague icon.”
This element isn't possible in the native iOS UI, and I've never seen US apps use this trick. These are the standard red icons that you are already used to, but they don’t have numbers on them. They are used in every menu item, list, and even in the bookmarks at the bottom of the screen. If you haven't opened an app for a while, multiple screens may end up littered with these icons.
These vague icons mean that:
- New content has been loaded here, and it is located somewhere inside the item marked with the UI element. It shows that innovations do not require additional action from the user, or that the exact number of innovations does not matter. This element is used in social media news feeds or to show that there are new movies, music or new e-commerce applications.
- New feature available. If you see such an icon, it will say “New” or “新” next to it.
- The user has completely or temporarily disabled notifications for some application functions. For example, a user can set the chat in the WeChat application to silent mode, in which case, when new messages arrive, the icon indicating the number of messages is replaced by such an undefined icon.
Applications use both numbered and undefined icons. If the UI has child elements of both types, then the numbered element takes precedence and is displayed on the parent menu element.
I like this find because more complex menu structures require thoughtful means of guiding user actions. In the same way, you can increase the degree to which users become accustomed to the application, this is especially effective in those moments when there are too many number plates and they will be conspicuous.
Fun fact. In the QQ app, you can pull on any number icon (this doesn't work with undefined ones) and it will detach from its parent UI element and disappear in a small puff of smoke.
Option 2: Restore and reset
In Android settings you can see such an item as “Backup and reset”. It is designed to reset system settings and restore from a backup saved on the Internet.
Click on the "Reset settings" option.
Scroll down and optionally check the box next to “Clear phone memory - card” to delete personal data from the SD memory card, such as photos, music and other user data. Click on the “Reset phone settings” button.
User data will be deleted and factory data will be restored.
We talk about Factory Mode on Android smartphones and tablets: what is it, why is it needed and how to use it?
Sometimes when working with an Android smartphone, a situation arises when it freezes or suddenly turns off, and when you try to turn it on, the operating system does not load. Instead, the display shows several lines of English letters on a black background. Many owners conclude that the smartphone is broken and take it to a service center.
Recovery in Chinese
Devices made in China are equipped with a system menu in the manufacturer's language. For ease of use, you need to compare the recovery menu items in Chinese with standard items that are identical in content and set of functions.
To call the recovery menu you need to:
- Power off the device
- Press and hold the power and volume up keys at the same time
- Holding the buttons will turn on the device and display the required mode
The user can move up and down through the settings using the volume buttons; to select a specific action, use the home button.
The main sections of the recovery system menu in Chinese correspond to the standard translation:
- Auto Test – checking the basic parameters of the operating system and testing it for errors
- Wipe eMMC – hard reset of all parameters and settings of the smartphone without the possibility of recovery
- Reboot - reboot
- Version info – help
- Mounts with Storage – gadget memory management, information about the amount of free space or formatting
- Wipe Cache Partition - clearing the cache
- Wipe Cache Partition – copying all existing information
- Factory Reset - restoring factory settings
To exit the settings, just press the power off button.
Hard reset (hard reset)
To restore the device to factory settings, perform a hard reset. This item can be accomplished in two ways - in the menu and, for cases when the smartphone does not turn on, using a key combination.
Hard reset on a Chinese phone in the menu is convenient to use only if the items are configured in Russian:
- Select "Settings"
- Activate "Backup and Reset"
- Additionally, click on “Reset settings”
For those cases when the device does not turn on or the Russified menu is not available, a hard reset on a Chinese phone is performed through rakveri or by pressing the “Power” + “Home” + “Volume Down” buttons, then select wipe.
Performing a hard reset will delete all the user’s personal data from the gadget’s memory.
Wipe data factory reset
Resetting the settings on a Chinese device Wipe data factory reset allows the user to clear the cache, remove installed applications and errors caused by their operation, while saving media files - music, photos, images.
Xiaomi recovery mode
You can call up the recovery menu on Android OS on a Xiaomi device by following the standard sequence of actions. Turn off the smartphone, then simultaneously hold down the volume up, home and power buttons. The volume up/down buttons are used to move through items, the power key is used to select or activate one of the actions. In this mode, it is possible not only to return to factory settings or restore functionality, but also to update the TWRP, CWM system folders.
Factory mode
On Android, in the system recovery menu you can not only reset, but also test the phone’s operation in the Factory mode item. It is represented by several subparagraphs, deciphering their meaning in Russian:
- Full Test – all phone parameters are checked
- Item Test – custom scan
- Signaling Test – SIM card and signal level test
- GPS – diagnostics of the correct operation of the location system
Russification of Android smartphone (up to OS version 4.2)
For some, the Russian keyboard alone is not enough, as a result of which they resort to deep Russification of the operating system. For this, there is a program called MoreLocale 2, which can be installed on GooglePlay. After downloading the application, perform the following sequence of actions:
- Launch the program and select “Customlocale” in the upper right corner of the window.
- In the window that opens, click on the two buttons “ISO 639” and “ISO3166” opposite the Language and Country items, respectively.
- Select "Russian" from each drop-down menu.
- Press the “Set” key, exit the application and reboot our “test subject”.
- Finally, we enjoy the intuitive smartphone interface.
Please note: some Asian and Western European flagships may simply not meet the requirements of the MoreLocale2 program, so Russification will not be completed completely (Russian translation will be present only in some menu items and settings). Also, the program does not work on Android operating systems versions 4.2 and higher.